TABLE OF CONTENTS
Adjusting Item Basic Settings
To configure the settings, open the Configuration → Basic Settings → Documents Setup → Item Management tab and select the necessary options: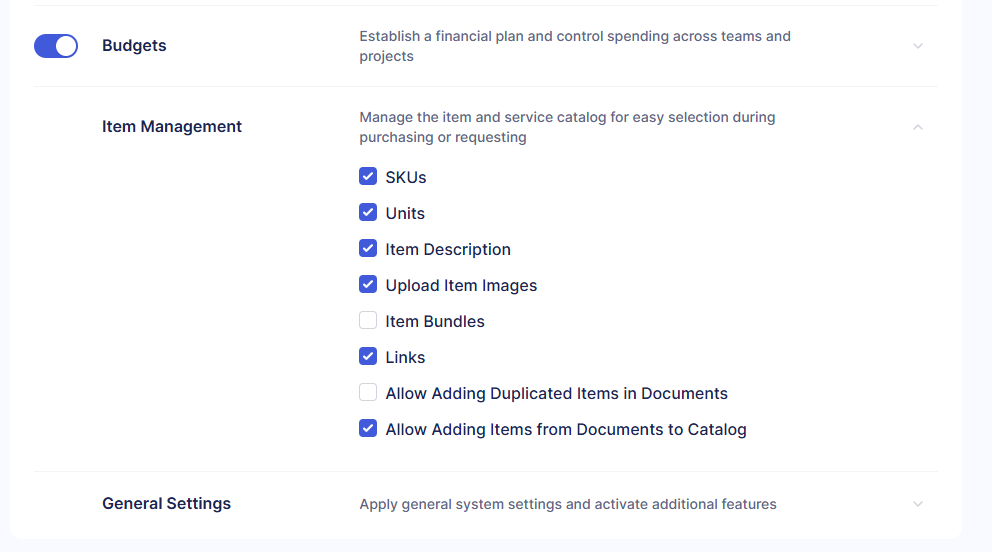
- SKUs—this allows entering the SKU numbering for the items to help you accurately track the stock.
- Units—enabled by default, this feature allows you to set units for items in all modules and item import/update templates.
- Item Description—allows adding a description to the items.
- Upload Item Images—allows adding images to the items in PNG or JPEG formats for visualization purposes.
- Item Bundles—a feature that allows creating a set of goods to buy as one set regularly.
- Links—allows adding links to various web resources to the items.
- Allow Adding Duplicated Items in Documents—allows adding items with the same values as SKU and Name in a document. If this feature is turned off, you cannot add duplicated items to documents.
- Allow Adding Items from Documents to Catalog—this allows you to add new items directly to the Catalog through the document itself.
After enabling the necessary features, you can manually Add Items to Precoro through the Item Management page.
You can also use the Import Items option to upload them in bulk.
Deleting And Deactivating Items
All users with the Item Management Create role in Precoro can use the delete and deactivate functions.
Please note that items currently used in Inventory cannot be deleted. They can only be deactivated.
Follow this link to find detailed processes for item deletion and deactivation.
Adding Custom Fields for Items
Customize the Items by adding the Custom Fields for Items, like Charts of Accounts/Cost Centers, Departments, or Projects. Consider the detailed instructions on the Custom Fields for Items functionality following these links:
Adding Items to Documents
Learn how to add items to documents and adjust the relevant settings in this article.
Additional Functions to Consider
Managing Items with the Help of Groups
If you wish to restrict certain items to particular employee groups, use the Item Group function and read this detailed instruction to set it up.
Order Conveniently with Unit Conversions
If you use different units of measurement for purchasing and stock tracking, you can configure an additional purchase unit for an item and define a conversion rate between units.
To set up a purchase unit:
-
Open the Item Management page.
-
Find the item you want to add a new unit for and press edit (pencil icon).
-
Under the base price, currency, and unit fields, click + Add Purchase Unit.
-
Enter the price and select the new unit.
- Define the conversion rate between units. For example:
- Base Unit: piece
- Purchase Unit: pack
- 1 pack = 10 pieces
- Press Save.
Once configured, the purchase unit will be available when creating purchase requisitions and purchase orders.
You can edit the unit when editing the item in PO or PR. However, you can’t change the unit when creating an invoice or receipt for a PO.
Using the Free of Charge function
When adding items, you can apply the Free-of-charge function, which can be useful in the following situations:
- Ordering or receiving free samples from the Suppliers or Partners.
- Custom duties invoices that include a $0 value of service, but there is an amount of tax payable (GST on customs).
- Packaging that does not need additional payment must still be displayed in the order.
To use this function, activate it by ticking the Free of Charge checkbox:
You can also Approve and Confirm documents with zero total value for the whole document and send them to integrated partners.
💡 Please note: This functionality is available for Purchase Orders, Purchase Requisitions, Expenses, Credit Notes, and Invoices.
You can also add free-of-charge items to Service Orders, but the total should be greater than 0 to confirm the document.
This feature can be really useful in case your company:
- Has a prepayment process that needs approval.
- Orders free samples.
- Receives additional free items from Suppliers.
To use it, proceed with the following steps:
1. Create the needed document and add items to it.
2. In the items, activate the Free of Charge function.
3. You can proceed to Confirm and Approve the document even if the Total amounts to zero.
Afterward, you can also create related documents as usual.
💡 Please note: In the related Invoice, once it is approved (or confirmed if your company does not use the Approval functionality), the document status will automatically change to Paid. The payment will be recorded using the exact time and date of the approval or confirmation.