How to Create and Track Budgets
This article will help you understand how to create and track budgets in Precoro.
But first, make sure that you already understand the functionality of budgets.
TABLE OF CONTENTS
Most Common Budget User Cases
- It’s hard to track a Project budget when you have more than one budget in one Project.
- I don’t understand the budget availability per month/quarter/year.
- I have the same budgets per different periods, and I should create a monthly budget with the same info.
What You Can Do with the Budgets Module in Precoro
Create a budget with multiple budget lines
- The budget line is a separate budget, included in the main budget.
- Each budget line can be assigned to Purchase Orders and Invoices.
- This module can be used to track budgets per different costs. Each budget line can be at a separate cost.
Create a budget with multiple periods
- Each budget line can have different periods: months, quarters, or one custom period.
- This case can be used as a yearly budget divided by cost and periods.
- In editing mode, you can remove the previously created periods.
How to Activate the Budgets Module
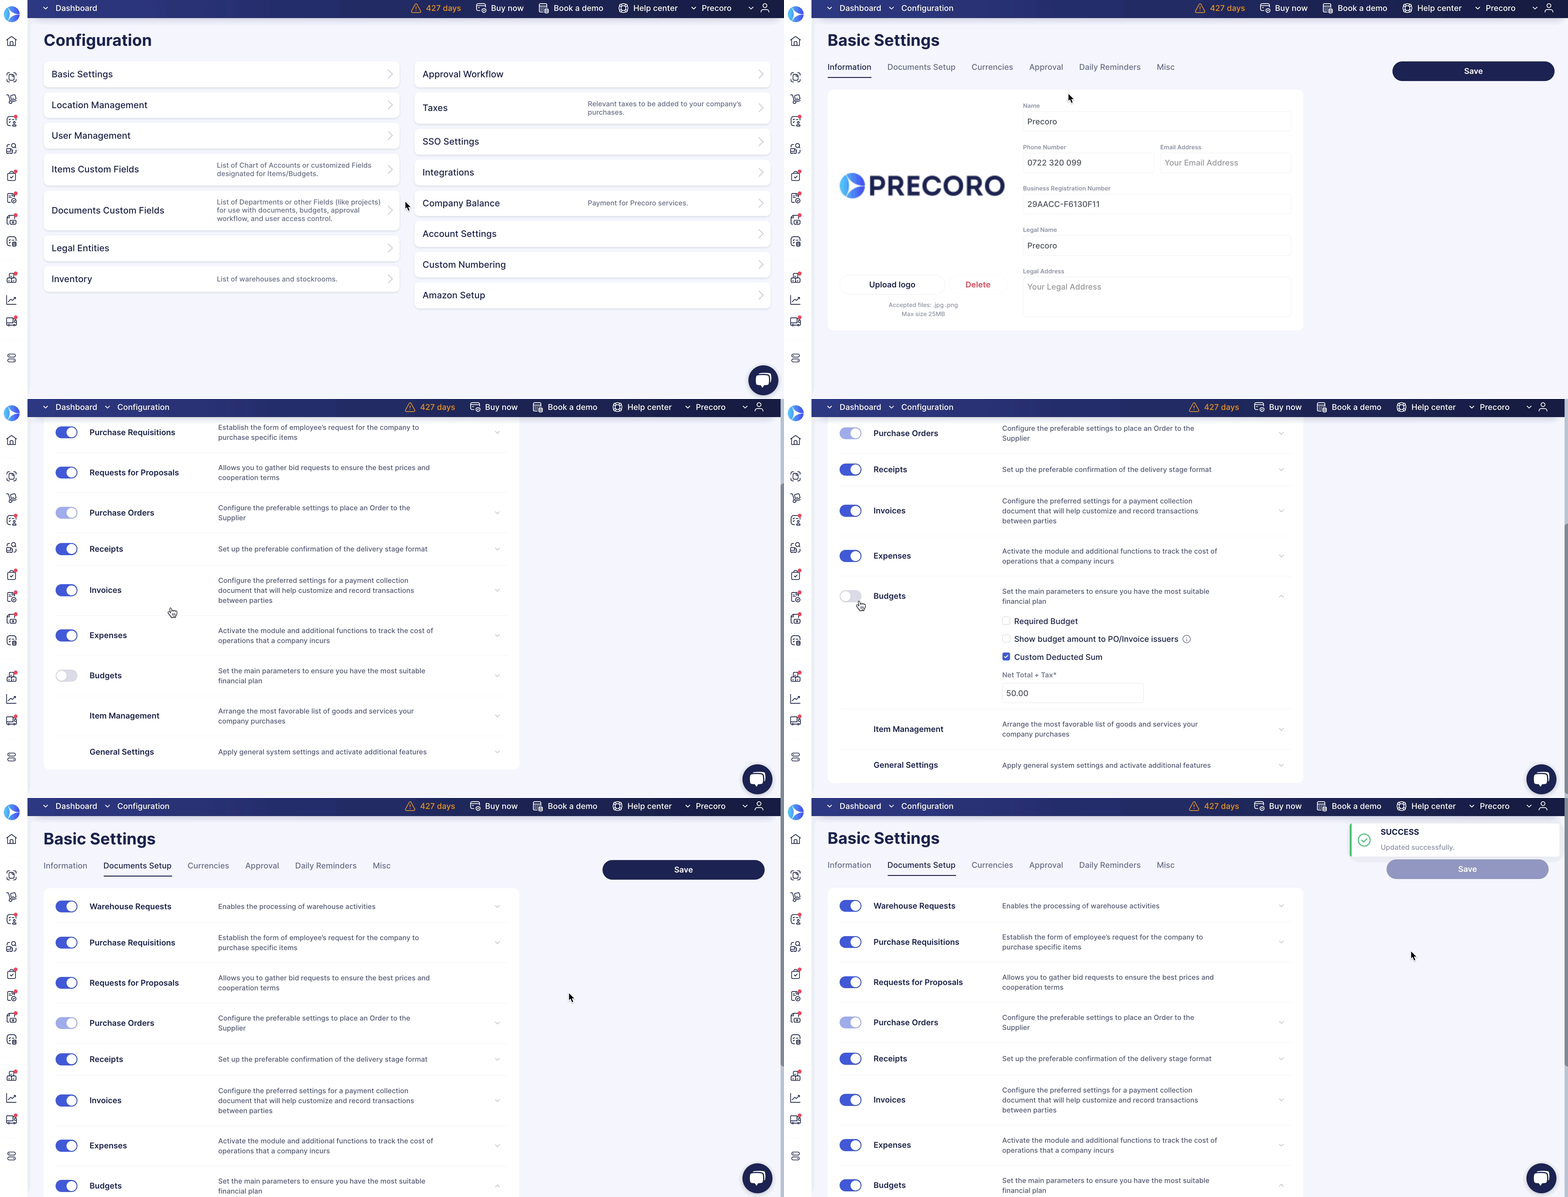
You can enable/disable the Budget module by going to Configuration → Basic Setting → Documents Setup → Budgets switch.
Please note that only users with the Budget role will have access to the Budget module.
To set the necessary role for a user, go to Configuration → User Management → Click the Edit button → Open the Roles tab and check the Budgets field.
The Budget role enables users with the following access:
- Access to the Budget module.
- Budget creation and tracking.
- View all the company’s Budgets.
- Set the user as a Budget holder.
How to Create a Budget
- Open Budgets from the left-side menu and click on the Create button.
- Fill out and set up all fields. Once done, hit the Create button to save the changes.
- Decide what to include in your budget.
- Set up the period/duration.
- Specify a Deducted Sum.
3. Fill out the budget lines. All changes will be saved automatically, but you can also click on the Save button.
- Set a name/description for each budget.
- Choose a location.
- Add Custom Fields for Documents and Items (if you decided to include them in the budget).
- Set a budget limit (if needed) by checking the Limit box. This function will not allow users to exceed the set Budget amount when creating documents.
- Fill out the amounts for each period.
You can also create a budget:
It can help you restrict access to budgets for employees from another department.
It allows you to dive deeper into tracking costs at the accounting level.
How to Add New Periods in the Created Budget
You can manage periods in the created budget by following the steps below:
1. Open the existing budget in the editing mode.
2. Scroll to the budget lines and press the green plus icon to add new periods. Press the red cross icon to remove the period if needed.
The periods you can add depend on the initial settings you have chosen when creating a budget: Monthly, Quarterly, and Custom:
- If you have selected the Monthly period, then when adding new periods you will see the future month:
- If you have selected the Quarterly period, then when adding new periods you will see the future quarters:
- If you have selected the Custom period, then when adding new periods you will be able to use the calendar and adjust the needed periods. For example, let’s edit an existing yearly budget and add the next year period to it:
How to Limit a Budget
When creating a Budget, you can set a Limit to allow users to create documents only if there is room in your Budget.
If you leave the Limit box unchecked that means you will allow exceeding the established Budget for your users. In this case, the document Approvers will be notified of the Budget overrun.
You can set the Limit for each individual Budget line.
How to Edit a Budget
Note: Only the admin (user with the Configuration role) and the budget holder can edit budgets.
If you should be the only person editing budgets, we advise you to put your user email as a budget holder for all the budgets instead of the current budget holders.
If current budget holders or other users should only view budgets (see and track the progress but not edit budget information), they need to activate the Budgets role in the User Management.
You can edit the budget to change the following information at any time:
- Budget name
- Budget holder
- Deducted sum
The Deducted sum will be unavailable for editing if documents are created with this budget (those that have statuses other than Draft).
- Edit, delete, and add budget lines
- Remove the period.
To manually edit the budget, click the Edit button on the Budgets list page:
Please note: If your budget includes Custom Fields for Items (e.g., Cost Centers / Chart of Accounts), you should click the View More button to view these Custom Fields for Items in the budget lines.
To edit a budget via template, go to the budget needed and press the Update Budget button. Then, download the template, edit all the fields you need to change, delete the rows with tips, and upload this template.
How to Create a Budget with Multiple Custom Periods
To customize budget lines for specific periods, you should create a budget and set the period as Custom. Once you create a first budget line and fill out all required fields, press the Add Period button.
The start and end dates will be changed according to set periods. Also, in editing mode, you can remove the necessary custom periods.
Please note that once the period is deleted, all details about this budget will be removed from all Purchase Orders and Invoices associated with it.
How to Activate the Auto Transfer Unspent Amount Function
This functionality can be useful if you want to stop manually transferring the unspent amount left from the previous budget period to the new one.
To activate it, please follow the steps below:
1. Create a new or open the existing budget you wish to automate and press the Edit icon. The budget should have at least two periods to qualify for the auto-transfer function.
2. Activate the Auto transfer of unspent amount checkbox so the remaining amounts for all the budget lines will be transferred from the previous period to the next after the end of the current budget period in the number of days specified in the settings.
Subsequently, you will see the following field: The sum will be transferred after — where you need to enter the number of days, after which the remaining sum from the previous budget will be automatically transferred to the new one. The maximum number you can enter is 28.
You can only enter the number of days up to the End Date of the next budget period. If not, then the number of selected days will exceed the End Date of the existing budget periods, and there will be no transfer.
3. Check the entered information, save the changes, and enjoy the automated process!
The amounts for each budget line will be automatically transferred within the period you specified in the settings.
How to View and Track Budgets
Viewing the Budget List
Use both the fast and advanced sets of filters to receive the requested data quickly.
You can find more information on working with filters in the corresponding article.
You can view your list of Budgets by:
- Parent Budget.
- Budget line names.
Ways to Track Budgets
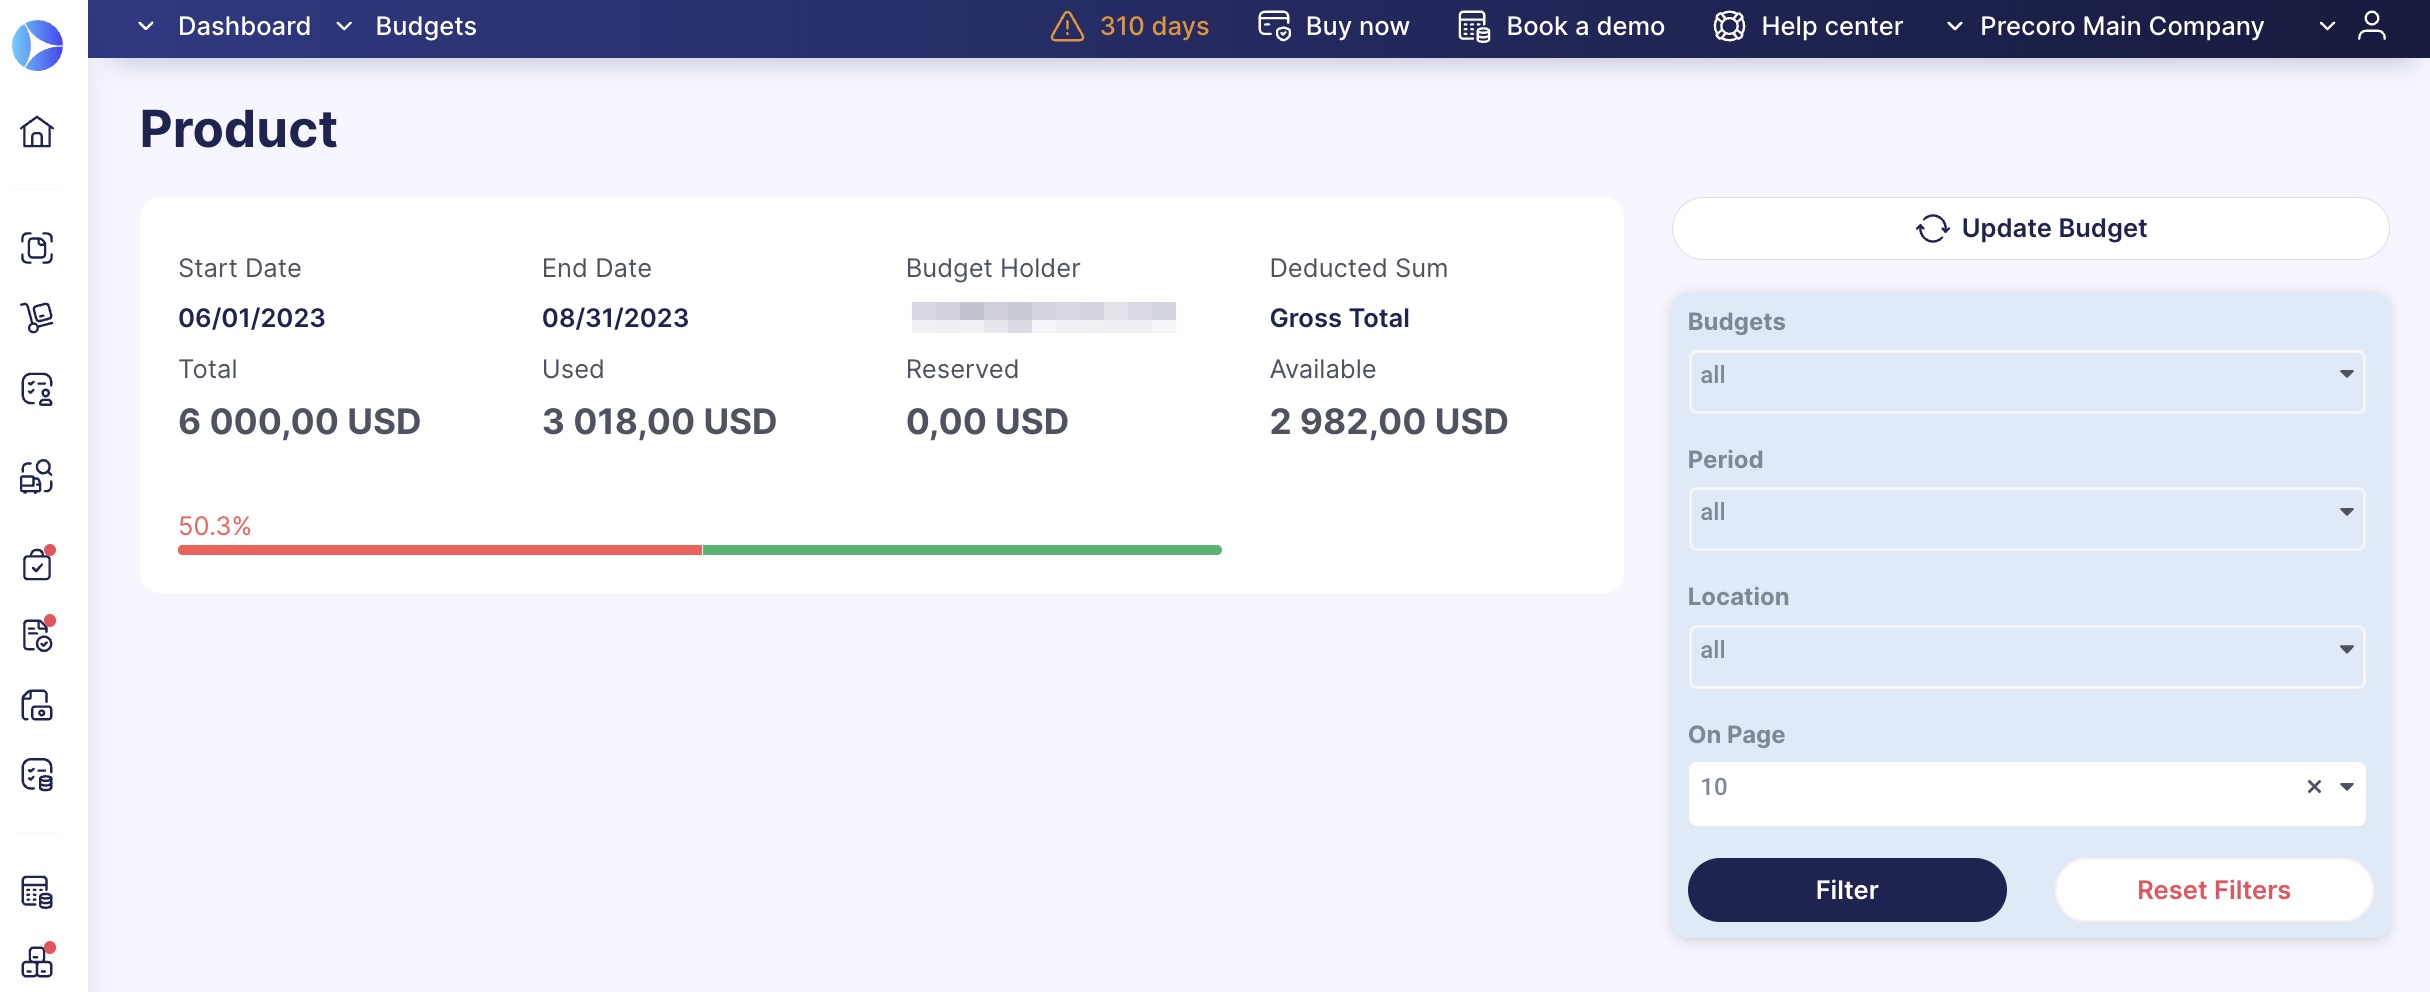
1. With the help of infocards, filters, and visual analytics on the Budget creation and management page:

2. Through Reports. You can use a Budget Usage Report or a custom Budget Report.
3. Through the Revision History.
Open the Budget page, scroll down to the Budget lines specification table, and press the Revision History button on the left side of the specific budget line.
To make a comparison, select two Revisions and press the Compare button below.
What changes you will be able to see:
- Budget Name
- Description
- Periods
- Sum
- Locations
- Custom Fields for Items
- Custom Fields for Documents
- Adding/Deleting Budget lines and sublines.
4. Through the Budget Analitycs. To see how the budget is being used, open the relevant budget page and view the following information in real-time:
- The total amount of the whole budget;
- The total amount Used;
- How much is Reserved in the budget for recurring documents;
- What amount is still Available;
- Start and End Dates of the Budget;
- The Budget holder’s email;
- How the Deducted Sum is calculated.

- At the bottom, you can see all the information by budget lines.

- Besides, you can set the budget filters and promptly get the necessary results.
If the budget is created by Custom Fields for Items, you can set filters only by Location.