
Pay Instantly with Pre-Approved Virtual Cards
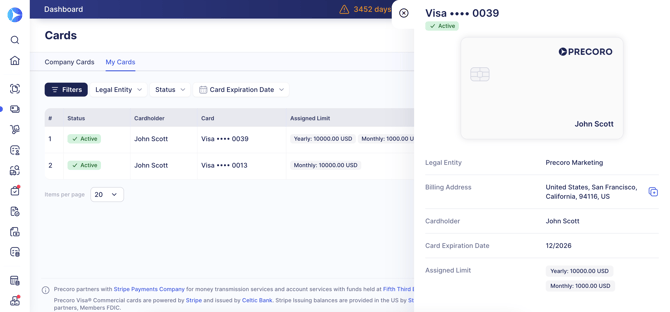
Give your team a fast, secure way to pay while you stay in full control of spend. You can now create cards for your financial account in Precoro, linking tracked payments to online and local spend.
With Precoro Cards, you can:
- Issue virtual cards instantly, with no issuance or per-transaction fees.
- Set precise spend limits per transaction, month, year, or for all time, and combine them on one card.
- Pay on any website or add cards to Apple Pay and Google Pay.
- Match every card transaction to an invoice in a few clicks.
This functionality is currently available only for US clients.
Learn how to get started in this article: How to Use Virtual Cards in Precoro.
Track Every Purchase in a Procure-to-Pay Report
The new Consolidated Procure-to-Pay (P2P) Report brings your whole purchasing cycle into a single export, from PR through PO, receipt, invoice, credit note, and payment. You no longer have to piece together separate document reports to see what happened to a purchase.
- Follow each item end to end. Each item gets one row that combines its data from all stages available to the report creator.
- See where each process stands. Items from the same purchase stay grouped together, and the processes with the most recent activity come first. This makes it easy to spot where a purchase has stalled.
- Build the report around your process. Choose which fields to include and in what order.
Learn more about creating and customizing P2P reports in this article: How to Create a Consolidated P2P Report.
Hand Off a Deactivated User’s Work
When you deactivate a user, Precoro now asks you to choose who takes over each part of their work, so documents, settings, and approval flows don’t end up without an owner. In the deactivation dialog, you can:
- Assign a different substitute for each document module.
- Permanently transfer ownership of Reports, Budgets, Contracts, Suppliers, Supplier Questionnaries, and AP inbox documents.
- Replace the user on every approval step they were part of, across all approval workflows, so your approval flows keep working.
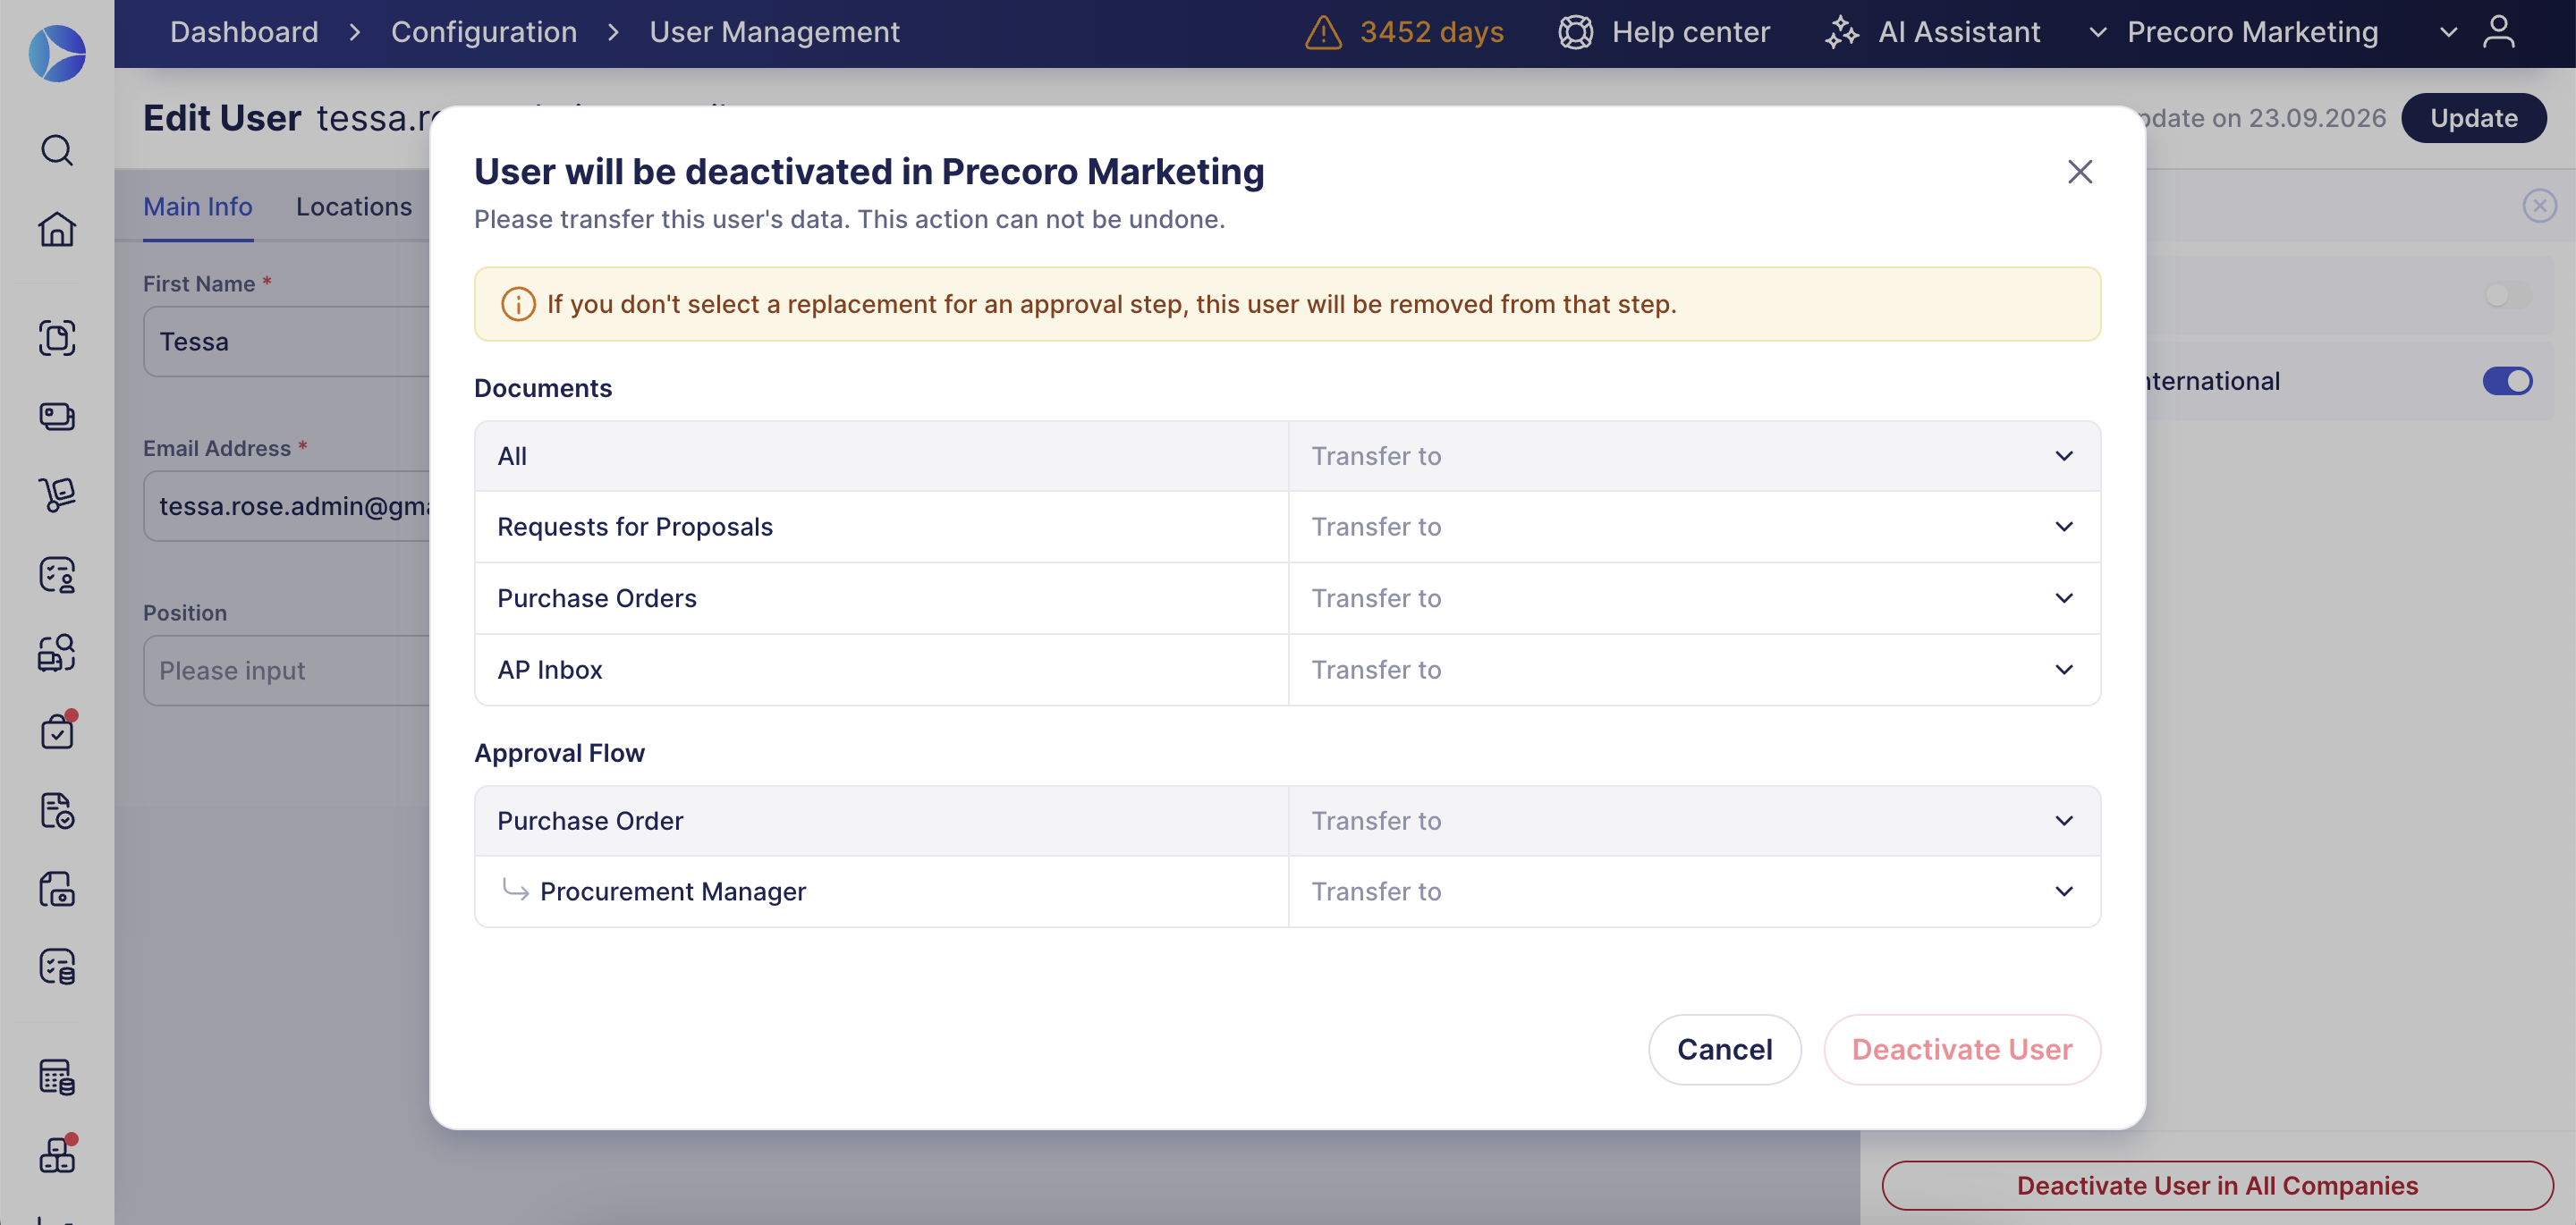
Only users with the right roles and access appear as options—that means approval rights, access to modules, and access to the required locations and custom document fields. New approvers permanently replace the deactivated user in the workflow, even if the original user is reactivated later. If the user you deactivated was selected as a substitute or backup approver, these roles are filled by the newly selected users.
Upload Excel, Word, and Outlook Files to AP Inbox
Send documents to the AP Inbox in the format you receive them, without converting them first. AP Inbox now accepts .XLSX, .DOCX, and .MSG files, whether you upload them manually or they arrive by email.
Purchase Requisition Creation Updates
Create Purchase Requisitions in One Step
Creating a purchase requisition (PR) now happens on one page instead of two. Fill in the PR details, add items and attachments, review the total and approval flow, and then save the PR as a draft or confirm it—all in a single form. If you’d like to go back to the previous 2-step flow, click the More Actions (…) menu in the top right corner of the PR creation page and click Back to old creation flow.
Set Your Default PR Form and Customize the Standard One
You can now customize your standard PR form to ensure requests are easier to create without missing important details.
Without the Intake Forms add-on, your process remains largely the same. Your standard PR form will still be used in all PR creation flows: from the side panel, the document list, an email, or another document.
It’s no longer called standard—you’ll see it as the default form—but it’s used in the same PR creation flows: from the side panel, the document list, an email, or another document.
However, you’ll be able to change the field order on your default form to make filling it out more convenient:
- Navigate to Configuration → Custom Form Settings → Purchase Requisition.
- On the Purchase Requisition tab, click Edit (pencil icon) on the default form.
- Drag the fields to rearrange them.
- Click Update to save the changes.
If you have the Intake Forms addon, you’ll notice the following changes to your PR forms:
- Orderly form management: Your standard PR form now appears in the list of PR forms alongside your custom forms, marked as Default, so you can manage every form in one place.
- Default form selection: You can set any form as the default by clicking Set as Default button in form configuration.
- Default form customization: All PR forms can be edited, including the default form.
Your existing standard form was moved over automatically and looks the same as before, so the Standard Purchase Requisition Form checkbox has been removed from Basic Settings. PR import templates now include every field enabled for the module.
Autofill the PR Fields You Pick Most Often
Custom document fields on Purchase Requisitions now remember your recent selections. Choosing the same option across three consecutive PRs automatically pre-fills that value on subsequent standard and custom forms, while still allowing manual overrides.
Autofill works with your existing setup: supplier default values always take priority, and for dependent fields, Precoro only fills in a value that’s valid for the controlling field you’ve selected.
New in Item Management
Match New Items to Your Catalog More Accurately
When you add a new item to the Catalog from a document—whether it came from PunchOut or was entered manually with Add Item—Precoro now looks for an existing matching Catalog item in this order:
- Supplier name and supplier part number
- Supplier name, manufacturer name, and manufacturer part number
- Supplier name and item name
Matching ignores letter case and extra spaces, and similar items—like different sizes of the same product—are no longer confused with each other. Each check runs only when its fields are enabled in Configuration → Basic Settings → Item Management.
- If the item matches, it takes the SKU from the Catalog, and any empty part number or manufacturer fields on the Catalog item are filled in. Existing Catalog values are never overwritten.
- If it doesn’t match, a new Catalog item is created, with the supplier part number as its SKU.
Either way, SKU stays editable on the document, since the supplier’s original identifier is kept in the Supplier Part Number field.
Thoroughly Control Item Management Access
Item Management is no longer accessible to request creators by default, so access is fully determined by Item Management View Only and Create roles. Users without them won’t see Item Management in the menu.
Everyone who can create PRs, POs, or invoices has been given View Only access automatically, so nothing changes for them unless you adjust their roles. Adding catalog items to documents works just as before, and super users keep full access.
Changes in Account and Company Management
Invite New Users Without Leaving Unfinished Profiles Behind
A new user is now saved only when you click Invite at the end of setup. If you leave before inviting them, the user isn’t created, so unfinished profiles no longer pile up in your user list. Precoro still asks you to confirm before you close an unfinished setup.
Users who were left with an unfinished setup before this update have been deactivated.
Renew Your Subscription Up to 60 Days in Advance
You can now pay for your Precoro subscription up to 60 days before your renewal date, instead of 30. This gives you more time to arrange payment on your schedule.
Record Refunds as Negative Lines in Expenses
You can now enter negative amounts on expense lines, just like on POs and other documents. Record refunds and other adjustments, so the total matches your credit card statement exactly. Negative lines are also supported when you scan expenses with AI.
Change a Contract’s Currency Until It’s Used
You can now change a contract’s currency after it’s approved, as long as no documents have been created against it yet. With this change, you won’t need to set up the contract again, even if you accidentally confirmed a draft that wasn’t ready or correct.
Show the Revision Number on Printed Purchase Orders
Help suppliers spot the latest version of an order at a glance. Turn on the new Revision Number checkbox in Configuration → Basic Settings → Purchase Orders → Order Printing Configurations → Header Settings, and printed orders show a Revision field under Delivery Date whenever they’ve been changed after approval—for example, “Revision 1” after the first approved edit.
The checkbox is off by default, and orders that haven’t been edited since approval don’t show the field.
See Stock Levels While Ordering Low-Stock Items
When you order low-stock items, the Select Items step now shows the inventory details you need to decide how much to order: Quantity, Minimum Stock Level, Reorder To, Ordered, and Need To Order.
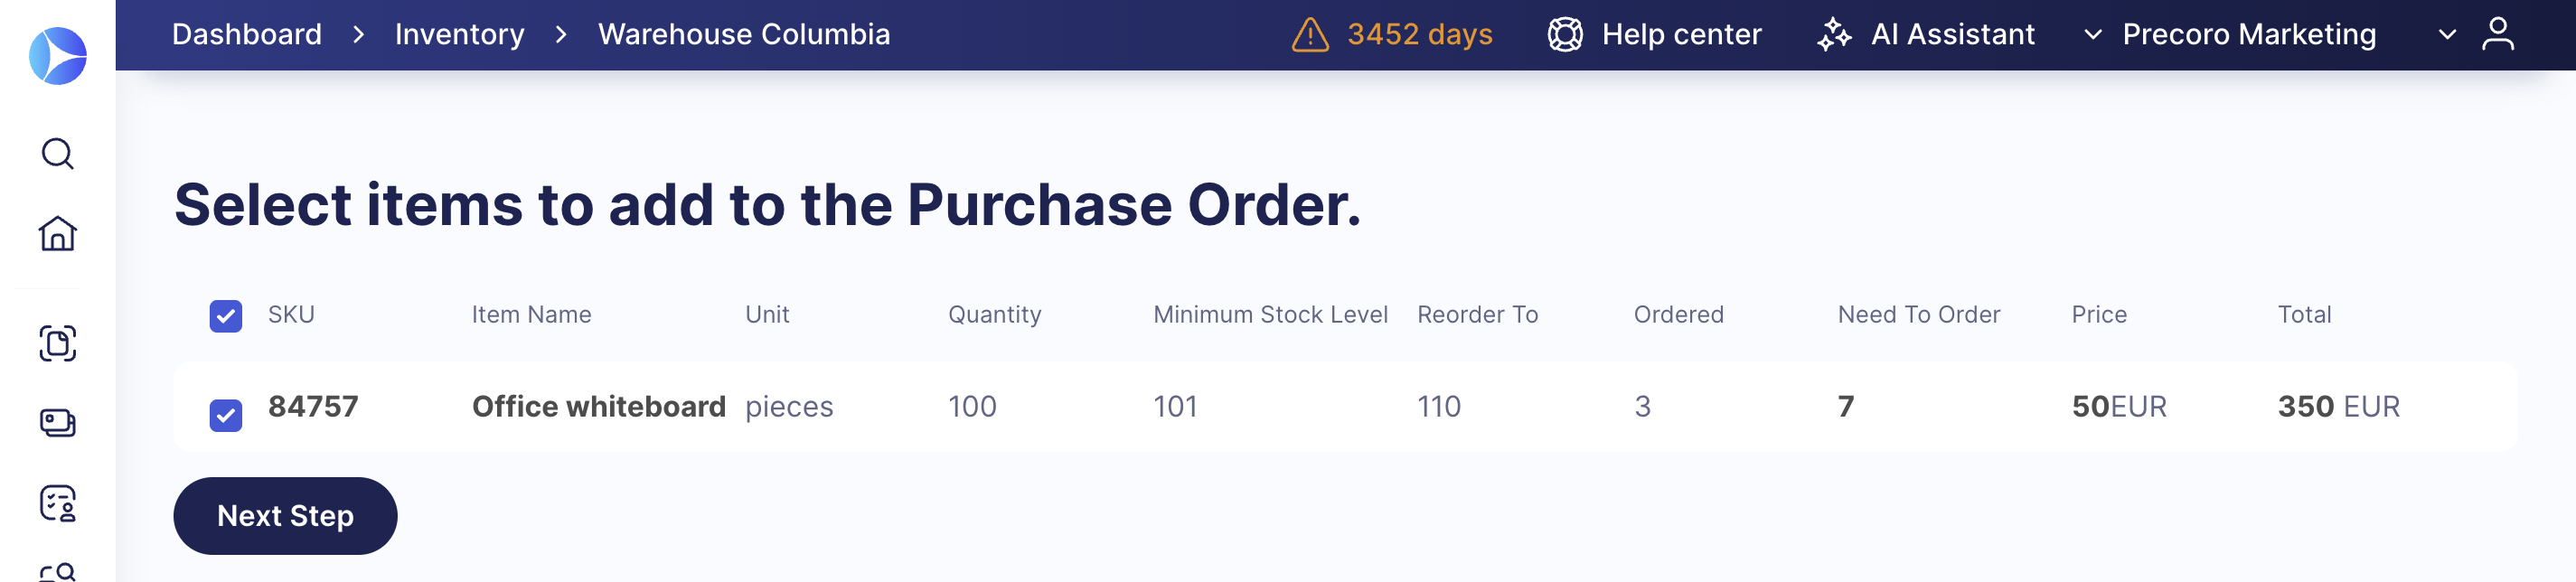
The new Ordered column shows how many units are already on purchase orders, including drafts, but haven’t been received yet, so you won’t reorder items that are already on the way. The Need To Order column accounts for this value and shows exactly how many units you still need to order.
On the Select the Supplier step, the existing Ordered column is now called Need To Order to match; the value itself hasn’t changed.
Add Receipts Faster to One Order or Several at a Time
Receiving goods now takes fewer clicks:
- Adding a receipt to a single PO. On a purchase order, clicking Add Receipt now takes you straight to item selection, where you choose items and quantities before creating the receipt. To receive everything in one step, click the arrow next to the button and select Quick Receipt.
- Receive several orders at once. Select multiple POs in the Pending Receipt infocard and add receipts for all of them in one action, without opening each order.
Follow Up with Suppliers Faster
We’re adding two new email notification types to help you communicate with suppliers.
- Remind a single supplier about an RFP to get a proposal on time. On an approved RFP, open the ⋮ menu next to a supplier and select Resend To Supplier, or use the button on their proposal page. Only that supplier receives the reminder—no one else in the RFP is emailed again. The option disappears once the supplier submits a proposal.
- Know when a supplier confirms a PO. The PO creator and all followers now get a notification by email or in Slack as soon as a supplier confirms a purchase order. It’s on by default, and you can turn it off anytime in your profile’s notification settings.