
TABLE OF CONTENTS
-
Never Miss an Invoice in Your AP Inbox—New AI Agent Handles Invoice Extraction in All Formats
-
Send Documents to QBO or Xero with Accounting Period Adjustments
Never Miss an Invoice in Your AP Inbox—New AI Agent Handles Invoice Extraction in All Formats
This update introduces an AI agent for Invoice Extraction—part of our AP Automation Crew that works independently to ensure Precoro processes all supplier invoices.
When a new invoice lands in your AP Inbox, it proceeds to the standard flow only if it has a PDF or image attachment. The agent detects all other formats—vendor portal links, spreadsheets, and plain text pasted into the email body—and converts them into clean PDFs that Precoro can further process and route for your confirmation and approval.
Ready to learn more? Check out a detailed article: AI Agent for Invoice Extraction.
AI Document Processing Updates
Leverage Smarter Tax Matching for AI-Scanned Expenses and POs
We’ve improved tax identification when you use AI to scan expenses and POs. You’ll notice the AI processing is now even more reliable, providing accurate tax calculations at the item level.
When Precoro's AI scans a document, it compares the recognized tax rate and matches it to the tax rates already set up in your company in the following order:
- Supplier’s default tax rate.
- Other company-level tax rates.
Once Precoro finds a match, the tax is applied automatically.
When no match is found, Precoro creates a tax item using the total tax amount from the scanned document, so nothing is left unaccounted for.
Scan More POs Successfully, Thanks to Supplier Auto-Requesting
When you create a purchase order via AI scanning, but the AI doesn’t find a matching supplier, Precoro can now create a supplier automatically instead of skipping the document.
- Supplier is created automatically in the following cases:
- The Allow Document Creators to Add New Suppliers checkbox is enabled in Configuration → Basic Settings → Document Setup → General Settings.
- Or the user who initiated scanning has the Supplier Create role.
- The new supplier gains the Pending status (or Approved, if no supplier approval workflow is configured in your company). Precoro fills in whatever supplier details the AI could read from the document: name, currency, address, phone number, and tax ID.
Automate Document Scanning Even When Currencies are Missing
When AI scanning can't detect a currency, or detects one your company hasn't set up yet, Precoro now handles it automatically instead of blocking the document. Here’s how it works:
- No currency detected—the document uses your company's primary currency.
- Currency detected but not yet set up—Precoro adds the currency to your company, with a default exchange rate, and applies it to the document.
Flag AI Scanning Mistakes Right from the Document
When AI scanning misreads a PR, PO, expense, or receipt, you can report this incident to help us adjust recognition for your company. It works similarly to recognition improvement for invoices:
- Open an AI-scanned PO, PR, expense, or receipt, where you’re not satisfied with the recognition quality.
- Press the Fix Recognition button in the top right.
- Explain what went wrong in the pop-up window and submit your feedback.
Your comments go straight to our team, so we can train the AI and improve recognition for your company. The changes will apply to further documents and will not affect what was created before.
Scan Contracts Directly from the Supplier Page
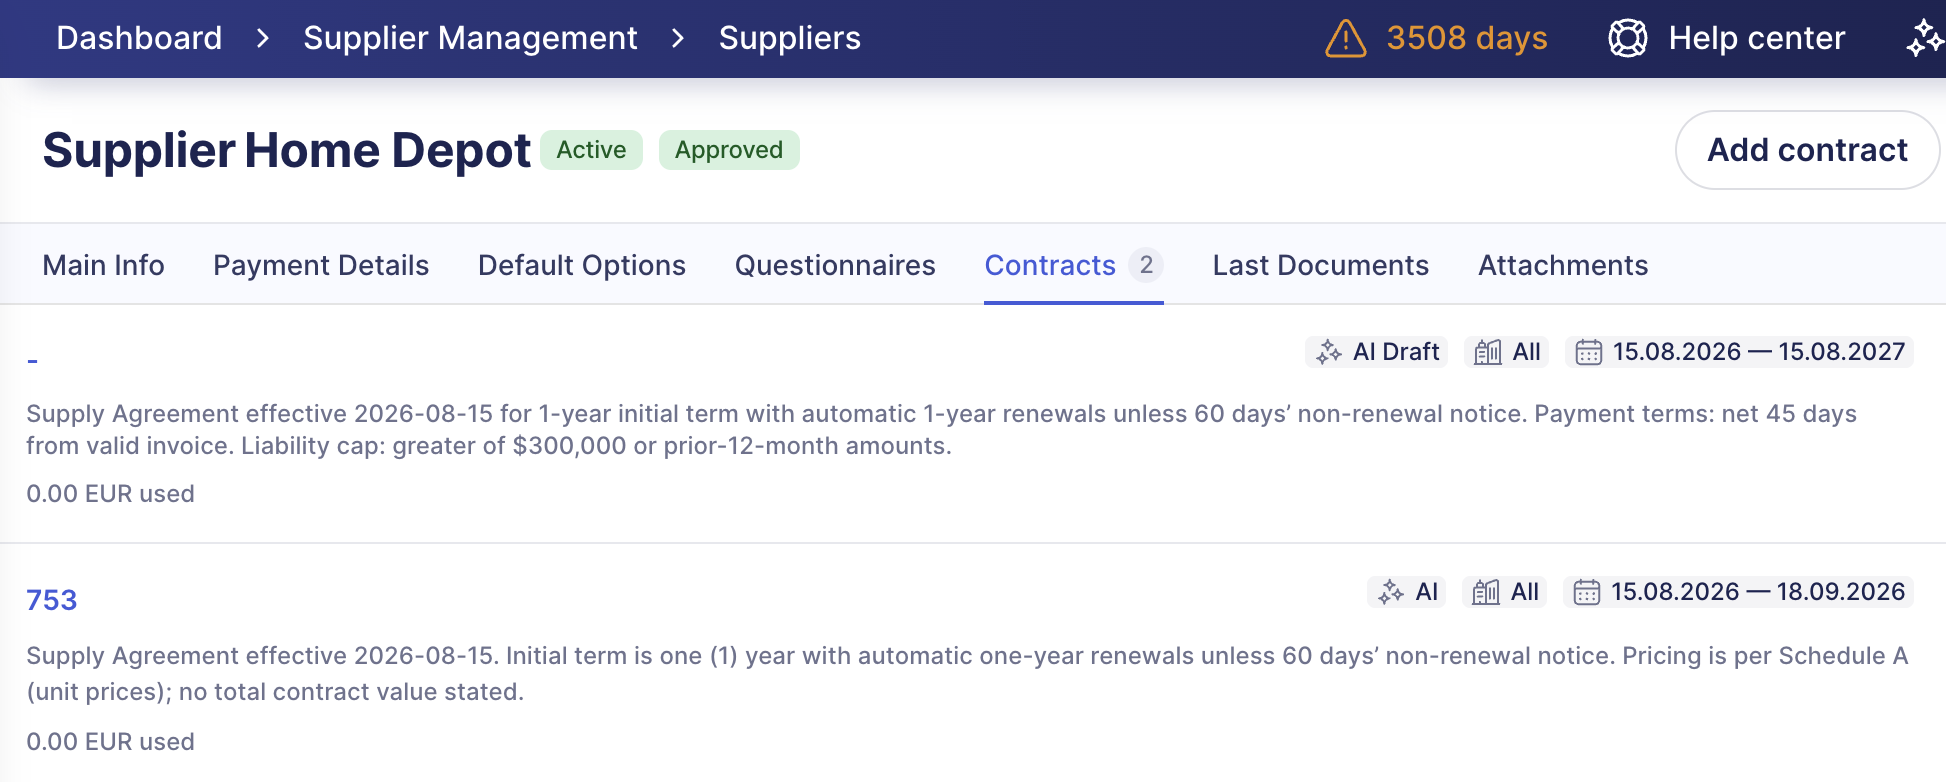
You can view contracts directly from a supplier's card, and our AI Contract Agent is available there too! Upload contracts, easily spot risks and benefits, and ask questions about the terms—all without leaving the supplier’s page.
New in Precoro Emails
Make a Stronger Impression by Sending Emails from Your Company Domain
💡 Please note: This functionality will become available for both EU and US servers on August 13.
The feature is included in the Automation subscription plan. If your company uses the Core plan, you can request the Custom Sender add-on by reaching out to your Customer Success Manager, or you can upgrade directly to the Automation plan.
Enhance supplier relationships and support your company's reputation with custom sender addresses. Once configured, Precoro will send automated emails, such as POs and RfPs, from your custom address, so suppliers will know exactly that your company is communicating with them.
As of now, this functionality only affects emails Precoro sends to suppliers; you and your teammates will still receive notifications from Precoro’s default address.
Here’s how to set up a custom sender address:
- Navigate to Configuration → Basic Settings → Custom Sender tab.
- If you already have a verified domain and want to customize a sending address, you can do it at this step. Edit the Sender name and Email prefix, then save the changes.
- To send emails from your domain, you’ll need to verify it first.
- In the Domains section, press + Add Domain.
- In the sidebar, enter your domain in the Domain field, then press Add.
- This action generates personalized records you need to enter in your DNS configuration. Find them in the Domain Settings section of the sidebar.
- Please enter the records in the DNS.
- Return to Precoro and click Confirm at the bottom of the sidebar.
- You can add multiple domains to choose from. They will be listed in the Domains section. You’ll also see informational tags that let you know whether the domain is verified.
- Once you have a verified domain, you can select it in the Domain drop-down in the Custom Sender Email section.
Understand Email Reminders at a Glance
To help you quickly understand what’s awaiting your action in Precoro and stay on top of your tasks, we’ve updated the design and content of our daily reminder emails.
Here’s what changed:
- Document lists: Each reminder now features up to 5 latest documents that require your attention. You’ll also see links to separate documents and corresponding infocards that help you navigate faster.
- Document details: Each document will also display a list of relevant fields. You can use this info to assess the tasks without even opening Precoro.
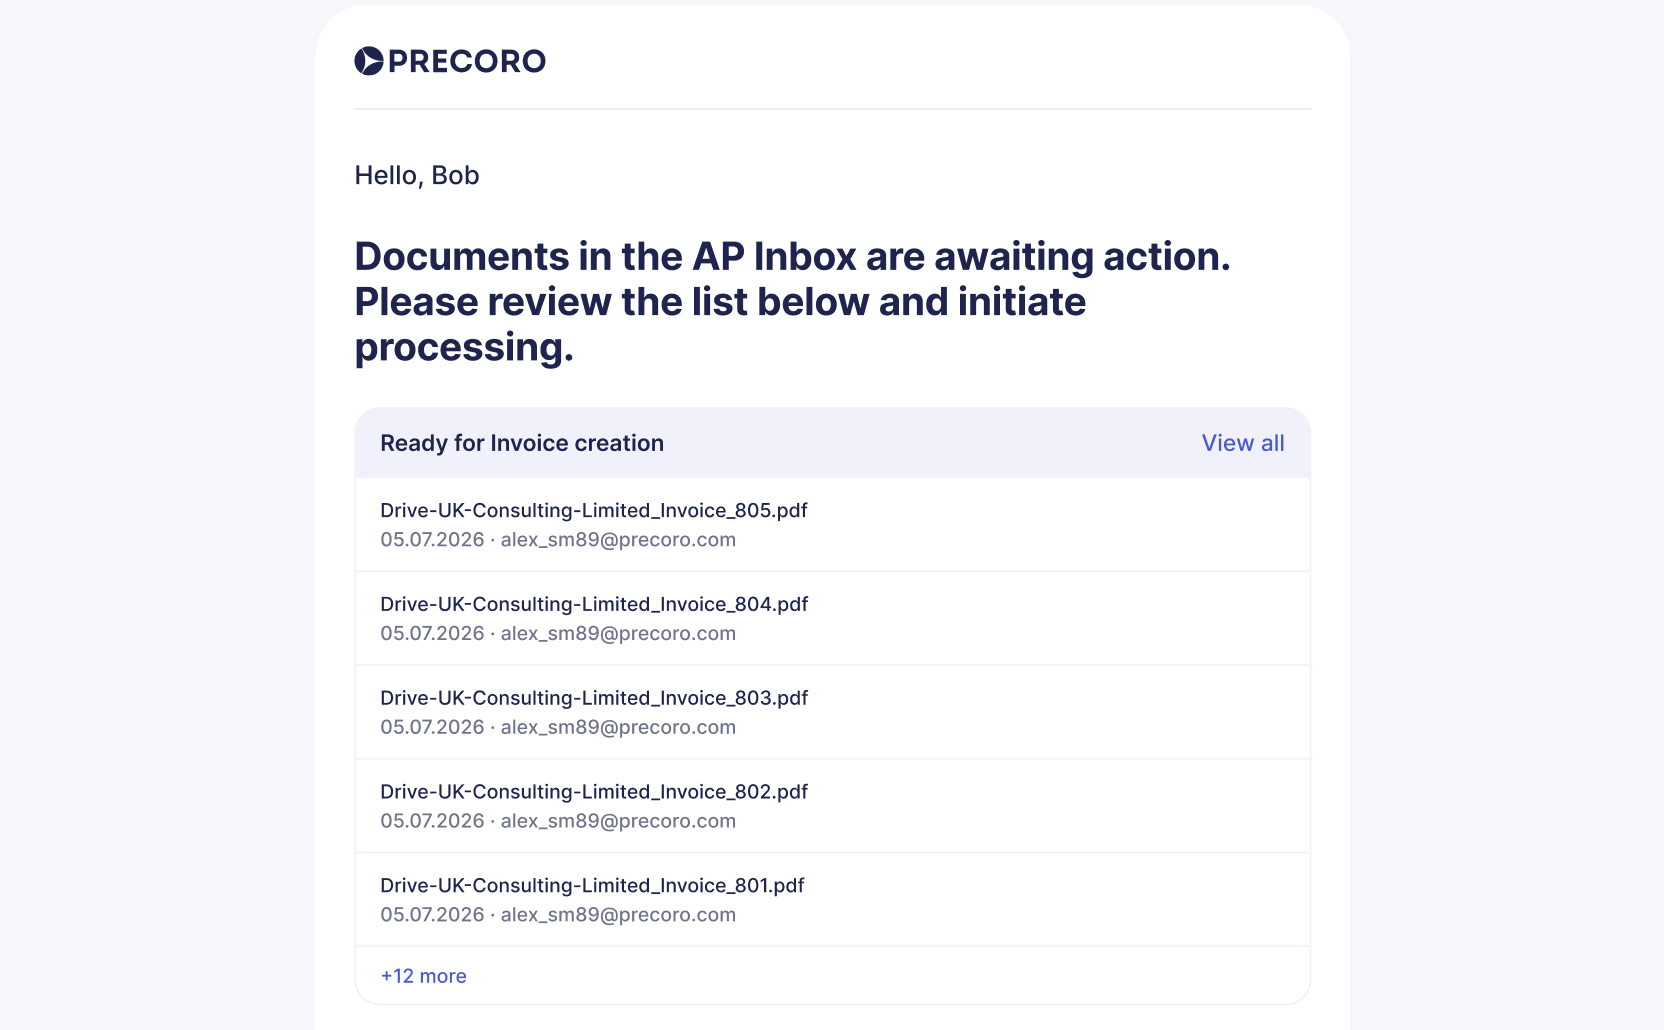
This change affects daily reminder emails for approvals, required actions, low warehouse stock, and AI-processed AP documents.
New PunchOut Integrations: DigiKey and CMT Group
We’ve added two new PunchOut catalogs to simplify and speed up ordering:
- DigiKey: If you’re dealing with electronics and often purchase parts like semiconductors, connectors, sensors, and development boards, try out this catalog.
- CMT Group: Confidently order construction tools, equipment, and consumables utilizing CMT Group’s online procurement portal, EDGE.
Connect these integrations for PR or PO creation following our standard PunchOut Setup Guide and add items directly from supplier-managed catalogs with current prices, offers, and availability display.
Send Documents to QBO or Xero with Accounting Period Adjustments
We’ve noticed that sometimes you may need to integrate documents in Precoro that would fall within a closed accounting period in integrations. The new setting gives you the flexibility to send the necessary documents to keep the data consistent.
To enable it, navigate to Configuration → Integrations → your integration’s configuration page and check the Automatically post documents on the first date of the open period checkbox, then save.
This setting only affects the first time you send a document from Precoro to the integration and doesn’t include revisions. Here’s how it works:
- Once the document is approved in Precoro, we compare its Issue Date (Receipt Date for receipts with the date when the last accounting period has closed in QBO or Xero.
- If the date falls after the last period close, the document posts as usual.
- If it falls within the closed period:
- Precoro checks if the document (or any of its item lines) has a budget attached. Documents with allocated budgets won’t be adjusted automatically, so you’ll see the error in the integration log.
- If the closed period ended less than 30 days before the issue/receipt date, Precoro automatically moves the date to the first day of the open period, sends the document, and logs the change.
- If the difference is over 30 days, Precoro sends the document as is and logs the error as before.
Better RFP Process
Create an RFP Directly from a Purchase Requisition
Skip the RFP list—start a request for proposal (RFP) straight from an approved PR.
- Open the PR's actions menu (the three-dot menu) and select Create RFP.
- Precoro opens the RFP creation page, prefilled with the PR's items.
- The new RFP is created in Draft status.
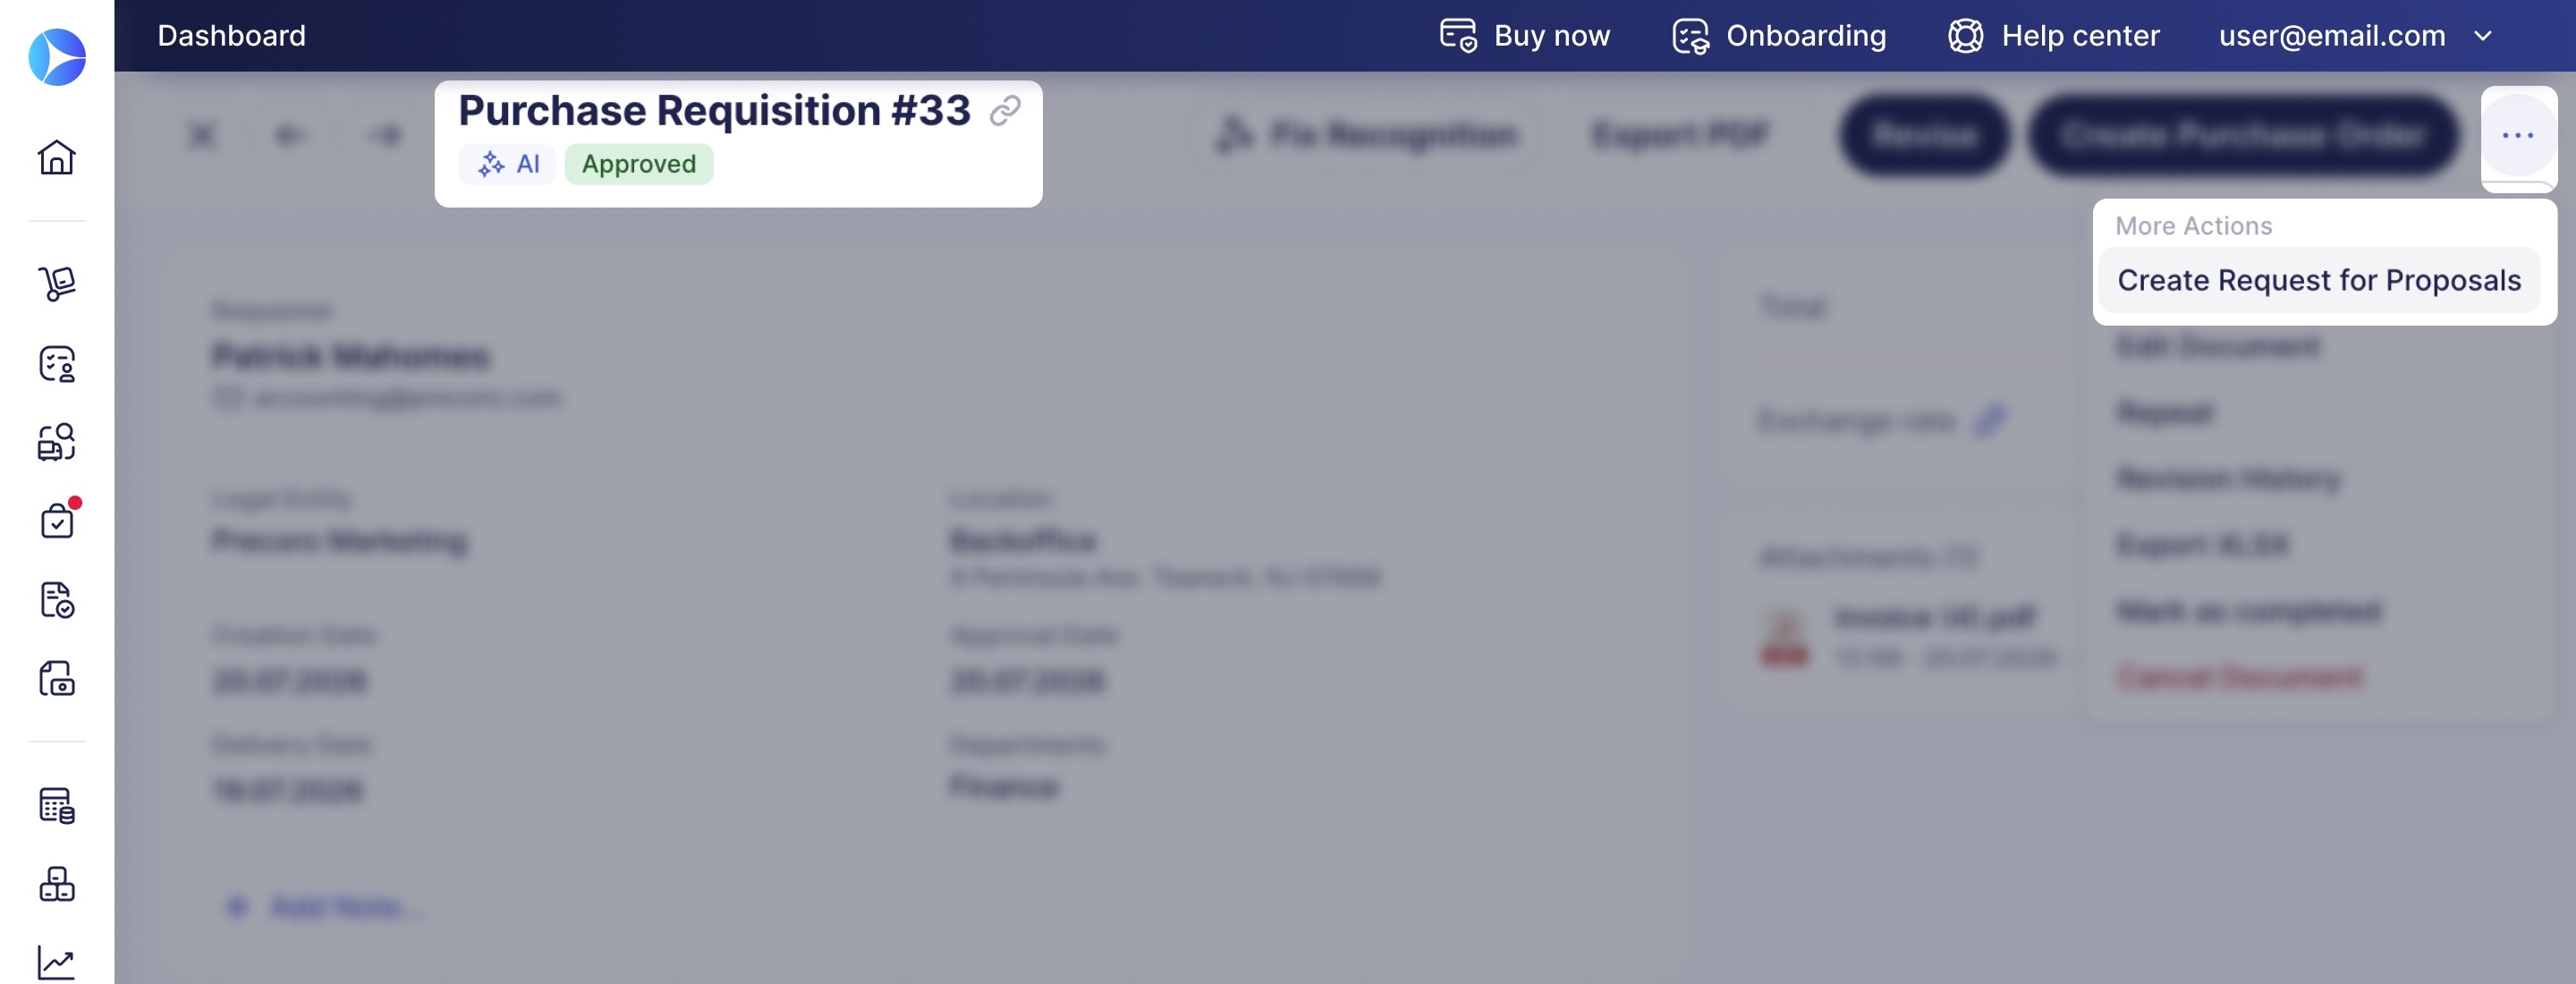
This button only appears when the PR is approved and has items not yet tied to an RFP or PO.
Turn a Completed RFP into a Purchase Order in a Few Clicks
Once a request for proposal (RFP) is completed, create a purchase order (PO) directly from it instead of entering supplier and item details by hand.
- Open the RFP.
- Click Create Purchase Order in the top right. This button is available while there’s at least one winning supplier and at least one item that hasn’t been added to a PO yet.
- If there's more than one winning supplier, choose which one to create the PO for; with only one winner, this step is skipped.
- Choose which items and quantities to include.
- Review the PO details prefilled from the RFP and save. The PO is created in Draft status.
Canceling or deleting a Draft PO made this way releases its items back to the RFP for a future PO.
See Linked RFPs Wherever You See Related Documents
Requests for proposals (RFPs) now show up in the Related Documents column and document section everywhere Precoro already displays related documents.
- PRs and POs now display related RFPs.
- The RFP page itself now has its own Related Documents block, showing any linked PRs and POs.
Precoro displays related documents as clickable links, so you can easily review all documents in the chain.