TABLE OF CONTENTS
What Is an Invoice?
An invoice is a document a supplier issues to inform a buyer about due payment. In Precoro, invoices contain the following details:
- invoice number;
- invoice issue date and due date;
- payment terms;
- buyer and seller details;
- references to related purchase order, service order, and credit notes;
- details regarding the products or services: description, quantity, prices;
- total amount.
You can customize the details required in the invoice in Configuration — Basic Settings — Document Setup — Invoices. You can also include additional information with custom fields for documents; follow this link to learn more.
Ways to Create an Invoice in Precoro
There are several ways you can create invoices:
- From scratch
Creating standalone invoices helps you account for purchases that do not require a PO and monitor your spending precisely. The next section of this article will guide you through this process.
- From a purchase order or service order
You can add invoices to previously created POs and SOs. In these cases, all the details in the original documents are added to the invoice so you do not have to enter them by hand. Check out these guides to Create an invoice from PO or Create an invoice from SO.
- Using optical character recognition
If your suppliers send you invoices in physical format, you can easily add them to Precoro with OCR. Upload images or document scans, check the details, and skip manually entering the information. Click here to learn more.
How to Create a Standalone Invoice
Step 1. Create the Document
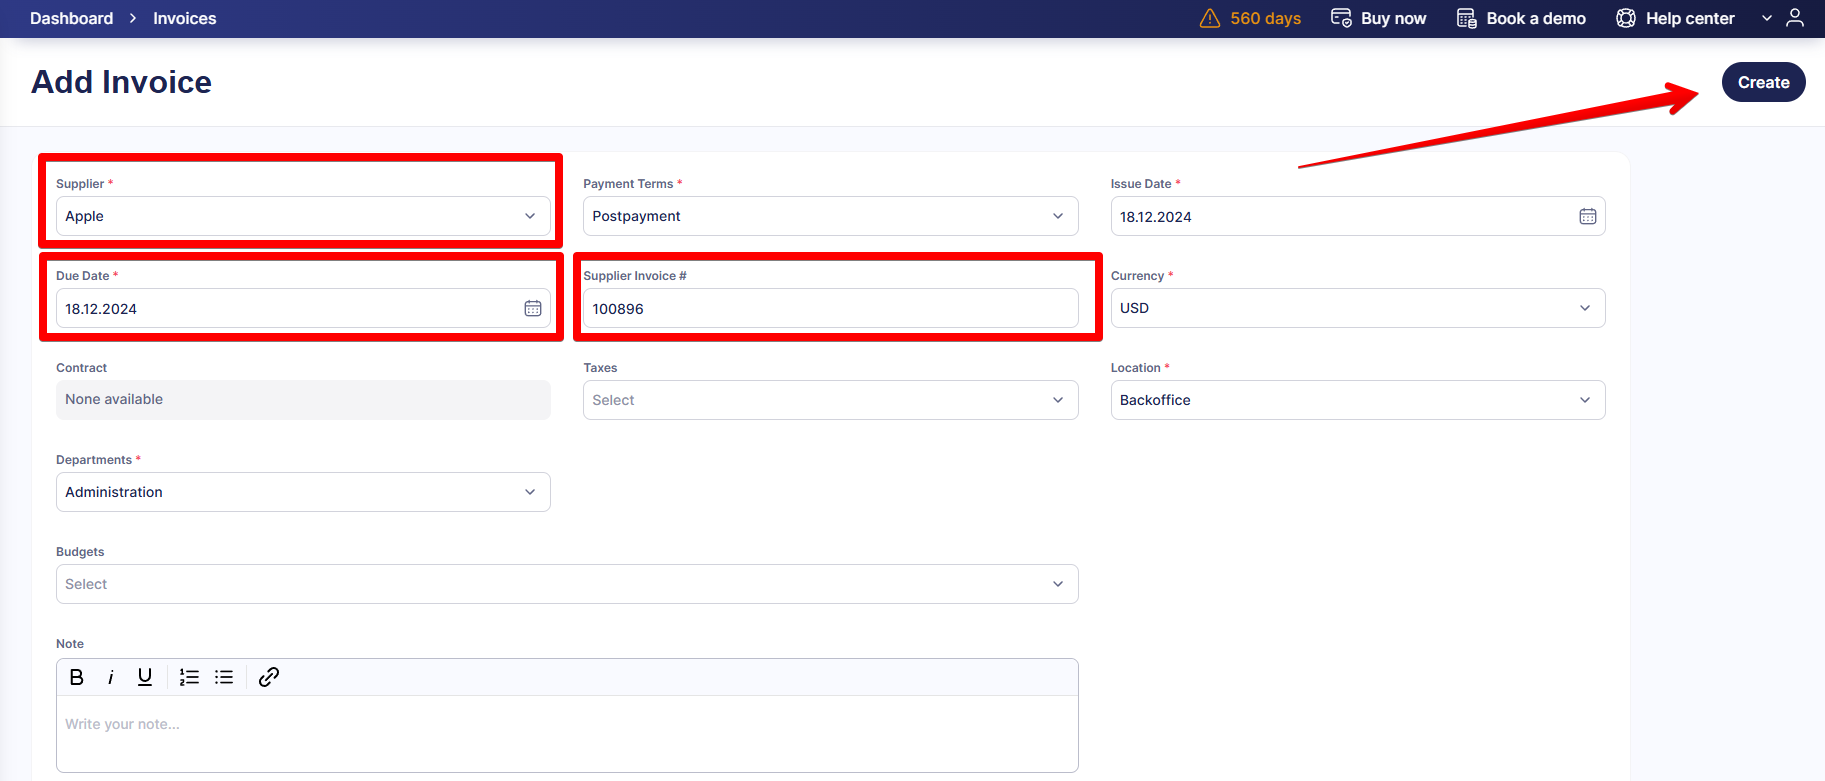
- Navigate to the Invoices module in the left-side menu.
- Press Add in the top right corner.
- Fill out the necessary details. Pay attention to these fields:
-
The Due Date is filled out automatically based on the Issue Date, Supplier, and Payment Terms. See how to Manage Payment Terms and set the needed rules and dates.
-
You can choose a supplier from the drop-down menu or add a new one by clicking Add new supplier at the top of the list.
-
If your company keeps track of numbers that suppliers assign to invoices, enter the number in the Supplier Invoice # field. To prevent creating duplicates, activate the Warn if Supplier Invoice or Credit Note # is duplicated setting in Configuration — Basic Settings — Document Setup — Invoices, but make sure there are no preexisting duplicates. You can learn more about this feature here.
You can also enable Split Costs and assign one document to several teams or budgets. Learn more about this functionality here.
-
- Click Create.
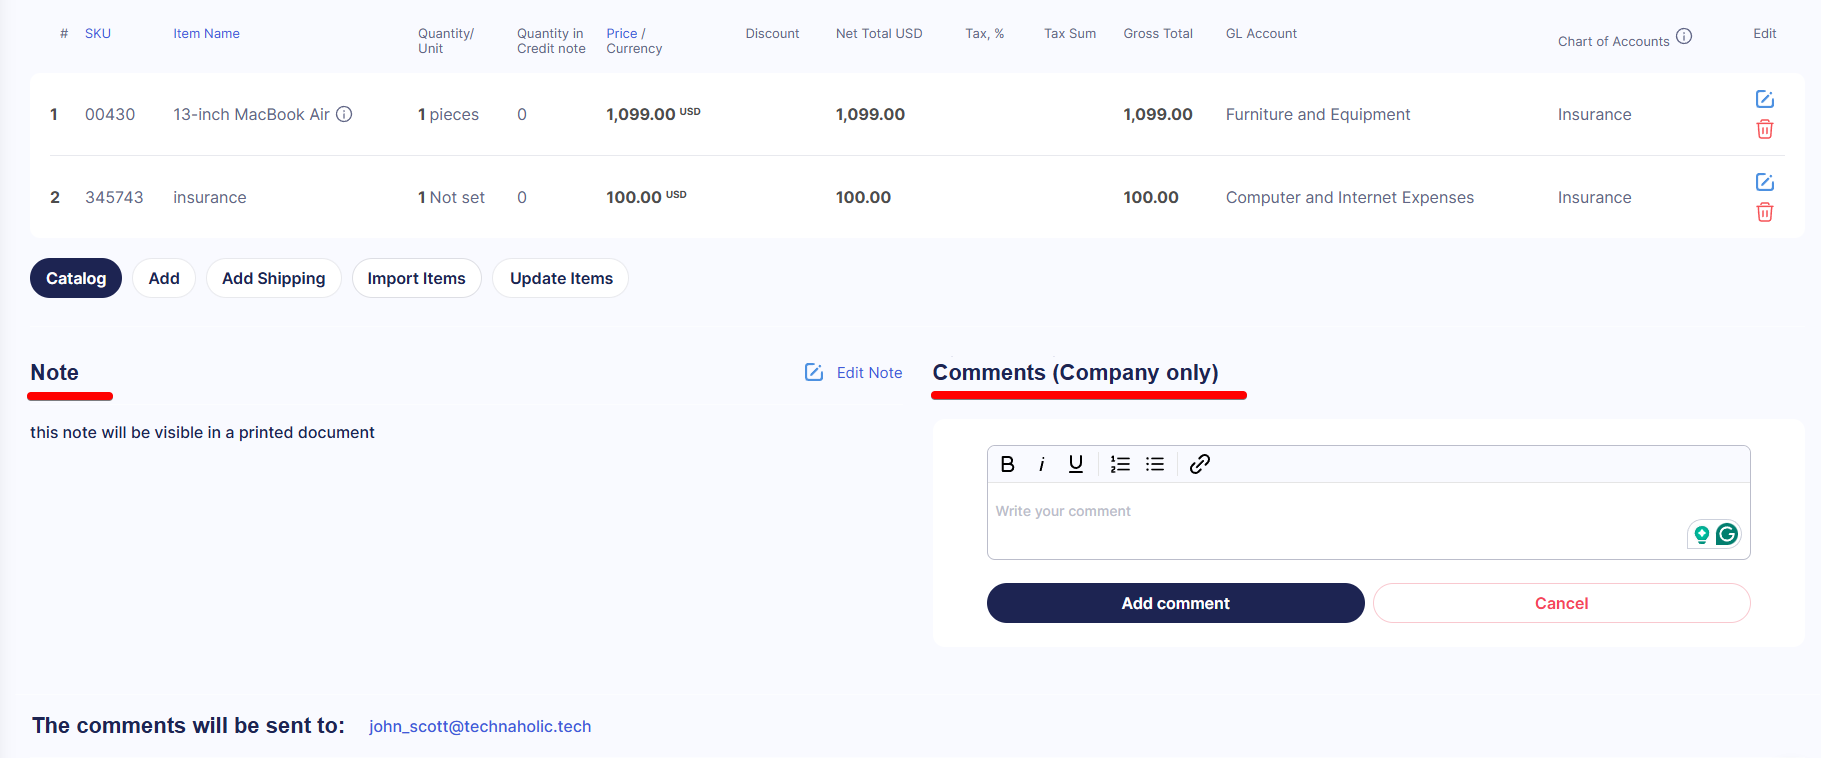
Step 2. Add Items
Use one of the following ways to add items:
-
Click the Catalog button to select items from the existing catalog.
-
Press the Add button to enter item details manually.
-
Press Import Items or Update Items to upload or update using Excel. We have detailed guides on How to Import Items In Bulk and How to Update Items In Bulk.
-
Click Add Shipping to include shipping and tax costs.
Learn more about adding items to documents in this article.
You can add items to the catalog directly through the invoice without transferring them manually. Find a guide on how to set up and use this function here.
You can also mark items free of charge or set negative item prices. To confirm the document, make sure the total amount is non-negative.
If you need to enter or select the same option for multiple lines in an item table, you can use mass editing.
Here's how to do it:
- Find the item table: Open a document you’d like to change and scroll down.
- Select items: Check the boxes in the leftmost column for the lines you want to edit.
- Open mass edit: Once multiple items are selected, the Edit Items button appears at the bottom of the screen. Click it to open the sidebar.
- Apply changes: Enter the necessary values in the sidebar and click Save. The changes will be applied to all selected items.
Step 3. Enter Additional Information
You can add notes, comments, and attachments to your invoices.
Notes appear on the printed document and can be used for communication outside of your company. Comments are visible to Precoro users who have access to the document. Learn more about notes and comments here.
Attachments include files needed for your company’s processes; you can make them required by activating Required File Attachments in Configuration — Basic Settings — Document Setup — Invoices. Learn more about using attachments in invoices here.
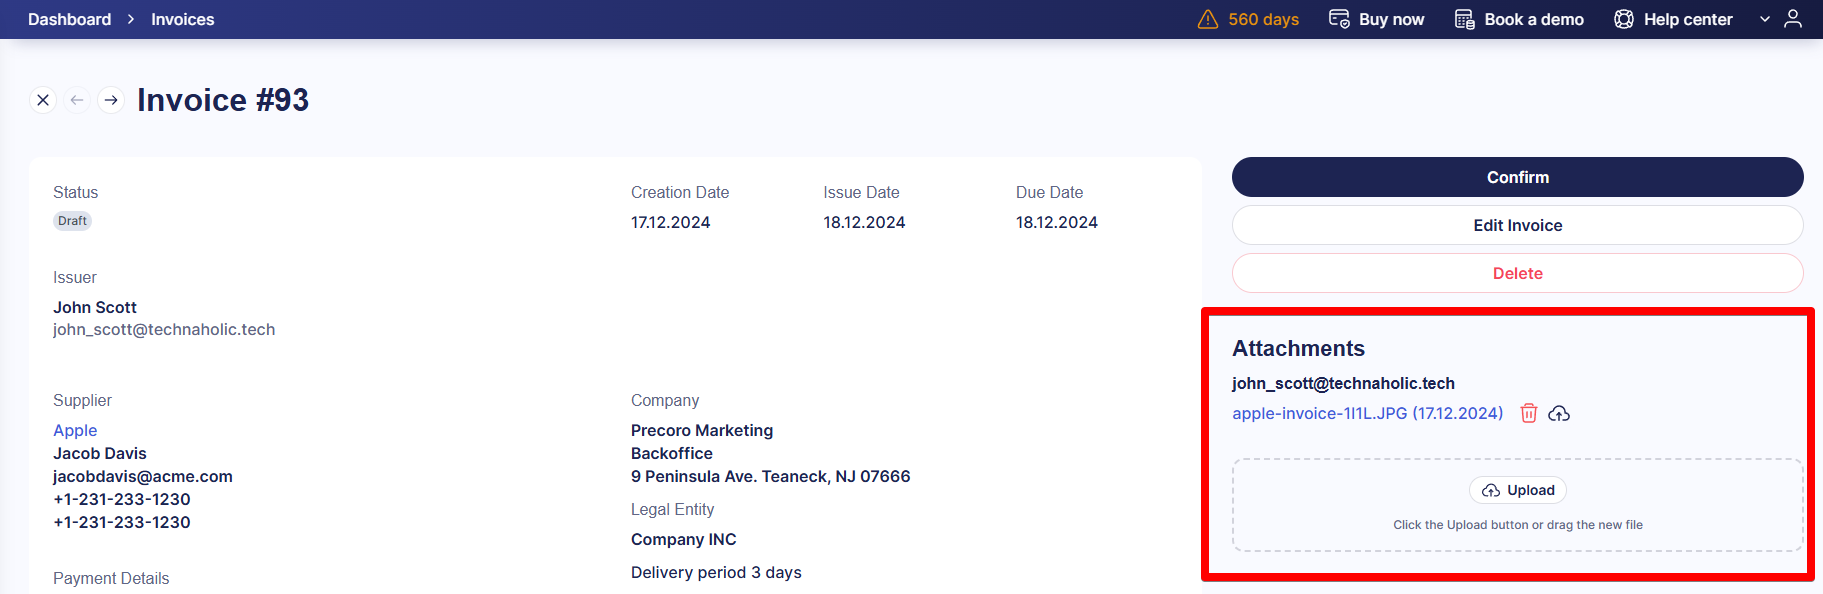
Step 4. Review and Confirm the Document
- Double-check the information as you can freely edit the invoice at this point. Once confirmed, you can edit payment terms, issue date, and delivery date, and you need to revise the document to change other information.
- When everything looks good, click Confirm. If the button is greyed out, hover over it to see what information needs to be added.
- Once confirmed, the document will proceed to the approval workflow set up in your company and gain Pending status. Use the Revision History button to see the changes made to the document; learn about this functionality here.
- You can download the invoice in XLSX or PDF formats unless it has Draft or Pending status.
How to Track Invoices
Track invoices directly from the Invoices page. There, you can see the list of invoices with their statuses, related documents (as hyperlinks), due dates, and other details. It also shows credit notes with allocated invoices. You can open any document from this list and check for more detailed information.
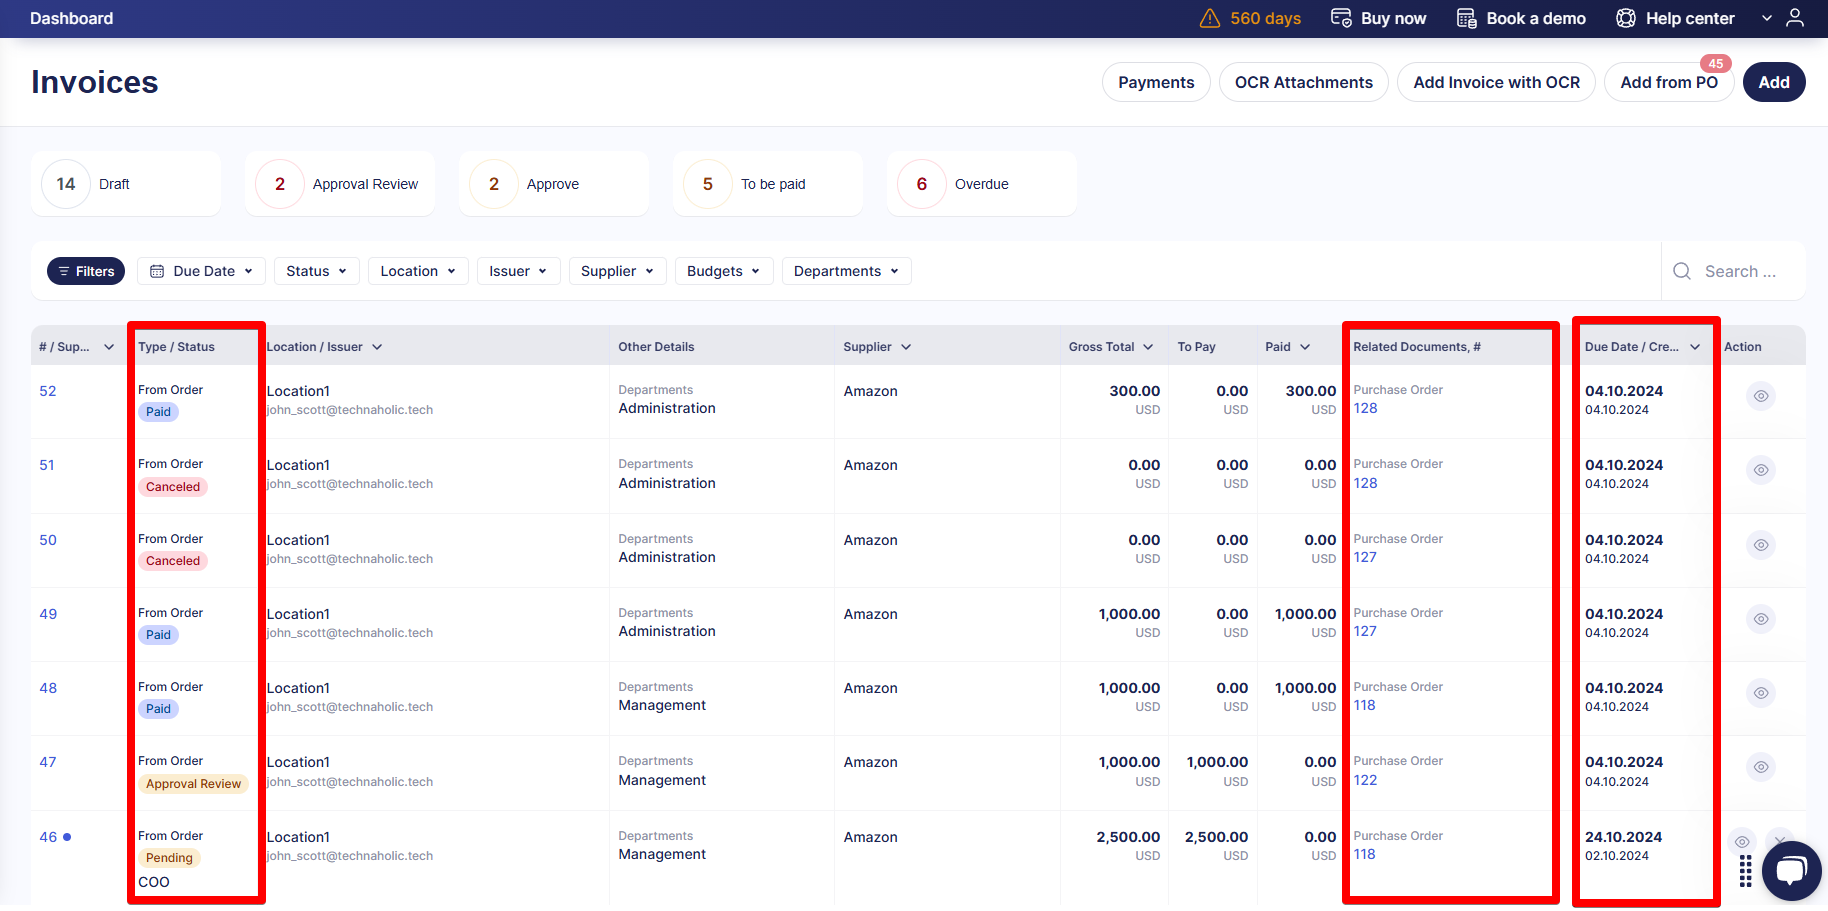
Let’s review the features that can help you monitor invoices from this page.
Understanding Invoice Statuses
Statuses give you an overview of the document’s progress. Here is a list of statuses an invoice can have:
|
Draft |
The initiator has not confirmed the invoice yet. At this stage, they can edit the invoice and add or modify the items. |
|
Pending |
The invoice is undergoing an approval process. |
|
Approved |
The invoice was approved and can now be paid. |
|
Rejected |
Approvers rejected the invoice, so it will not be paid. |
|
In Revision |
The revision process allows changes in a previously confirmed document. |
|
Canceled |
The initiator revoked the invoice. |
|
Matching |
There are discrepancies between the invoice and the related PO. Therefore, the PO initiator needs to review and approve the changes in the PO. |
|
Pending receipt |
If your company uses 3-way match functionality, an invoice cannot be confirmed before you receive the items. |
|
Paid/Partly paid |
The Invoice is paid/partly paid with prepayments from related PO or payments added to the invoice. |
|
Closed |
If the Automatic closing of overdue documents setting is active, overdue documents from the year before last and older automatically gain this status. Learn more about this functionality here. |
If the Invoices module is deactivated, invoices in Pending, In Revision, and Pending Receipt status will be automatically set to Closed. If the Receipts module is disabled while some invoices are waiting for receipt (Pending Receipt), the invoices will be sent for approval. If payments are disabled, invoices will be automatically marked as Paid.
Using Filters and Infocards
To navigate the list faster, you can use filters; this guide will show you how to use them in more detail.
On the Invoices page, you can use both fast and advanced filters. You can also search by SKU or names of items included in the invoice.

Infocards offer both convenient filtering and a way to approve, reject, and pay invoices in bulk. Here are the infocards you can see at the top of the page:
-
The Draft infocard shows all invoices you created that have a Draft status. From there, you can finish creating invoices and submit them for approval.
-
The Approve infocard shows all the invoices awaiting your approval. After clicking the infocard, you can select several documents and press either Approve Selected or Reject Selected.
-
To be paid and Overdue infocards show the invoices awaiting payment. After clicking the infocard, select several documents and press Add Payments to Selected; these invoices will gain the Paid status.
Looking for More Invoice Features?
If you need more flexibility in invoice processing or tracking, the functionality you’re looking for may already be in development or waiting to be requested. To see what’s planned, please check out our Open Product Roadmap.
There, you can:
-
See what’s planned and in progress
-
Upvote ideas that matter to you
-
Leave comments to share your use case
-
Subscribe to announcements and follow relevant ideas
-
Submit new feature requests
To get started:
-
Review existing ideas and upvote the ones that you find helpful.
-
Log in or sign up using your business email to access full functionality.
-
Submit new ideas and share insights with your peers in the comments.
Every suggestion counts—your feedback shapes what we build next. Refer to this article for more details on working with the product plan.
FAQs