TABLE OF CONTENTS
- How to Automate Requisition Creation from Quotations
- How to Edit Multiple Items at Once
- Frequently Asked Questions
What Is a Purchase Requisition?
A purchase requisition is a formal request made by an employee to acquire goods or services for their company. It serves as the initial step in the procurement process and helps ensure that all purchases are necessary, properly approved, and within budget.
Department heads typically oversee the approval of purchase requisitions. Once approved, the requisition is sent to the procurement department, which is responsible for sourcing and purchasing the requested items from suppliers.
To learn more about the requisition process, including when and why requisitions are needed, and to discover best practices, visit our blog post.
How to Create a Purchase Requisition in Precoro
💡 Please note: The company administrator must first set up and configure the module to allow users to create new purchase requisitions.
Visit this article to learn how to enable the module, assign relevant user roles, and set up the approval process.
Step 1: Create a New Document
-
Open the Purchase Requisition module from the left-side menu.
- Click Create and choose a form if your company uses the Custom Document Form feature.
- Enter the required details, including Location, Delivery Date, and any custom fields your company uses.
- Optionally, add a budget to your PR. Learn how here.
- Press Create.
💡 Please note: Precoro lets you create custom PR forms tailored to different purchase types. To learn more about this feature, check out our article.
Step 2: Add Items to Your Purchase Requisition
Once your PR document is created, you can add items using one of the following methods in Precoro:
- Select items already in the Catalog.
- Enter item details manually.
- Bulk upload items from external sources using Excel.
- Bulk update items with an Excel file.
Learn more about adding items to documents in this article.
Once the items are added, you can fill out the Supplier, Category, and Custom Item Fields using mass edit as described in this section.
💡 Please note: When you add a supplier while the document is in Draft status, you can either select an existing supplier from the drop-down list or create a new one by clicking Add New Supplier.
Supplier Field Logic: Document Level vs. Item Level
To avoid mismatched supplier data while creating, editing, and revising a custom PR, Precoro applies one consistent rule:
It isn't possible to have different suppliers at the document level and item level in a custom PR at the same time.
A custom PR can have either one supplier on a document level or a different supplier for each item.
- If you fill in the document-level Supplier field, the same supplier automatically applies to all items in the custom PR.
- If the document-level Supplier field isn't added to the form or is left empty, you can assign suppliers separately for each item in the Supplier column of the item table.
- If the document-level Supplier is selected, the Catalog only shows items from the selected supplier and items with no supplier assigned.
- If you change the document-level Supplier field during Revise, Precoro updates all existing items and hides the Supplier column on the item-level. Clearing the document-level Supplier brings back the column, and existing items keep their current supplier.
Step 3: Add Notes, Comments, and Attachments
You can also include additional details or specify important information in your purchase requisition. In Precoro, you can do this in several ways:
- Add Notes: Include delivery times and other critical details that will appear on the printed document.
- Add Comments: Communicate directly with your team by tagging users with “@” to notify them and keep all discussions within the document.
- Add Attachments: Upload relevant files, such as images or documents, to support your requisition.
To learn more about how to work with notes and comments, please follow this link.
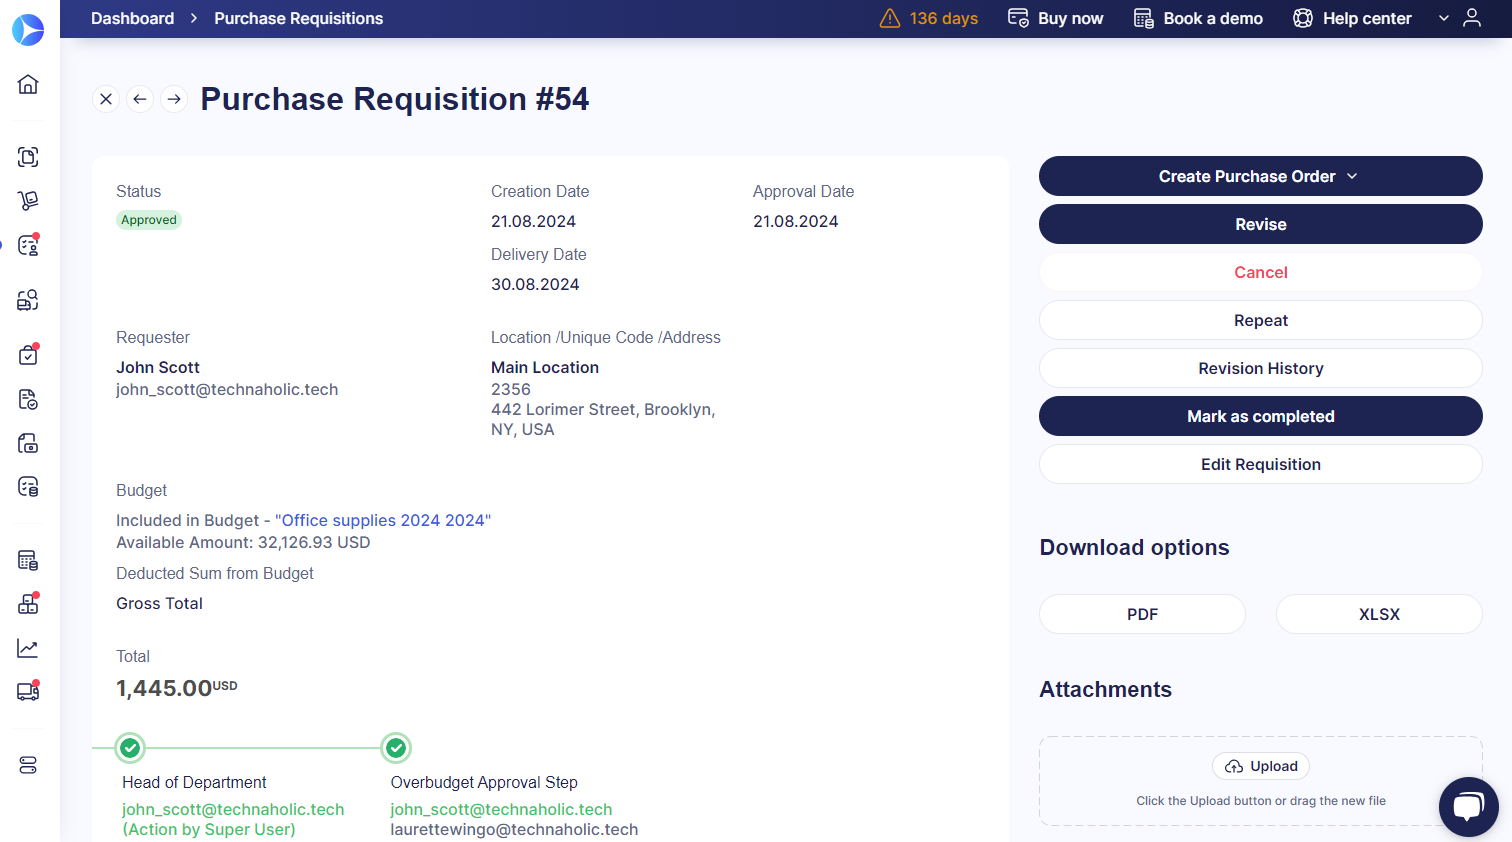
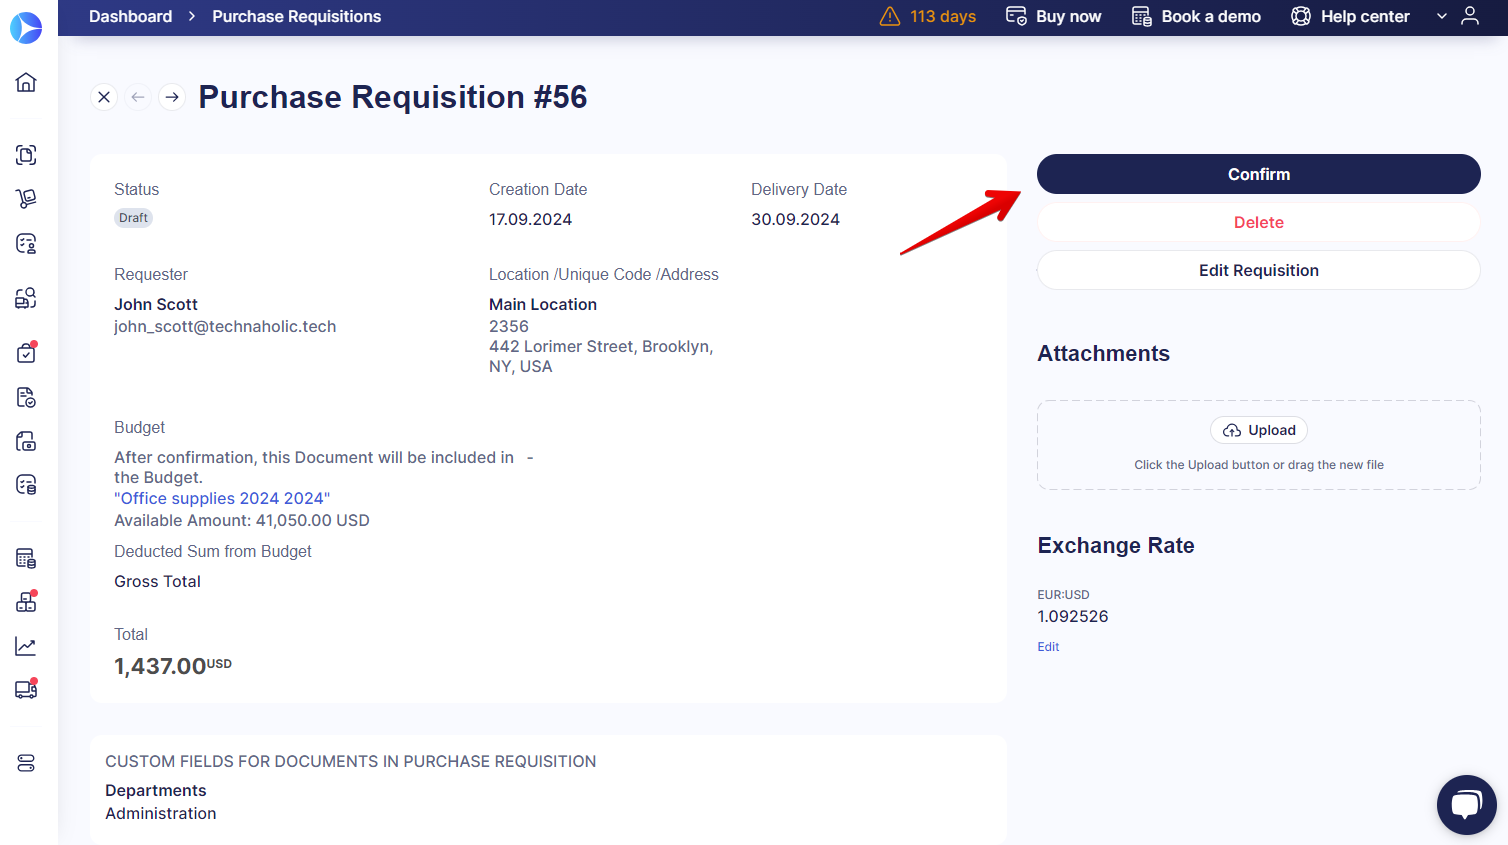
Step 4: Confirm the Document
Review the document to ensure all required information is included. When ready, just press the Confirm button on the action panel.
💡 Please note: If the Confirm button is inactive, hover over it to see which fields need to be filled out before you can proceed.
If your company uses the Approval Workflow feature, the document will be sent to the designated approvers for review. For more details on how approvers handle requisitions, please refer to this article.
Without Approval Workflow, the document will automatically be marked as Approved after confirmation.
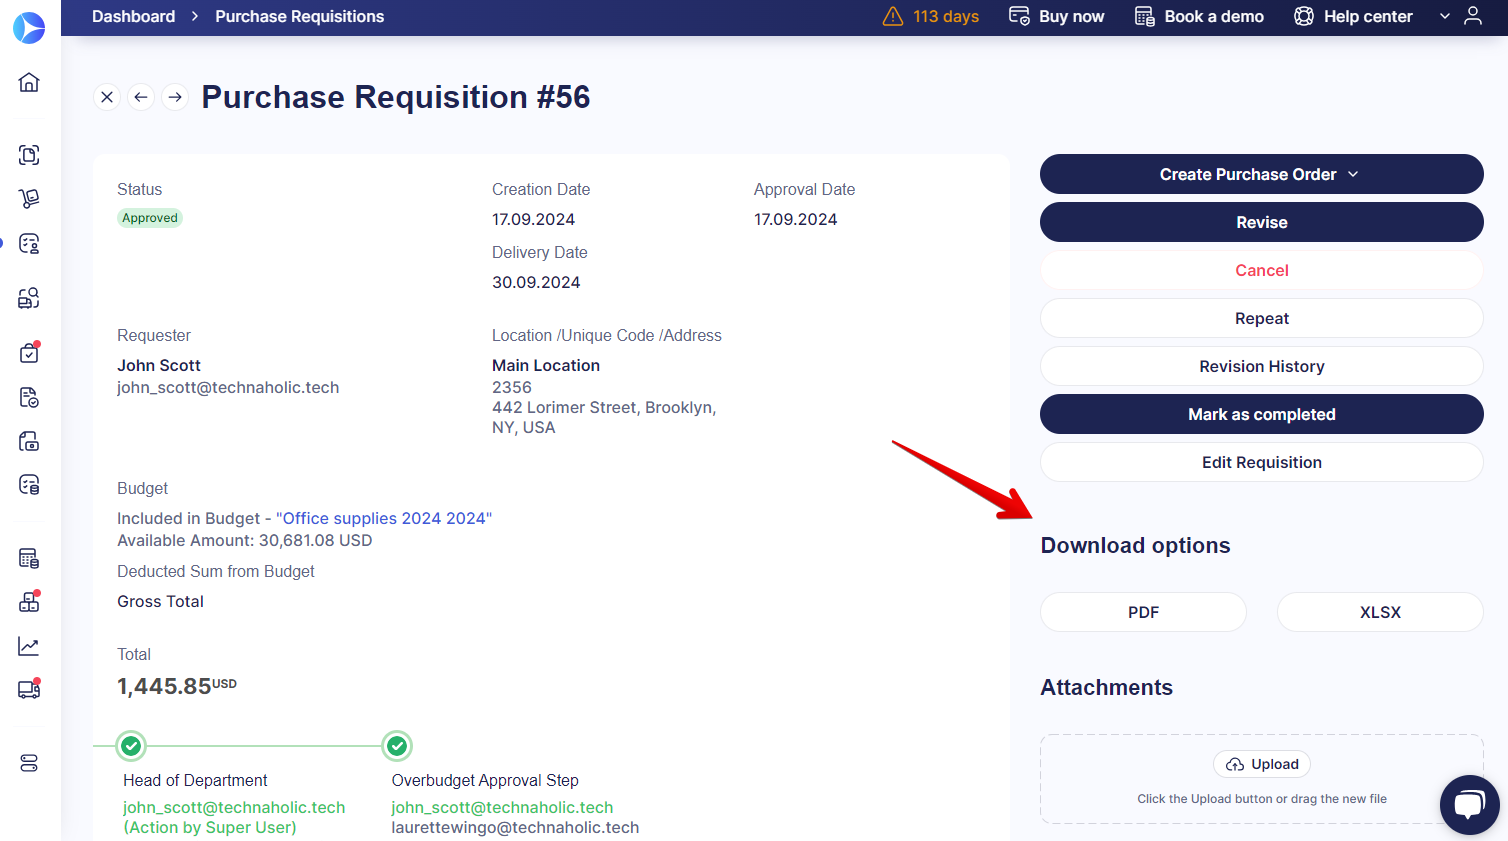
Step 5: Download the Created PR
Once the document is approved, you can download it by selecting either the PDF or XLSX format from the available options.
Note that downloads are only available for documents in all statuses except Draft, Canceled, Pending, and In Revision.
How to Automate Requisition Creation from Quotations
If you fill out requisitions based on supplier quotations, our AI Assistant can help you speed up the process and complete the tedious data entry task for you. Please check out this article to start using this feature.
How to Edit Multiple Items at Once
Using mass editing functionality, you can instantly set the same suppliers, custom fields, and categories (if you have them set up as a custom field) in multiple or all items added to the PR. Here are a few cases in which this ability shines:
- Filling out optional fields for items added as empty rows.
As the field is not required, you can skip it when adding the item and use mass edit later. - Adding items from the catalog where the supplier or custom fields aren't specified.
- Creating a requisition from a punchout catalog.
Using Mass Edit Functionality
💡 Please note: This functionality is available in purchase requisitions on Draft, In Revision, and Pending statuses for the users currently editing, revising, or approving the document.
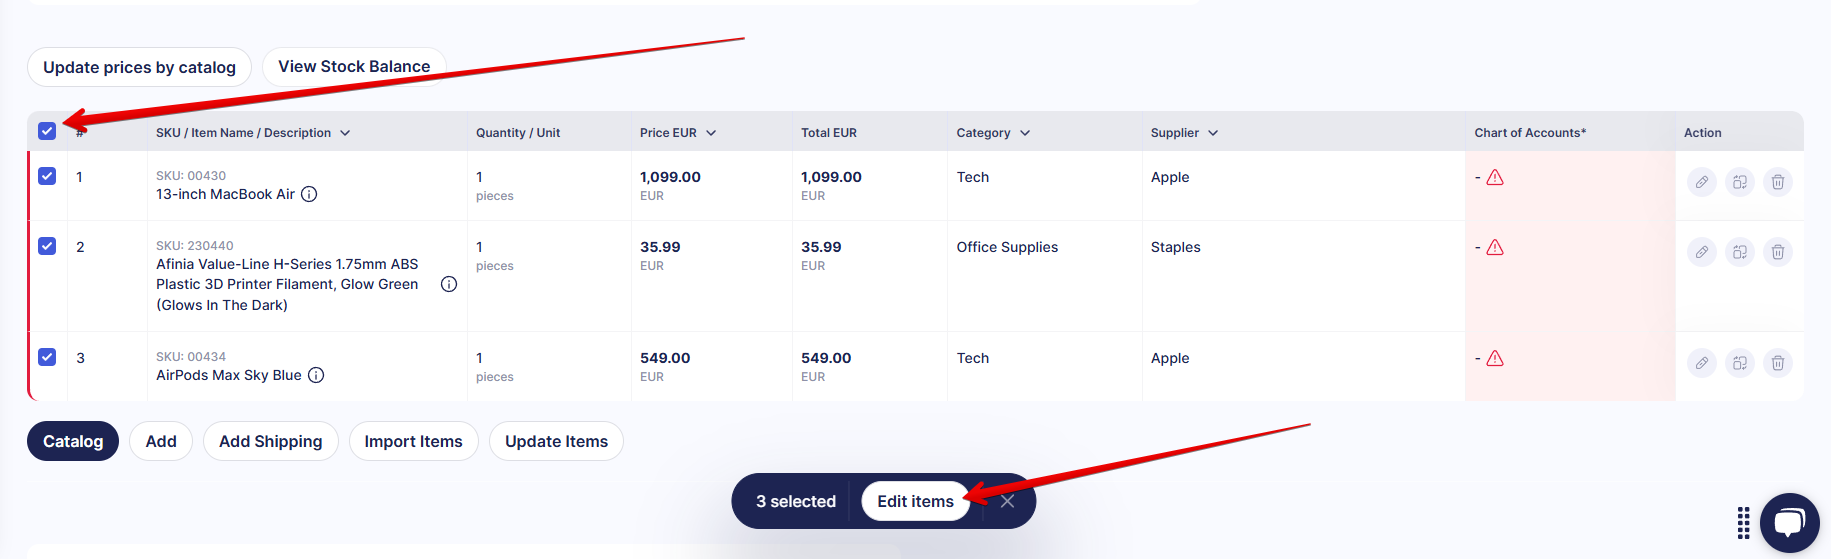
- Create or open a purchase requisition and add items you need to request.
- Navigate to the list of items in the PR and select the ones for which you want to assign the same values. You can also click the Select All checkbox at the top of the list.
- Once you have selected several items, the Edit Items button will appear at the bottom of the screen; click it to start editing.

- You will see the fields available for editing in the selected items in the panel on the right. Fields that can be shown here:
- Supplier;
- Custom item fields.
- Click Save to confirm the selected values. You can also click Cancel or close the panel to discard the changes.

Restrictions for Mass Editing
The Restrict Catalog Items Editing setting applies to mass editing. Learn more about this feature and the exceptions that still allow editing here.
Additionally, the changes made using mass edit can’t be saved if there are items without a price (price value is set to 0). You will see the error message, and the supplier and custom field values will remain unchanged. Please set the correct prices before you use the mass edit function.
Frequently Asked Questions