TABLE OF CONTENTS
- What Are the Custom Supplier Fields
- How to Create the Custom Supplier Fields
- Create the Approval Workflow for Custom Supplier Fields
- Manage Custom Supplier Fields with Filters
- Analyze Custom Supplier Fields in Custom Reports
What Are the Custom Supplier Fields
Custom supplier fields are the fields you create and fill out for suppliers to store all the details needed for your processes. Here's what you can do with their help:
- Create new Custom Fields and assign them to Suppliers in their profiles.
- Manage those fields by activating/deactivating them or making them required to fill out both for the users and Suppliers.
- Conveniently handle the Custom Field data with the help of Filters and Custom Reports.
- Display those fields as you need in the Suppliers List, in POs and Invoices, and in printed documents as well.
- Simplify your process of adding new Supplier as those Custom Fields are available for selection in the Registration Form.
💡 Please note: When creating Custom Supplier Fields, you can also make them available as Custom Contract Fields.
How to Create the Custom Supplier Fields
This functionality is available to all users with Supplier Management Create Role: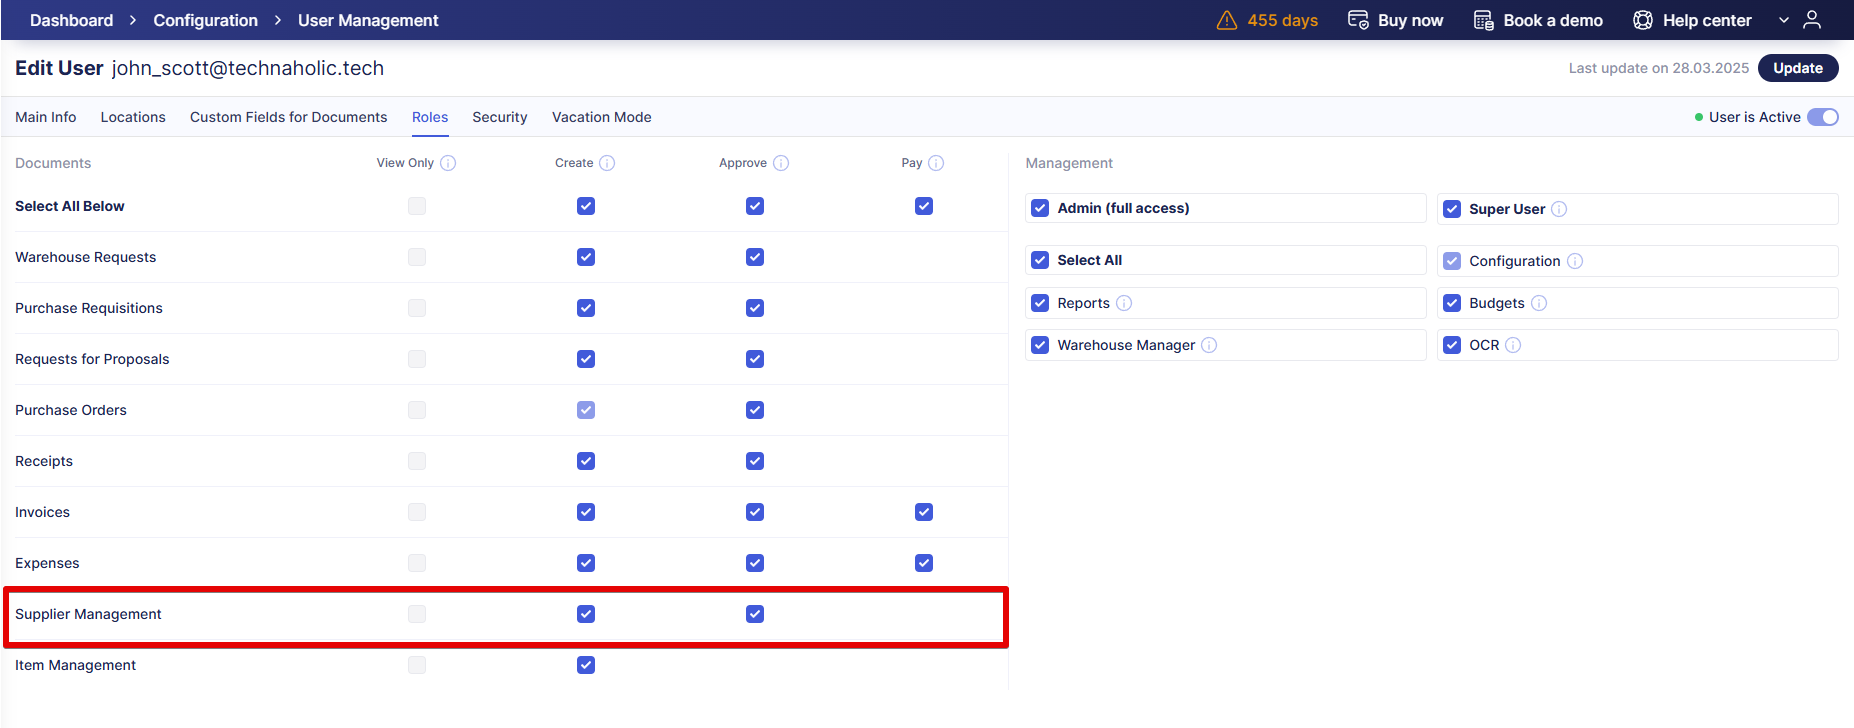 To To create a new Custom Field, follow the steps below:
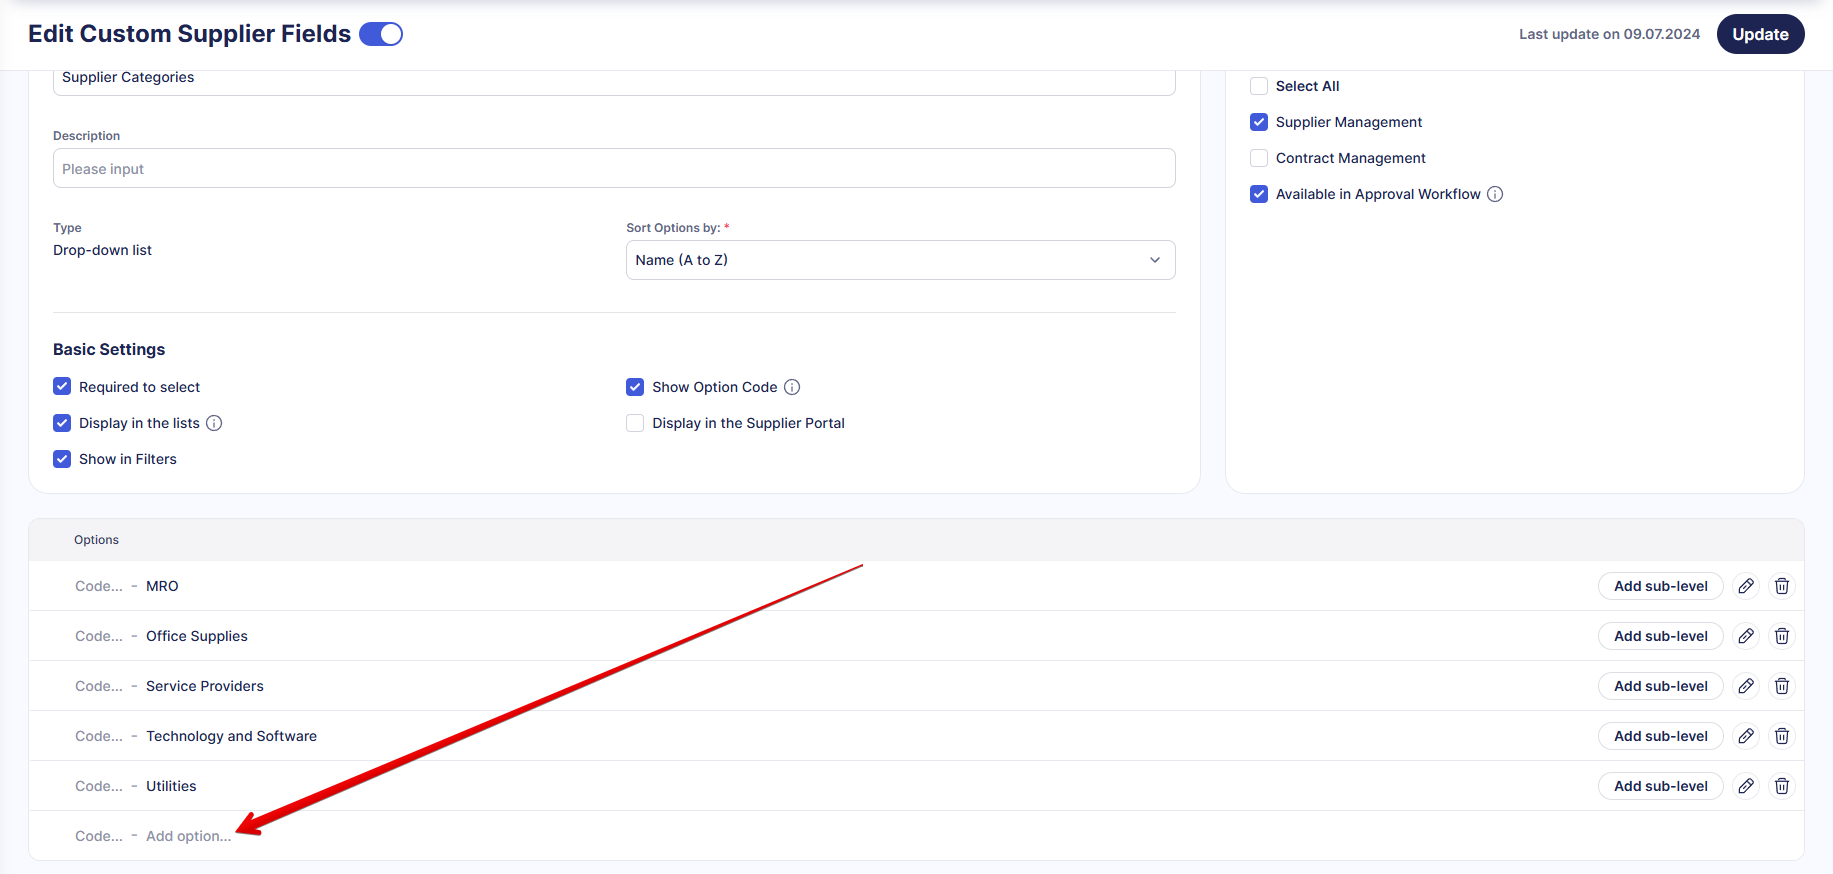
1. Go to the Supplier Management module → Custom Supplier Fields page and click the green Add Field button on the right.
2. Enter the required Name and select the Type. Check the needed Basic Settings for this Custom Filed.
Check the Suppliers option in the Available to select in section. If you also want to enable the field in contracts, please find more details in the Custom Contract Fields Functionality article.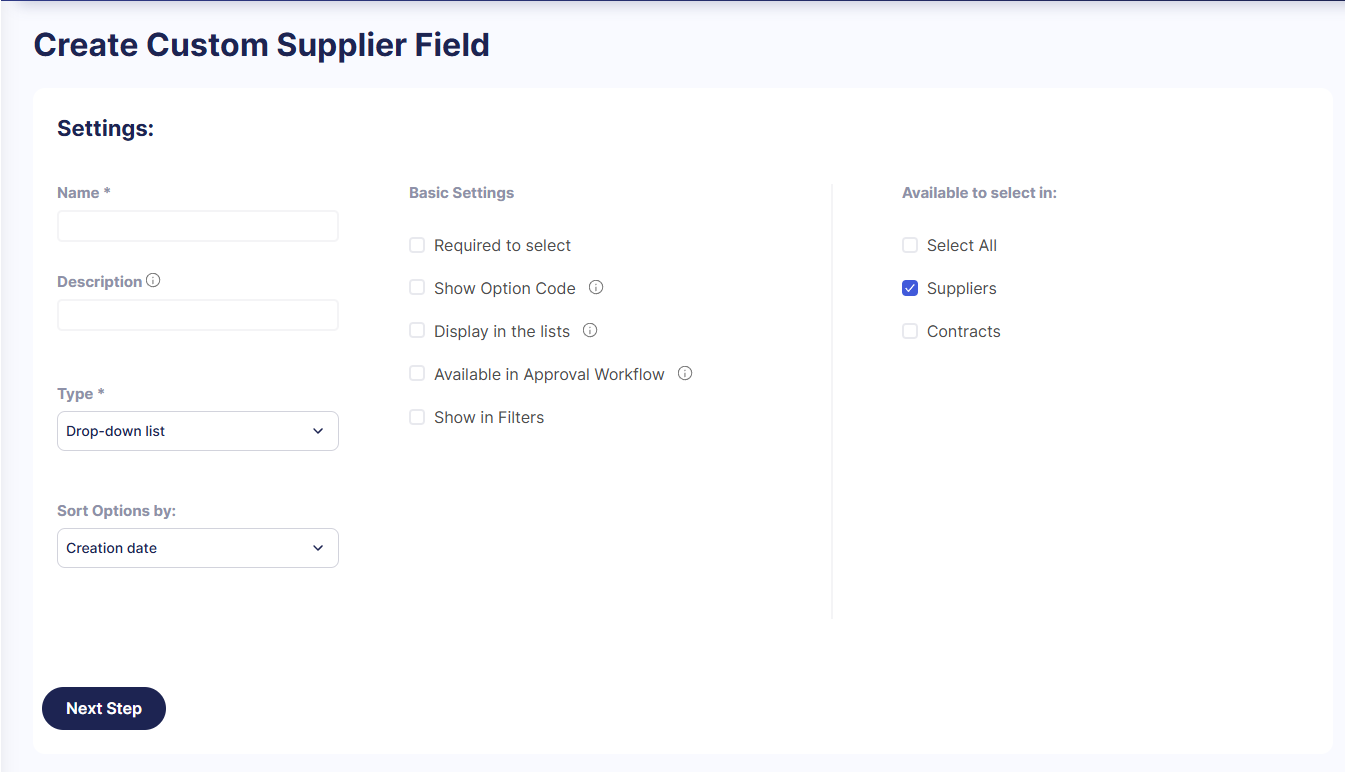
- Drop-down list — allows users to select the previously added options from the list.
- Text — allows users to enter text value into the field.
- Date — allows users to select the date ranges.
- Required to select — makes this field required to fill out for the user in the Supplier profile.
💡 Please note: If you have activated the Required to select setting, then when adding new Suppliers, users will not be able to save their profile without this information.
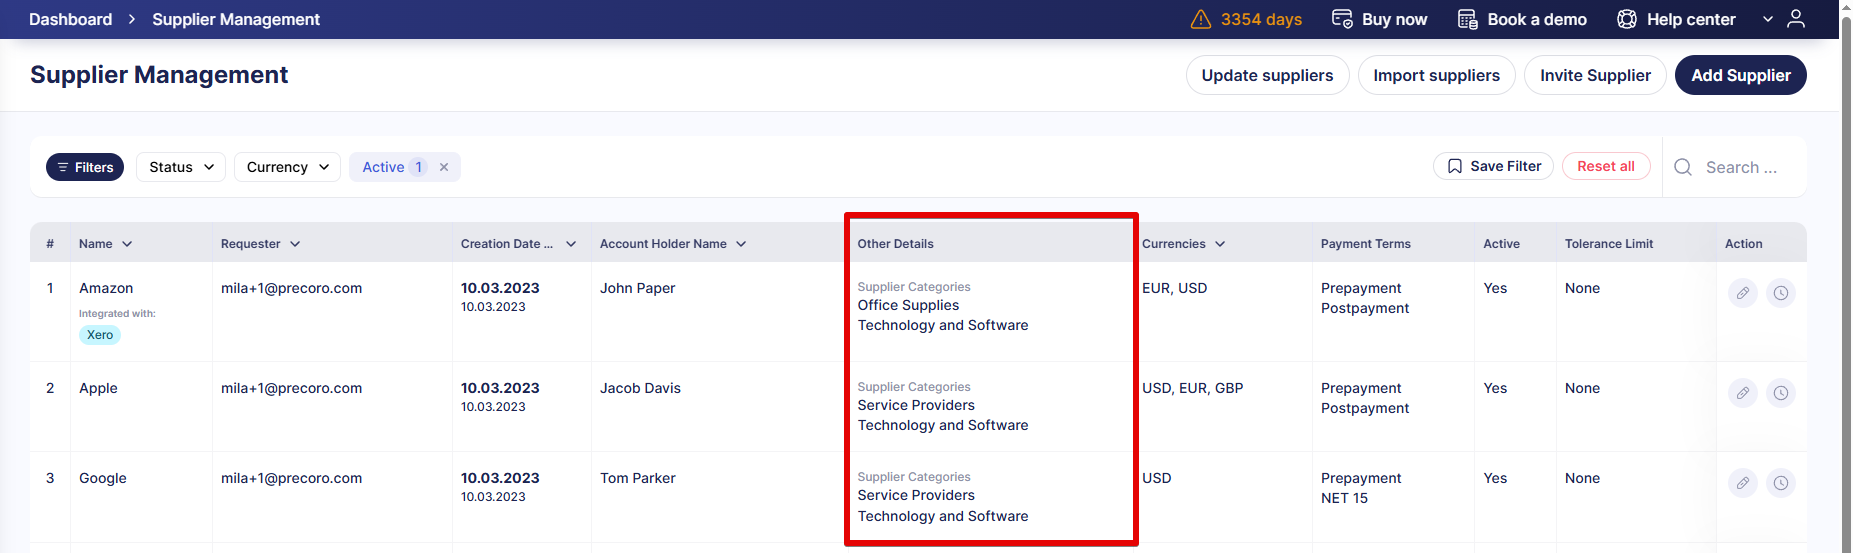
- Display in the Supplier list — the created Custom Field will be displayed in the Other Details column on the Supplier Management page.
More information on Document Custom Field types and their management can be found in this article.
- Show in Filters — if activated, you will be able to apply filters by the created Custom Fields on the Supplier Management page.
3. Once done with the setting, click either the Save button if you have selected the Date or Text type or the Next Step button if you have selected the Drop-down list type to enter the available options.
To ensure every Drop-down list field has at least one option for users to select, these rules apply:
- When you create a custom field with the Drop-down list type, it’s disabled by default. The field is enabled automatically when you add the first option.
- When you edit a previously deactivated field, it’ll remain disabled even if you add new options.
- If you disable all options of a custom field, it’ll be automatically disabled too.
You can also import and update Custom Supplier Fields in bulk. For details, see the article on how to import and update Custom Supplier Fields.
How to Use the Custom Supplier Fields
The newly created Custom Fields can be found and used in the following:
- Supplier Profile
1. Go to the Supplier Management page and open the Supplier profile.
2. Click the View More button and scroll down to find the Custom Fields.
💡 Please note: If you have activated the Required to select setting when adding new Suppliers, users will be unable to save the profile without this information.
Please note the Show checkmark next to every created Custom Field: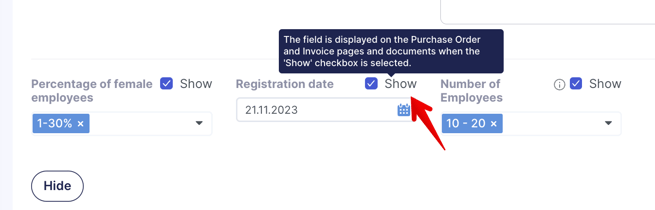
With the Show checkmark activated, the Custom Fields will be displayed:
-
-
In the Purchase Order and Invoice documents, along with Supplier information:
-
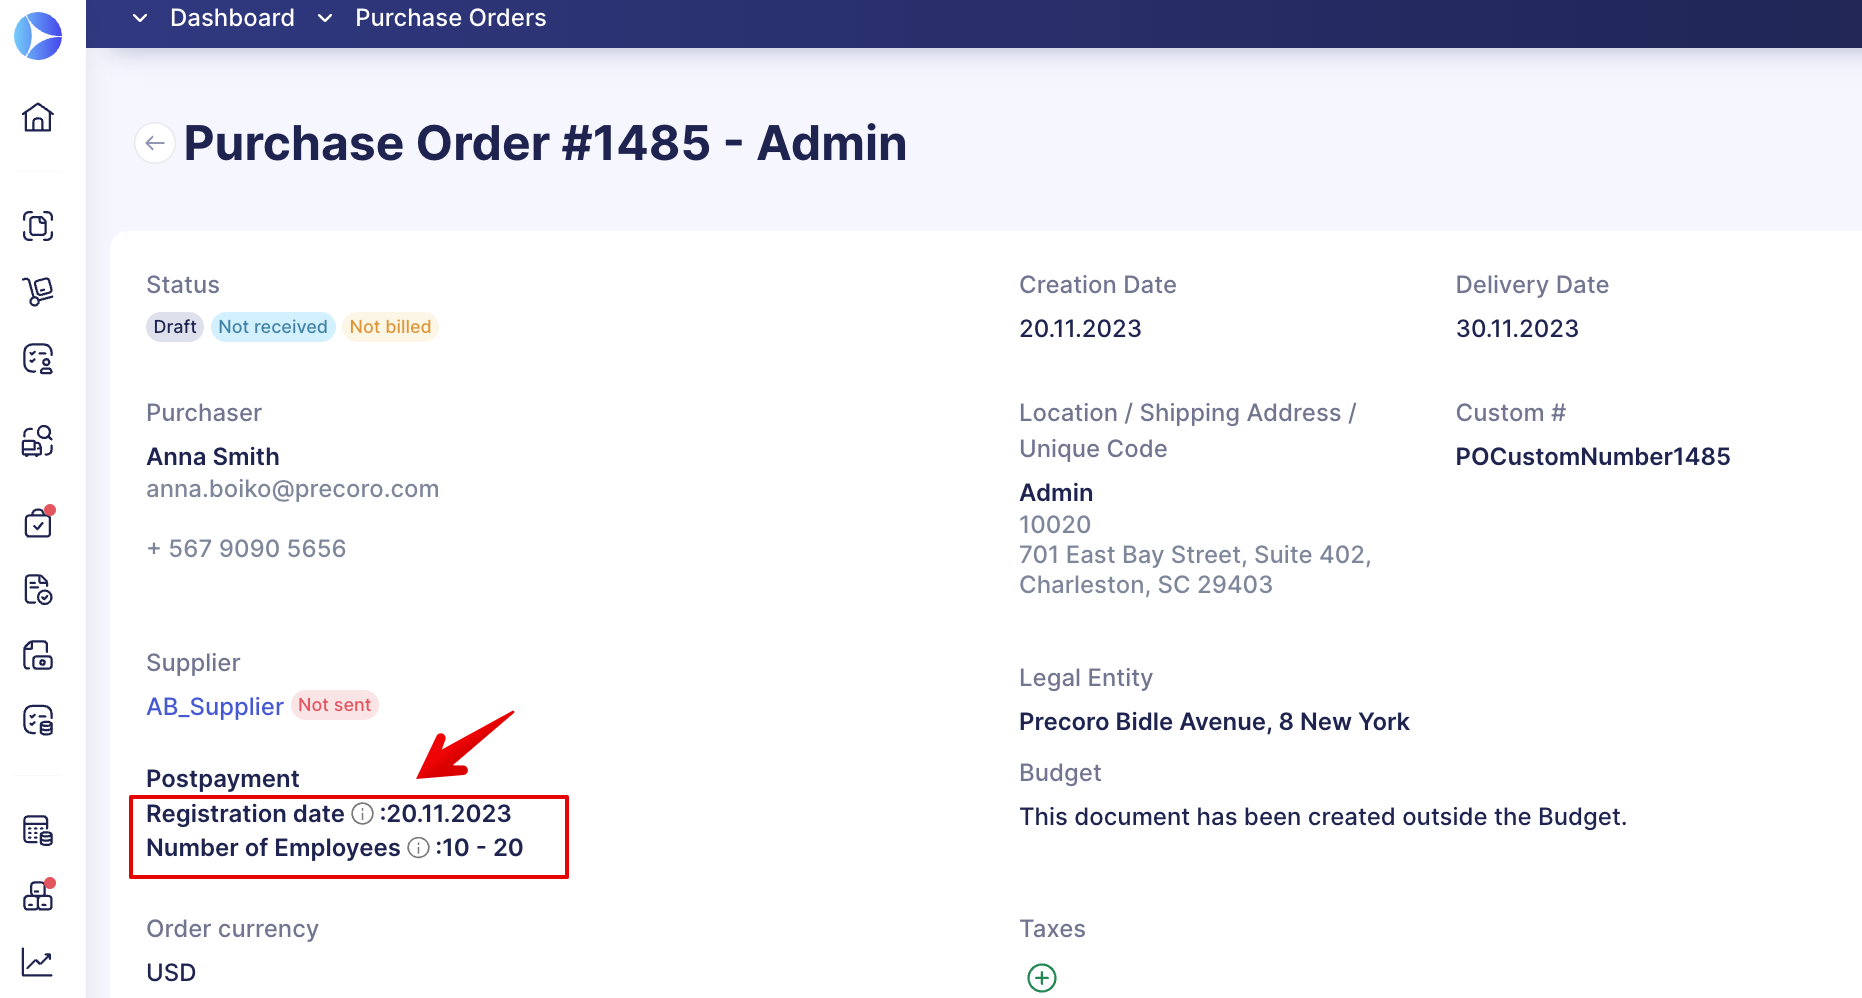
-
-
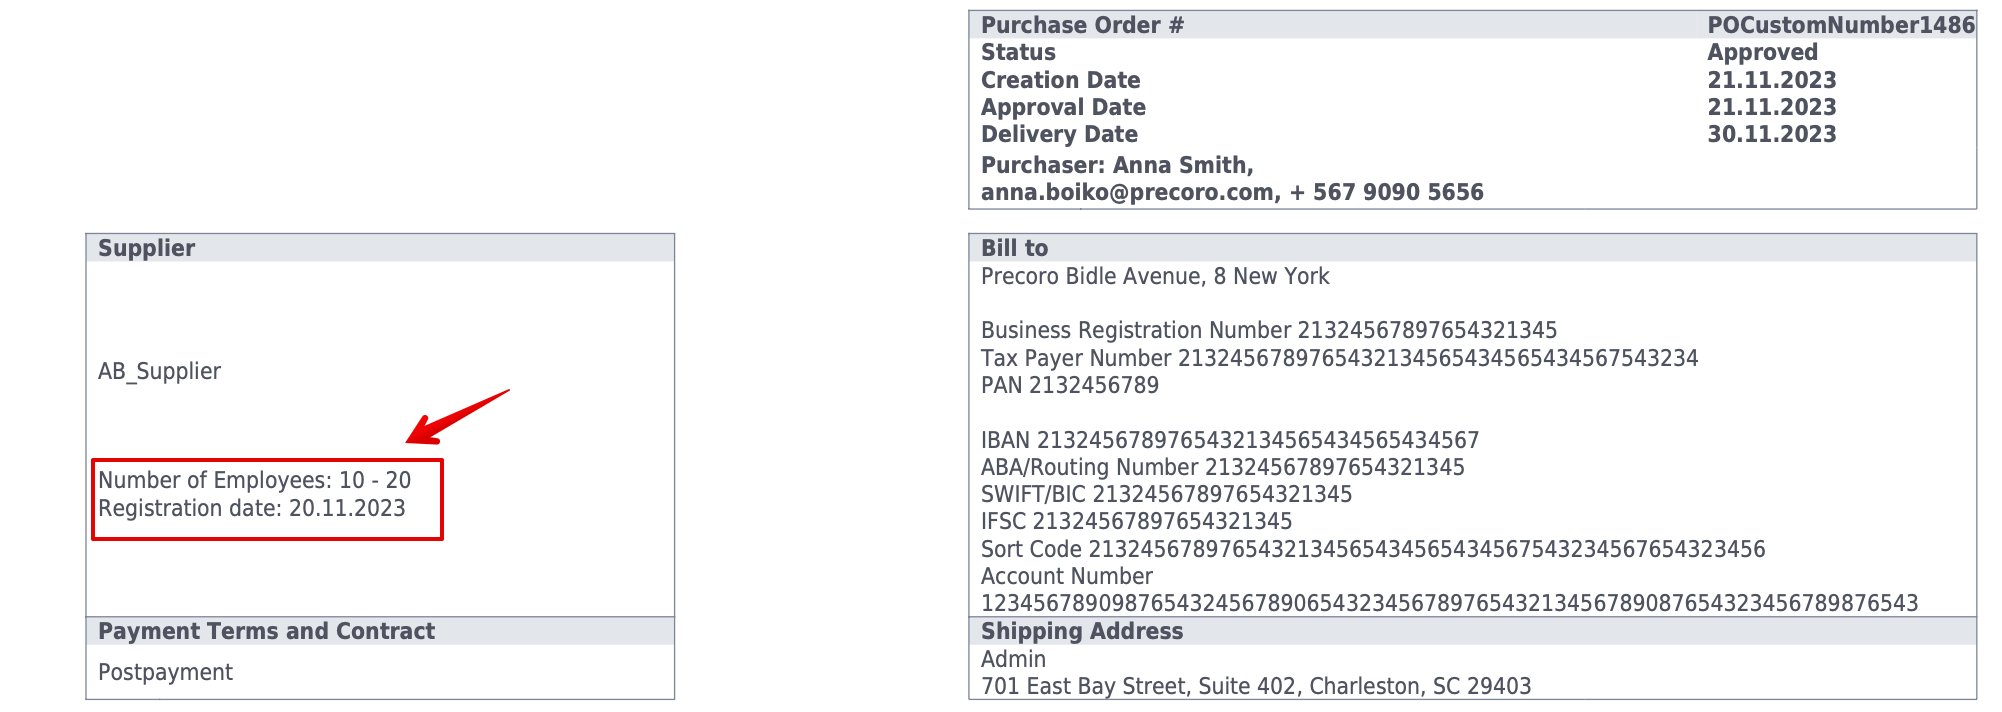
In the printed Purchase Order and Invoice documents:
-
- Supplier Registration Form
1. Go to the Supplier Registration Settings page and open the existing form in editing mode or create a new one.
2. Scroll down in the Registration Form Fields section, and in the Additional Fields container, you will find the Custom Fields. 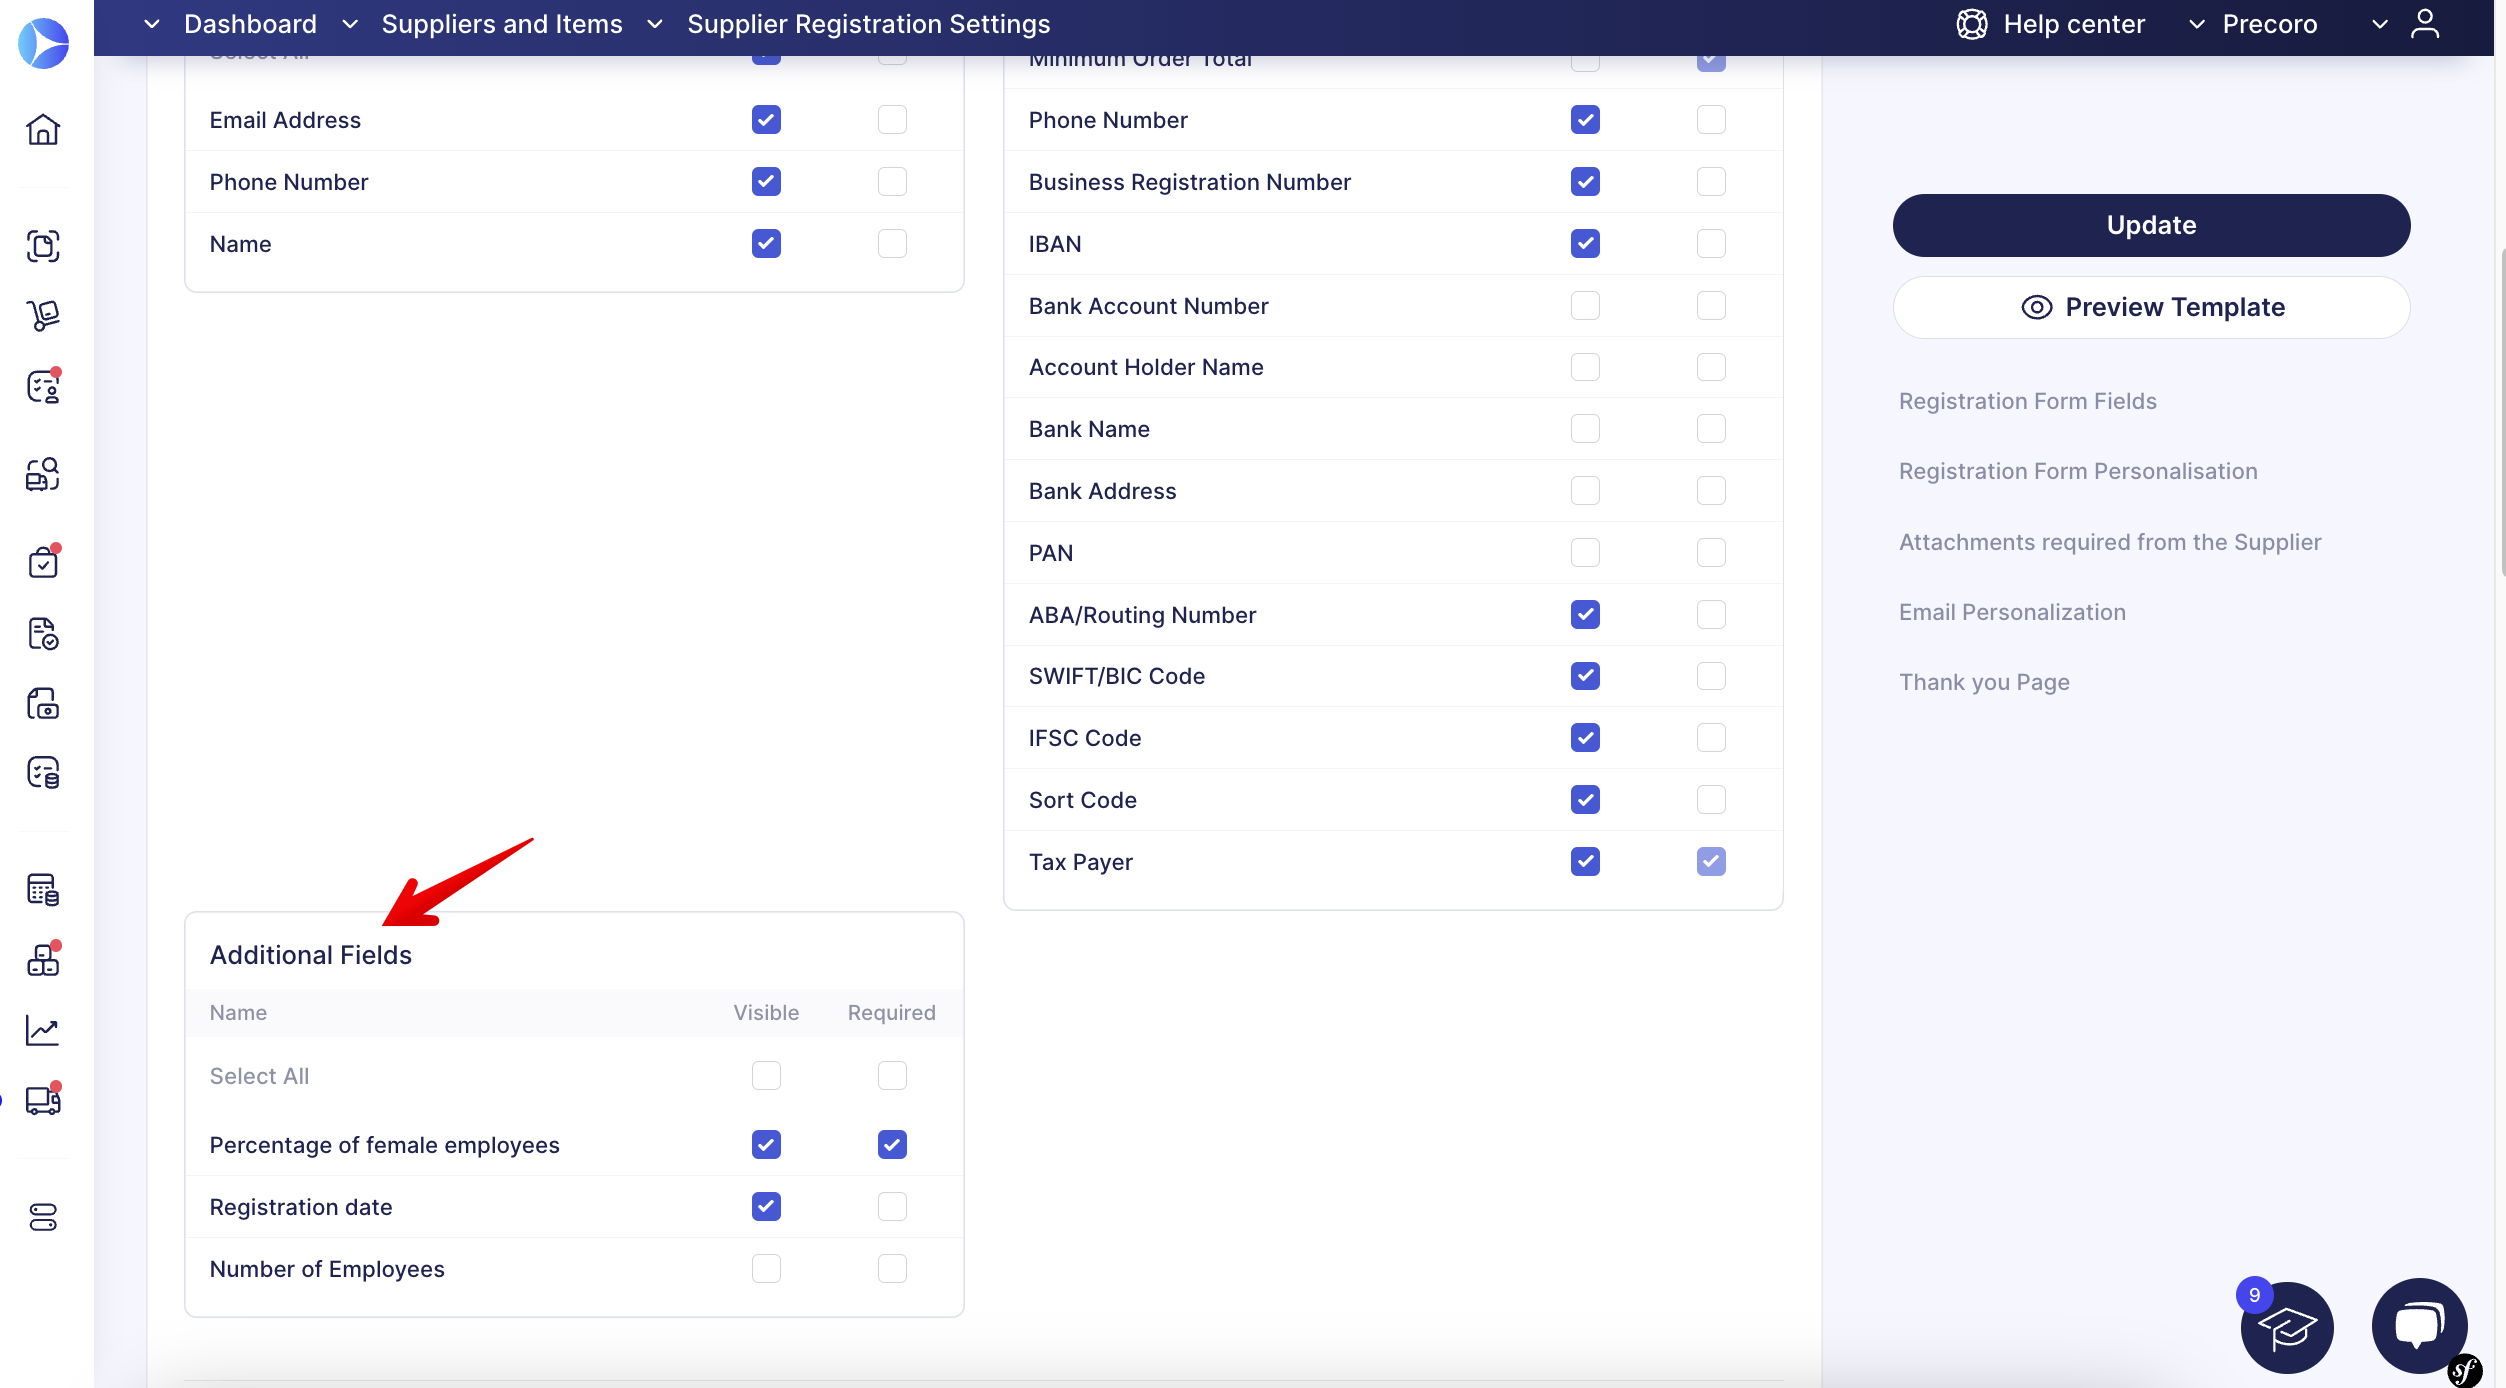
3. With checkmarks, select those fields you want the Supplier to see in the form and those required for filling out.
💡 Please note: Suppliers can only submit the registration form after filling out all the required fields.
Please visit the following article to learn more about working with Supplier Registration Form in Precoro.
After the Supplier receives and fills out the form, along with the custom field, you will see this information:
- Supplier Portal
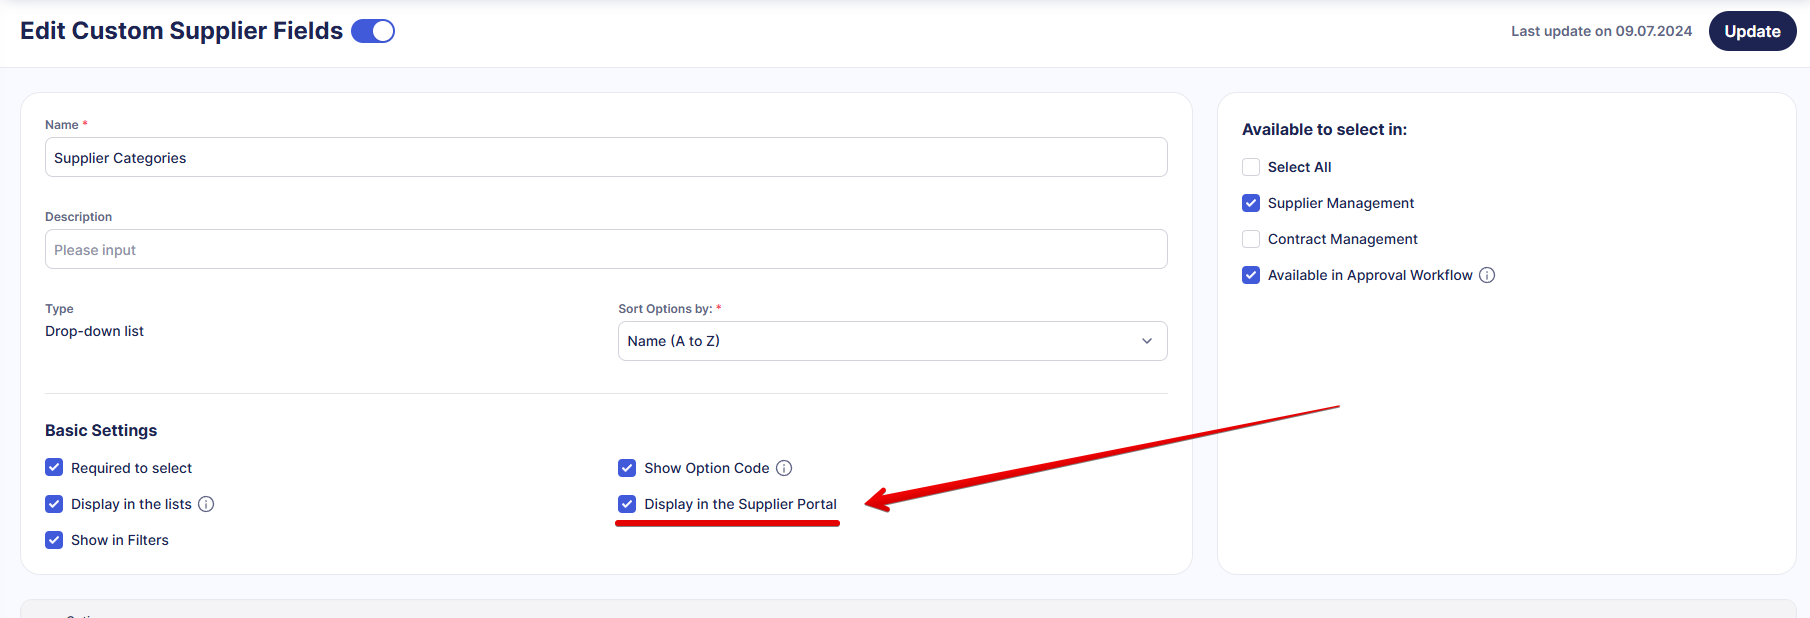
You can add the display of Custom Supplier Fields to the portal, allowing suppliers to fill in the data themselves and making the supplier management process more convenient and efficient. To activate this feature, please follow the steps below:
1. Proceed to Custom Supplier Fields → open the existing SCF option to edit or create a new one → activate the Display in the Supplier Portal setting and save the changes.
💡 Please note: The setting will only be displayed if the Supplier Portal functionality is enabled in the company.
2. There is a convenient and constant exchange of information between the two parties as these fields are still available for editing from the supplier and your side as well.
The changes will be transferred to their profile if the supplier adds any information to SCF in the portal. If you add new information about the supplier, it will also be uploaded to the portal for the supplier to see.
Create the Approval Workflow for Custom Supplier Fields
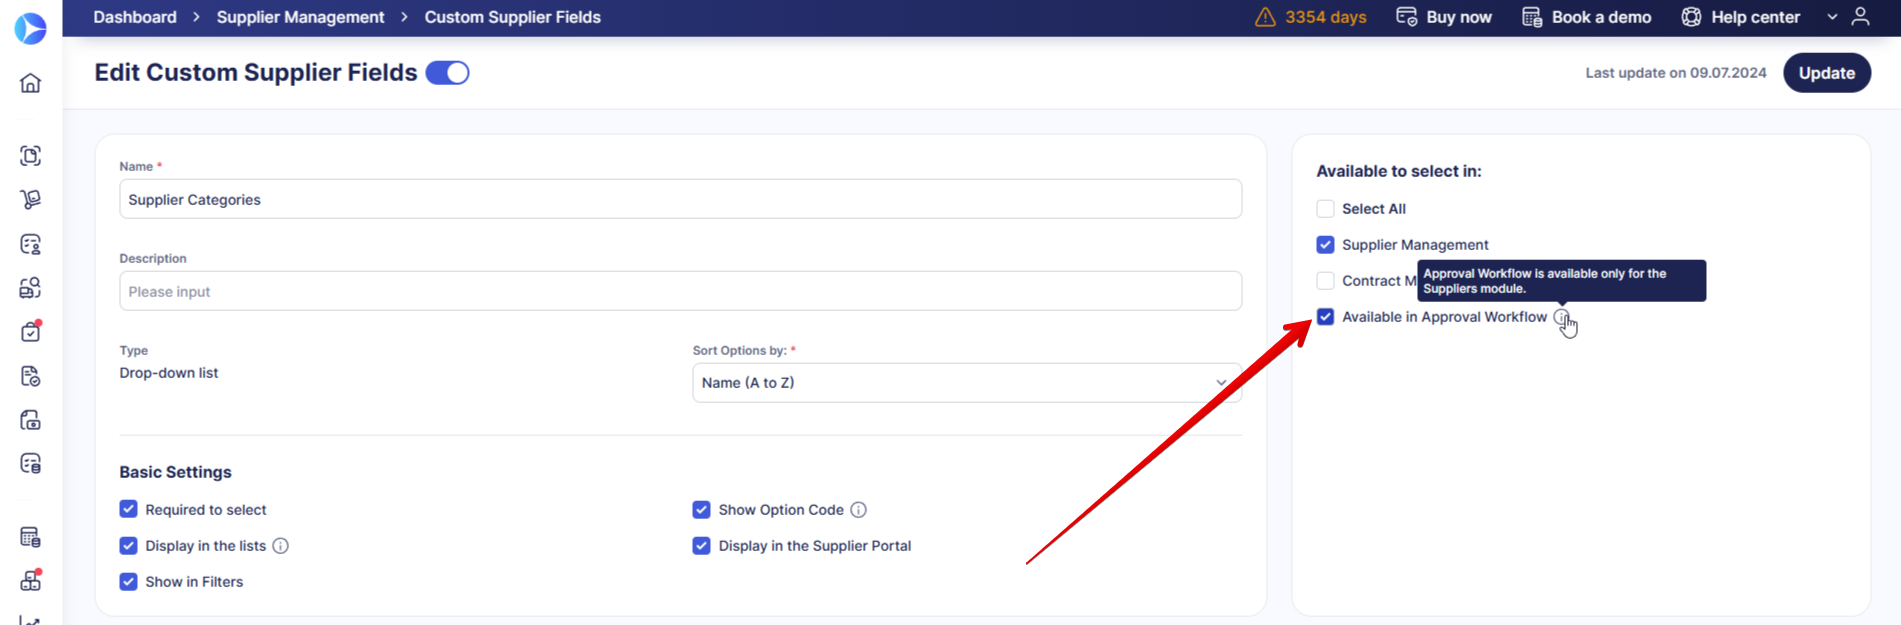
You can create the Approval Workflow for the SCF. Here is how the process works:
1. Go to Custom Supplier Fields and activate the Approval Workflow checkbox. In that case, this SCF will be added and available for the approver settings in the workflow. The type of the SCF must be a Drop-down list:
2. Open the Supplier Approval Workflow and grant users access to these fields. You can edit the current approver’s rights or add new ones, building a new workflow.
3. Now, when adding new Suppliers, they must undergo the Supplier Approval Workflow you have set. Please see the video below to learn more about its work.
Drop-down list fields support multi-select, and approvals will work as follows:
-
If one option is selected, users with access to it will be listed as approvers.
-
If several options are selected, only users with access to all of them will be listed as approvers.
-
If any selected option is not available to users, the workflow will not run.
💡 Please note: Ensure you have provided users with the necessary roles to be able to approve Suppliers.
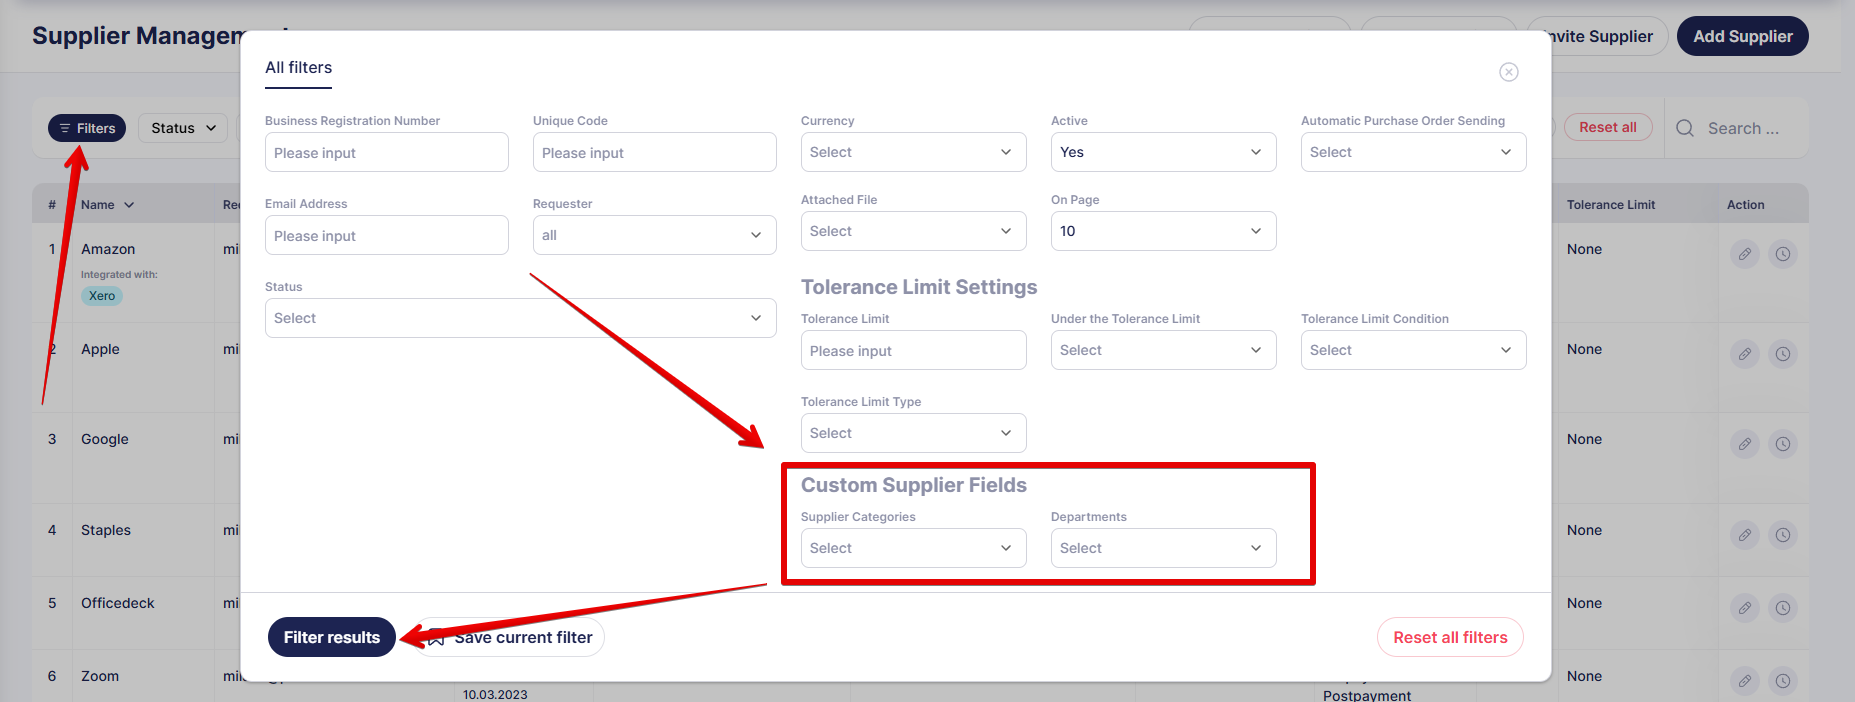
Manage Custom Supplier Fields with Filters
You can conveniently manage all the created Custom Fields using filters.
💡 Please note: If you have not activated the Show in Filters setting when creating the Custom Field, then it will not be displayed.
- On the Supplier Management page:
- In adding items from the Catalog to documents:
- In Requests for Proposals when adding suppliers to the document:
Analyze Custom Supplier Fields in Custom Reports
The created Custom Supplier Fields are available in the custom Reports for the following document types:
-
Purchase Order
-
Invoice
-
Receipt
-
Credit Note
-
Payment
-
Contract
In the Supplier Data module, you can add those fields to later be able to export them in Excel format and continue your work with them.