Optical Character Recognition (OCR) is a process that converts an image of text into a machine-readable format. For example, if you scan an invoice, your computer saves the scan as an image file. With the OCR, you can transform the image into data and create an Invoice in Precoro automatically or with some manual edits.
OCR feature can automate purchasing processes and allows you to:
- Get efficient document management sent to the AP inbox.
- Avoid manual data entry and subsequently save time.
- Reduce the number of manual errors.
In Precoro, you can use the OCR for standardized Invoice creation.
TABLE OF CONTENTS
- How to Set Up OCR in Precoro
- How to Process Attachments with OCR
-
How to Get the Updated Versions of the Document Creation Pages — BETA
-
Manage Documents on the AP Inbox Page with Infocards, Mass Actions, and Filters
- How to Add Credit Notes to An Invoice Through OCR
How to Set Up OCR in Precoro
To enable the OCR feature, please contact our Customer Success Team, who will provide you with all the necessary assistance.
Give your Users the Necessary Roles
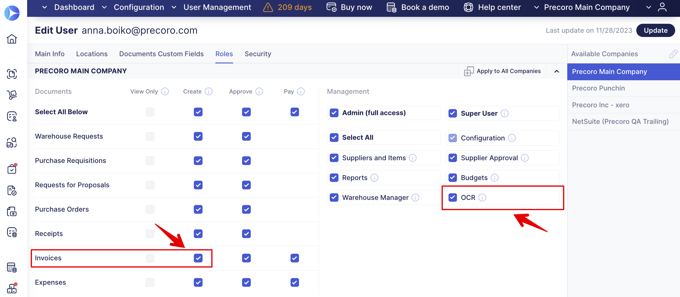
To be able to work with OCR functionality in Precoro, your users should have several Roles:
- Invoice Creator — the ability to create and edit Invoices.
- OCR — allowing the interactions with the AP inbox and operating with the recognized documents.
You can customize the settings listed below to automate your working process with the help of our Customer Success Manager:
- Inbox email for documents — this is the email where suppliers or clients send you the Invoice documents. Precoro takes those documents from the email, processes them, and adds them to your AP inbox, where you can continue working with them.
The first part of the email name up to the @email.precoro.com domain can be changed. If you want to change it, please contact our CS team.
Please note if you prefer not to utilize an email associated with the Precoro domain, you can establish an automated forwarding system from your inbox to a predefined AP (Accounts Payable) inbox.
The created email can then be shared with your suppliers.
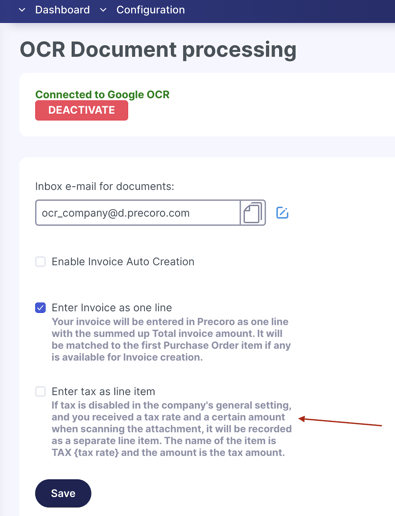
- Enable Invoice Auto Creation — activating this setting will allow you to set the initiator and select the Invoice type you want for automatic creation.
- Initiator of Auto-Created Invoices — the email of the person who will be set as an initiator of the Invoice in Precoro.
When selecting an Initiator please note the following:
- You can select users who do not have an OCR role as the Default Invoice Creators.
- In case the Purchase Order Purchaser is deactivated in the company or does not have access to the required Location, we will automatically assign the Invoice Issuer to be the Issuer of the Auto Created Invoices.
-
Select one of the Invoice Types for Auto Creation:
- Only Purchase Order (PO) based Invoices — invoices will be automatically created only if they match Purchase Order.
- PO-based Invoices and Standalone Invoices — all the invoices will be created automatically. The Invoice will be created as a PO-based Invoice if there is a match.
- Only Standalone Invoices — the invoice will be automatically created only if there are no POs for this case.
- Enter Invoice as one line — your Invoice will be entered in Precoro as one line with the summed-up Total invoice amount. It will be matched to the first Purchase Order item if any is available for Invoice creation.
- Enter Tax as a line item — that way, if taxes are turned off in your company’s Basic Settings, but the document includes the tax amount, it will be recorded as a separate line item. The created item’s name will be TAX {tax rate}, with the recorded tax amount indicated in the document.
Please note that this setting applies only to the document-level tax and not to the individual items.
To activate the setting, please contact our Support Team, and we will gladly assist you with that.
How to Process Attachments with OCR
To begin processing the Invoices, ensure the OCR is set up and your users have the necessary roles. If the OCR is set, you will see the new section in the right-side menu called AP Inbox, where you will be able to:
- Upload new attachments through Precoro.
- See the attachments from the email and their processing statuses.
- Create the Invoices based on the processed document.
Please note that OCR can only work with the following formats: pdf, jpeg, png, and tiff.
New documents can be added to the AP Inbox in these three ways:
1. Supplier or other user sends the Invoice to the Inbox email for documents provided by Precoro. The document will automatically be sent for recognition. In addition, you can track the document progress on the AP Inbox page by Statuses.
Use the Upload Through Email button at the top of an AP Inbox page. When clicked, the button provides you with general use information and the Email address you can copy and use to send your documents. In turn, Precoro will automatically scan and upload them as Drafts to the AP Inbox page so that you can conveniently continue working on them.

2. Manually upload the document directly through the AP Inbox page using the Upload Attachment button.
3. Manually upload documents directly through the Invoices page using the Create with OCR. Enter the required CFD information, add the attachment you want to get processed, and press the Create button below.
You can check the document queue and statuses by clicking the OCR Attachments button on the Invoices page top panel. You can also use the advanced set of filters on that page to quickly find the necessary information.
When working with the OCR feature you can resize the split screen with the attachment to your needs:
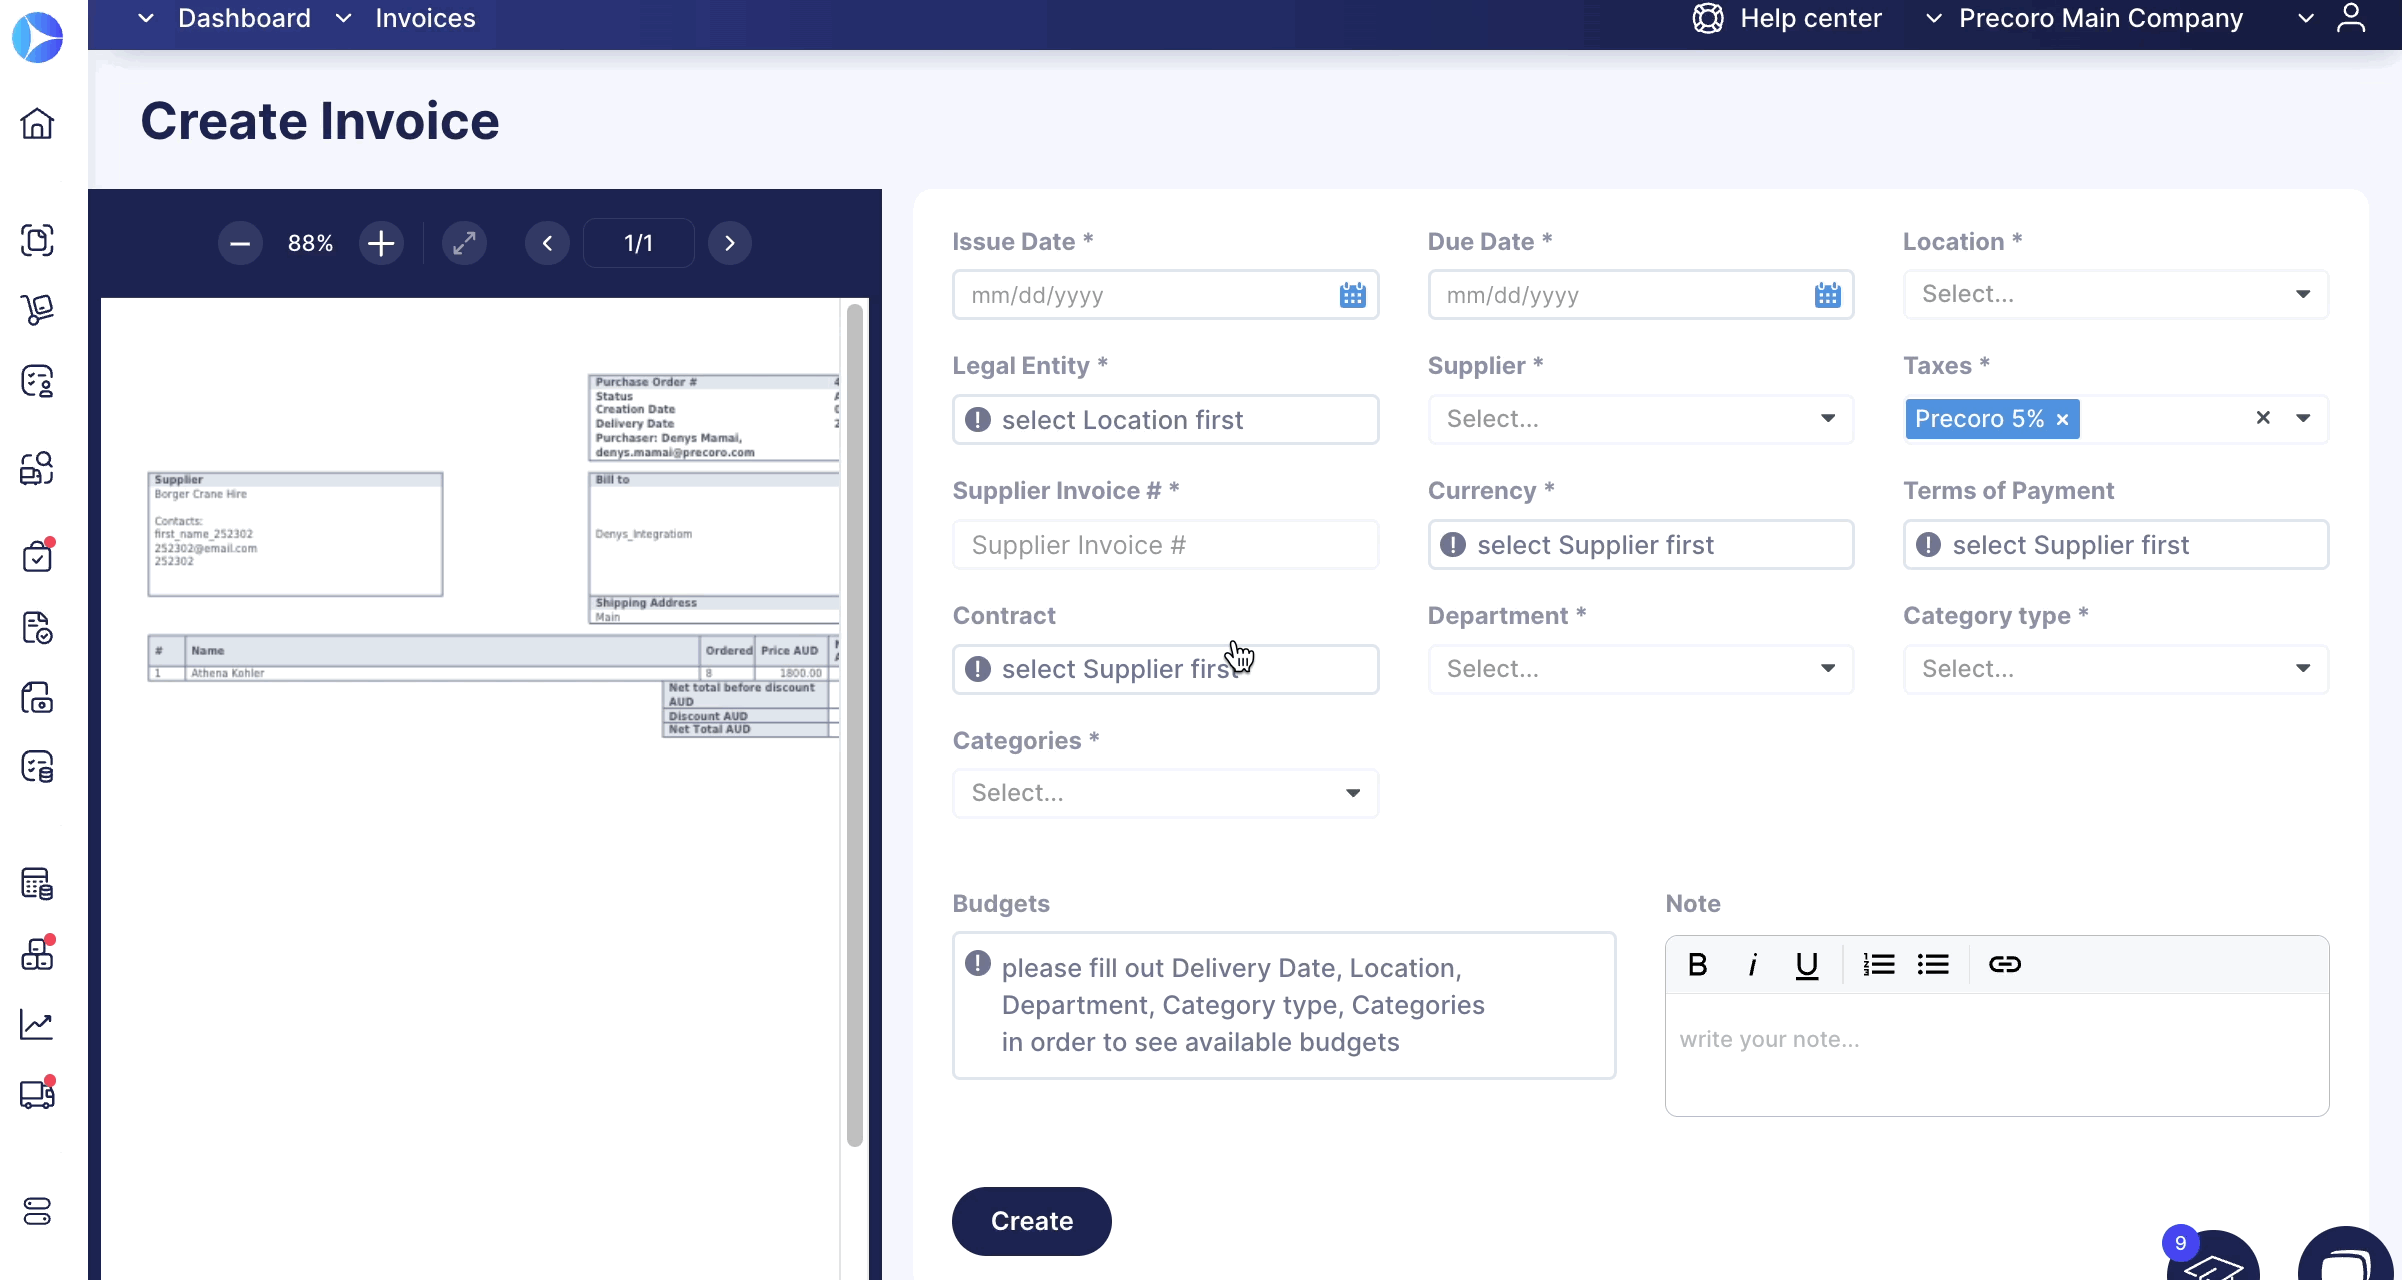
Additionally, you can select and copy the information you need directly from the file. This way, you will save time by manually entering the data and avoid manual input errors.
Recognizing Suppliers
When you add a new Supplier manually, through import, or by invitation form, the Enter Invoice as one line setting will be automatically activated for them if you have previously activated this setting in the OCR configuration.
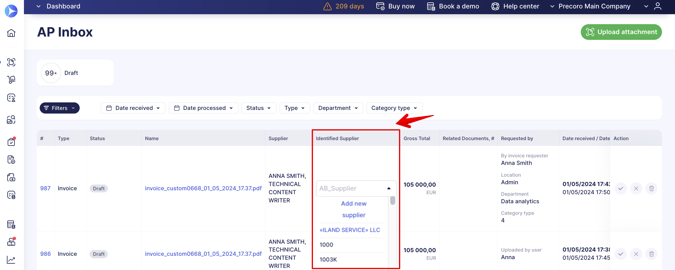
You can add a new Supplier through this field by clicking the corresponding button:
When requesting a new supplier, the supplier name will be automatically filled out by the OCR recognized value in the form. The auto fill-out is available on the:
- AP Inbox page.
- Invoice creation page.
- Invoice from PO creation page.
Processing Time
The processing time for your documents can vary depending on the OCR provider you select, ranging from as quick as 30 seconds to a maximum of two working days. Rest assured, we are diligently working on streamlining the process to automate your documents, aiming to make it as efficient and seamless as possible for you.
Adding the same document multiple times will simply queue them up, potentially prolonging the waiting time for processing.
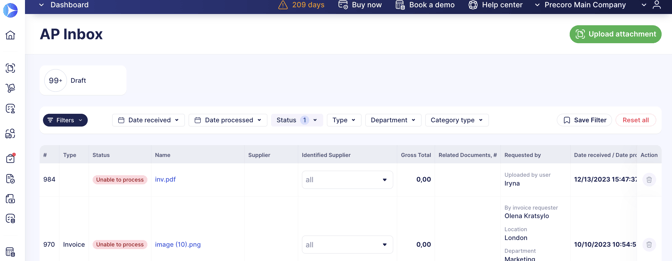
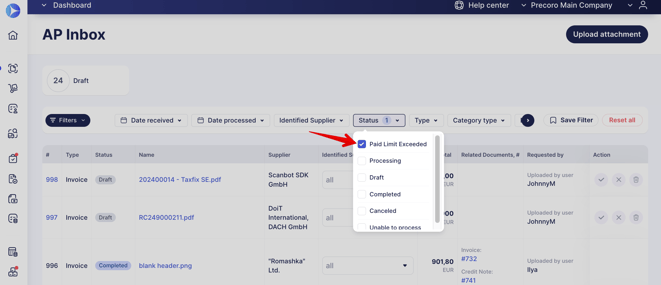
Statuses of the Processed Documents
You can always see the document progress guided by their Status:

- Processing — the file is being processed with OCR. It may take a couple of hours. At this stage, you can either Delete the attachment or Reject it. If you proceed with Rejection, the system will ask you to provide a comment stating the reason. After the Rejection, you can still find the document with the Canceled Status, whereas if you Delete it, the attachment will be removed completely.
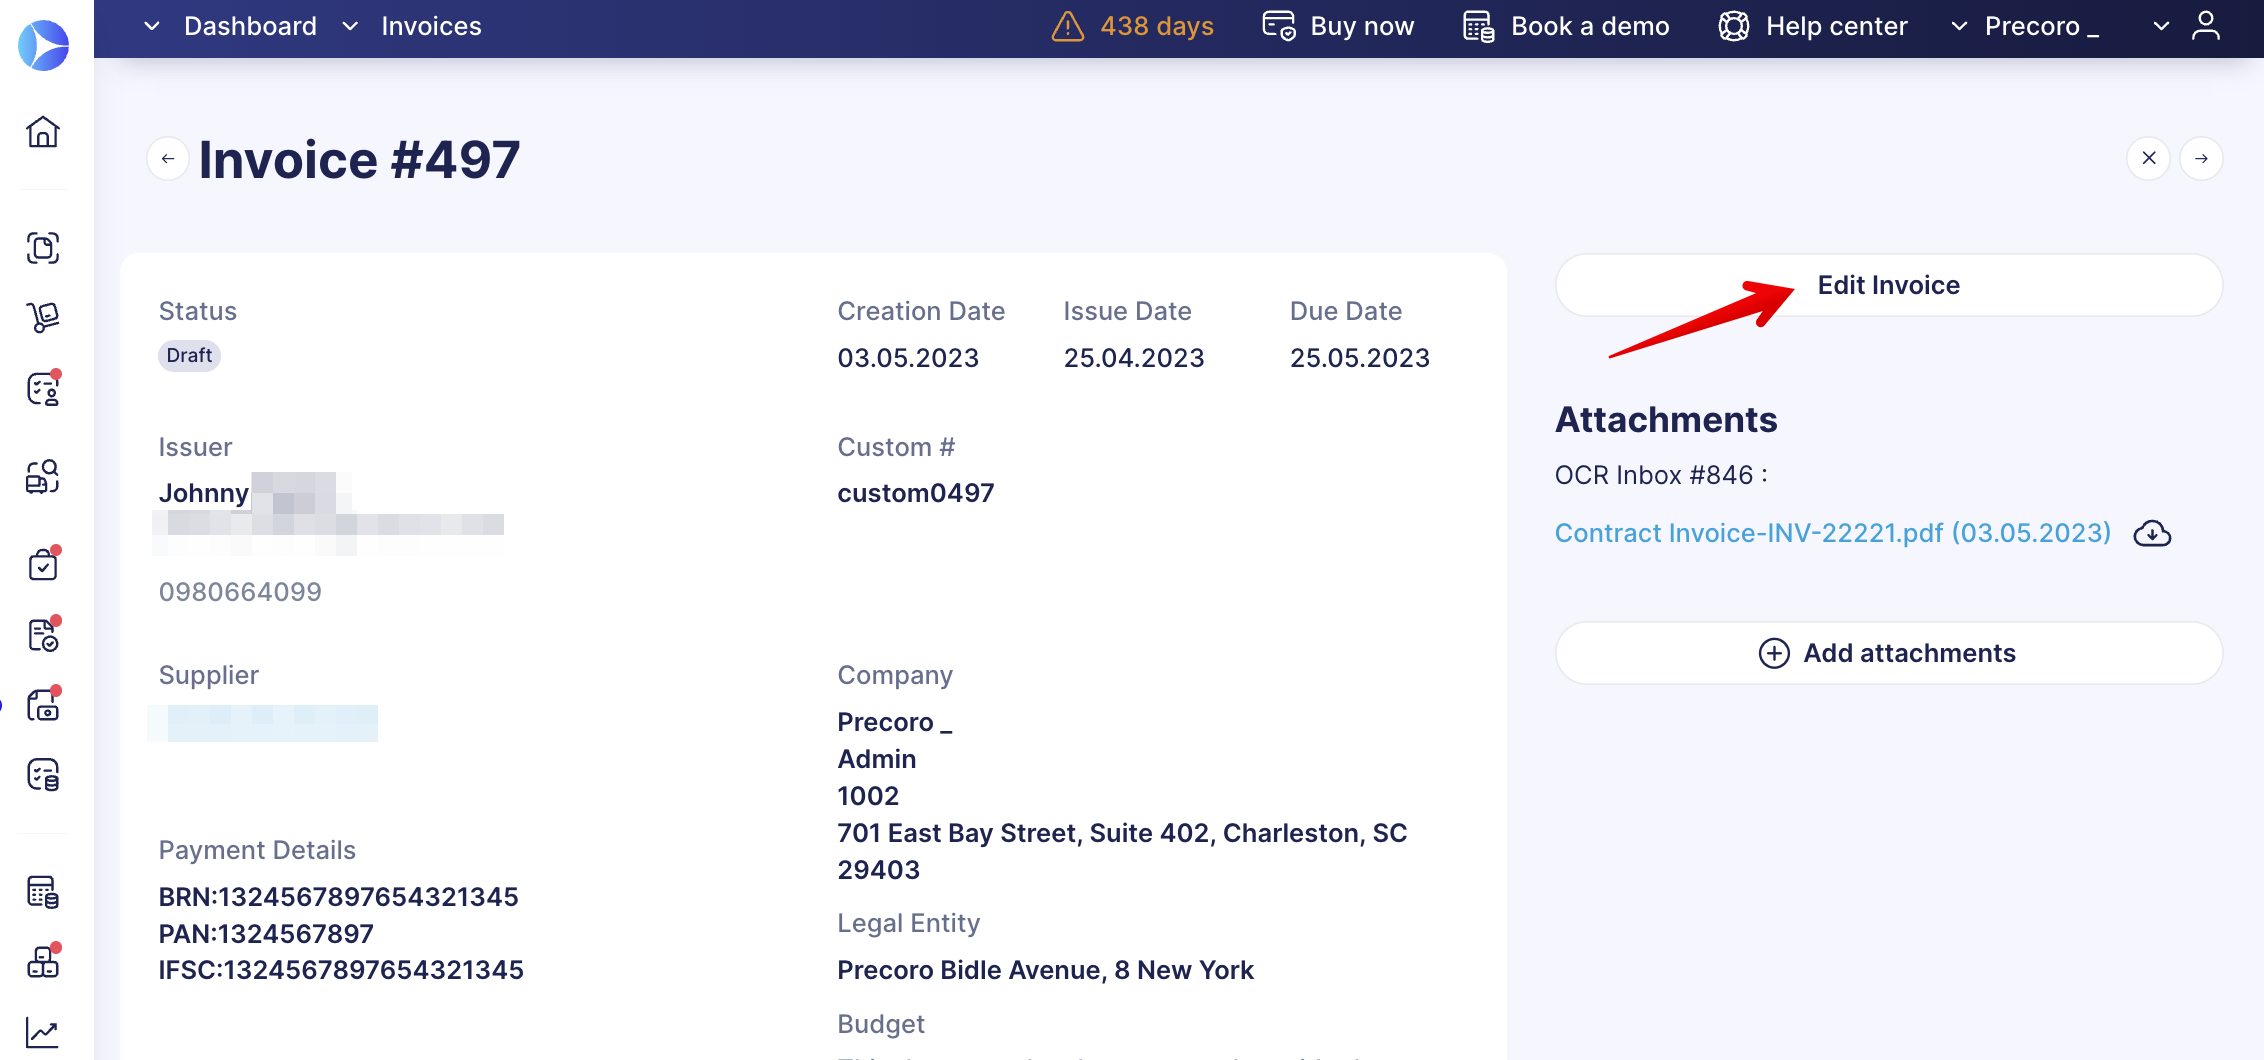
- Draft — the document has been processed and is ready for further work. Users will receive email notifications that the document is ready. At this stage, the user can:
- Create the Invoice or Invoice on PO documents.
- Reject the attachment, which will give it the Canceled Status.
- Delete the attachment completely.
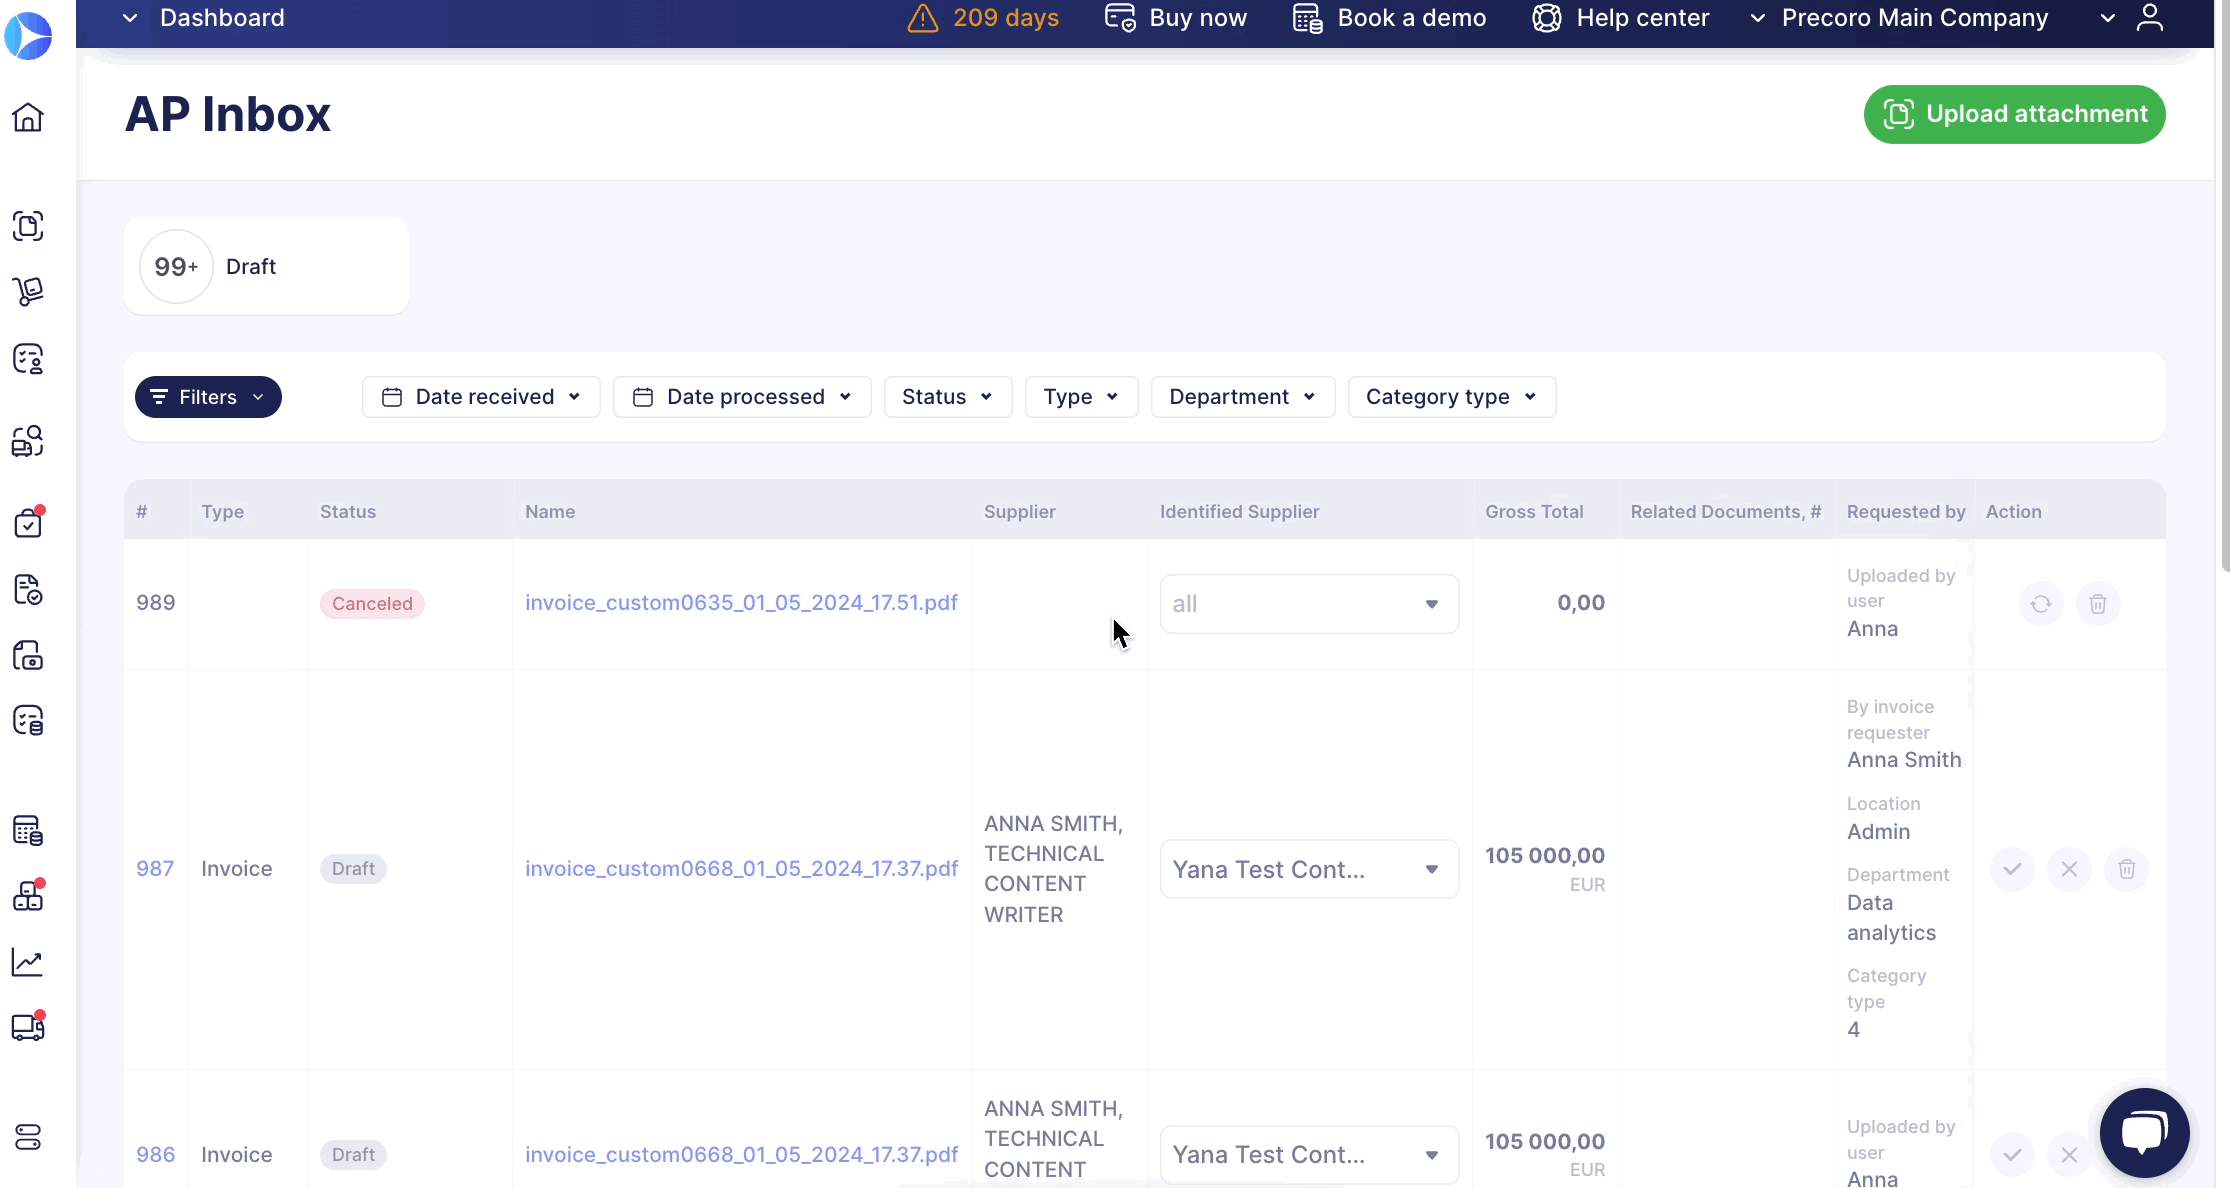
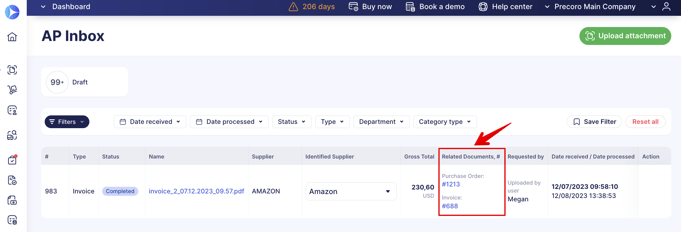
- Completed — the user has created either type of Invoice for the document. You can proceed to the Invoice by following the Related Documents # field link.
- Canceled — the user has canceled the document. At this stage, the user can still Resend the document for another OCR recognition or Delete the attachment.

When you hover over the Canceled status, you will see the first and last name of the user who has canceled it: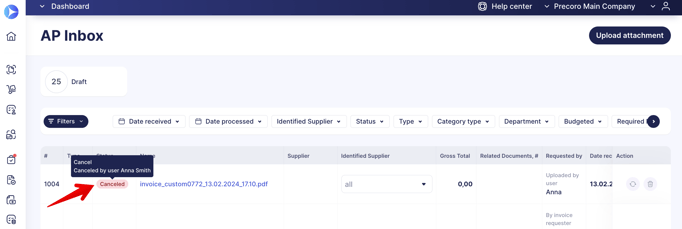
- Unable to process — there was a processing error when recognizing the document. Potentially, the error may occur due to duplicate values, password protection, damaged files, wrong format, and so on. The only action available for these documents is Deletion.
- Paid Limit Exceeded — this status means that you no longer have any paid documents for processing. To continue processing documents, please proceed to Billing and replenish your balance. If you do not have access to Billing, please contact your administrator.
How to create Invoices with Processed Documents
In the AP Inbox, when the document is in Draft Status, you can press the checkmark action button and select the type of Invoice you want:
- Create Invoice

1. Fill in the required Custom Fields for Documents that were not entered automatically and press Create.
2. Make sure to fill in the required Custom Fields for Items by Editing the Invoice:
- Create from PO
1. Select a Purchase Order from the list of existing ones for the new Invoice.
2. Check and fill in the required Custom Fields for Documents that were not entered automatically and press Create.
3. Make sure to fill in the required Custom Fields for Items by Editing the Invoice.
You can proceed to the Invoice and Purchase Order on the AP Inbox page by following the link in the Related Documents # field.
You can use the OCR functionality to recognize the Credit Note documents as well. See more information on this here.
Document’s Total Processing
Suppose the OCR provider does not recognize the Item Name in the document. In that case, Precoro will automatically create a system item Invoice {file name} and enter the price recognized by the OCR. Thus, even if the Name was not added, you will still see the Total amount displayed.
This functionality does not apply to invoices with a single line setting turned on.
Also, please note that if both the Name and Price are not recognized by the OCR provider, then such items will not be added.
Discount Processing
If your company had the discounts feature turned off in the settings, the OCR will still transfer the discount amount to the document during recognition, and the system will add the discount as a separate item line.
This functionality does not apply to invoices with a single line setting turned on.
Invoice Due Date Processing
Generally, in Precoro, the Invoice Due Date field will be automatically calculated and filled out based on the Invoice Issue Date, Supplier, and settings you selected in Payment Terms. It applies in both cases when you create a single Invoice or one that is based on a Purchase Order.
See how to Manage Payment Terms and set the needed rules and dates.
With OCR processing, the Invoice Due Date will be filled out based on the recognized value, but it can still be manually edited if needed.
If the Invoice Due Date value was not recognized, the field will be filled out according to the general Precoro logic described above.
How to Get the Updated Versions of the Document Creation Pages — BETA
We are thrilled to share the updated:
- Invoice from the PO version on the AP Inbox creation page. The improvements include:
- Added both fast and advanced filters that will simplify and expedite the search for needed documents.
- Ability to match and disconnect items with the ones in the related PO.
- A more user-friendly flow of adding items from the PO.
Please note that the new improvements are still in the BETA testing phase, and more enhancements are already planned and will be added in the future.
If you want to use the updated version of the page, please contact our Support Team, who will aid you with this.
Also, if you have activated the Invoice as a single-line functionality for your Supplier, you will not be able to match the items on the Invoice editing page.
- Updated Invoice version on the AP Inbox creation page:

Manage Documents on the AP Inbox Page with Infocards, Mass Actions, and Filters
You can manage your documents more efficiently with the infocard filters and the mass action buttons on the AP Inbox page.
You can use the following infocards:
- Draft — filters all the documents with the Draft status. The available mass action for the filtered results is Delete.
- Canceled — filters all the documents with the Canceled status. The available mass actions for the filtered results are Delete and Upload for rescanning, which will send all the selected attachments for repeated scanning.
Mass Process of Automatically Filling Out the Identified Supplier
We have simplified the process of updating supplier information in AP Inbox documents, particularly when the identified supplier for the document gets changed, and there are other documents in the Draft status with the same supplier name.
Please note that the Supplier column must be recognized and filled out to apply the functionality.

For example, if you upload ten documents and Precoro does not find a match among the existing ones, thus you manually select the needed one. In this case, the supplier can be automatically replaced with the one you have selected in the remaining nine documents. To make the change, you will need to confirm your action in the pop-up flash.
Also, you can automatically change the OCR-recognized supplier in multiple documents at once if needed for another one.
Location Auto Fill Out
We will process addresses from the Ship to Address fields in Invoices and link them to Location fields in Precoro. That is, the document Location will now be filled out based on the recognized address from the OCR and your Location selection in the document. Precoro will remember the choice, and the next time an Invoice with an identical address comes, the system will automatically fill out the Location.
How this process works:
1. After sending the document for recognition, Precoro will receive data from the Ship to Address field.
2. You proceed to create a new document. It can be a Standard Invoice, Invoice from PO, or Credit Note, and select the Location for the document manually (for the first time).
3. Precoro will remember your choice, and the next time an Invoice with an identical address comes, the system will automatically fill out the Location.
Please note the following:
- If you have changed a Location, the system will overwrite the selection for the subsequent documents.
- If the Ship to Address field has no corresponding value recorded in Precoro, the Location will be displayed blank.

Best Practice Use Cases for Matching Functionality
|
For Whom Will Be Useful |
Example of the Mapping Settings |
Usage Benefit |
|
Those who require the strict accuracy of amounts between the Invoice and the PO. |
|
Provides rigorous cost control and detailed expense tracking, which is crucial for staying within the project budgets. |
|
Those who require fast document creation and have an unchanging amount. |
|
If you are confident in the accuracy of your suppliers' documents, you can choose the selective mapping option. In that case, Precoro will promptly process and create a document. |
|
Those who have clearly defined Purchase Orders and suppliers deliver them according to the set requirements. |
|
Allows you to quickly create a document without additional validations. |
|
Small companies with a moderate number of suppliers. |
|
This setup simplifies compliance checks and ensures Invoices accurately reflect Purchase Orders, which is vital for maintaining budget controls and supplier relationships. |
|
Large corporations with high accuracy requirements. |
|
Ensures high accuracy and compliance during audits, reducing the risk of financial discrepancies and promoting transparency. Although, with all the rules in place there is a higher possibility of more manual work needed. |
|
For companies that have stable commodity prices and a significant item catalog. |
|
Helps provide procurement accuracy. |
|
Standard orders in medium-sized companies. |
|
When the amount and number of items do not change, but there may be differences in product names. |
Invoice Matching Process
Precoro automatically matches documents with existing Purchase Orders to speed up the document processing. This functionality will work for the following:
-
Standard Purchase Order.
-
Blanket Purchase Order Per Total.
-
Blanket Purchase Order Per Item.
-
Service Order.
Please note If the PO number matches both the standard PO and the Blanket one, the Invoice will be created and recorded in the standard one.
We have rules that determine whether documents match. For example, we compare the SKU or the Item code to make sure that this Invoice, in fact, corresponds to the previously created Purchase Order. The system will create a standalone Invoice without a related Purchase Order if the parameters do not match. Items from Invoices that have been matched will affect the budget and be displayed within the budgeting information.
The rules below demonstrate the current matching process:
- SKU or Code Matching: The SKU or code on the invoice line is compared with the SKU or code on the corresponding PO line.
- Name or Description Matching: The name or description on the invoice line is compared with the name or description on the corresponding PO line.
- Rate Matching: The rate specified on the invoice line matches the price specified on the corresponding PO line.
- Amount Matching (Net Total): The amount on the invoice line is compared with the net total amount on the corresponding PO line.
- Amount Matching (Gross Total): The amount on the invoice line is compared with the gross total amount on the corresponding PO line.
- Total Invoice Amount Matching: The total amount on the Invoice is compared with the gross total amount on the PO.
- Line Count Matching: The number of lines on the Invoice should match the number on the PO.
If the system fails to recognize the Supplier, Tax Rate, and Location initially, once you input this information manually, it will remember your choice and apply it for future use.
You can also select the needed type of Invoice to Order Mapping Rules:
- Selective Mapping — documents must match at least one of the set rules.
-
Complete Mapping — documents must fully comply with all the set rules without exception.
Please note that the Invoice to Order Mapping Rules are only available if you have previously selected the PO-based Invoices in the Invoice Type for Auto Creation field.
To apply the settings, please contact our Support Team, who will gladly help you with the configurations.

Additional Matching Rules
We have added more matching rules for Invoices to Purchase Order documents with OCR to increase the number of documents created automatically.
Here is the list of new matching rules that you can additionally select for your OCR processing:
-
Invoice line SKU or code matched to the PO line SKU.
-
Invoice line Name or Description matched to the PO line Name.
-
Invoice line rate matched to the PO line Price.
-
Invoice line amount matched to the PO line Net Total.
-
Invoice line amount matched to the PO line Gross Total.
-
Invoice amount matched to the PO Gross Total.
-
Count of the Invoice lines should match the PO line count.
These are the default matching rules that are automatically selected and cannot be deleted:
-
PO number on the Invoice matched to the PO IDN or custom number.
-
Invoice match to the PO if there is only one PO available.
You can select additional matching rules only after activating the automatic Invoice processing.
To adopt the new rules, please contact our Support Team, who will gladly help with the settings.
Managing Taxes in OCR-Recognized Documents
You can add Taxes directly through the document without having to go to the settings, add a new tax, and then return to the document to apply the newly created tax. This shortcut tax creation process will reduce the time spent processing documents in your AP Inbox.
To add the new tax through the document:
1. Click the Taxes field and press the Add New Tax button on top of the drop-down list of options.
2. Enter the needed Tax information and press the Save button below.
More information on creating Taxes in Precoro can be found in this article.
3. Now, you can see the added option available for selection in the list.
Another OCR feature, with regard to Taxes, is the automatic fill-out of the Tax Rate field in the document. We will map the tax values recognized by OCR with your existing Rates and record this data in your document. This process will speed up document autocomplete and help reduce manual errors.
Additionally, the default Tax you have set for the Supplier will be recorded in the OCR-recognized Standard, Service, Blanket PO per Item and Total type of documents:
How to Add Credit Notes to An Invoice Through OCR
You can add Credit Notes to the Invoice with OCR.
You can also add more than one CN to the document. This functionality can be really useful when one Credit Note does not cover the Invoice Total, and you need to add another to cover the difference. When adding multiple CNs, please note:
- You can only keep adding other documents from the AP Inbox list to the Invoice, not the same one.
- To be able to use this functionality, your Invoice must have more than one item in it. Otherwise, you cannot add more Credit Notes to it. The system only allows one Credit Note per item, regardless of whether it is fully or partially paid.
Follow the steps below to add a Credit Note document for your Invoice:
1. Proceed to the AP Inbox page, select the needed document from the list, and press the Create Document action button.
2. Select the Credit Note type and go on to select the Invoice. Please note that you can additionally see the Custom Fields for Items from Invoice when you create a Credit Note with OCR. This way, you will have more complete information to help you keep track of the needed data and save time.
3. Select the item for which you wish to create a Credit Note, fill out the needed information, and Confirm it.
That is it the Credit Note has been added!
If you wish to add several CNs to the document, please follow the two additional steps below:
- Go to the AP Inbox page, select another document from the list, and press the action button to create another Credit Note document.
- In the Select the Invoice list, you will see the previous Invoice, where you can still add the new Credit Note for the item left.
We have been gradually improving the design and outlay of the document creation pages with OCR, and today, we are thrilled to announce the enhancement of the Credit Note creation page.
This functionality is in BETA testing mode. To view the new design, contact our Support Team, who will activate it for you.
Manage OCR Email Flow
You can manage the OCR email flow by turning on or off the inbox notifications regarding the attachment processing status. The settings to manage those letters can be found in the Email Preferences → MISC → Document has been processed with OCR checkbox.
Also, you can track all the documents that were unprocessed for one of the reasons listed below. You can activate this notification in Email Preferences → Misc → Notification with the List of OCR Unprocessed Documents:
With this option activated, users with OCR Roles will receive emails once a week with the list of all the OCR unprocessed documents from Precoro.
Please consider the reasons why the attachment might not get processed:
1. Check that the document type sent is an Invoice.
2. Ensure your document format is either pdf, jpeg, png, or tiff.
3. Make sure the document is not password-protected or encrypted.