TABLE OF CONTENTS
- How to Set Up Purchase Orders Integration
- How to Send Pending Purchase Orders to NetSuite
- Integrated Fields and Their Synchronization Method
- How the Items Mapping Works
- Custom Fields for Documents and Items Integration
- Character Limits for Purchase Orders Fields in NetSuite
- FAQs
How to Set Up Purchase Orders Integration
To set up the Purchase Orders integration:
- In Precoro, go to Configuration → Integrations.
- Locate NetSuite integration card → click the Update Settings button.
- In the Documents to Send field, select the Approved Purchase Orders option.
- Click Save to record the changes.
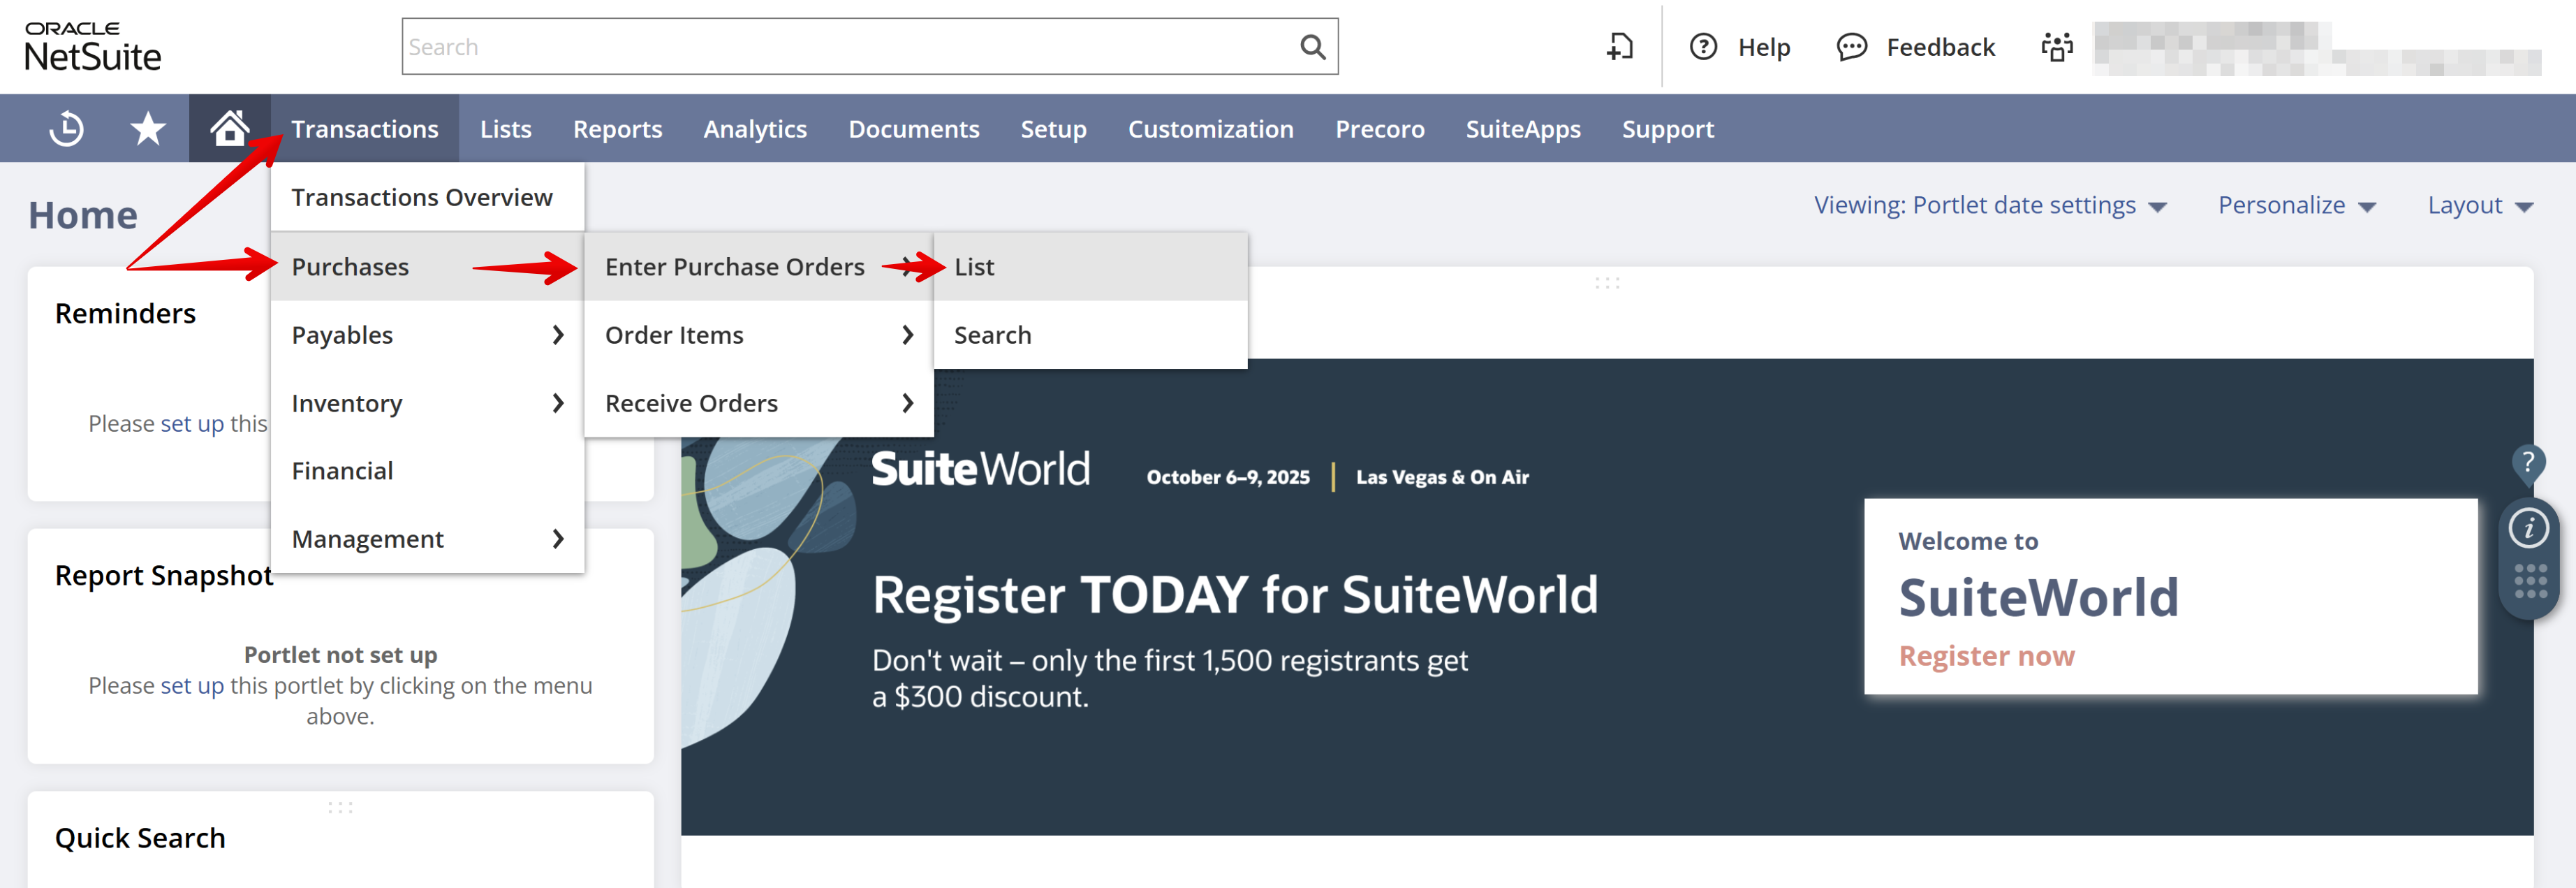
The Purchase Orders in NetSuite will be integrated into the Transactions → Purchases → Enter Purchase Orders → List section.
How to Send Pending Purchase Orders to NetSuite
To enable sending POs in the Pending status to NetSuite, please contact our Support Team.
Once the feature is activated, it will be available for users with the Create and Approve Purchase Orders roles.
When the document acquires the Approved status, the current system logic will work out, and the document will be sent to NetSuite automatically.
Integrated Fields and Their Synchronization Method
The integration uses one-way synchronization, therefore:
- Documents created in Precoro will be transferred to NetSuite.
- Documents created in NetSuite will not be sent to Precoro.
Here’s how the data mapping works:
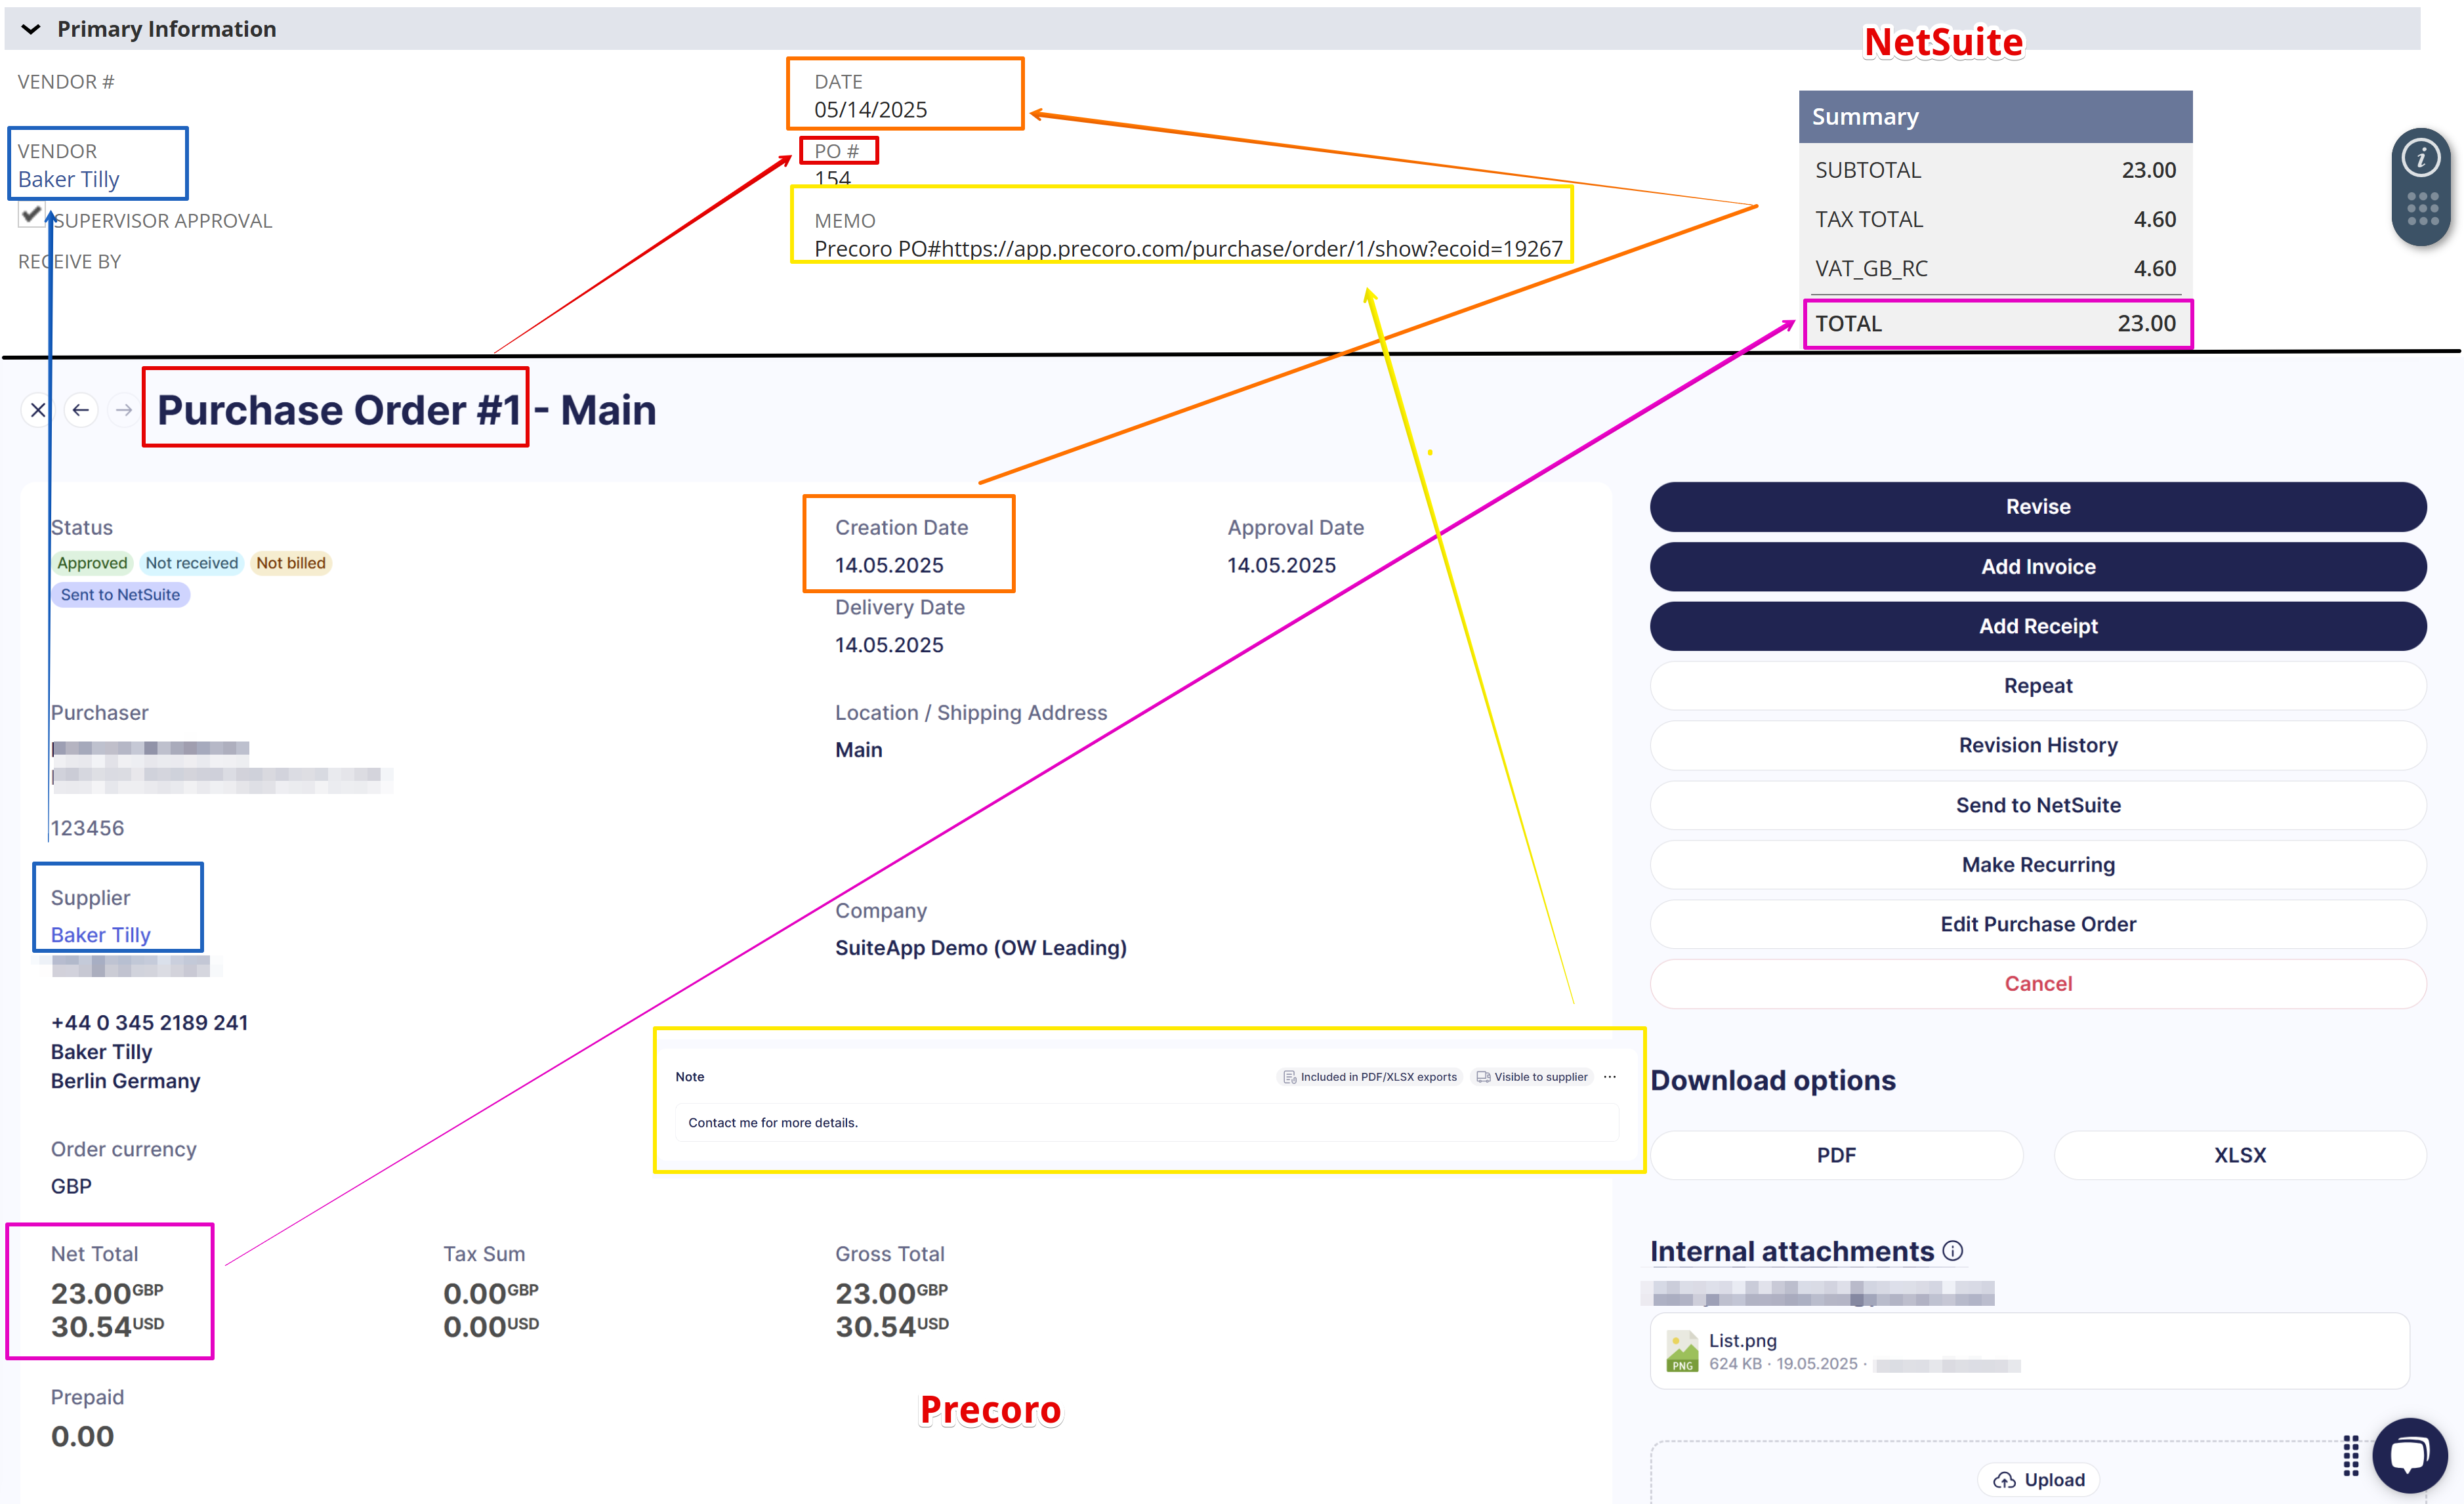
Primary Information Mapping
| Field in Precoro | Field in NetSuite |
| Purchase Order # | PO # |
| Supplier | Vendor |
| Creation Date | Date |
| Delivery Date | Receive By |
| Net Total | Total |
| Note | Memo (integrated with the text and direct link to the PO) |
 |
|
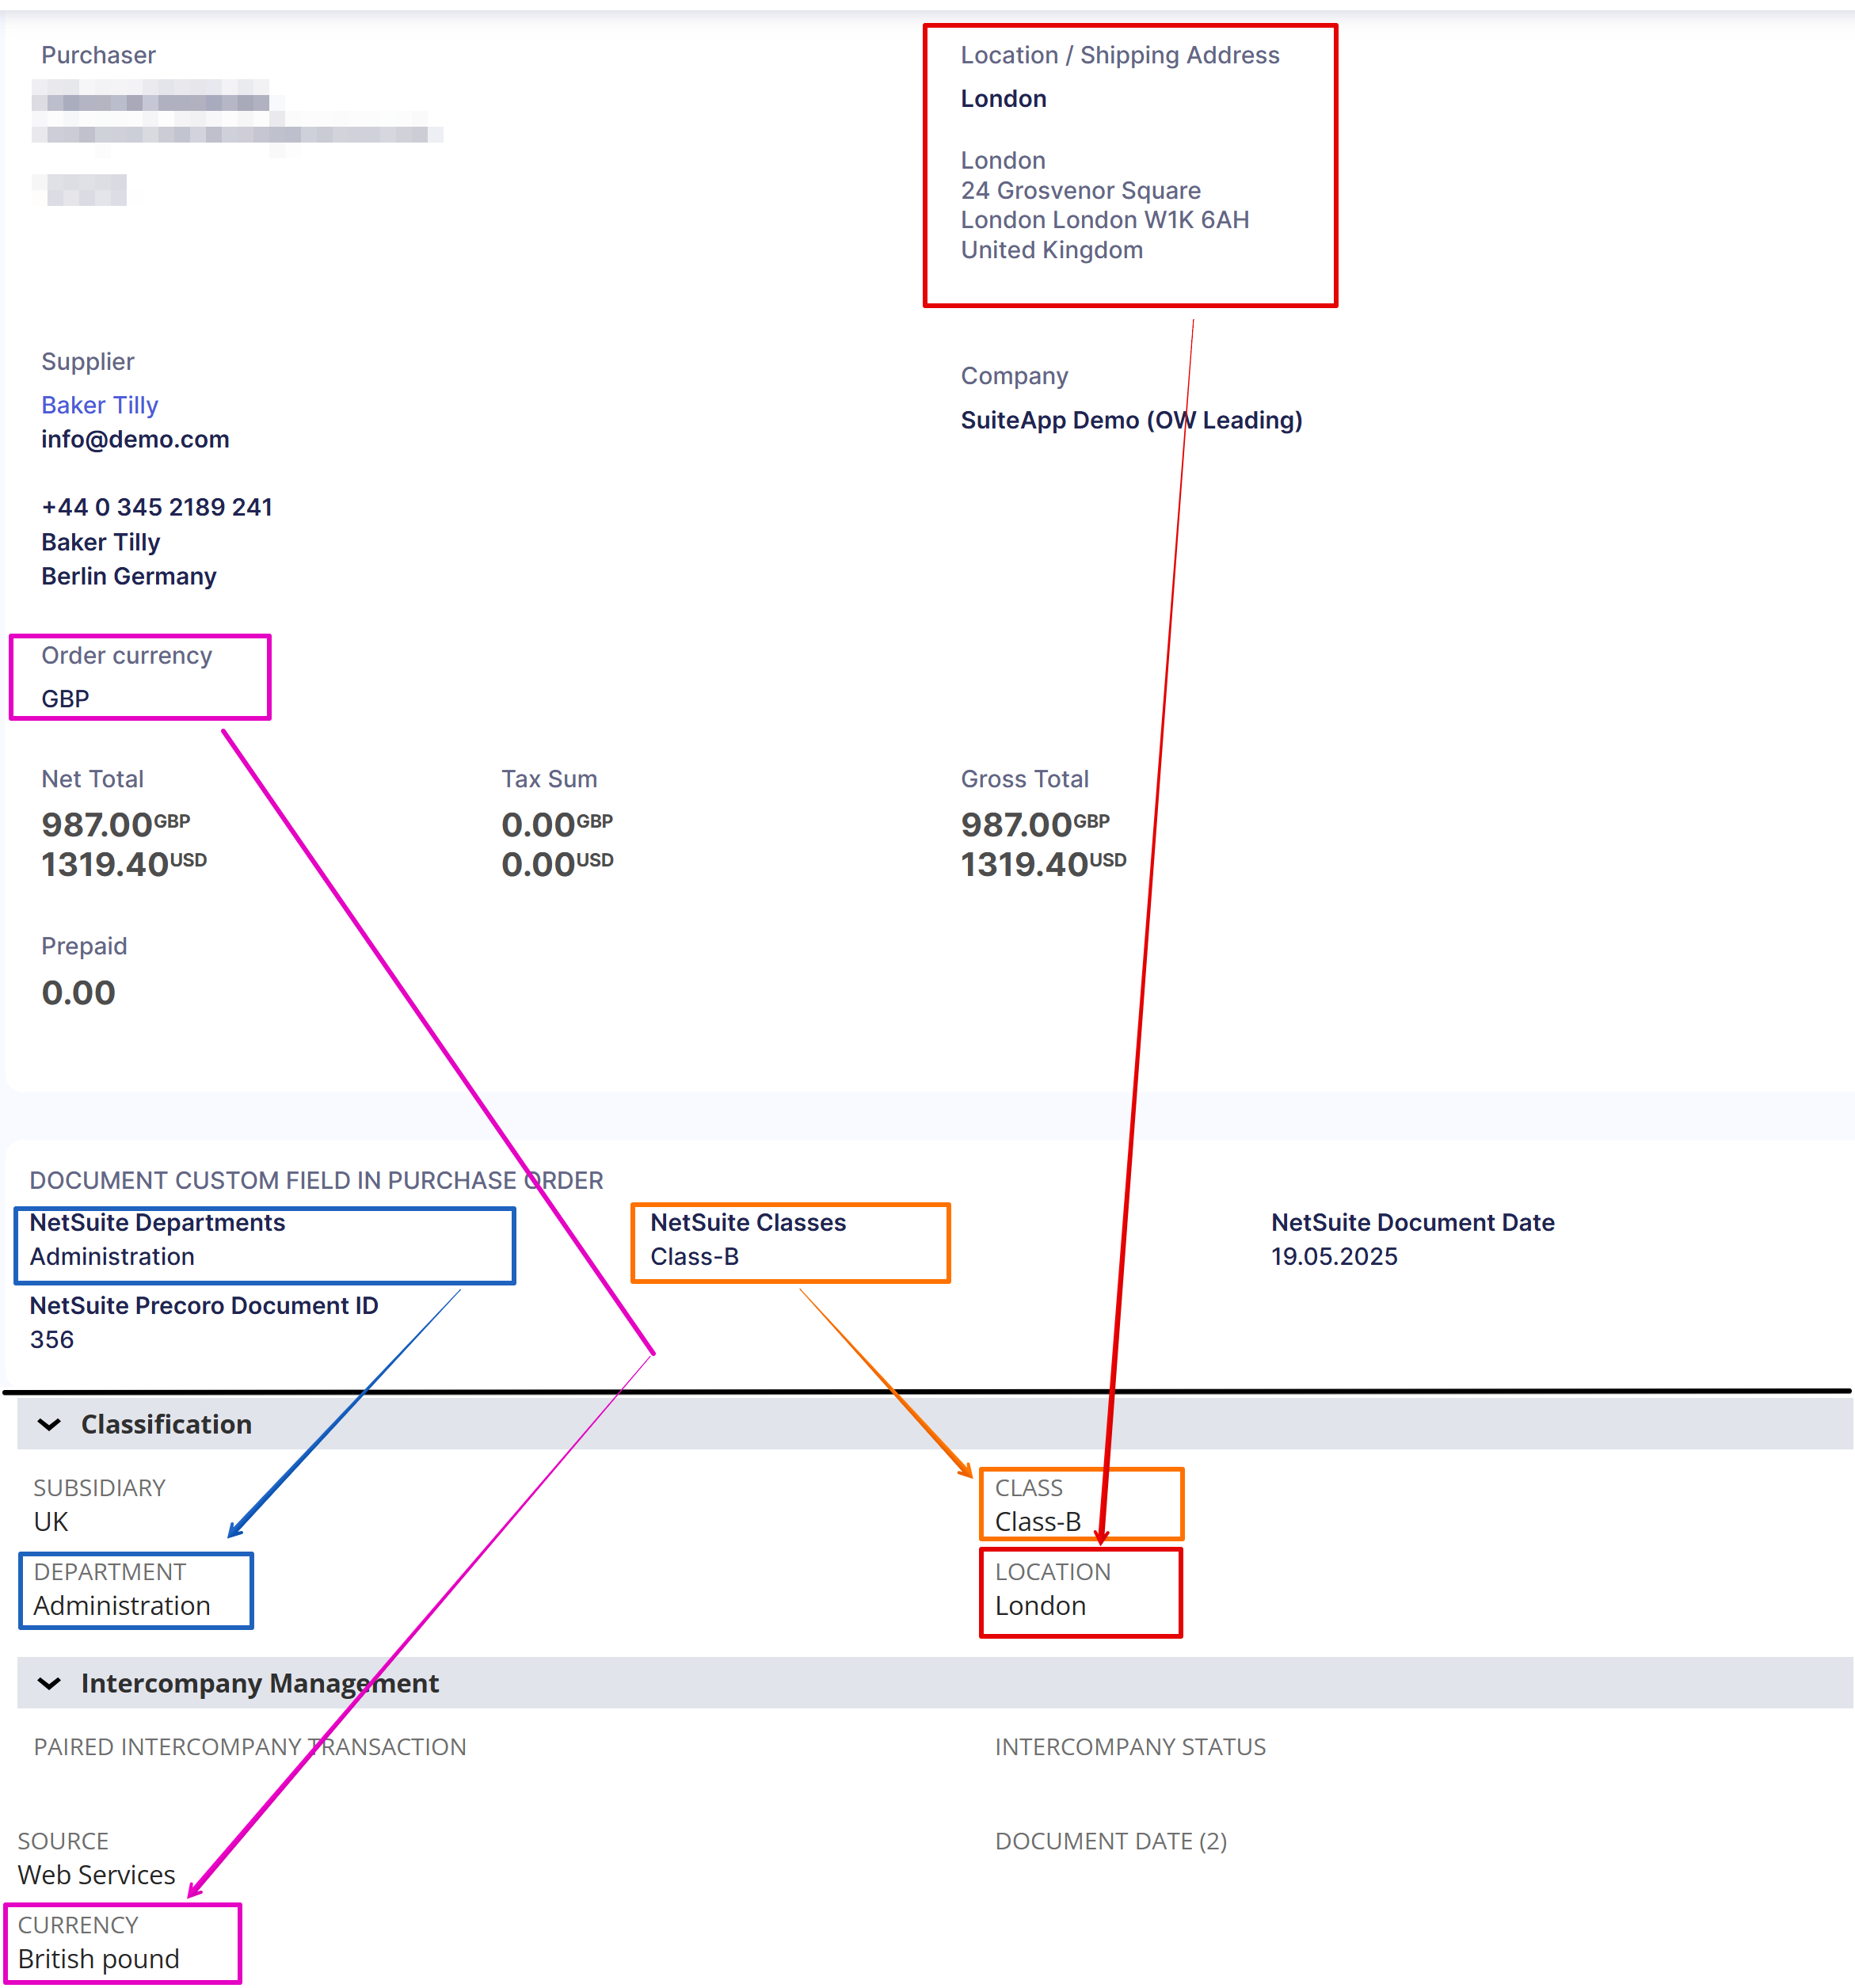
Classification Mapping
| Field in Precoro | Field in NetSuite |
| Location / Shipping Address | Location |
| Order Currency | Currency |
| NetSuite Departments | Department |
| NetSuite Classes | Class |
 |
|
Attachments Mapping
Attachments from Precoro Purchase Orders are transferred to the Files tab in NetSuite. The internal or external status of the attachment is not carried over.
How the Items Mapping Works
💡Please note: You can find more detailed information about items integration here.
The way items are added in Precoro affects how they appear in NetSuite:
- Items added via the Item Management page using the Add Item button that were previously integrated will be transferred to the Items tab in NetSuite.
- Items added from the Item Management page → Add Item button, but not integrated, will be transferred to the Expenses tab in NetSuite.
- Items added manually using the Add empty row button will be transferred to the Expenses tab in NetSuite.
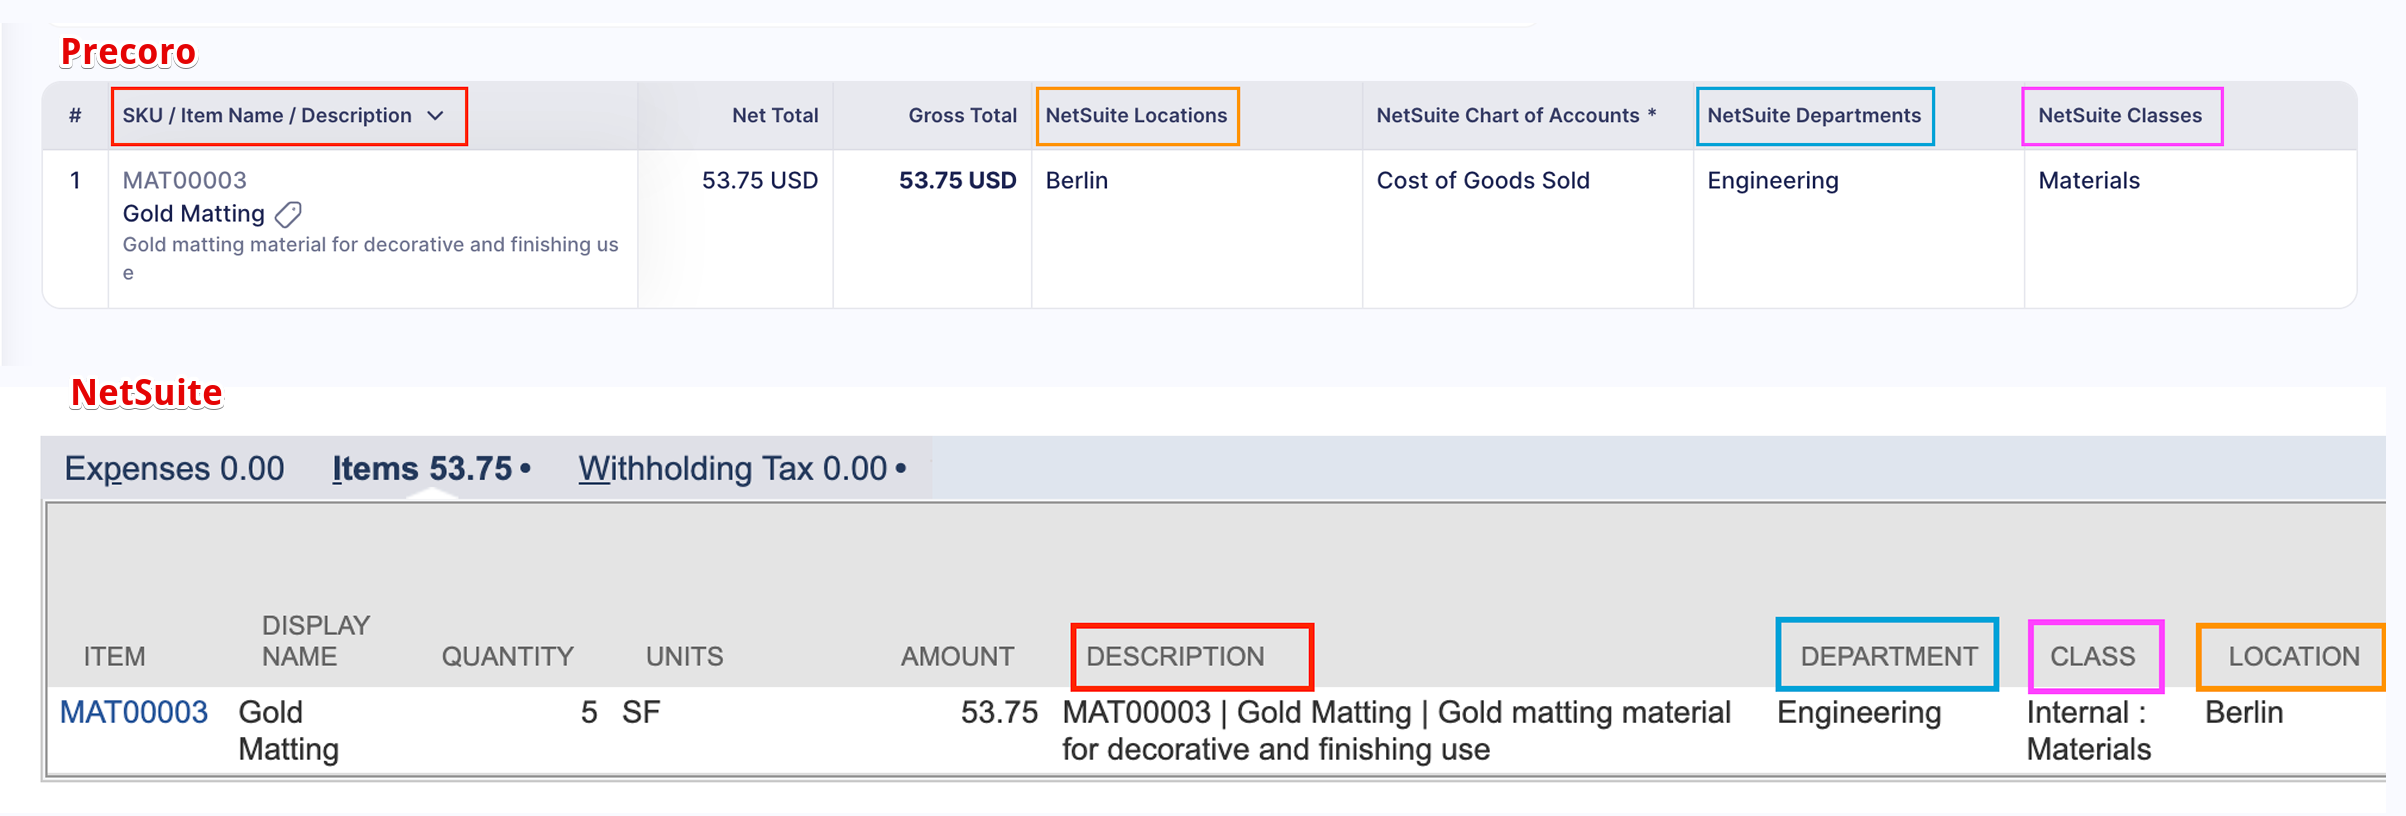
Here’s how the mapping of manually added items works:
| Field in Precoro | Field in NetSuite |
| SKU|Name|Description | Memo |
| Price | Amount |
| NetSuite Chart of Accounts | Account |
| NetSuite Departments | Department |
| NetSuite Classes | Class |
| NetSuite Customers | Customer or Project |
| NetSuite Locations | Location |

Here’s how the mapping of items added from the Item Management page works:
Custom Fields for Documents and Items Integration
You can find more detailed information on the integration of Classes, Customers and Projects, Locations, Charts of Accounts, and Departments by the corresponding links.
In general, here’s how the integration works:
- The Chart of Accounts is integrated as the Custom Fields for Items only.
- Classes, Locations, and Departments can be integrated both as Custom Fields for Items and Documents.
- Customers and Projects are integrated as the Custom Fields for Items only.
Character Limits for Purchase Orders Fields in NetSuite
NetSuite enforces character limits for certain fields:
- Note: 927 characters
- Combined character count in the SKU, Name, and Description fields for each item: 927 characters
- Item quantity: 10 characters
FAQs