TABLE OF CONTENTS
- Edit Documents On the Go with Precoro Mobile
- Use Custom Invoice Forms for OCR Attachments
- Create Documents Faster with Keyboard Shortcuts
- Integrate Delivery Tracking Tools via API
- Monitor User Access Changes with Updated Revision History
Edit Documents On the Go with Precoro Mobile
In the new mobile update (available later this week), we've added editing functionality to help you adapt to changing needs and correct errors without hassle. It’s now available in Purchase Orders, Purchase Requisitions, Receipts, and Expenses.
Here’s how you can use this feature:
- Open the document you need to edit.
- Click the More Options menu at the top right. At the bottom of your screen, you’ll see available actions; click Edit. For Expenses on Draft status, you’ll see the Edit button at the top right of the document page.

- Enter the correct values. Once everything looks good, click Update to save the changes.
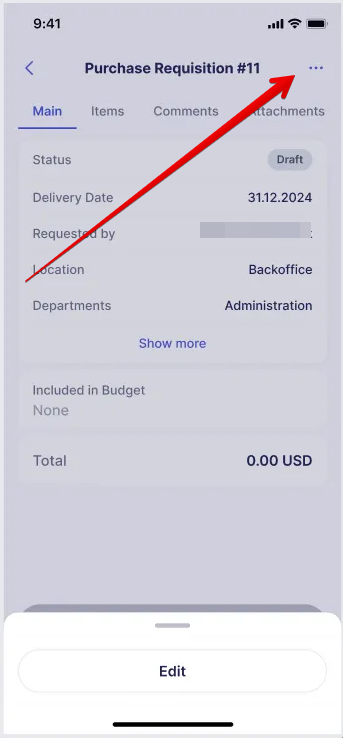
Please note that document editing may activate the re-approval process. Learn more about what triggers it here.
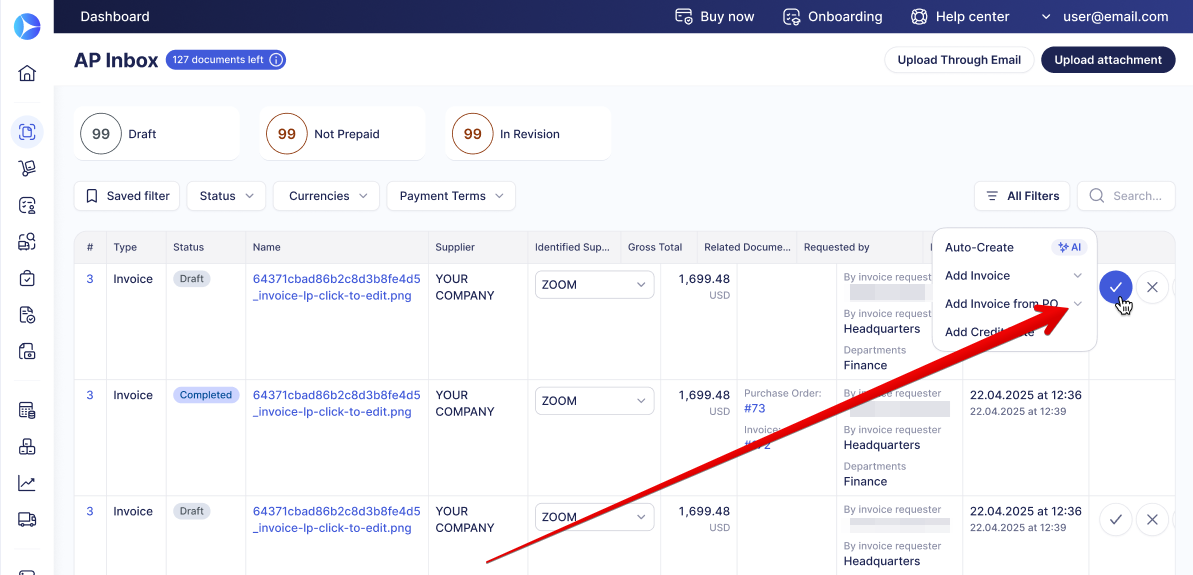
Use Custom Invoice Forms for OCR Attachments
You can now use custom invoice forms added in your company when creating standalone and order-based invoices from OCR-processed attachments.
Here’s how to access them:
- Find the attachment on the AP Inbox page and click the Create button (“🗸” icon).
- You’ll see the regular menu with the types of documents you can create. Opposite the Create Invoice and Create Invoice from PO options, you’ll see the drop-down arrow; click it and select the necessary form.
- If only one (standard or custom) form is enabled in your company, it’s selected automatically.
Create Documents Faster with Keyboard Shortcuts
You can now use your keyboard to fill out Drop-down list fields. Once you’ve clicked on a field and, optionally, entered part of the value, try using these keys to find and select the necessary option:
- Backspace—remove previously selected value or clear search;
- Enter—select the option;
- Escape—close the drop-down menu;
- Arrow down or Arrow up—navigate through the option list;
- Arrow right and Arrow left—expand or collapse the sub-option list.
Integrate Delivery Tracking Tools via API
A new Precoro API feature helps you integrate external tools used to track item delivery. When you create a receipt on another platform, you can automatically send a request to add a corresponding receipt in Precoro. The receipt is then linked to a related purchase order and sent for approval (if an approval workflow is configured for receipts) to ensure purchases are completed correctly and promptly.
Endpoint: POST /receipts/{purchase_order_id}
When configuring a POST request, please include these required fields:
- requiredDate in the ISO-8601 format (for instance, "2025-07-24T00:00:00+00:00").
- dataDocumentCustomFields.data (if there are required custom document fields). The array should contain all required fields’ values in the necessary format:
- Date fields—ISO-8601 format;
- Text fields—text;
- Drop-down lists—option ID.
- selectedItems (an associative array containing at least one element; the PO item ID is used as the key). Each element should contain the following:
- purchaseOrderItem.id (required);
- received (required)—quantity of items received;
- dataItemCustomFields (optional)—an array containing custom item field values.
You can also add the following optional fields:
- warehouse—warehouse ID;
- Note—text or null;
- receiptNumber—a unique custom number mostly used for integrations.
Please note: If the Automatically Transfer Notes from PO to Receipt setting is active in your company, notes from purchase orders are automatically added to receipts if the Note field is null. If you fill out the Note field in the receipt, the new value will be saved, and the note from the order won’t be transferred.
Monitor User Access Changes with Updated Revision History
We've updated the User Revision History functionality to provide the most relevant and useful data on how user permissions changed over time in every company.
To access the revision history, open the User Management page, locate the user, and press Revision History (clock icon) in the Action column. You’ll see the Revision History page, where you can review and compare revisions.
If the user exists in several companies, you’ll only see the changes associated with the company you are currently logged into. Switch to a different company to see how the user’s access changed there.
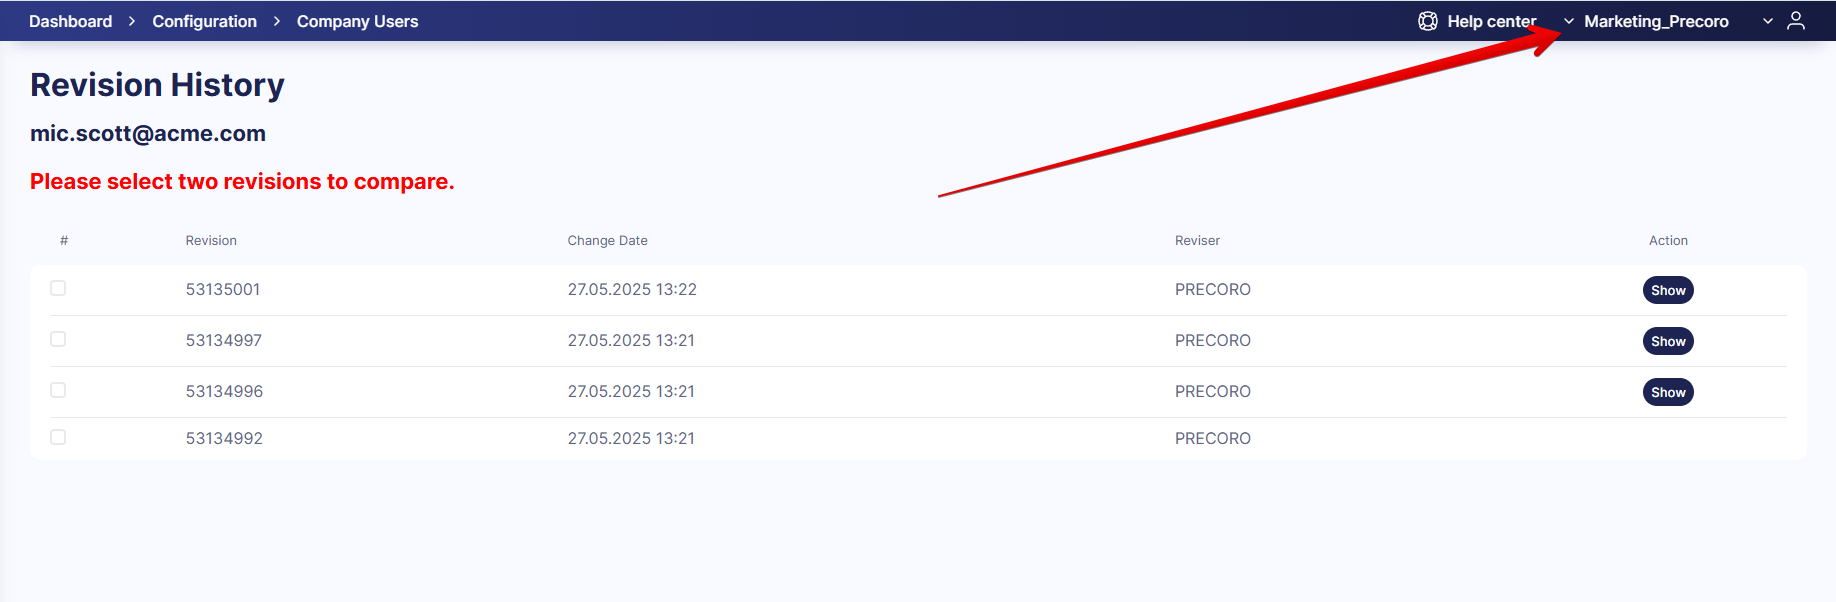
We track these user settings:
- Legal Entities
- Locations
- Custom Fields for Documents
- Groups
- Roles
- Substitute User
- Active status (if the user is active or not)
Changes to these settings are not shown:
- Name
- Position
- Phone Number
- Two-Factor Authentication
- Vacation Mode settings