TABLE OF CONTENTS
- Step 1: Enable the Required Features in NetSuite
- Step 2: Verify Integrated Lists in Precoro
- Step 3: Capture Your Current Integration Settings
- Step 4: Contact Your Customer Success Manager
- Step 5: Rename the Integration Records
- Step 6: Set Up the NetSuite SuiteApp Integration
- Step 7: Configure Global Settings in NetSuite
- Step 8: Set Preferred Transaction Form in NetSuite
- Step 9: Import Required Lists via CSV
Step 1: Enable the Required Features in NetSuite
Before installing the Precoro SuiteApp in NetSuite, make sure that all necessary features are enabled in the company settings:
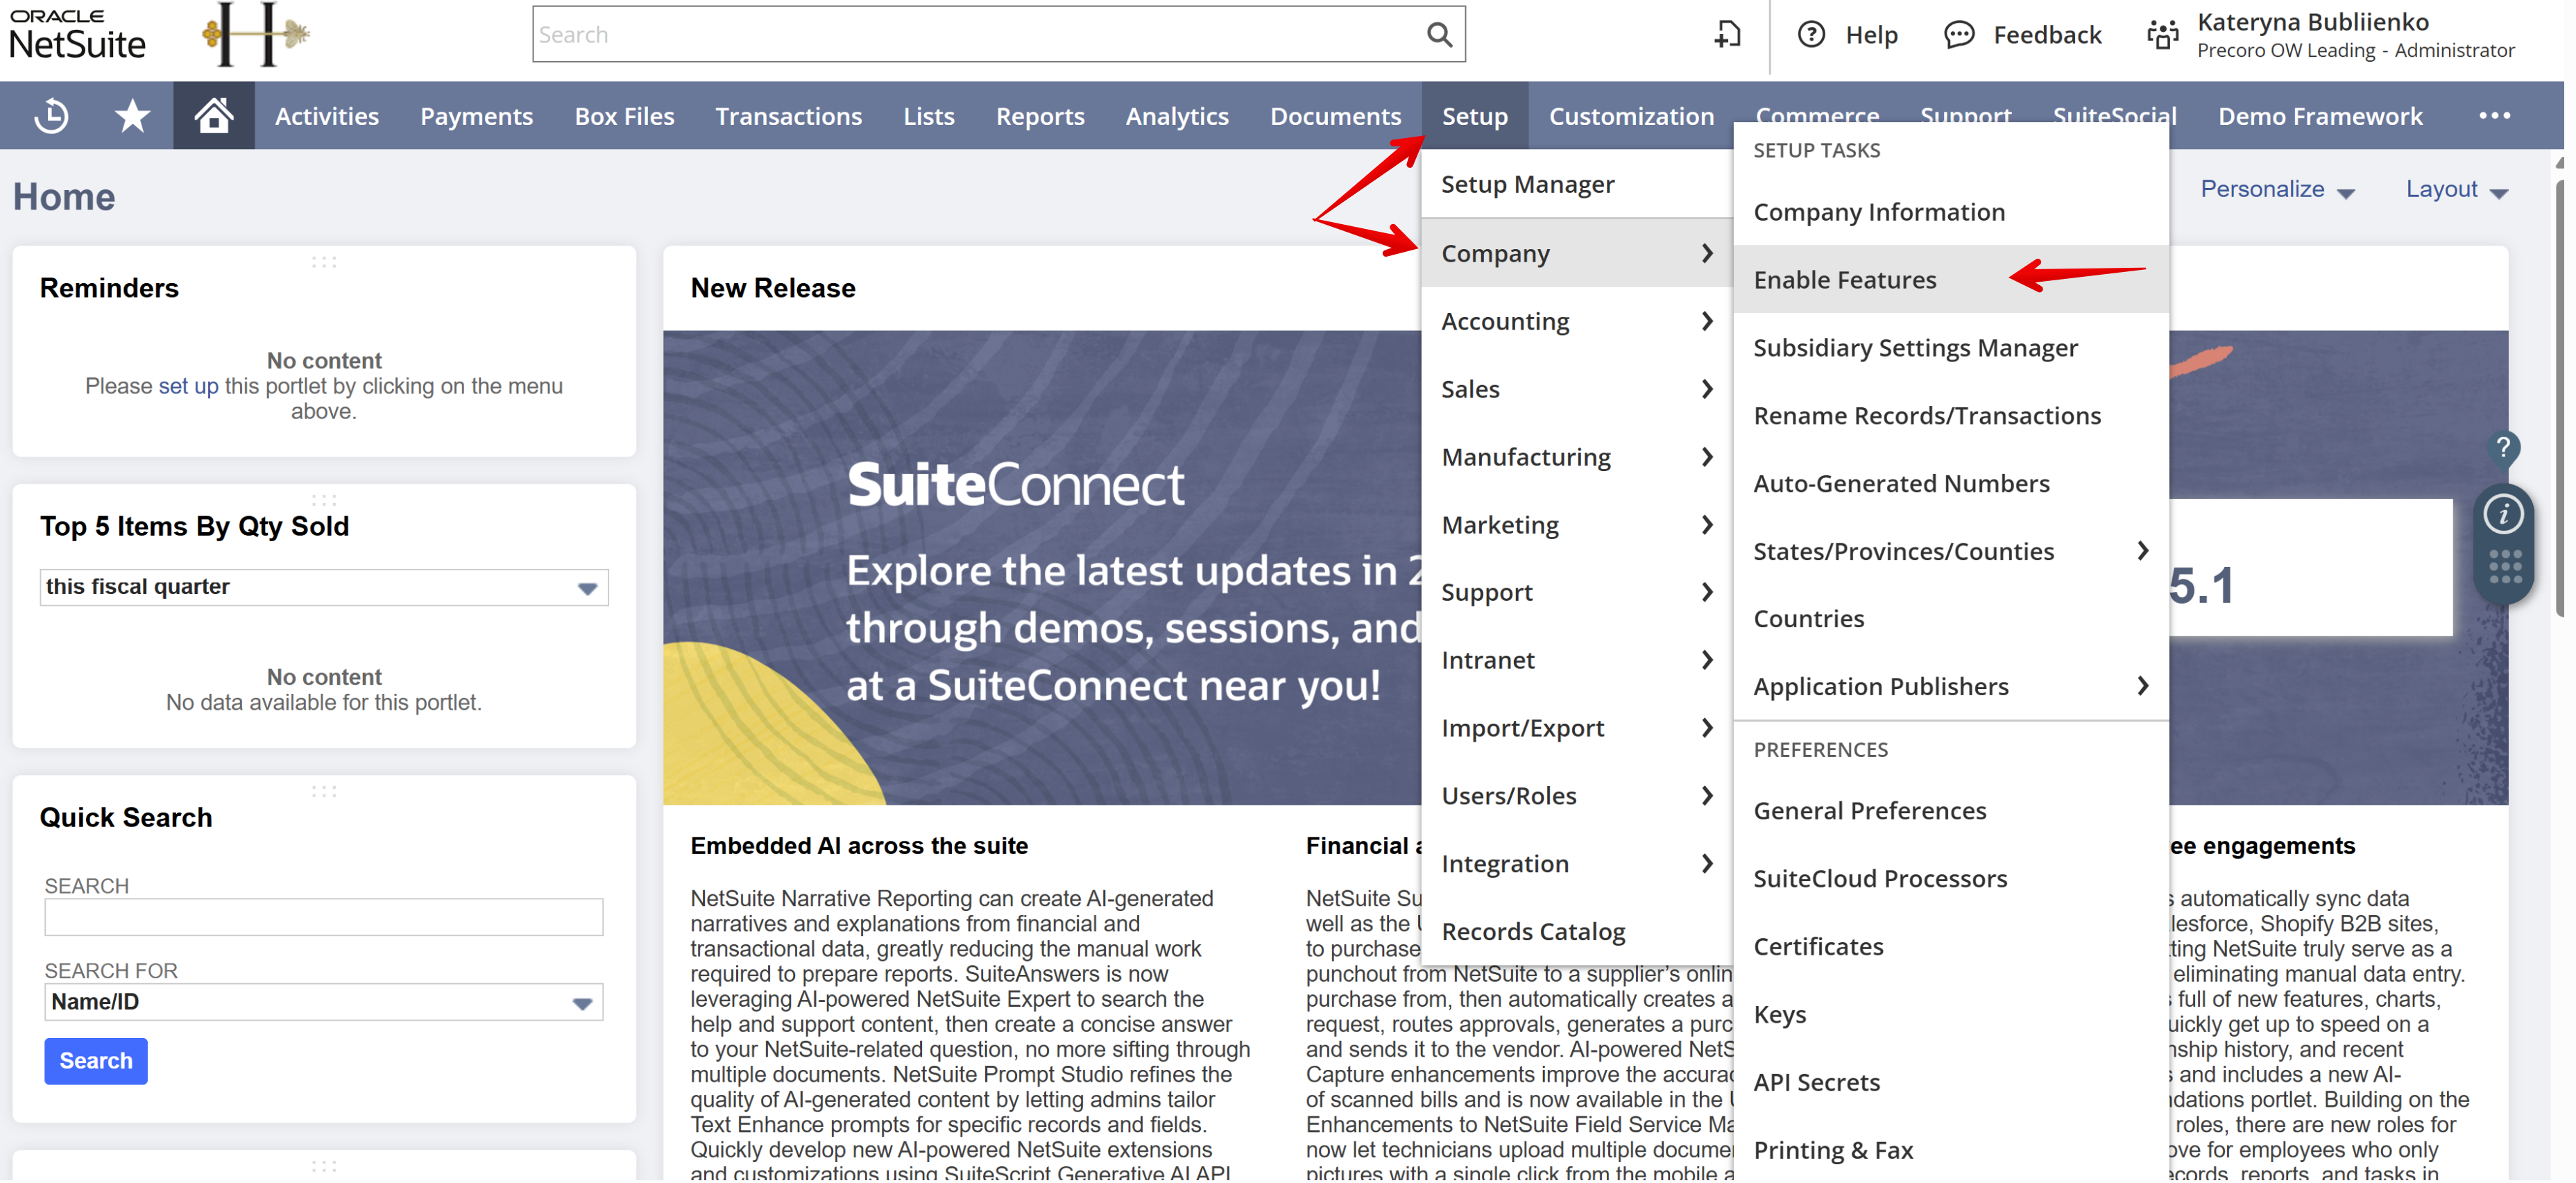
- Go to Setup → Company → Enable Features.

- Mark the following checkboxes in the SuiteCloud tab:
Section
Features to enable
SuiteBuilder
Custom Records
SuiteScript
Client SuiteScript, Server SuiteScript
SuiteFlow
SuiteFlow
SuiteTalk (Web Services)
SOAP Web Services, REST Web Services
Manage Authentication
Token-based Authentication
SuiteCloud Development Framework
SuiteCloud Development Framework
- In the Analytics tab, enable SuiteAnalytics Workbook.
- In the Accounting tab (Basic Features), enable Accounting.
- Click Save to apply the configurations.
Step 2: Verify Integrated Lists in Precoro
Ensure that all NetSuite lists integrated with Precoro are fully synchronized and up to date:
- In Precoro, go to Configuration → Integrations.
- Locate the NetSuite integration → click the Update Settings button.
- On the NetSuite Configuration page, scroll down to the Import lists and settings section.
- Update all imported lists so they reflect the most recent data from NetSuite.
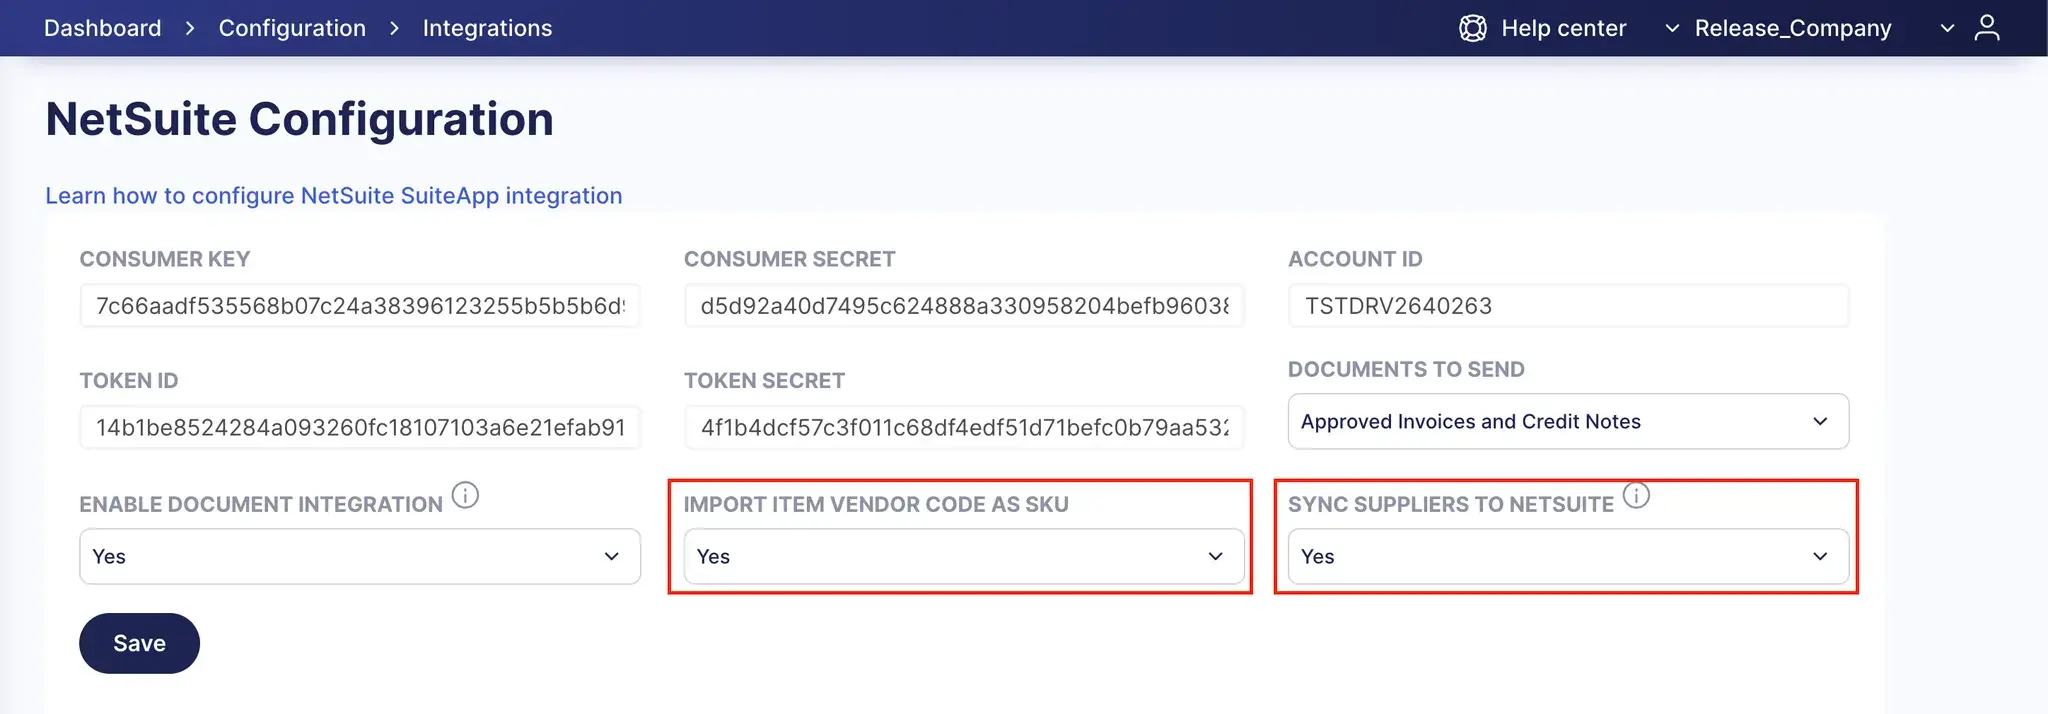
Step 3: Capture Your Current Integration Settings
Document the following integration configurations in Precoro, as you’ll need to verify or reapply them after migration:
- Import Item Vendor Code as SKU
- Sync Suppliers to NetSuite
Step 4: Contact Your Customer Success Manager
Before starting the migration, collect and share the information below with your Customer Success Manager. This information is required to plan the migration, prepare data mappings, and avoid delays during setup.
a) Confirm the Integration & Migration Details
Please confirm the following:
1. Integration scope: Will you use multiple subsidiaries or a single-subsidiary integration?
If you have one subsidiary in NetSuite, you can configure a SuiteApp connection with your Precoro company without additional company setup.
If you’d like to integrate multiple subsidiaries, we offer the following options:
- If you currently have one company integrated with one subsidiary, you can set up a new company with multi-entity management and integrate different subsidiaries as legal entities.
- If you have multiple companies, each integrated with a corresponding subsidiary, you can set up a new company with multi-entity management and integrate different subsidiaries as legal entities for centralized management.
In this case, we won’t be able to transfer historical documents.
- If you have multiple companies and need to keep the existing documents, we offer entity-by-entity migration. In this case, you’ll keep current companies and data; a SuiteApp connection will be established for each company separately.
💡Please note: While planning the migration, clearly define your preferred approach and the subsidiaries you need to integrate. This information is necessary for our team to assist you effectively.
2. NetSuite access: Are you ready to grant access to your NetSuite account so the Precoro team can complete the integration setup?
3. Migration timeline: Your preferred or estimated migration date.
b) Select the NetSuite Lists to Sync
To keep automatic updates from NetSuite to Precoro working after the migration, all existing integrated NetSuite records must be marked with the “Sync to Precoro” flag. Since this setting cannot be applied automatically to existing records, you’ll need to update them later via CSV import in NetSuite.
For this reason, select which of the following NetSuite lists should be synced and share the details with your Customer Success Manager:
- Departments
- Classes
- Locations
- Chart of Accounts
- Projects
- Taxes
- Customers
- Billable Fields
- Suppliers
- Items
- Custom Segments (specify which ones to include)
For each selected list, specify:
- Sync scope: Should this list be imported from NetSuite and used in Precoro?
- Assignment level: Is this list value applied on a document or item level in NetSuite?
Based on the information you provided, the Precoro team will identify which NetSuite lists are currently integrated with Precoro and prepare corresponding CSV import files for NetSuite.
Each CSV file will include the Internal ID of every NetSuite record and set the “Sync to Precoro” field to true.
💡Please note: To ensure data accuracy and avoid conflicts, the Precoro team prepares mapping and CSV import files no earlier than 1–2 days before the scheduled migration date.
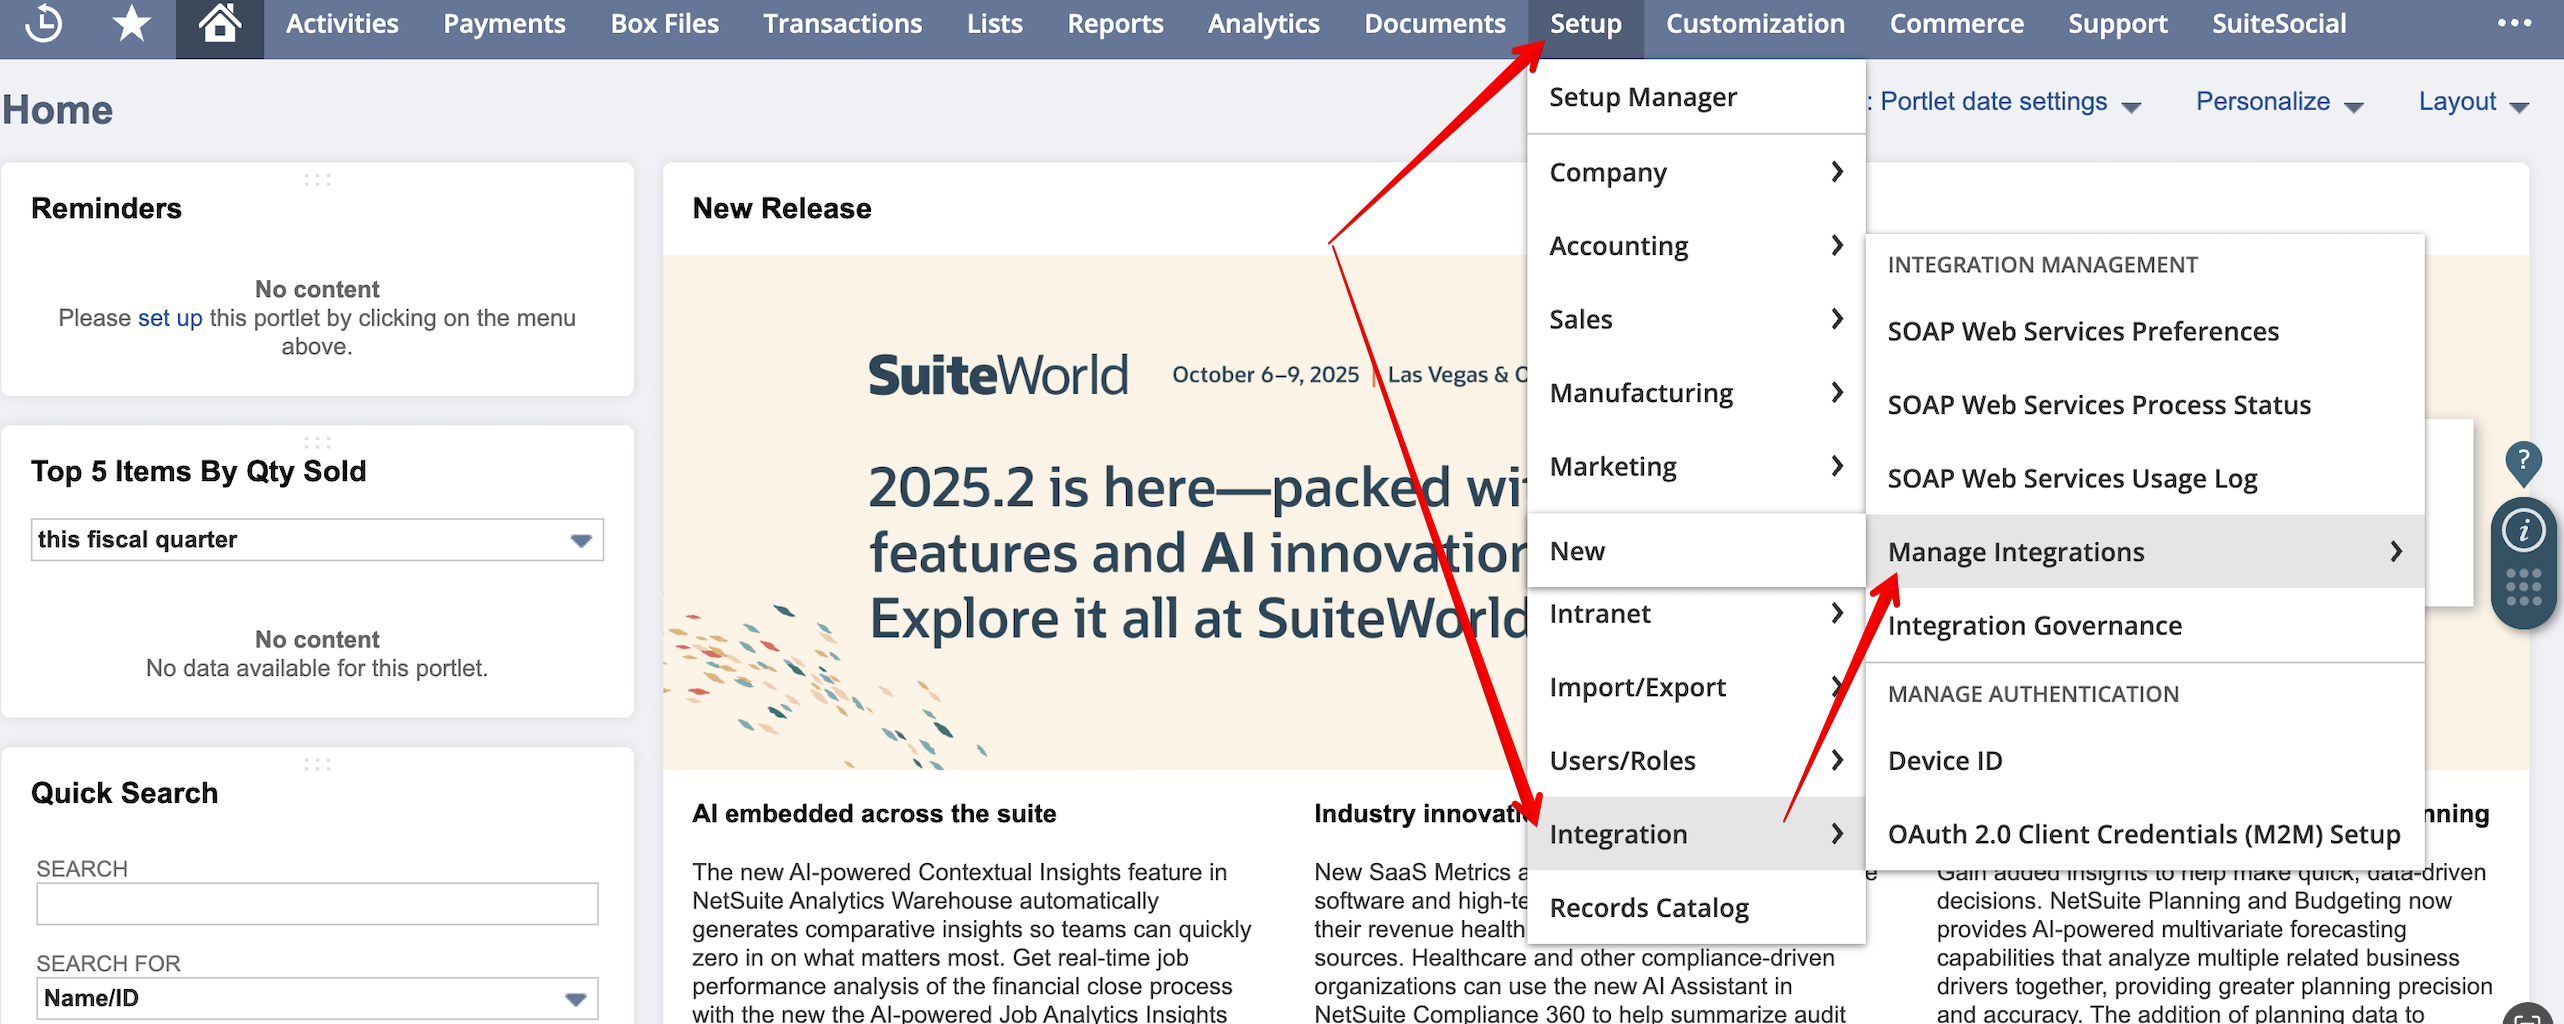
Step 5: Rename the Integration Records
Before the Precoro SuiteApp installation, you need to update the names of integration records in NetSuite to prevent duplications and avoid conflicts during the SuiteApp setup.
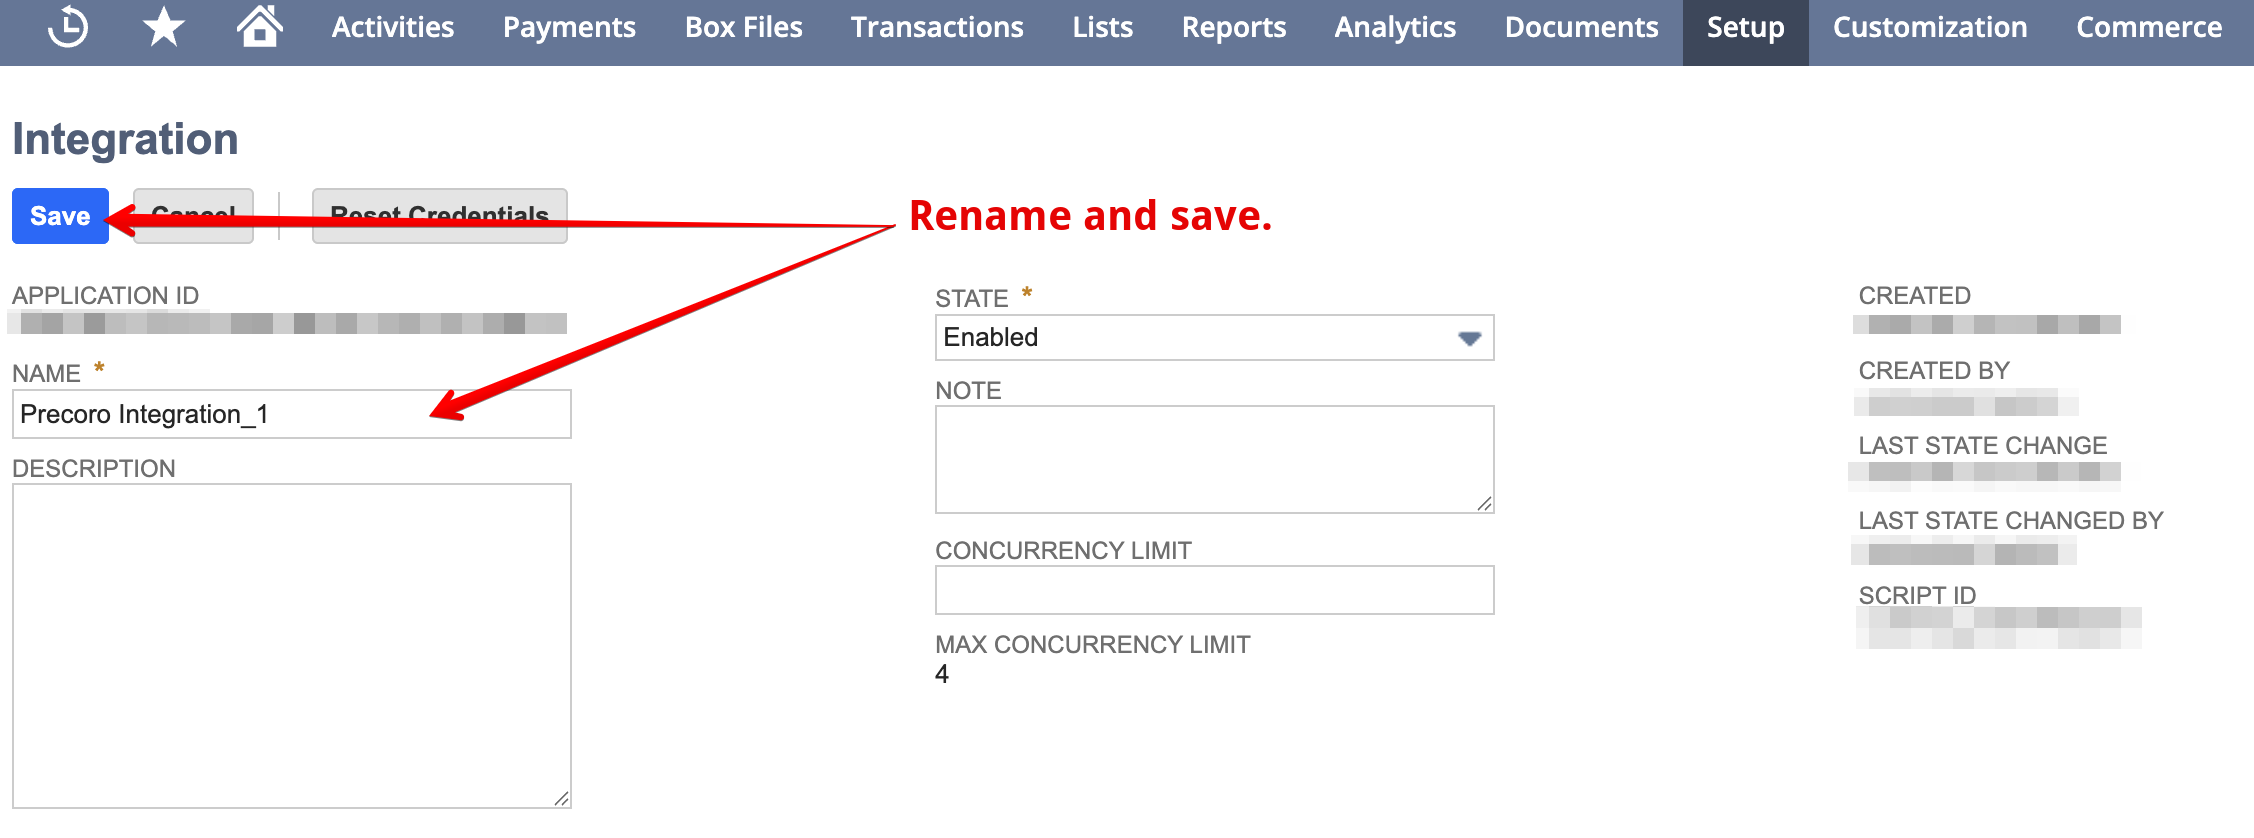
To rename the existing Precoro Integration:
- Go to Setup → Integration → Manage Integrations.

- Open the Precoro Integration → click Edit.
- Change the “Precoro Integration” name to any other suitable option.
- Click Save to record the changes.

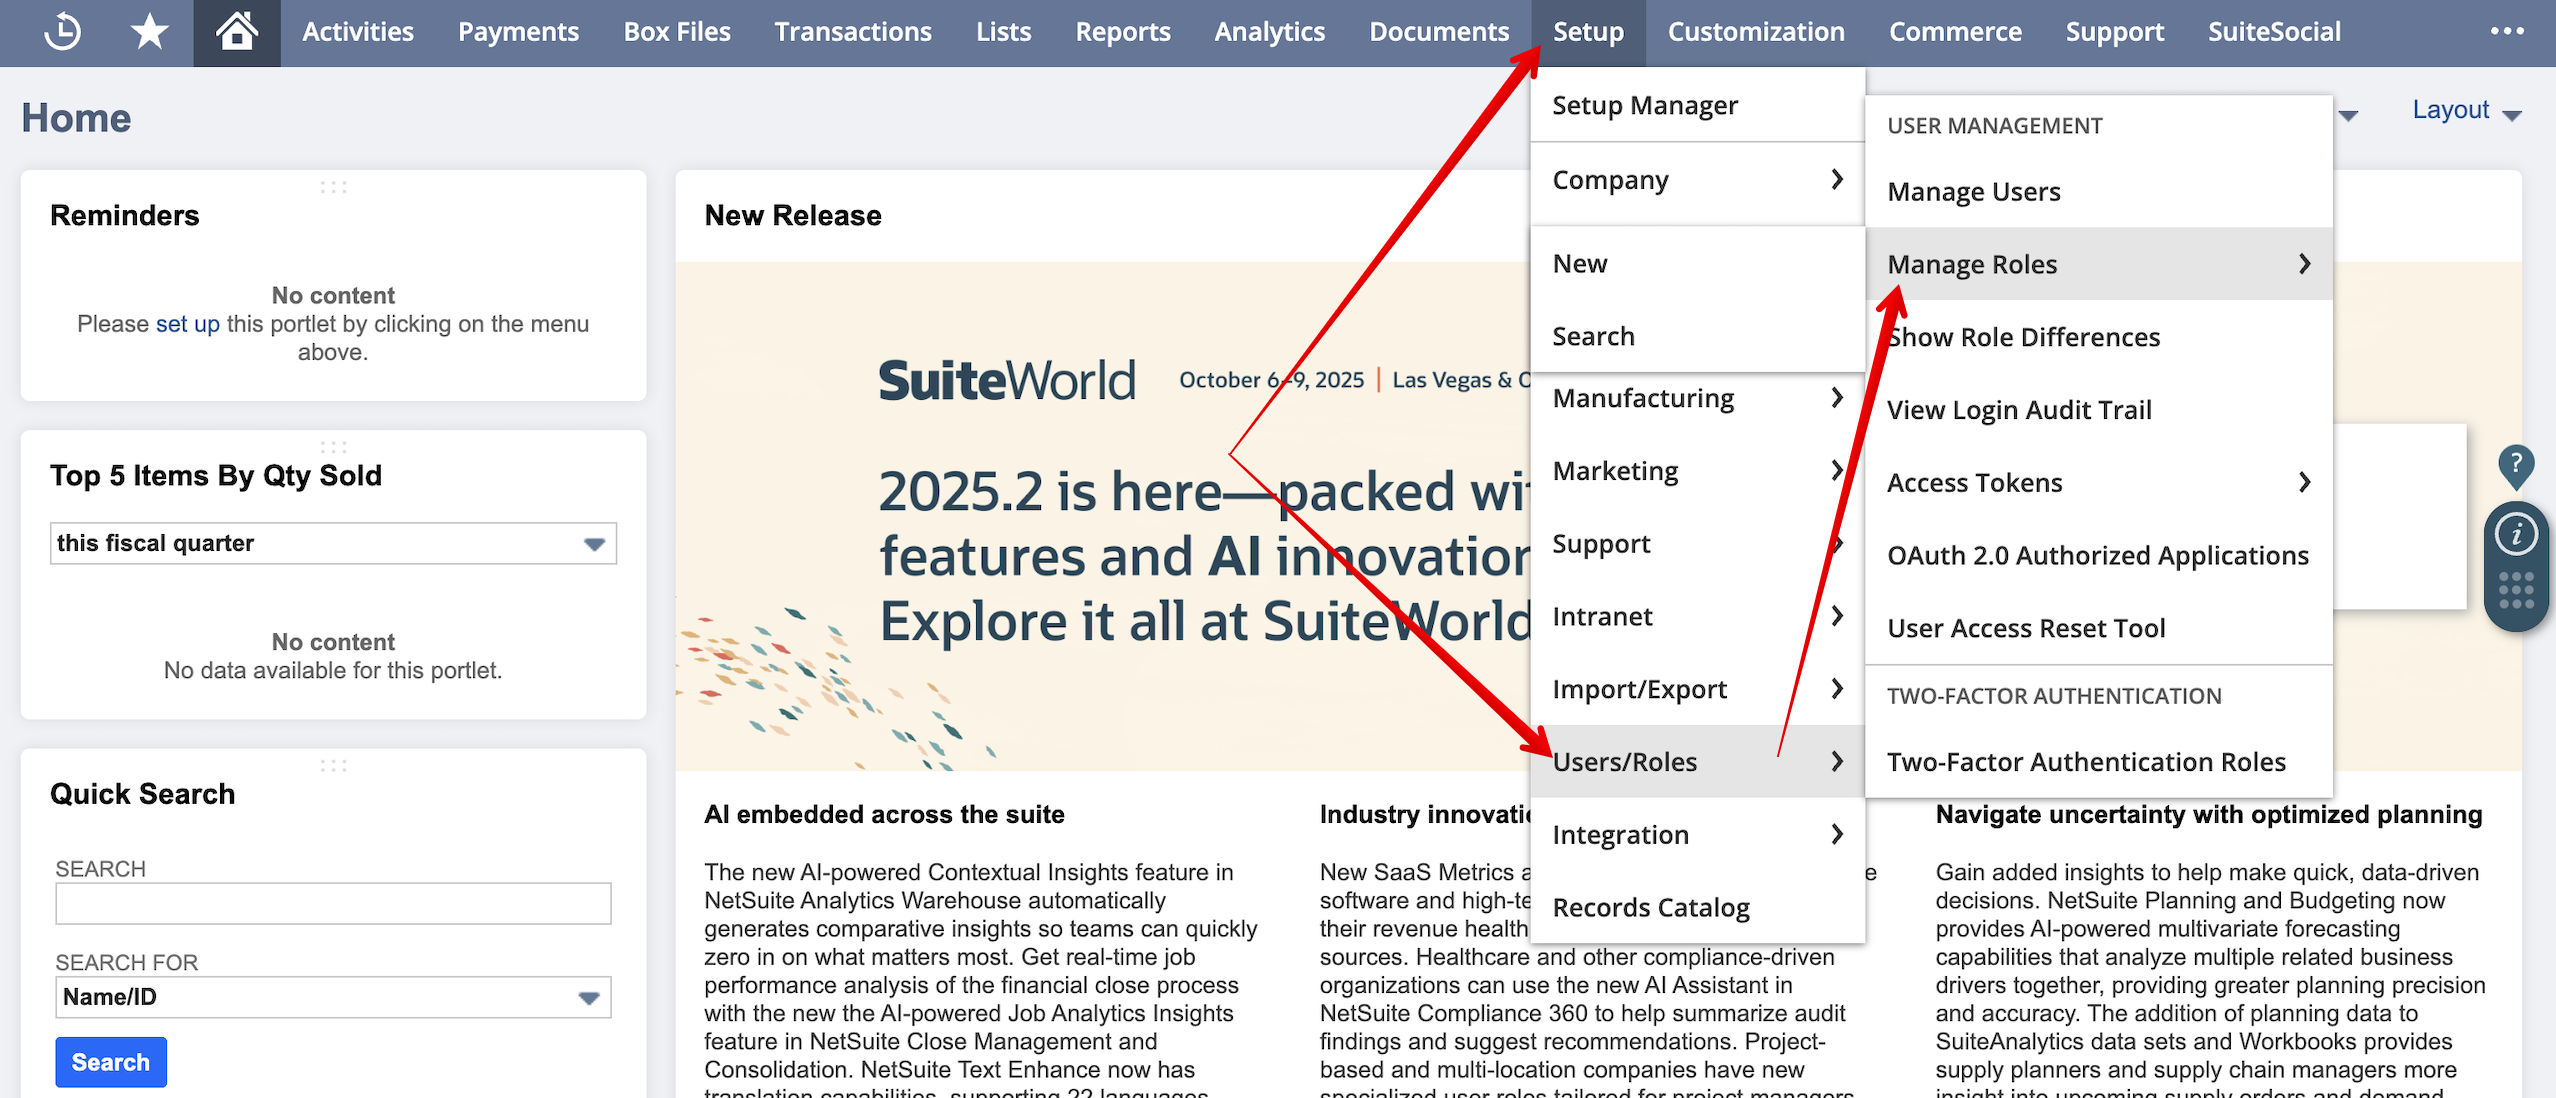
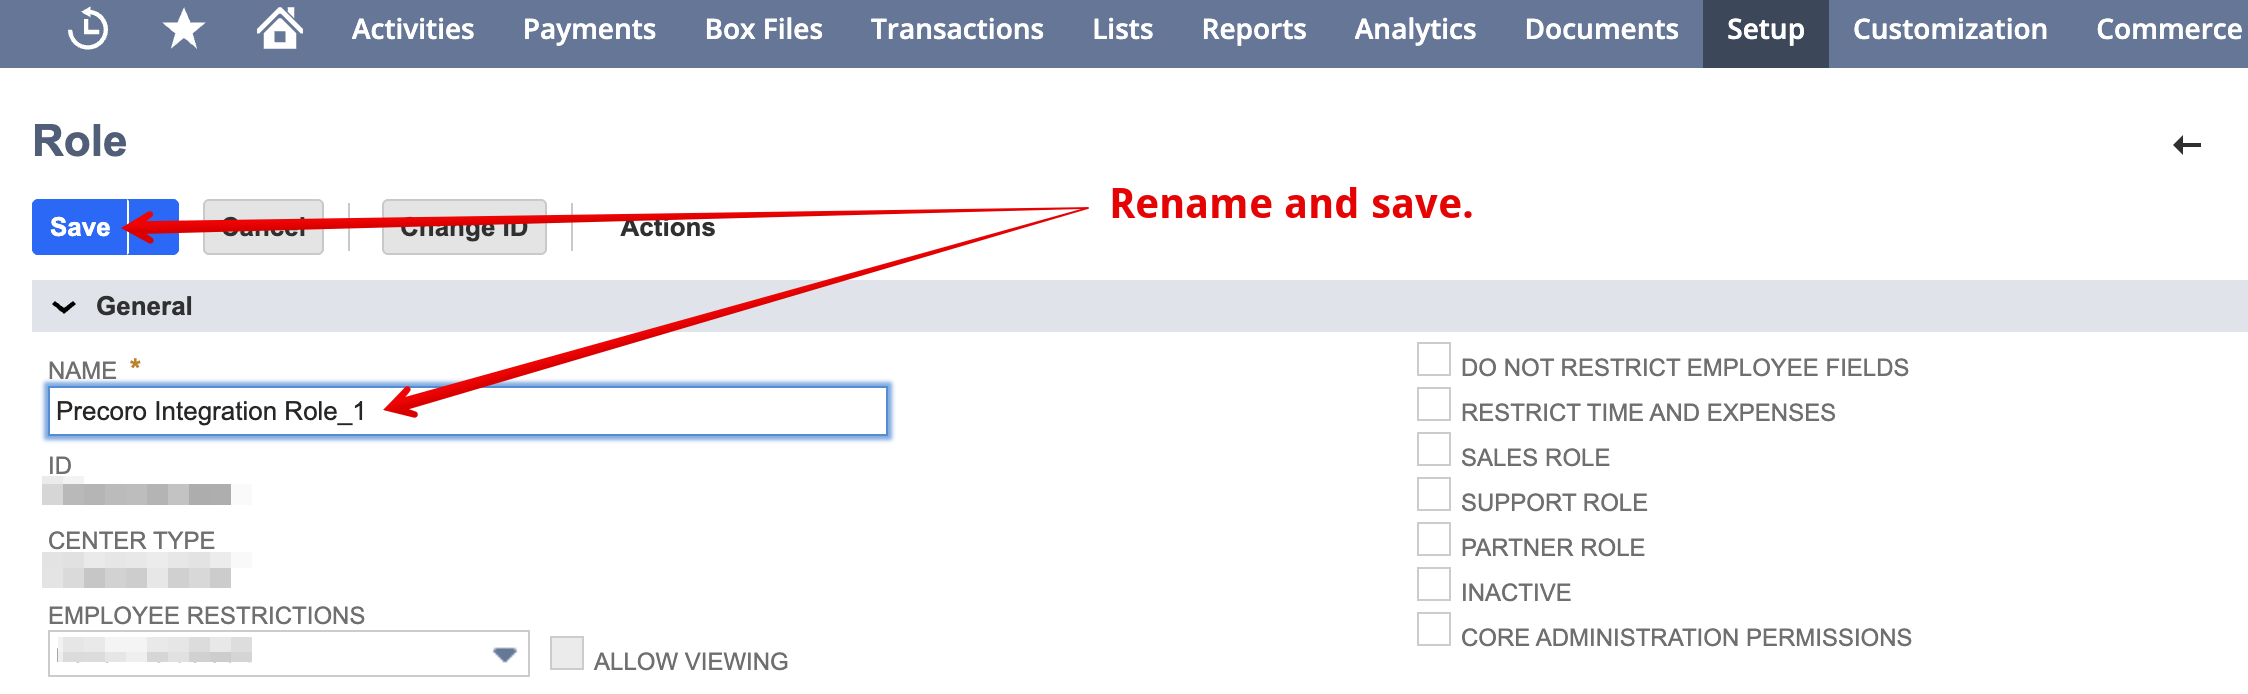
To rename the existing Precoro Integration Role:
- Go to Setup → Users/Roles → Manage Roles.

- Click Edit next to the Precoro Integration Role.
- Change the “Precoro Integration Role” name to any other suitable option.
- Click Save to record the changes.

Step 6: Set Up the NetSuite SuiteApp Integration
Follow steps 2-5 from the How to Set Up NetSuite SuiteApp Integration guide:
💡Please note: Once you have a Token ID, Token Secret, and Account ID, please securely share these details with your Customer Success Manager, as they are required to connect Precoro to NetSuite in the next steps.
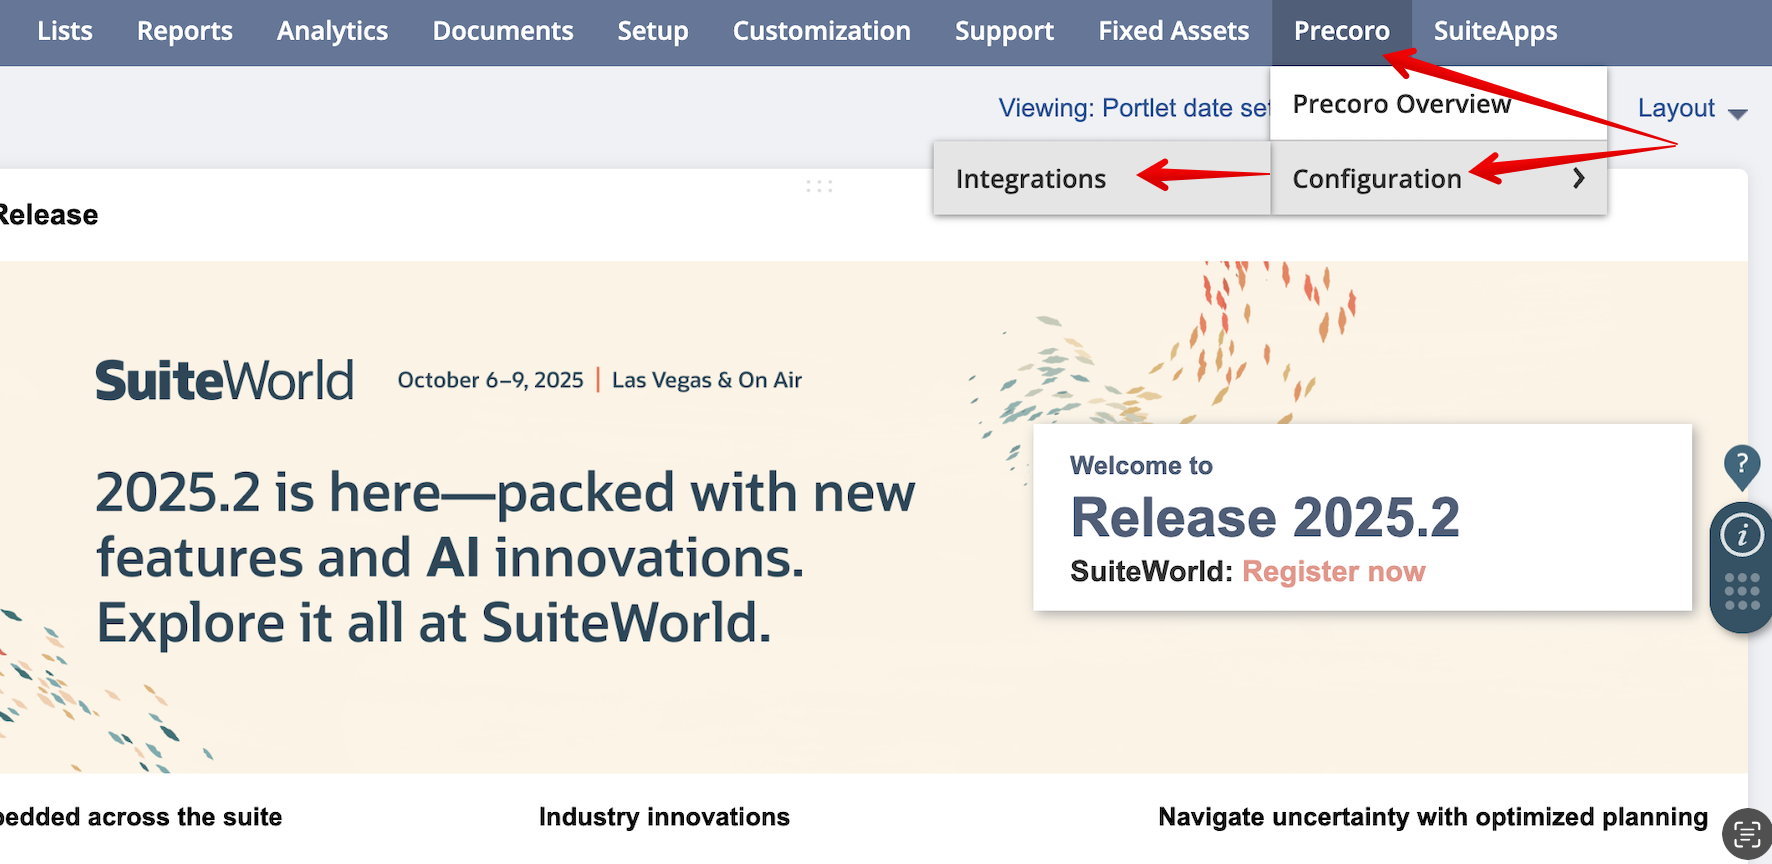
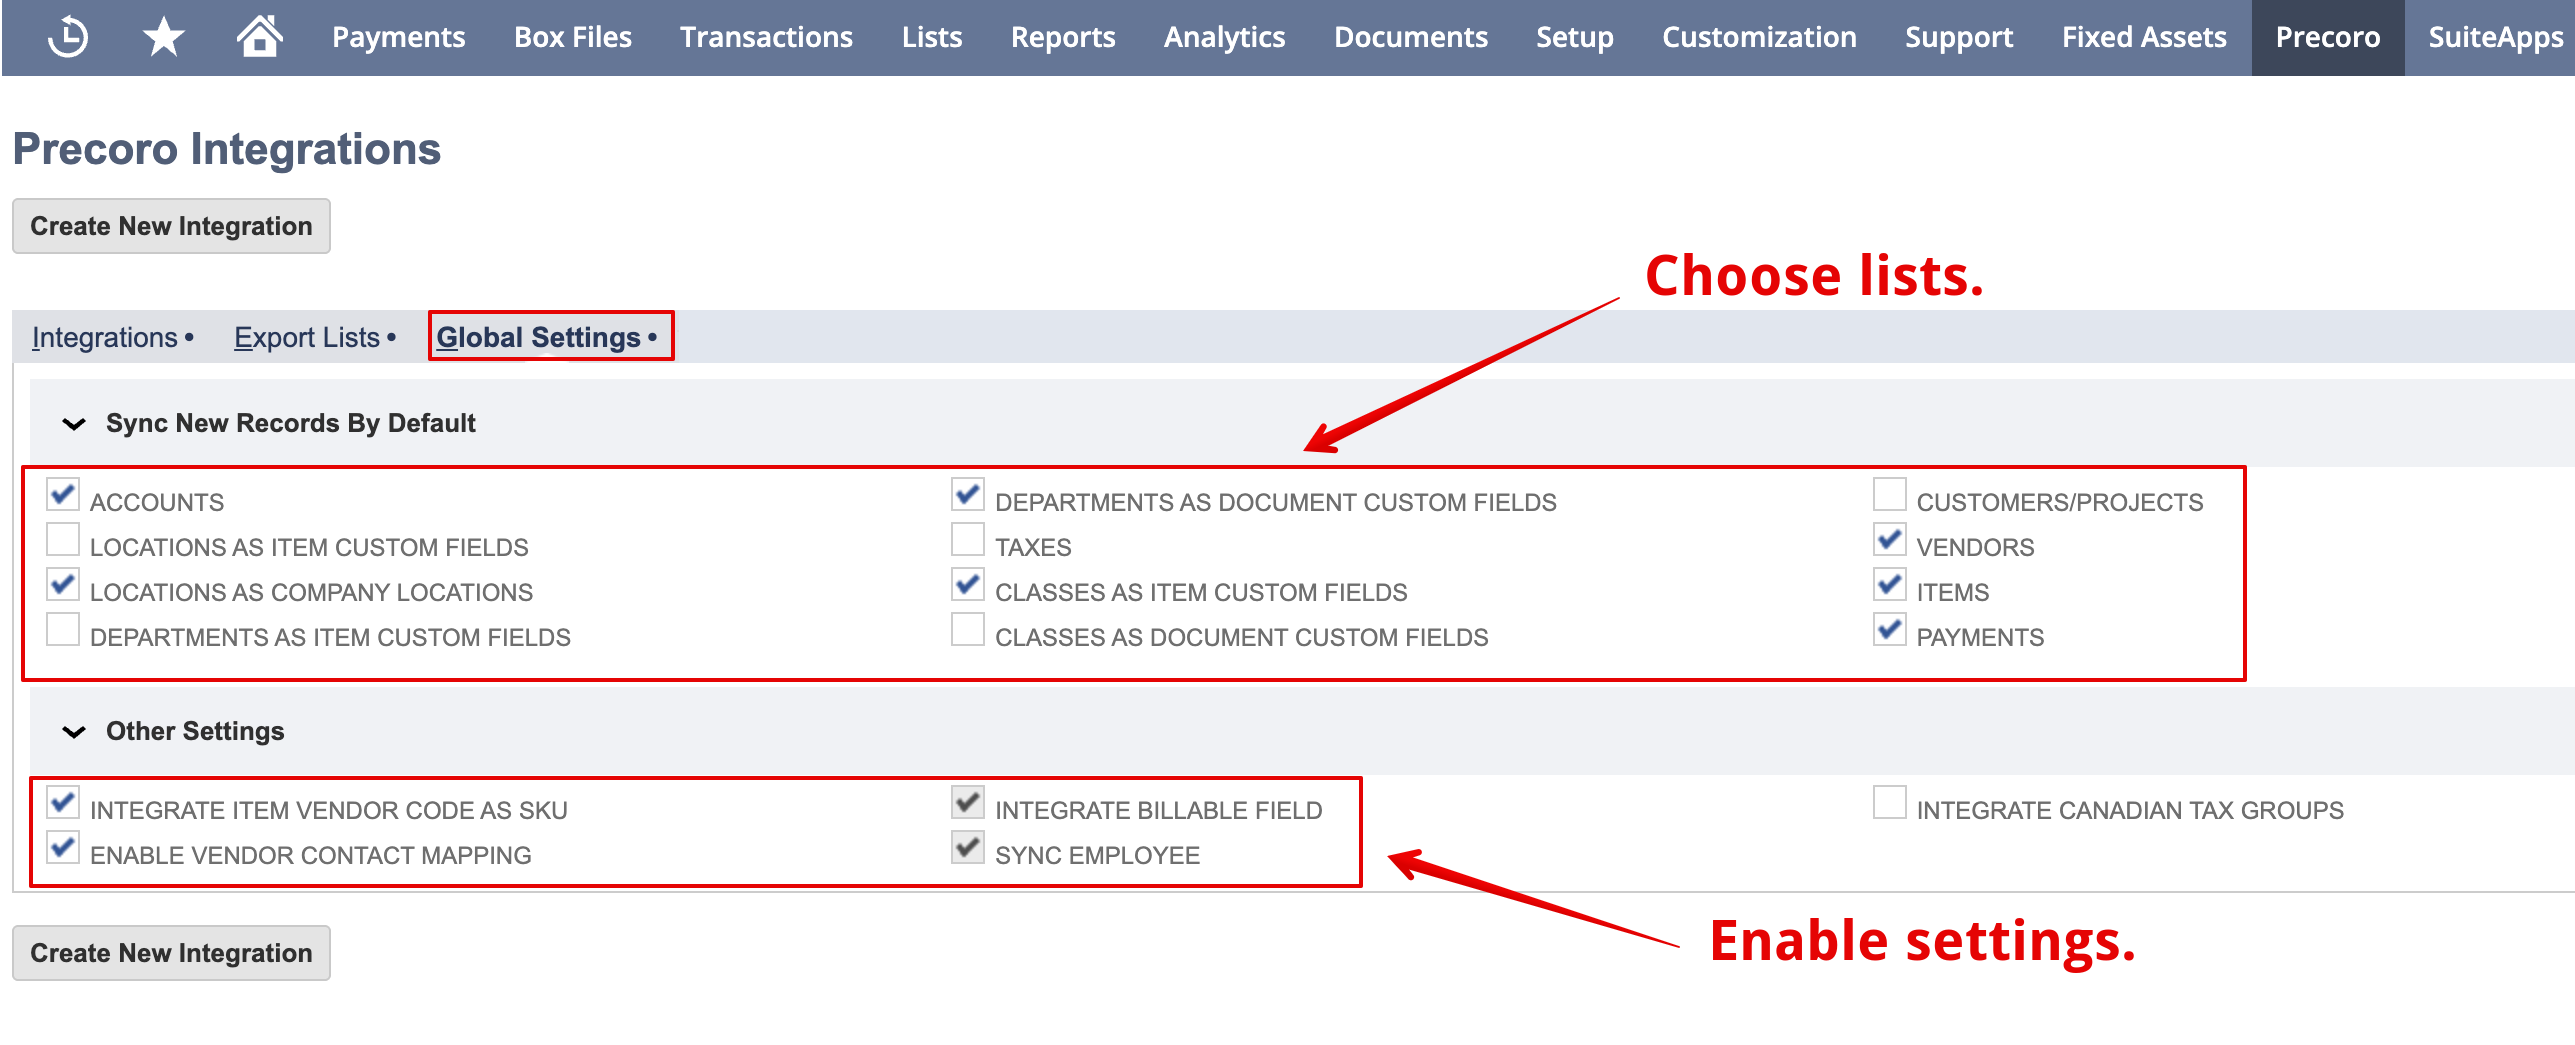
Step 7: Configure Global Settings in NetSuite
Once the SuiteApp connection is established, complete the following setup steps in your NetSuite account:
- Navigate to Precoro → Configuration → Integrations.

- Open the Global Settings tab.
- In the Other Settings section, enable the following checkboxes:
- Import Item Vendor Code As SKU
- Enable Vendor Contact Mapping
- Integrate Billable Field
- Sync Employee
- In the Sync New Records by Default section, select the checkboxes for each list you want Precoro to automatically sync when new records are created in NetSuite.

Step 8: Set Preferred Transaction Form in NetSuite
To ensure transactions are processed through the correct form:
- Go to Customization → Forms → Transaction Forms.
- Open your desired form (previously used with the Legacy integration).
- Navigate to the Roles tab.
- Find the Precoro Integration Role → enable the Preferred checkbox.
- Click Save to apply the changes.
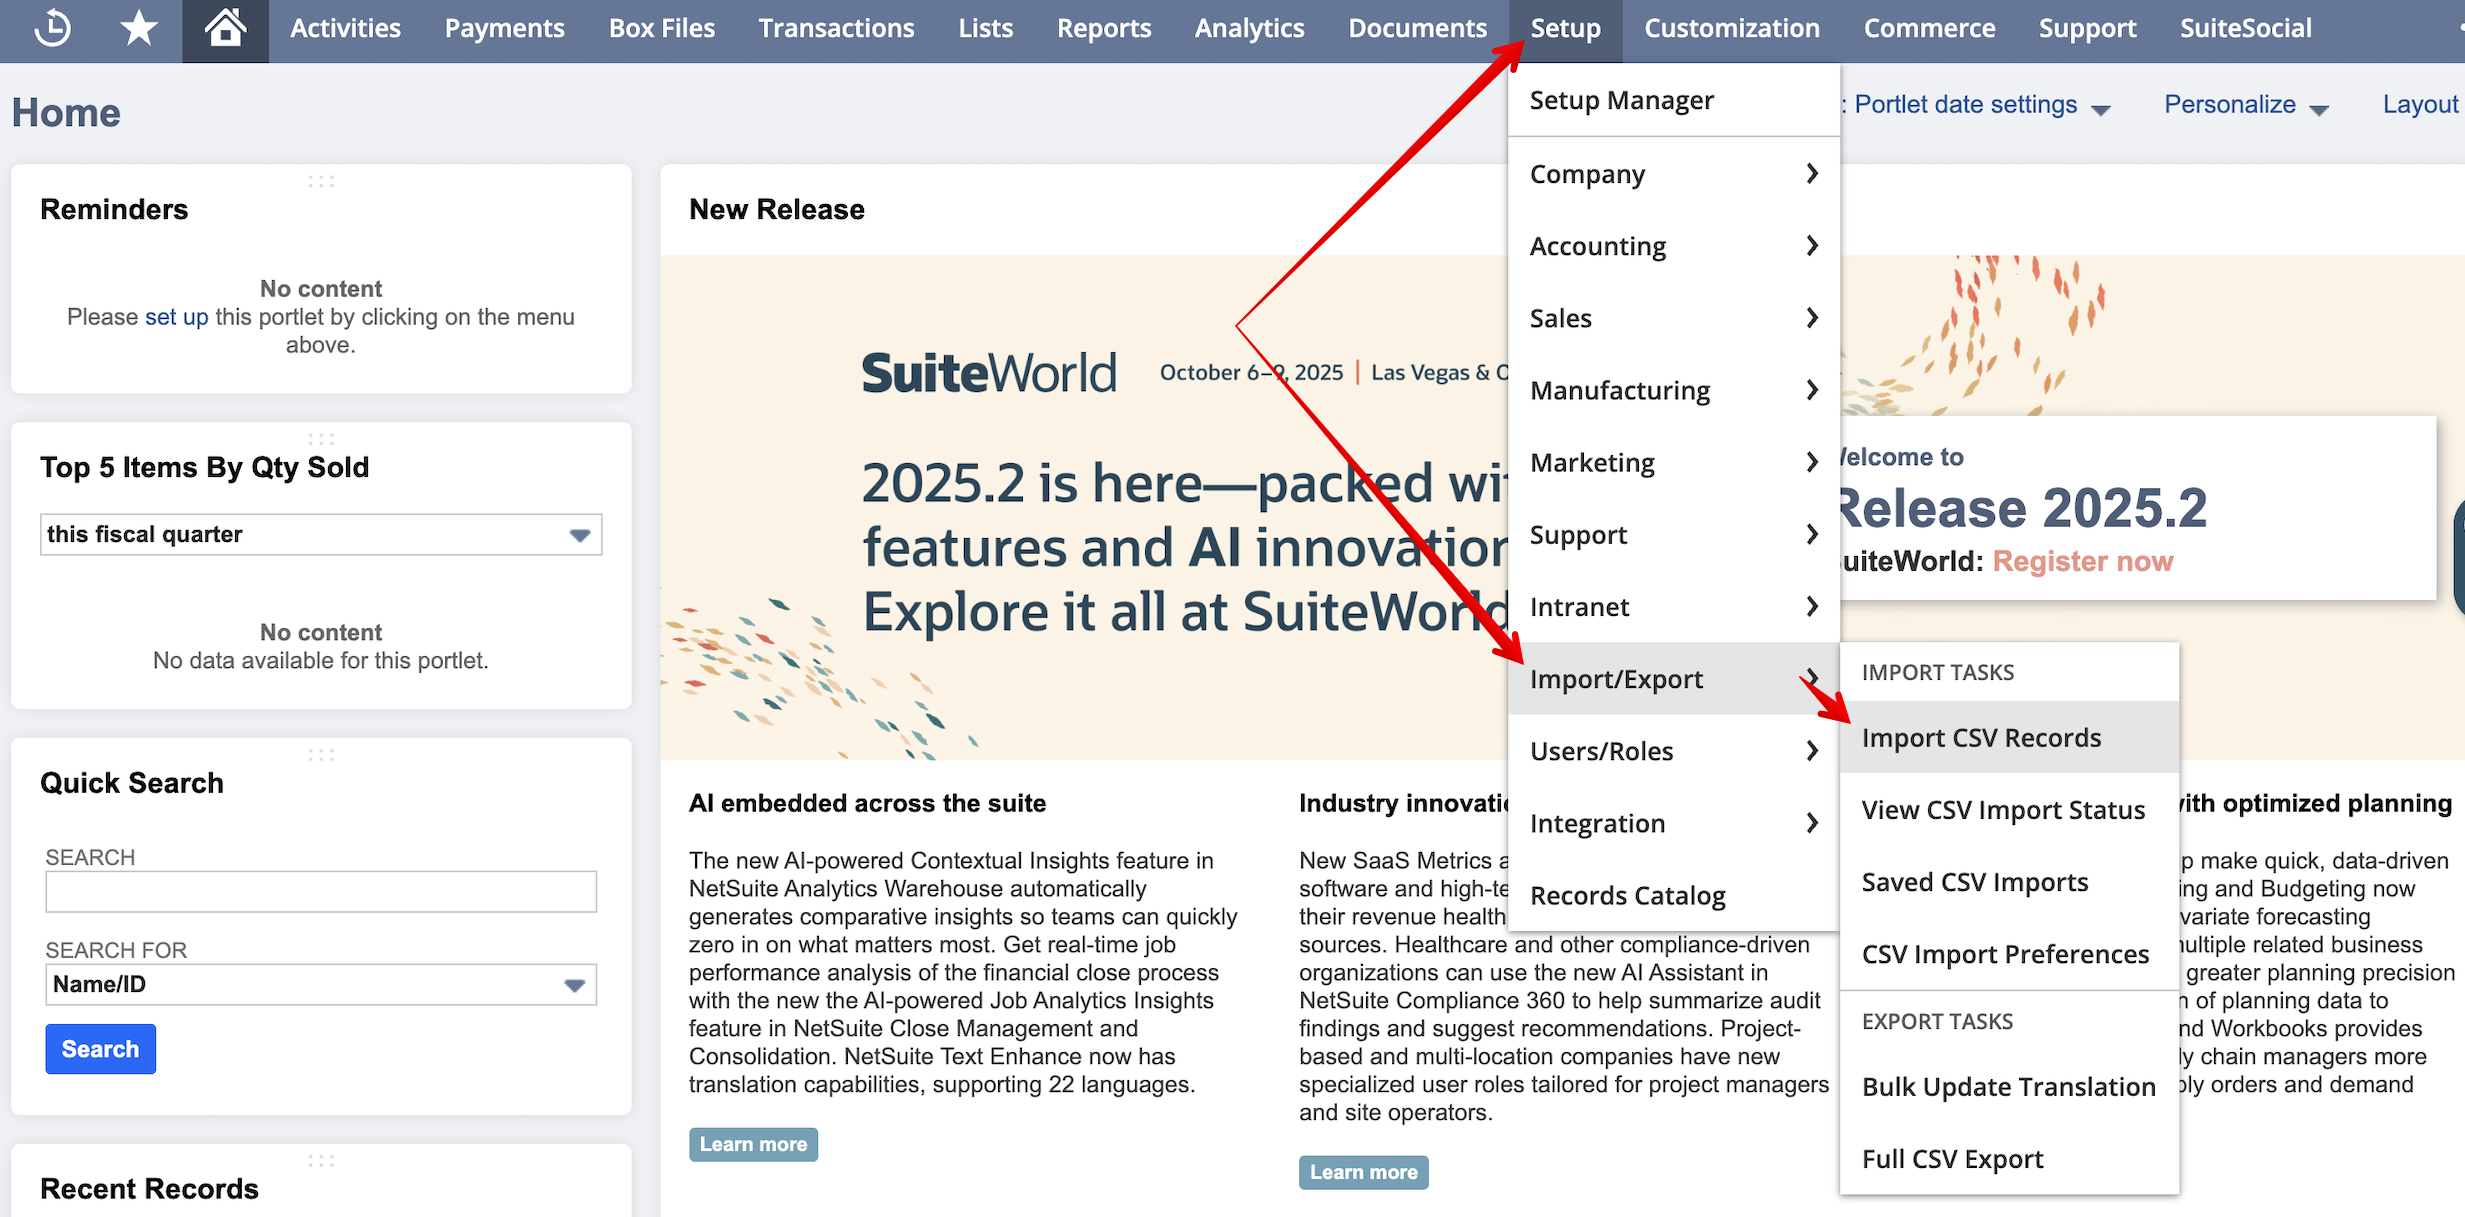
Step 9: Import Required Lists via CSV
Once the setup is completed, you can start your NetSuite data migration to Precoro SuiteApp using CSV files.
Before importing a CSV file, please enable the Run Server SuiteScript and Trigger Workflows checkbox in Setup → Import/Export → CSV Import Preferences. If it is disabled, no scripts or workflows can be executed, so the export to Precoro will fail.
💡 Please note: Migration of Taxes and Custom Segments via CSV is not supported.
To import the lists:
-
Get the ready-to-use CSV files from Precoro to ensure correct mapping and formatting.
- In NetSuite, go to Setup → Import/Export → Import CSV Records.

- Select the import and record types, character recording, CSV column delimiter, and other settings according to the instructions in the table below → upload your file.
💡 Please note: Supplier forms may switch to the user’s default during CSV import. To avoid incorrect assignment, set the correct default form before the import, or update it manually afterward.
| List type | Instructions |
| Vendor |
Import file:
Import settings:
|
| Chart of Accounts |
Import file:
Import settings:
|
| Locations |
Import file:
Import settings:
|
| Departments |
Import file:
Import settings:
|
| Classes |
Import file:
Import settings:
|
|
Items (different item types will be in different separate imports) |
Import file:
Import settings:
|
💡 Please note: You can import Customers and Projects either together or separately, depending on how they’re structured in NetSuite. If they belong to different NetSuite lists, you can still use the same Precoro file, as their internal IDs are unique and won’t overlap.
| Customers/Projects |
Import file:
Import settings:
|