TABLE OF CONTENTS
- Step 1: Enable Required Features in NetSuite
- Step 2: Install Precoro SuiteApp in NetSuite
- Step 3: Retrieve Integration Credentials
- Migrating to Multi-Subsidiary Integration
💡Please note: Currently, the SuiteApp integration supports only One-World NetSuite accounts. To configure the integration, you should have an Administrator role.
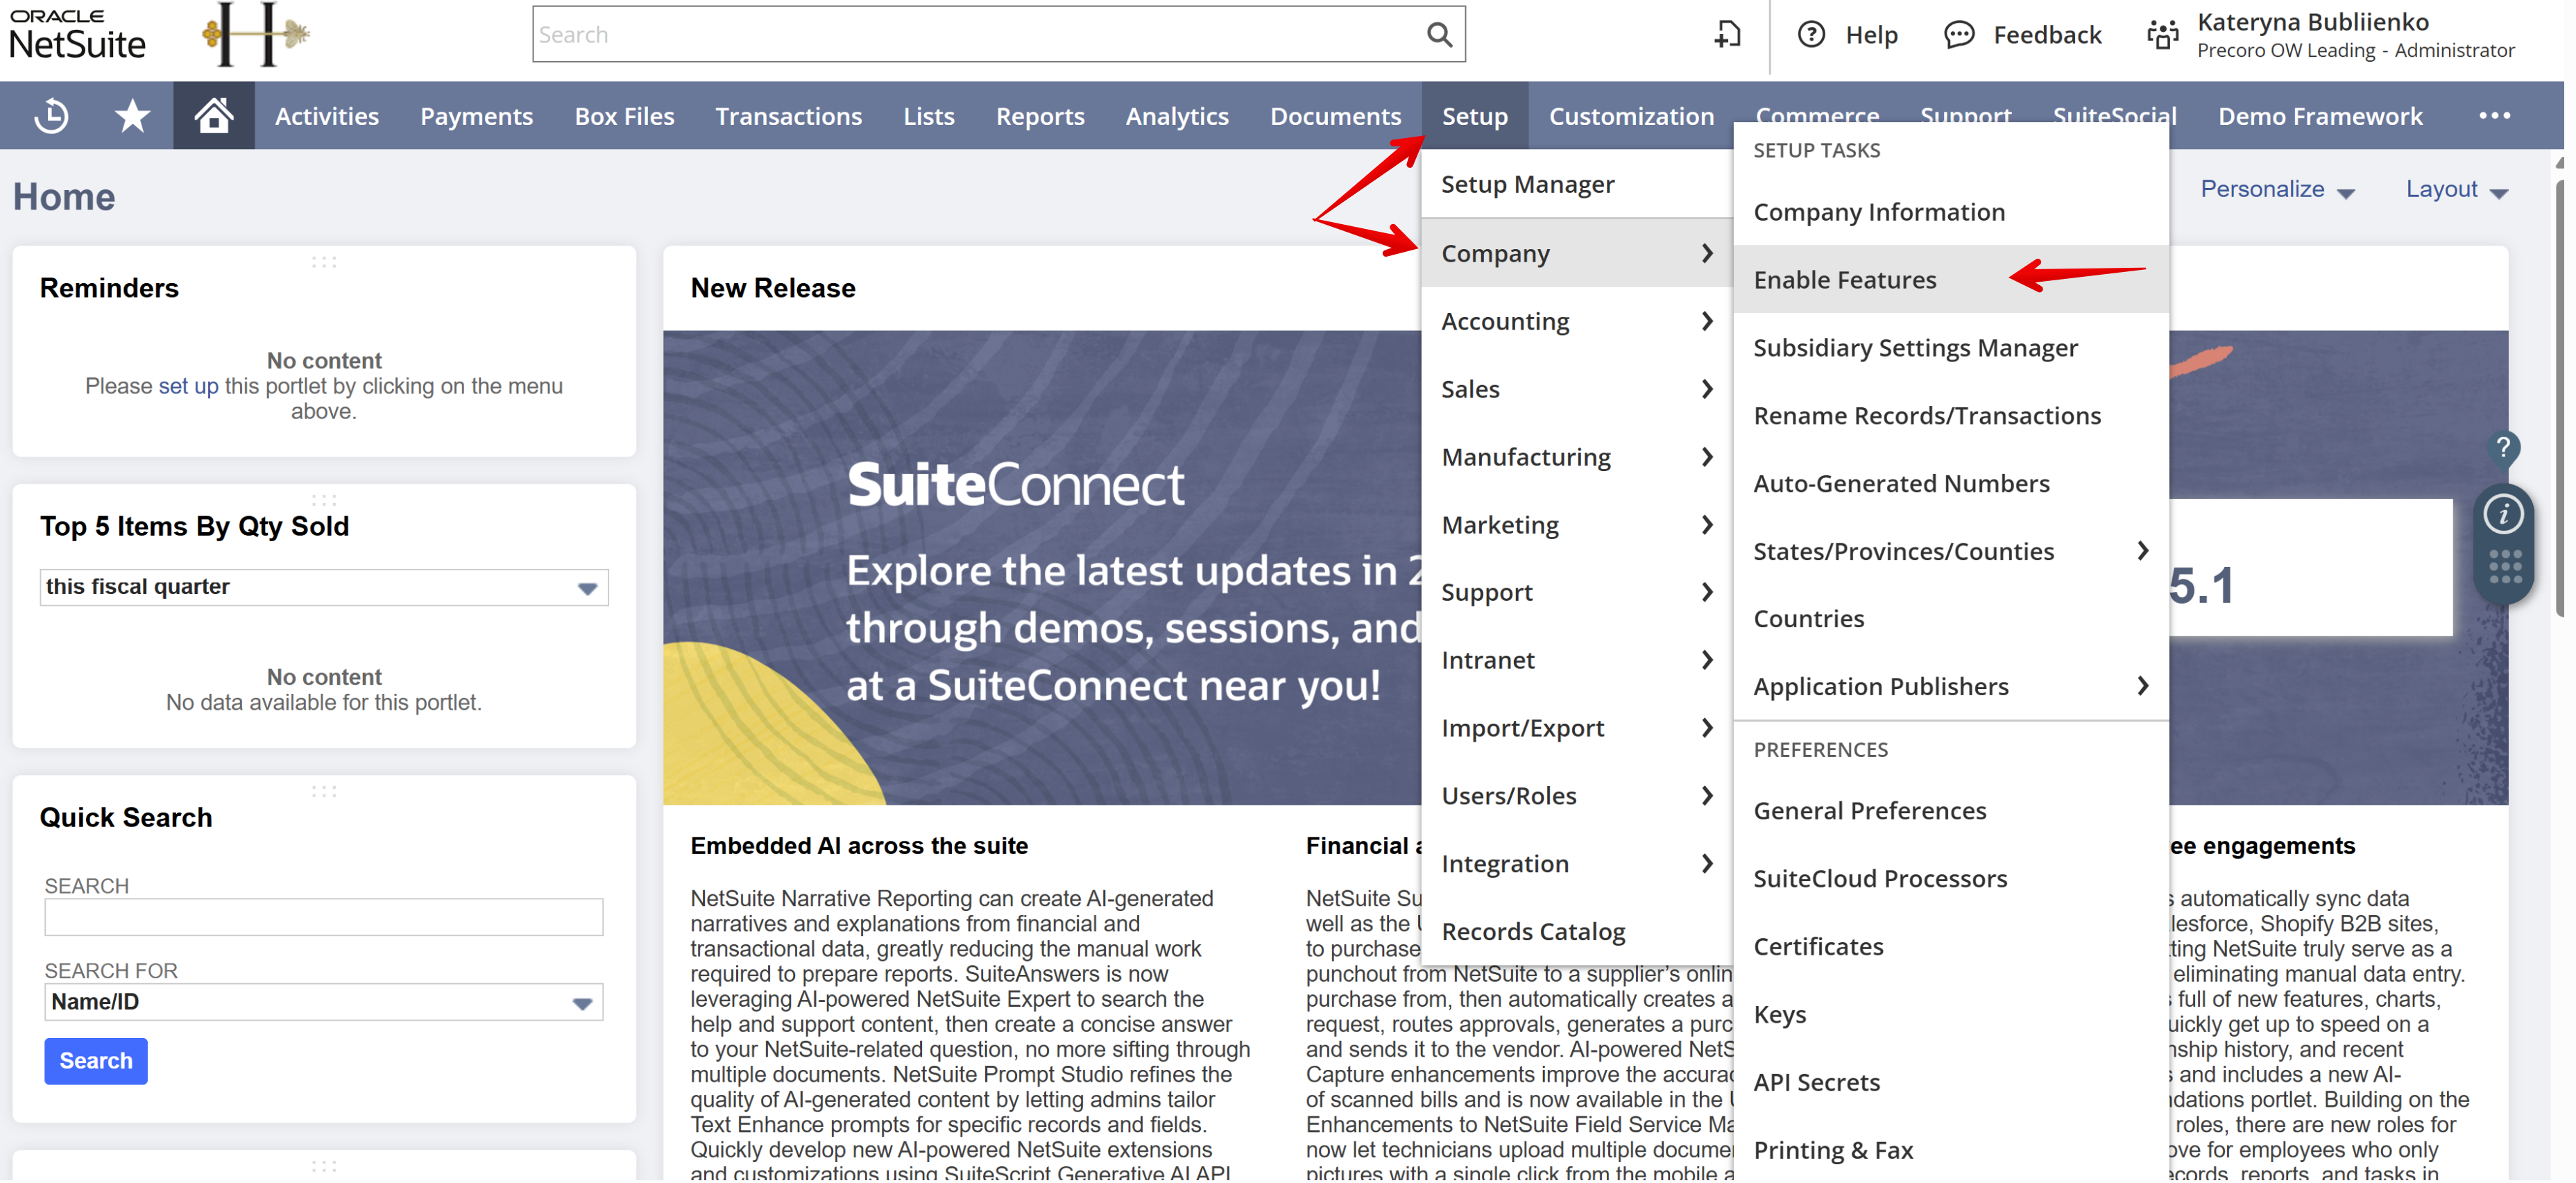
Step 1: Enable Required Features in NetSuite
Before installing the Precoro SuiteApp in NetSuite, make sure that all necessary features are enabled in the company settings:
- Go to Setup → Company → Enable Features.

- Mark the following checkboxes in the SuiteCloud tab:
Section
Features to enable
SuiteBuilder
Custom Records
SuiteScript
Client SuiteScript, Server SuiteScript
SuiteFlow
SuiteFlow
SuiteTalk (Web Services)
SOAP Web Services, REST Web Services
Manage Authentication
Token-based Authentication
SuiteCloud Development Framework
SuiteCloud Development Framework
- In the Analytics tab, enable SuiteAnalytics Workbook.
- In the Accounting tab (Basic Features), enable Accounting.
- Click Save to apply the configurations.
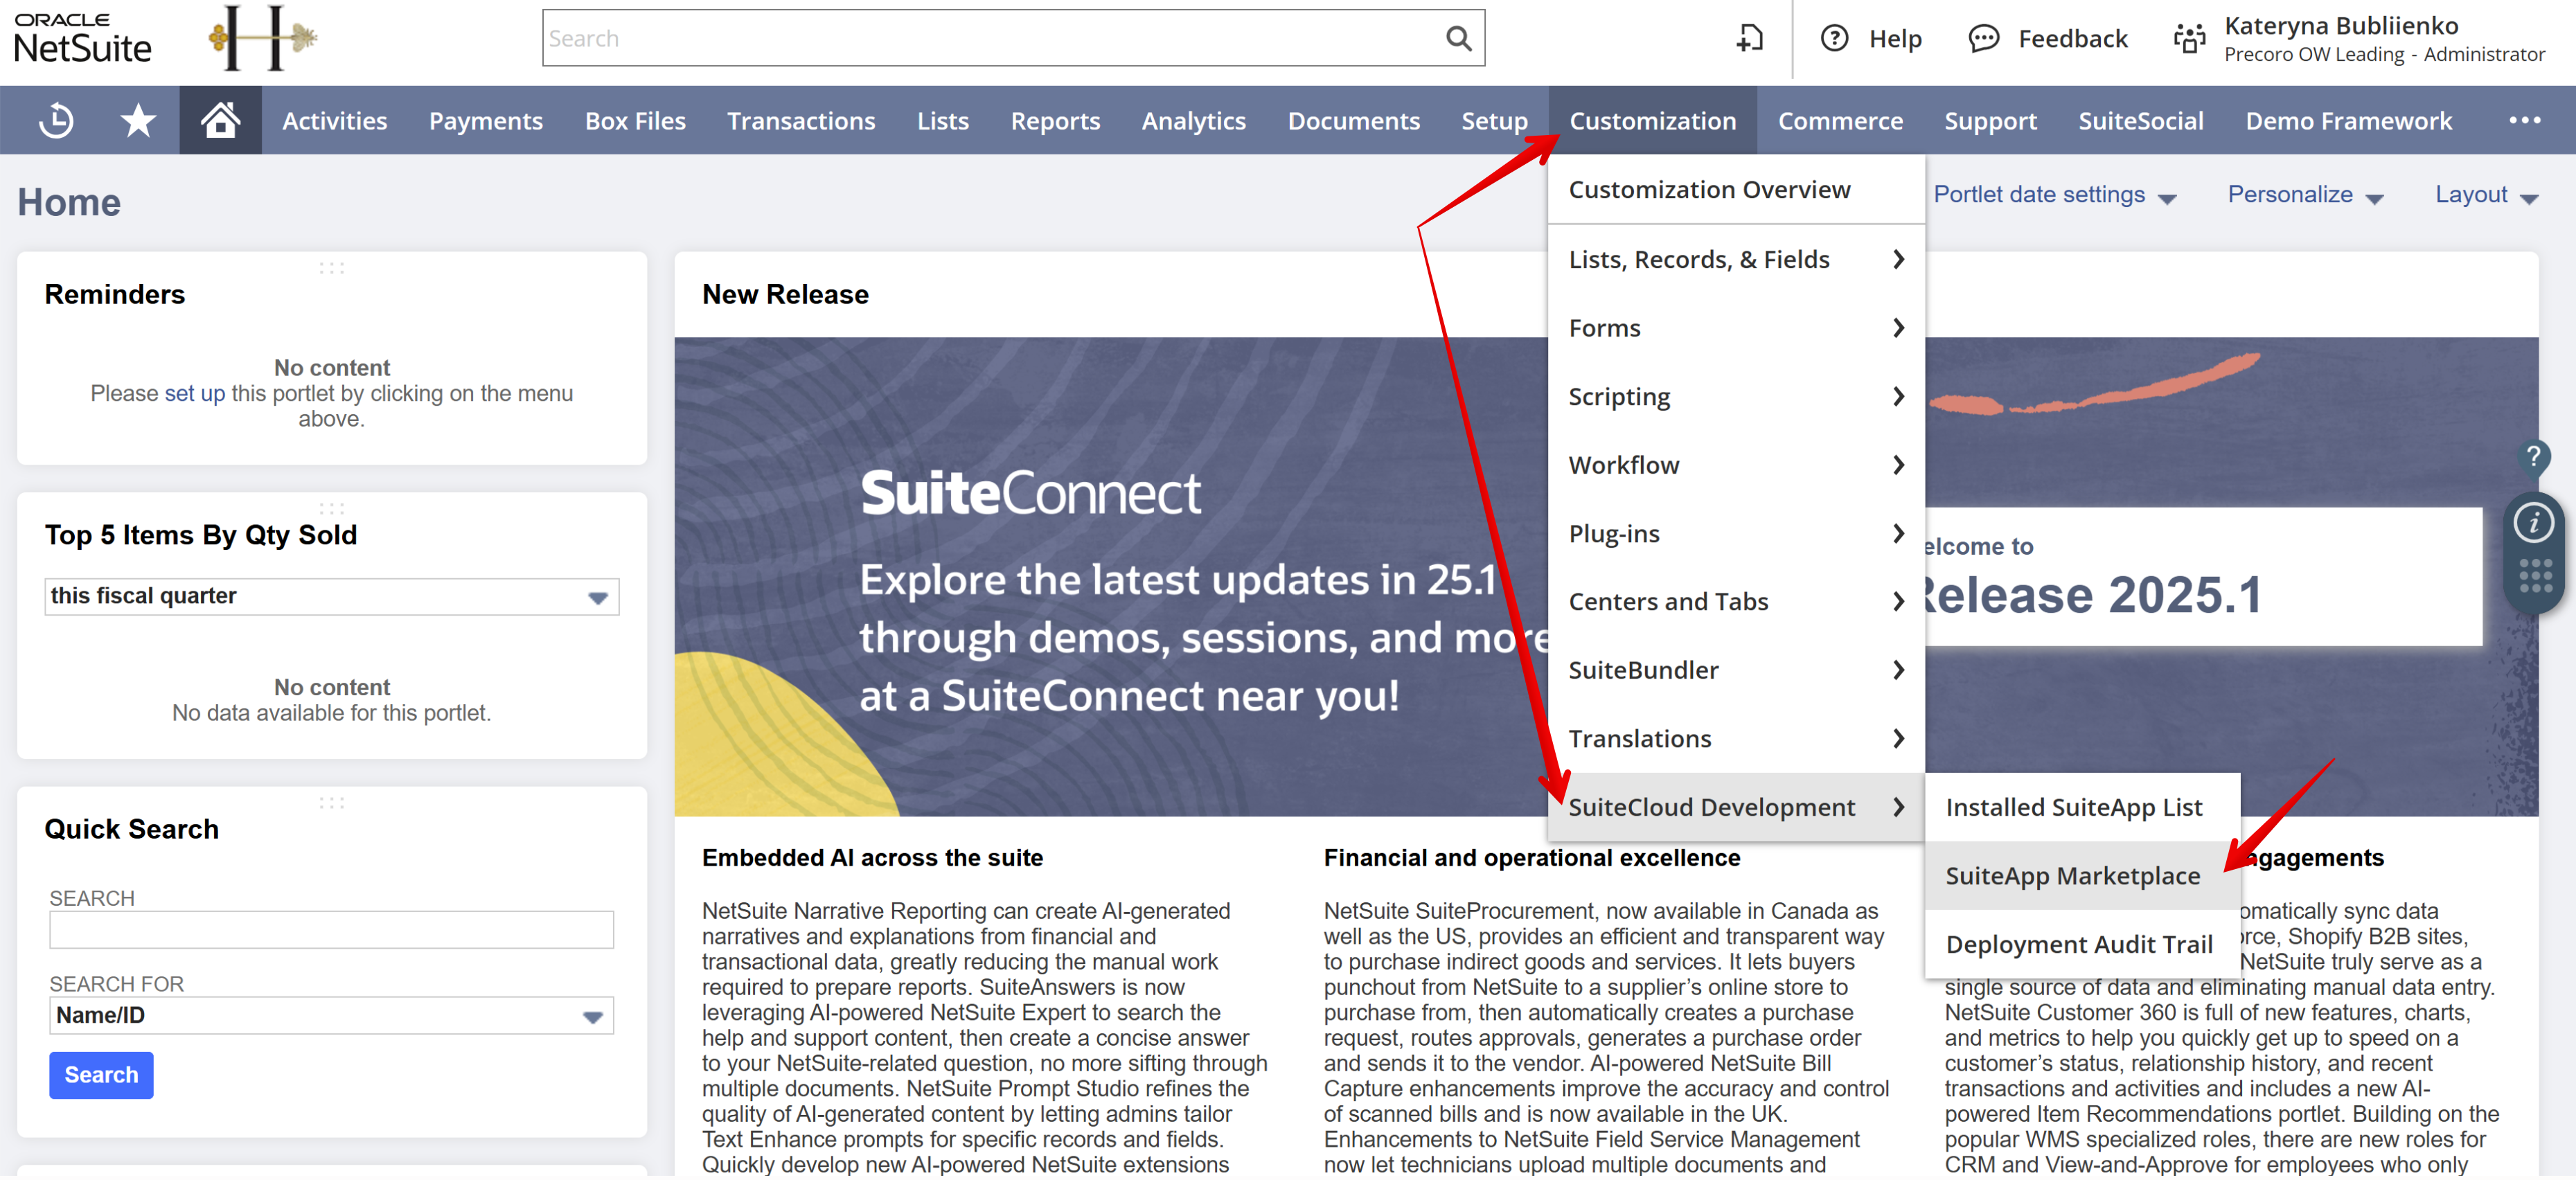
Step 2: Install Precoro SuiteApp in NetSuite
Once all required features are enabled, proceed to the SuiteApp installation:
- Navigate to Customization → SuiteCloud Development → SuiteApp Marketplace.

- Search for “Precoro Procurement for NetSuite” SuiteApp.
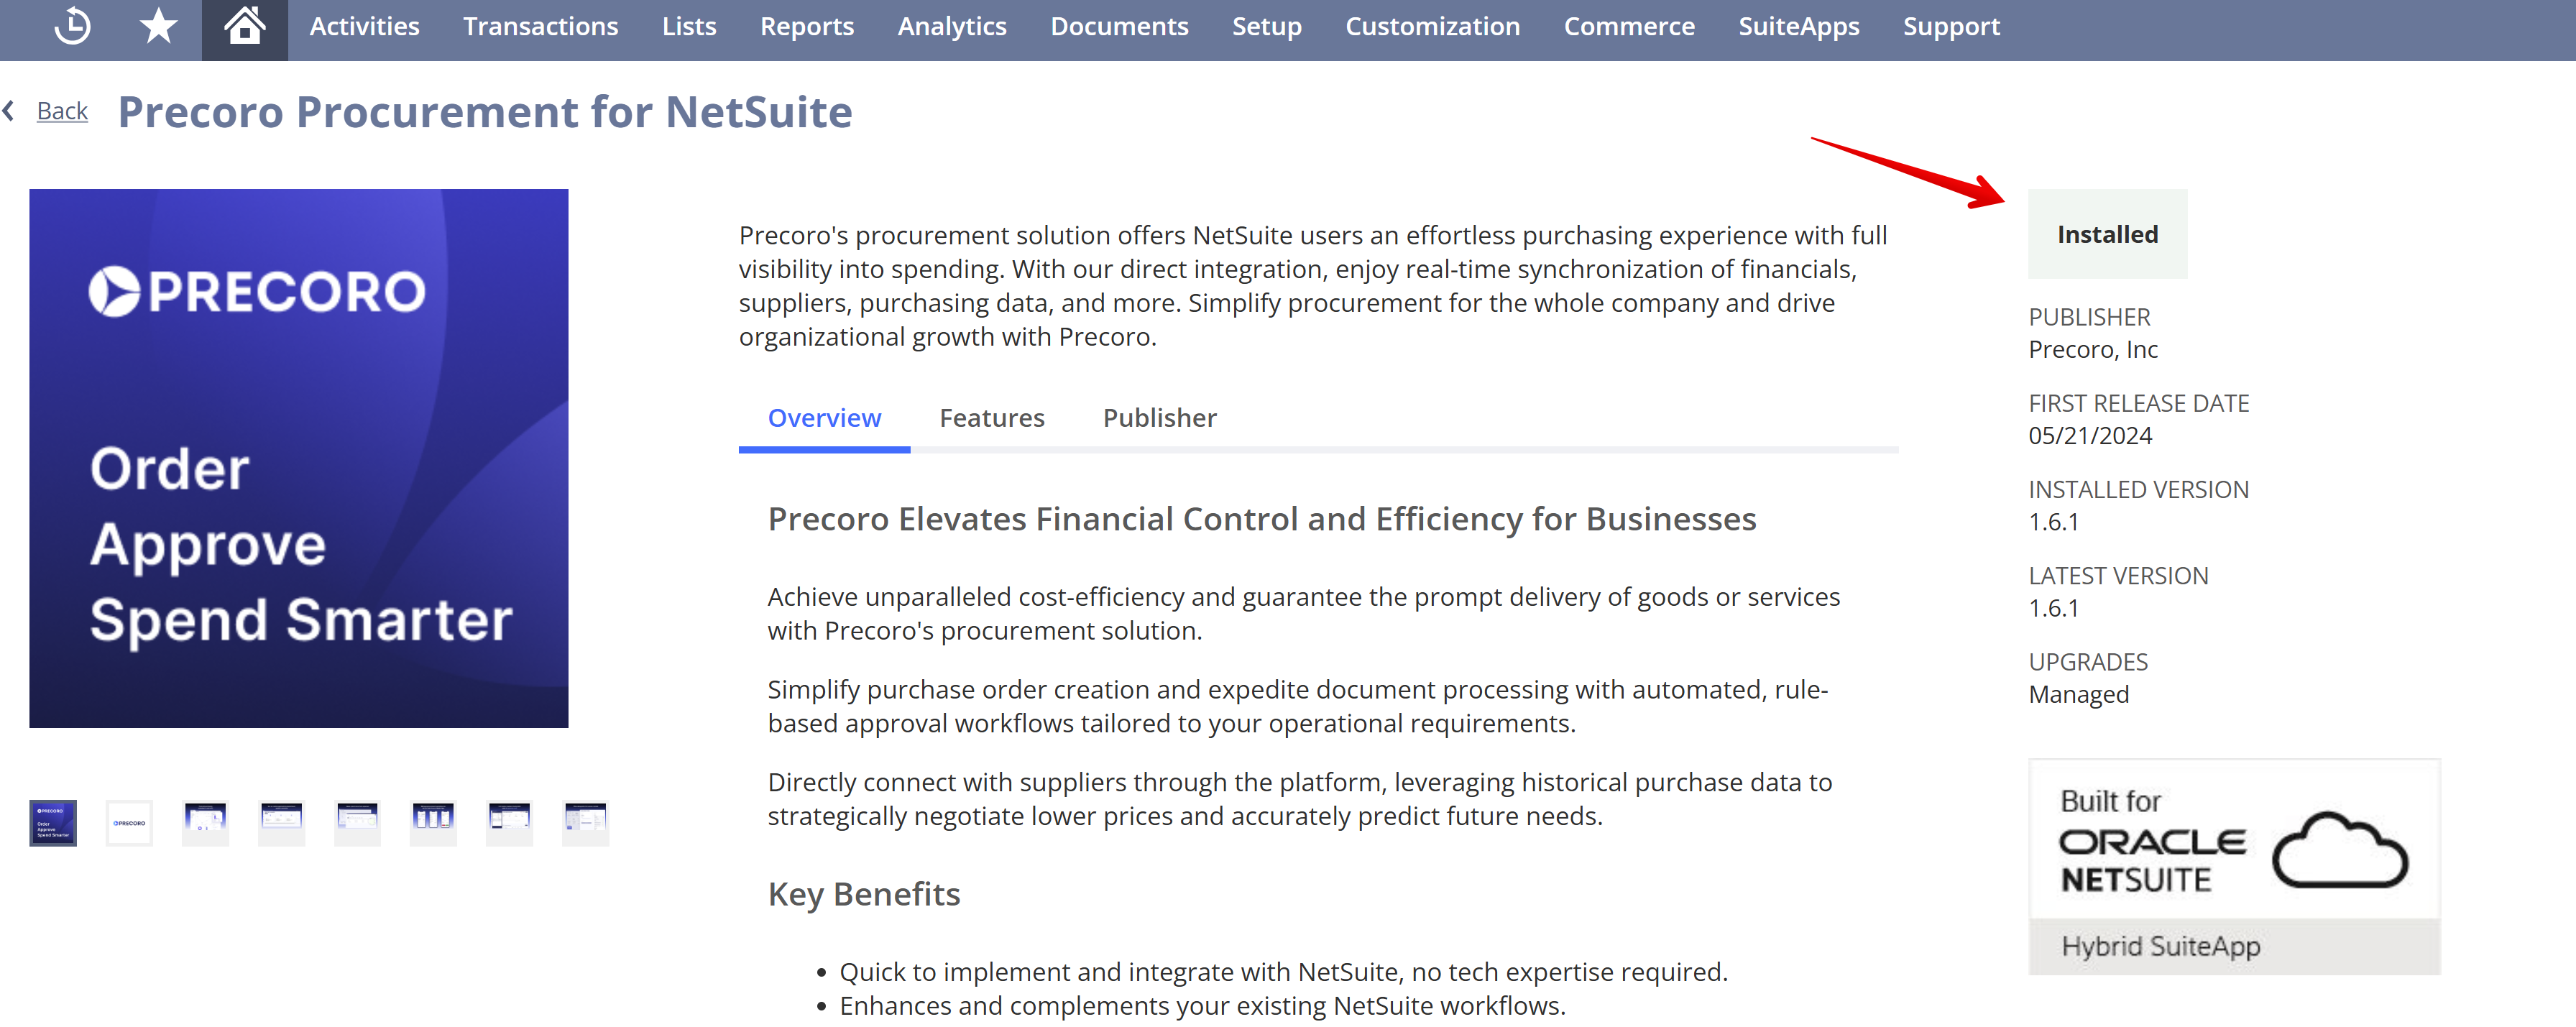
- Open the SuiteApp and click Install. The installation may take up to 5 minutes.
After successful completion, the SuiteApp will have the Installed status.
💡Please note: If any NetSuite account settings are missing, the system will prompt an error message. Enable the listed features and click Install again.
Step 3: Retrieve Integration Credentials
Along with other Precoro functionality, SuiteApp adds the Precoro Integration Role and Precoro Integration Record to your NetSuite account, both important for integration setup.
1) Assign the Precoro Integration Role
At this step, assign the Precoro Integration Role to the user responsible for generating tokens to connect Precoro and NetSuite, as well as to the user setting up the SuiteApp. These can be the same user.
💡Please note: To ensure a stable integration, select a reliable user. If they are removed from NetSuite or their role is revoked, the integration tokens will become invalid, and data synchronization will be interrupted.
To assign the needed role for a user:
- Navigate to Lists → Employees → Employees.
- Find the required user → click Edit.
- Go to the Access tab → Roles section.
- Choose the “Precoro Integration Role” option → click Add.
- Press Save to apply the changes.
2) Generate Access Tokens
- Navigate to Setup → Users/Roles → Access Tokens → New.

- Select:
- Application Name: Precoro Integration
- User: The assigned integration user
- Role: Precoro Integration Role
- Click Save.

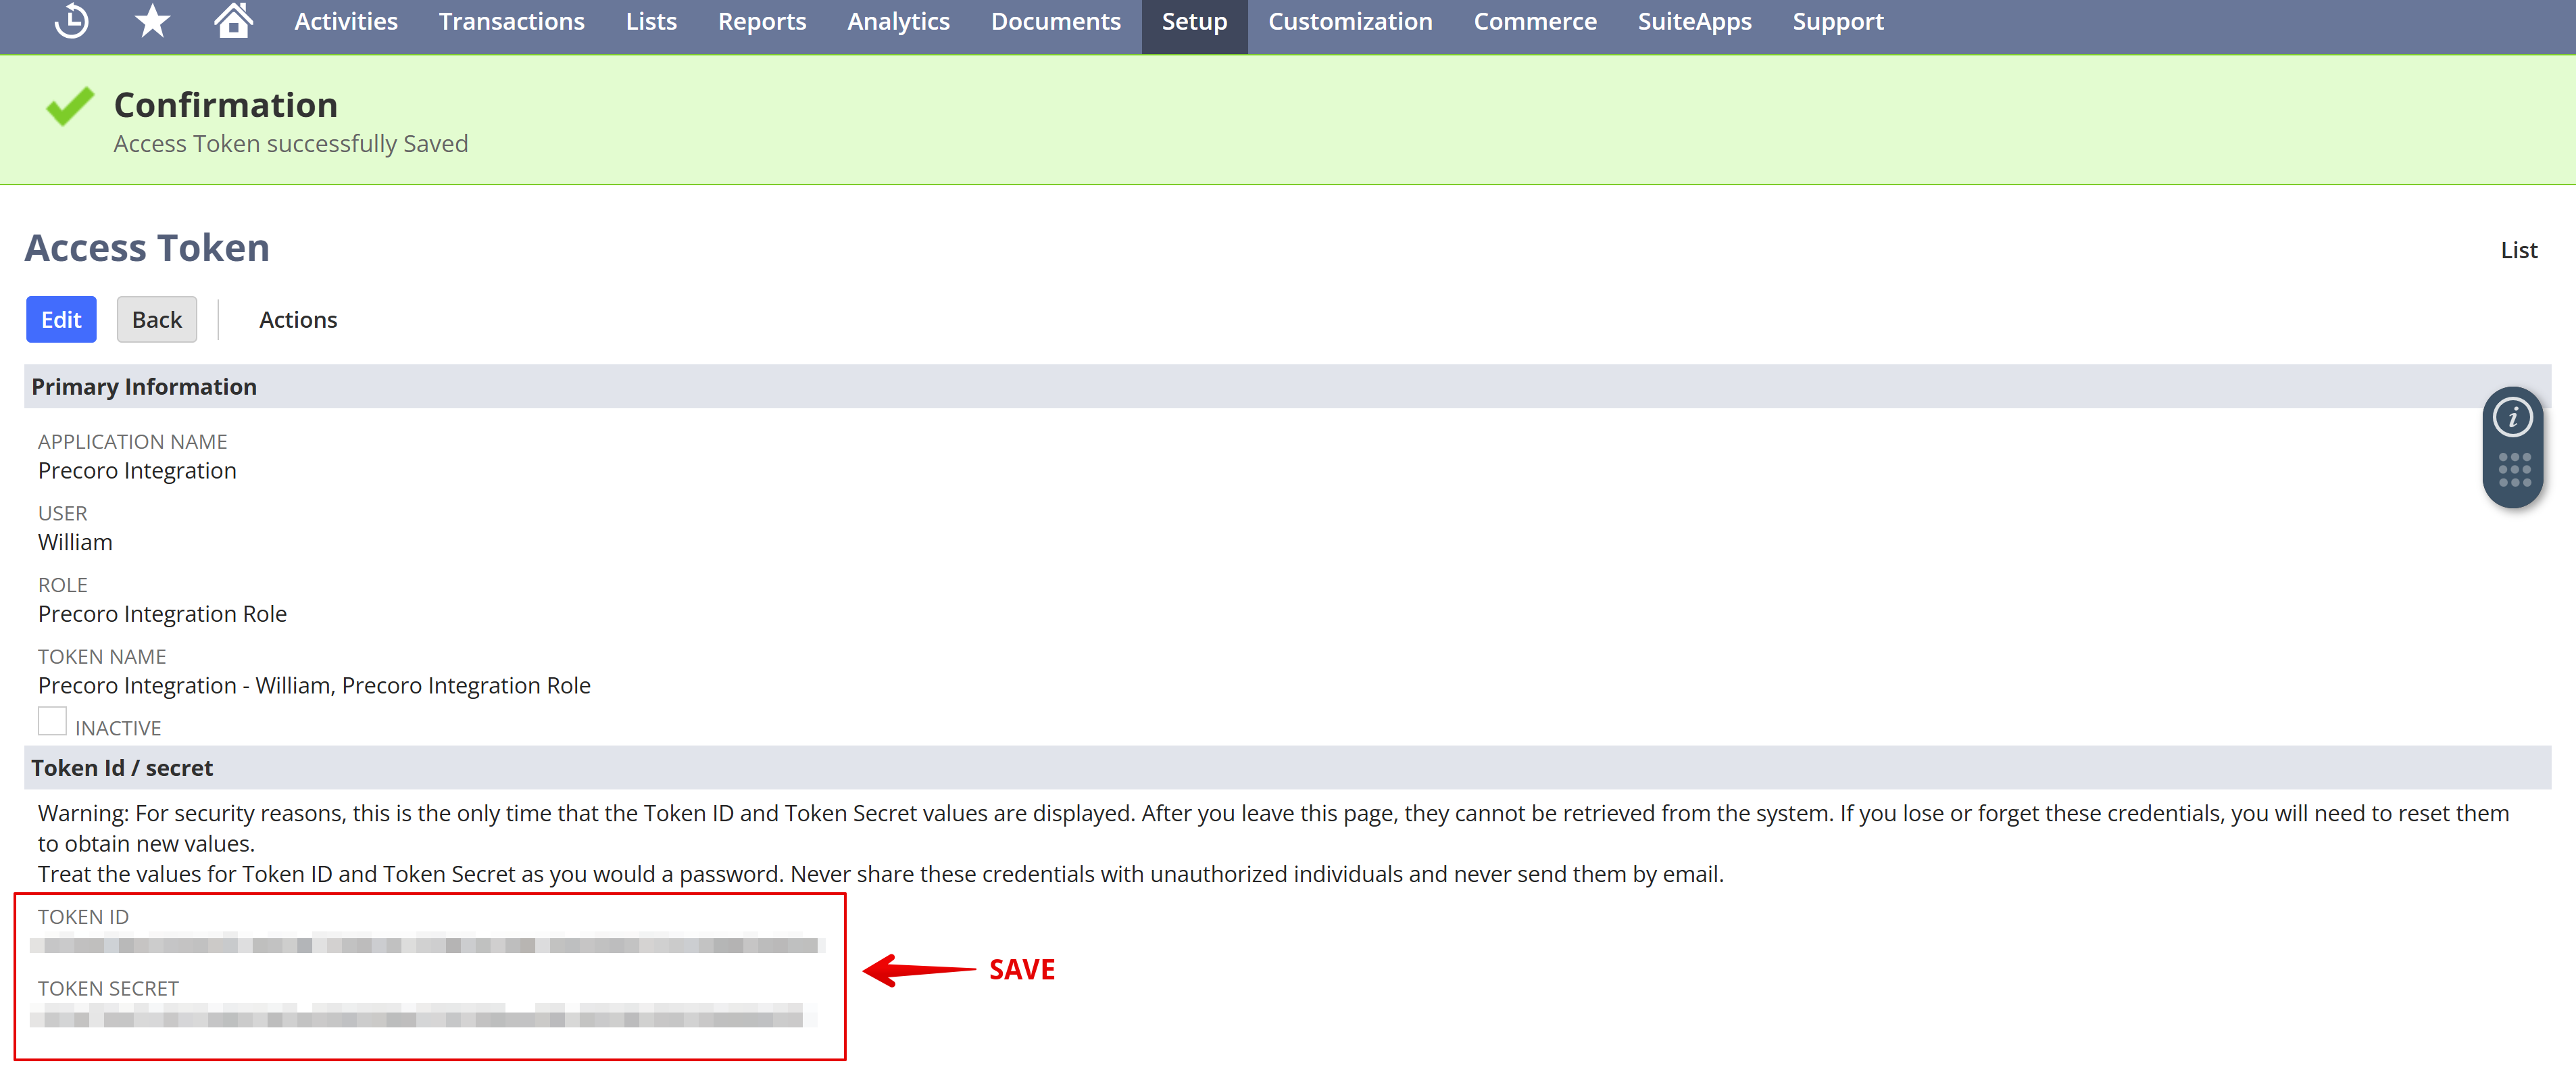
- Locate and securely save the Token ID and Token Secret.
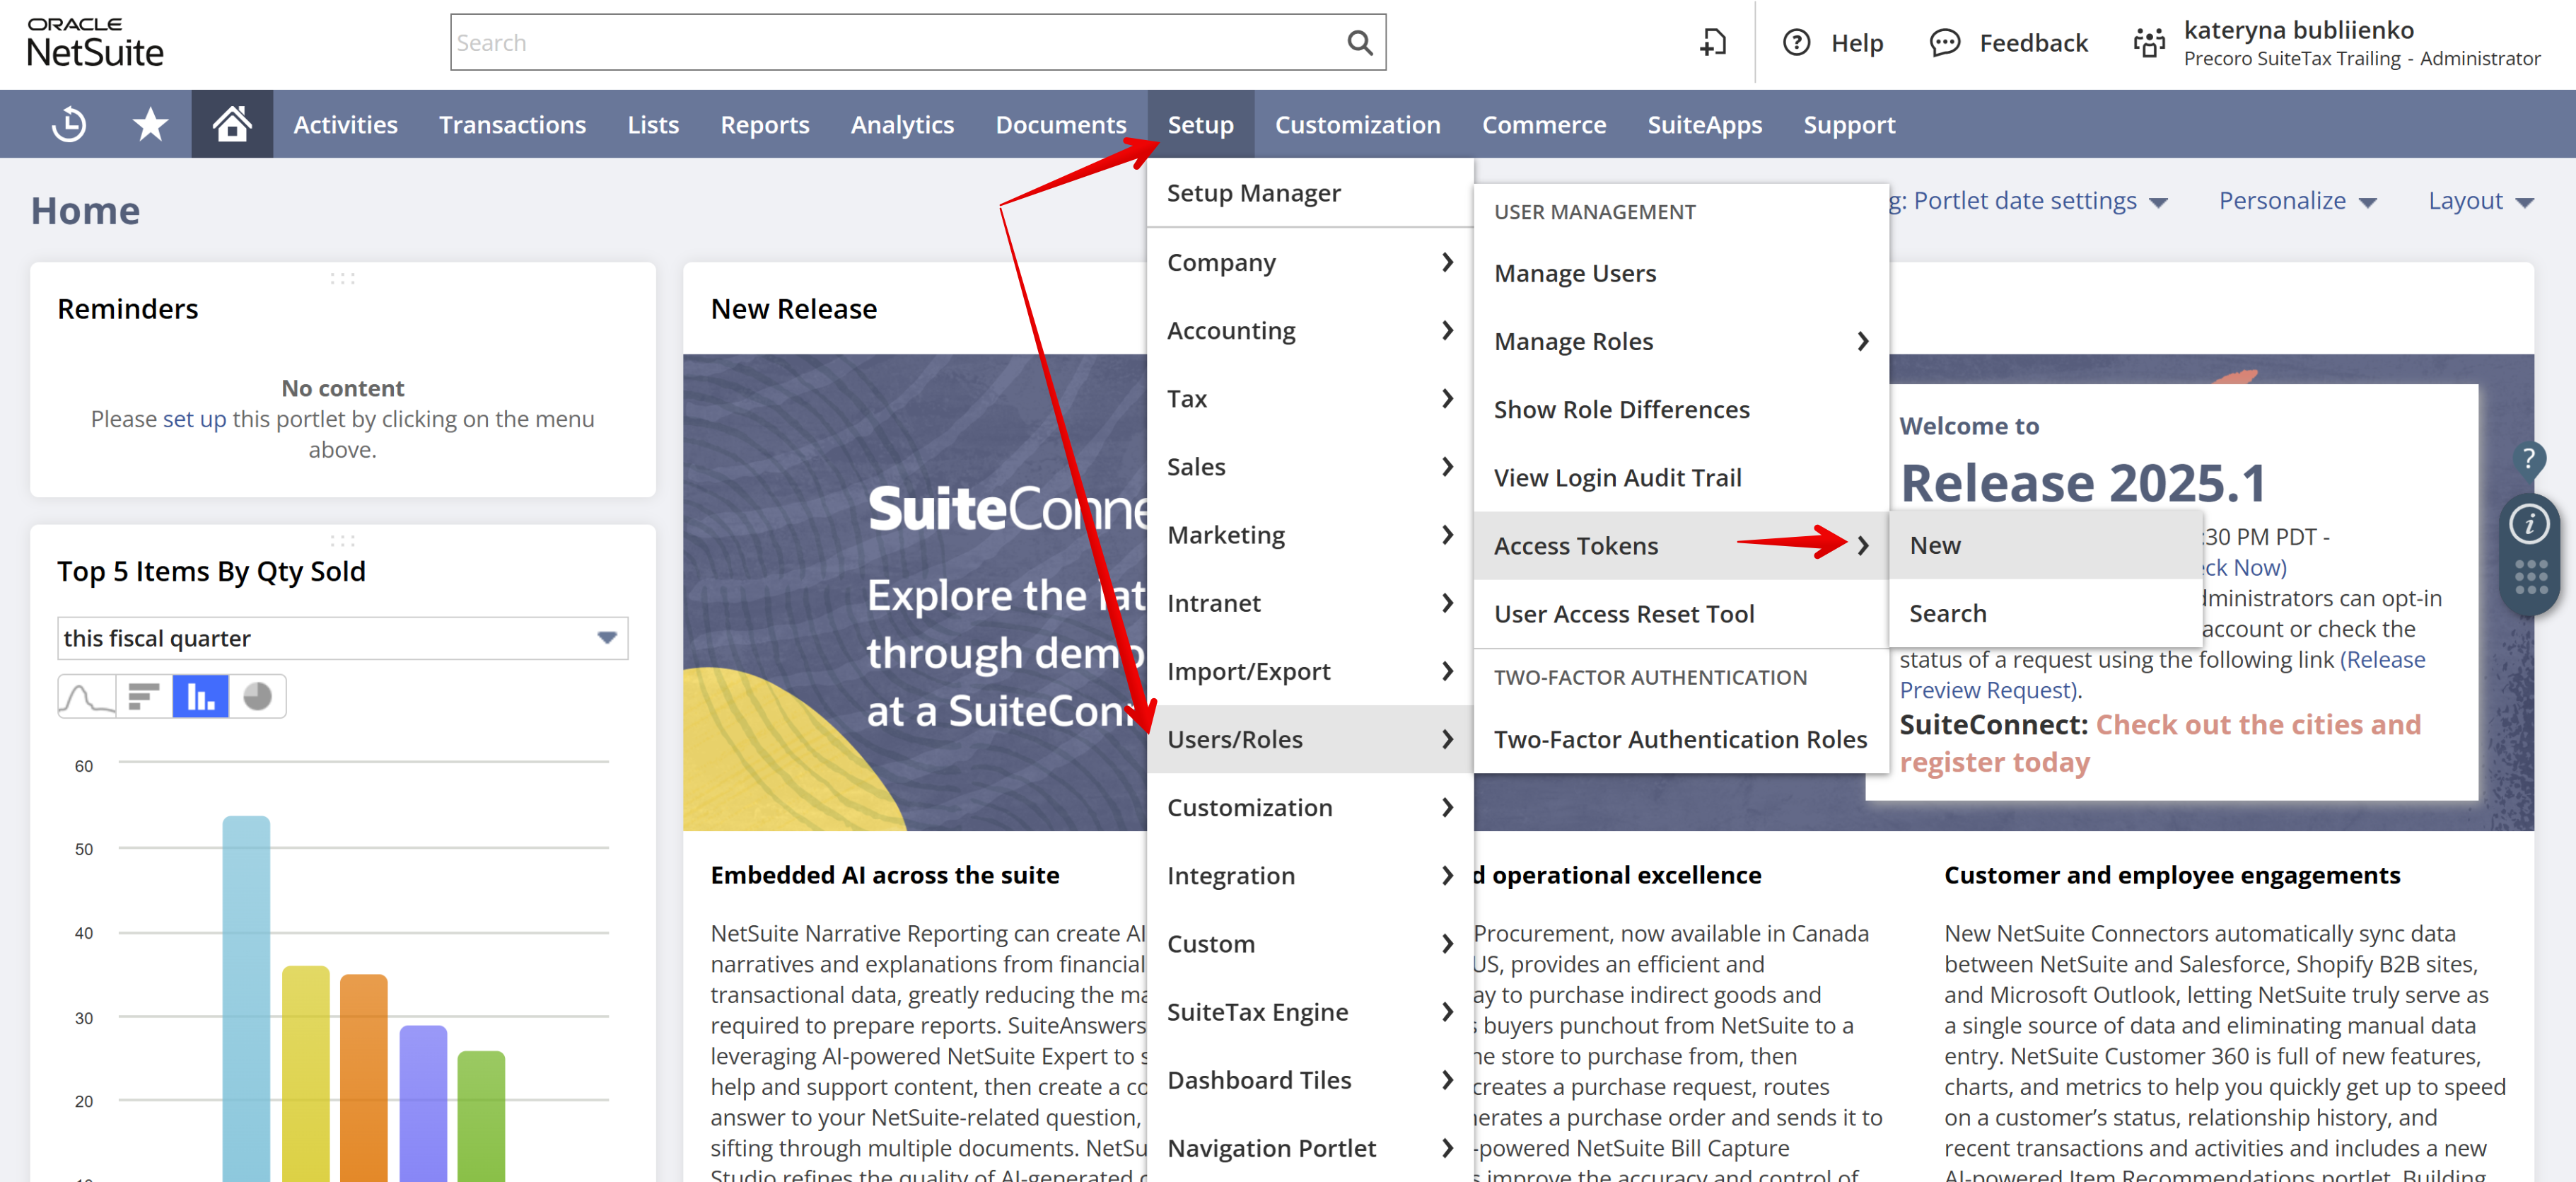
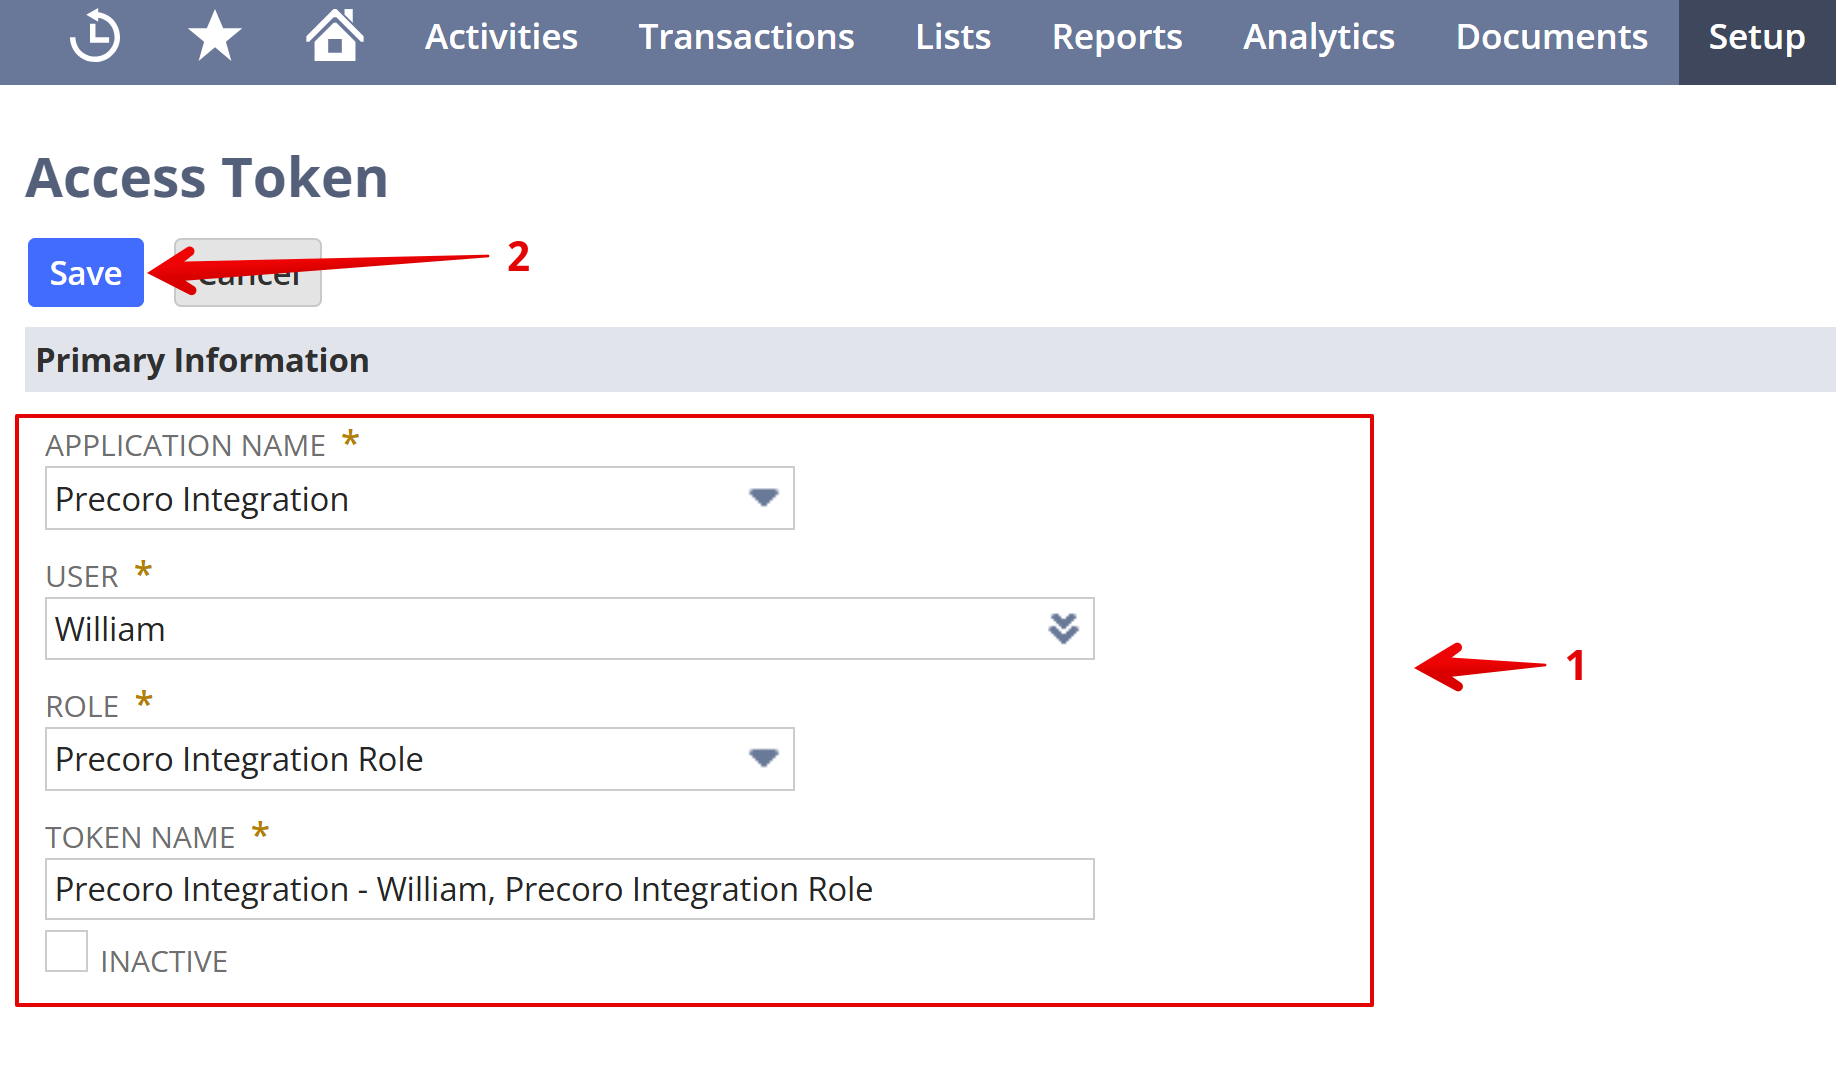
💡Please note: Token ID and Token Secret are displayed only once. Please save them right away.
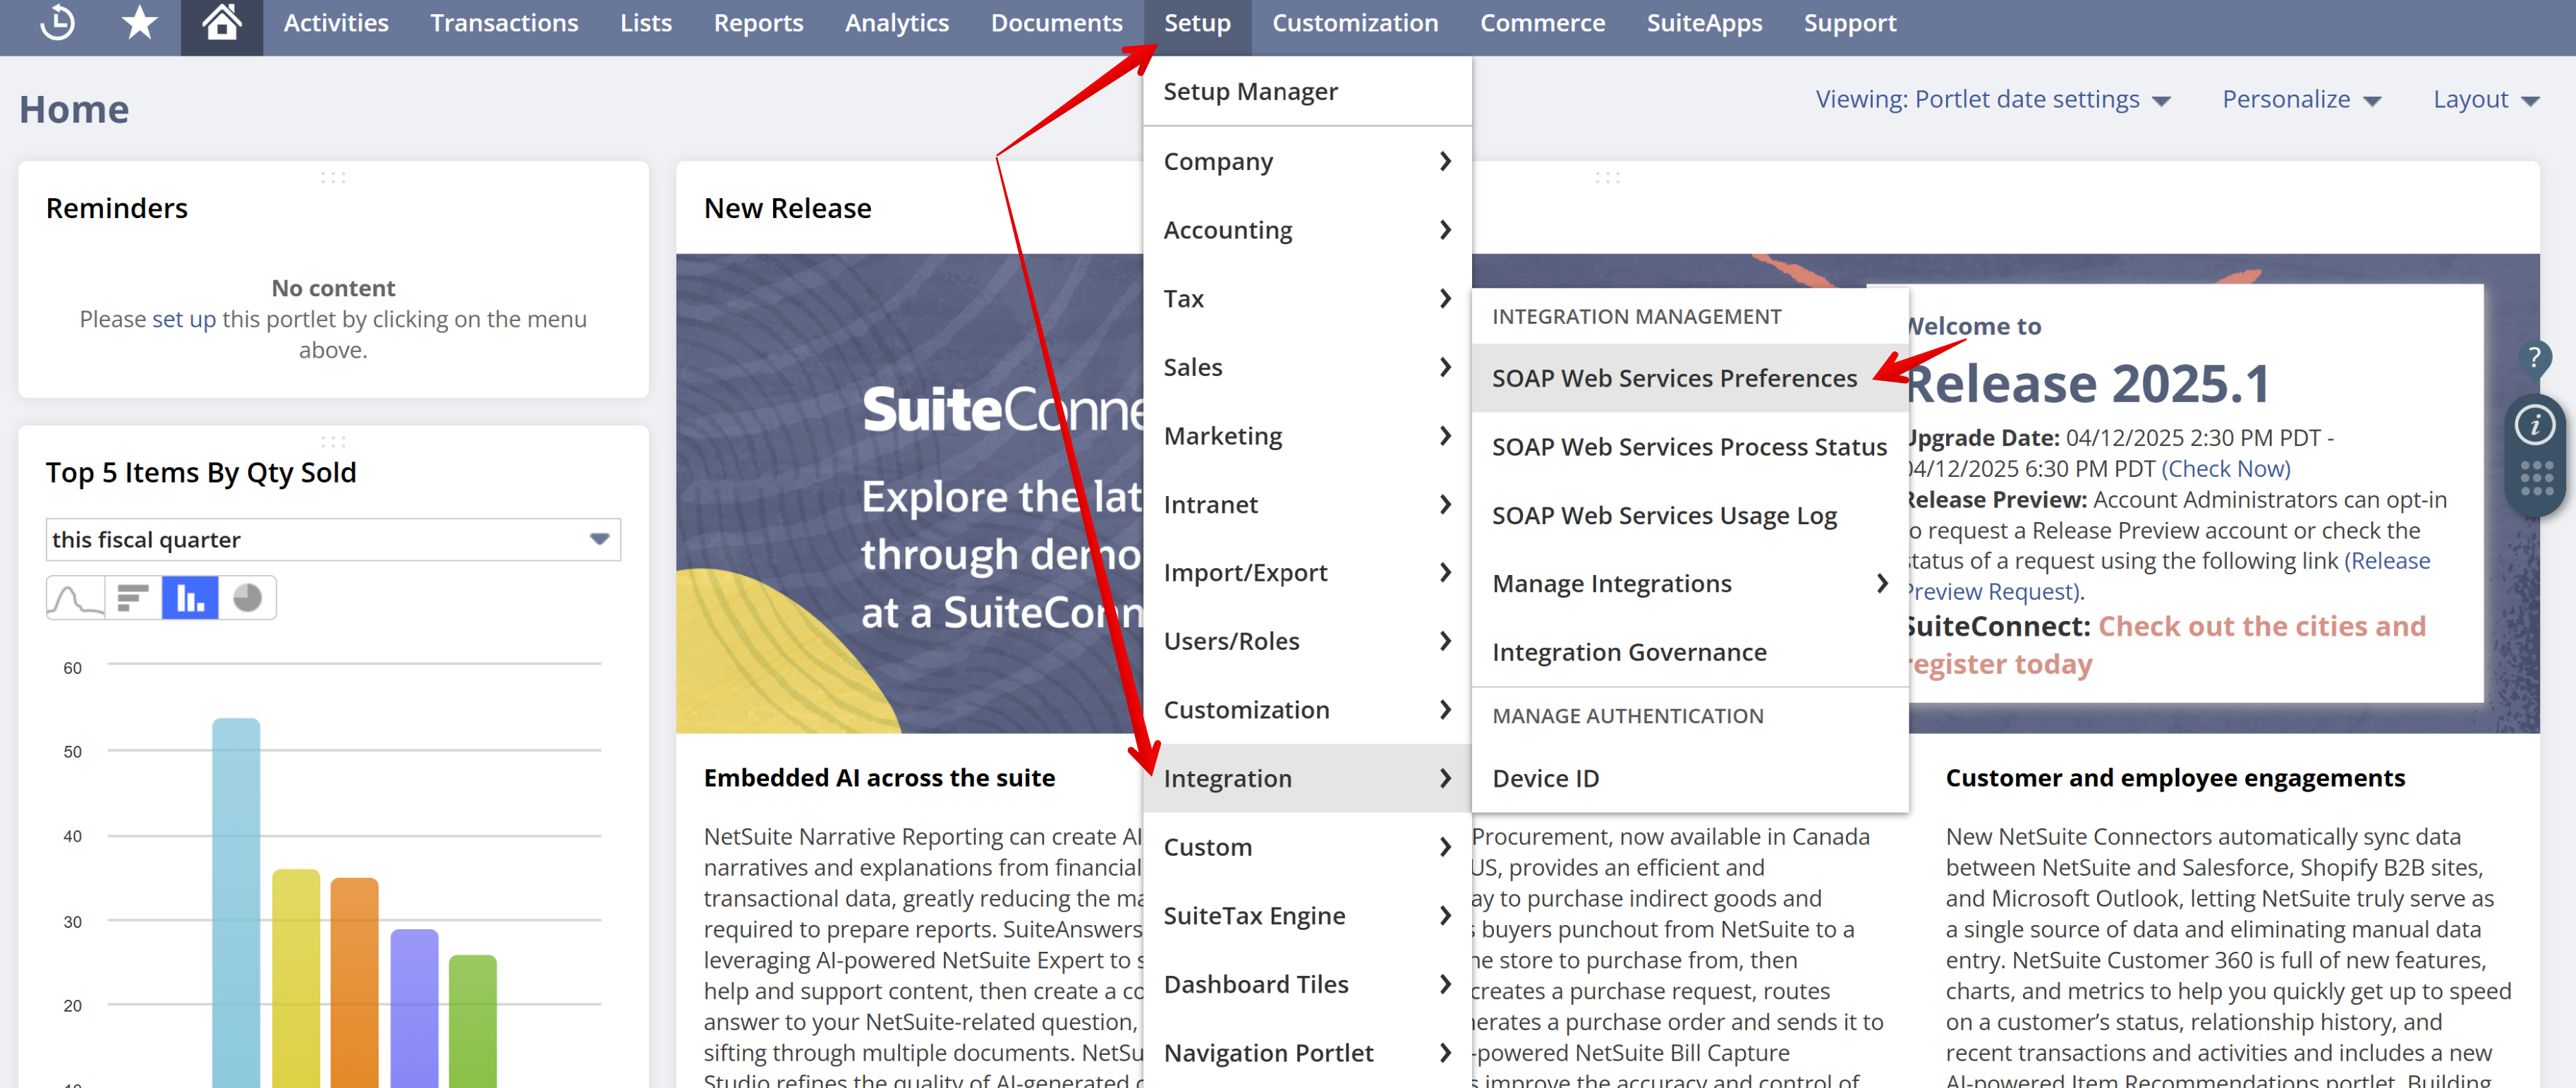
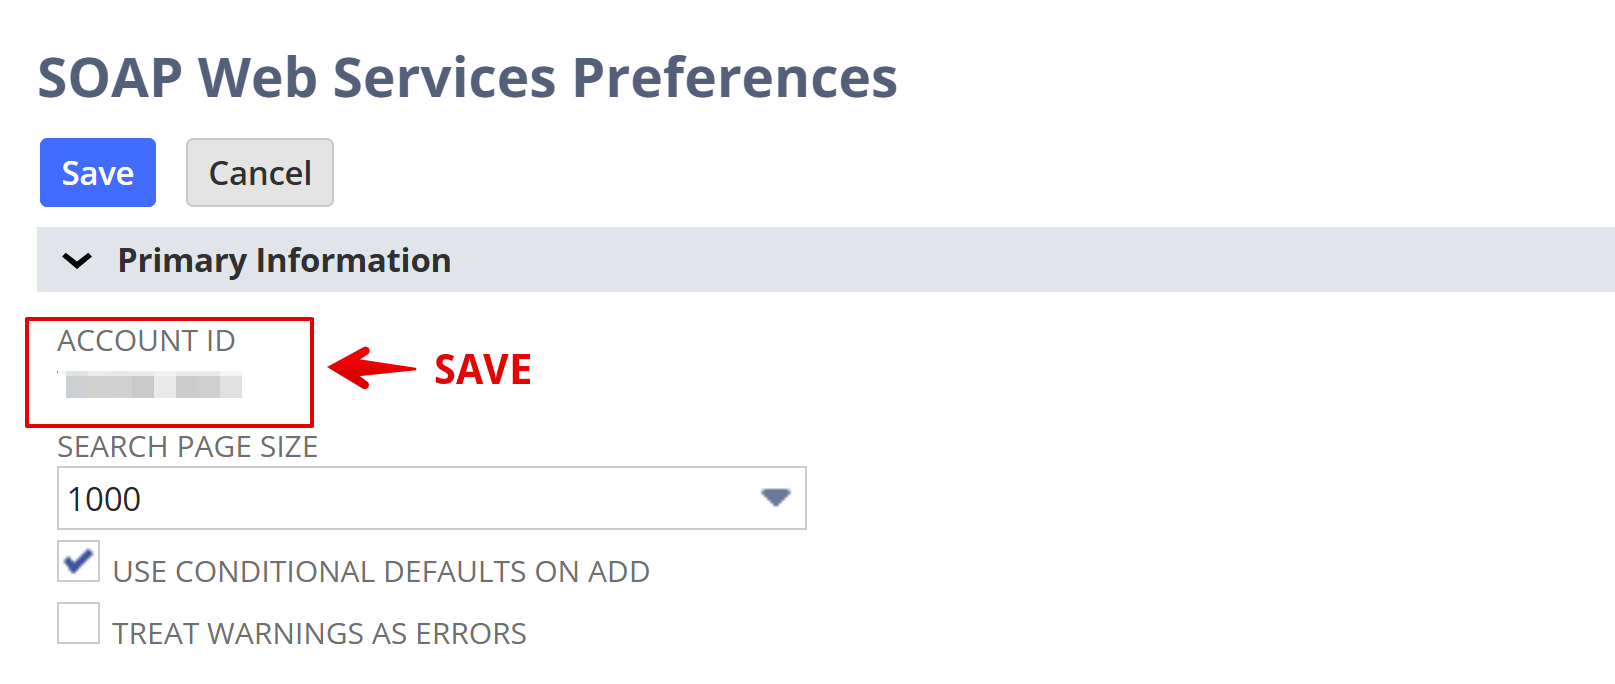
3) Retrieve Account ID
To find your Account ID:
- Navigate to Setup → Integration → SOAP Web Services Preferences.

- Save the Account ID.

Step 4: Connect Precoro with NetSuite
Once you have a Token ID, Token Secret, and Account ID, please securely share these details with your Customer Success Manager, as they are required to connect Precoro to NetSuite in the next steps.
If you use Multi-Entity Management, you can integrate multiple subsidiaries. Each of them will be mapped with a legal entity. Otherwise, one Precoro company can be integrated with only one NetSuite subsidiary.
💡Please note: If you have access restrictions based on subsidiaries in NetSuite, these restrictions will not be transferred to Precoro. This functionality is underway and will be added in the following updates.
Currently, if you create legal entities when integrating subsidiaries, all options will be available for all legal entities. When you create a document for a legal entity mapped with a NetSuite subsidiary and fill an integrated field with a value unavailable for this subsidiary, the document won’t be sent to NetSuite.
1) Connect Precoro to NetSuite
To connect Precoro to NetSuite, follow these steps:
1. In Precoro, navigate to Configuration → Integrations → NetSuite → Connect.
2. Enter the retrieved Account ID, Token ID, and Token Secret.
3. In the Documents to Send section, choose document types to integrate. This setting can be adjusted later.
You can use the Core Document Set option to sync Purchase Orders, Receipts, Invoices, and Credit Notes as one connected Procure-to-Pay flow.
Please note: This feature is currently in Beta. To start using it reach out to your Customer Success Manager to enable the functionality.
4. Click Save.
5. After validation, the Subsidiary section appears for companies that will be integrated with one NetSuite subsidiary. Choose the Subsidiary to integrate with the Precoro company → click Save. If you have Multi-Entity Management enabled, skip this step.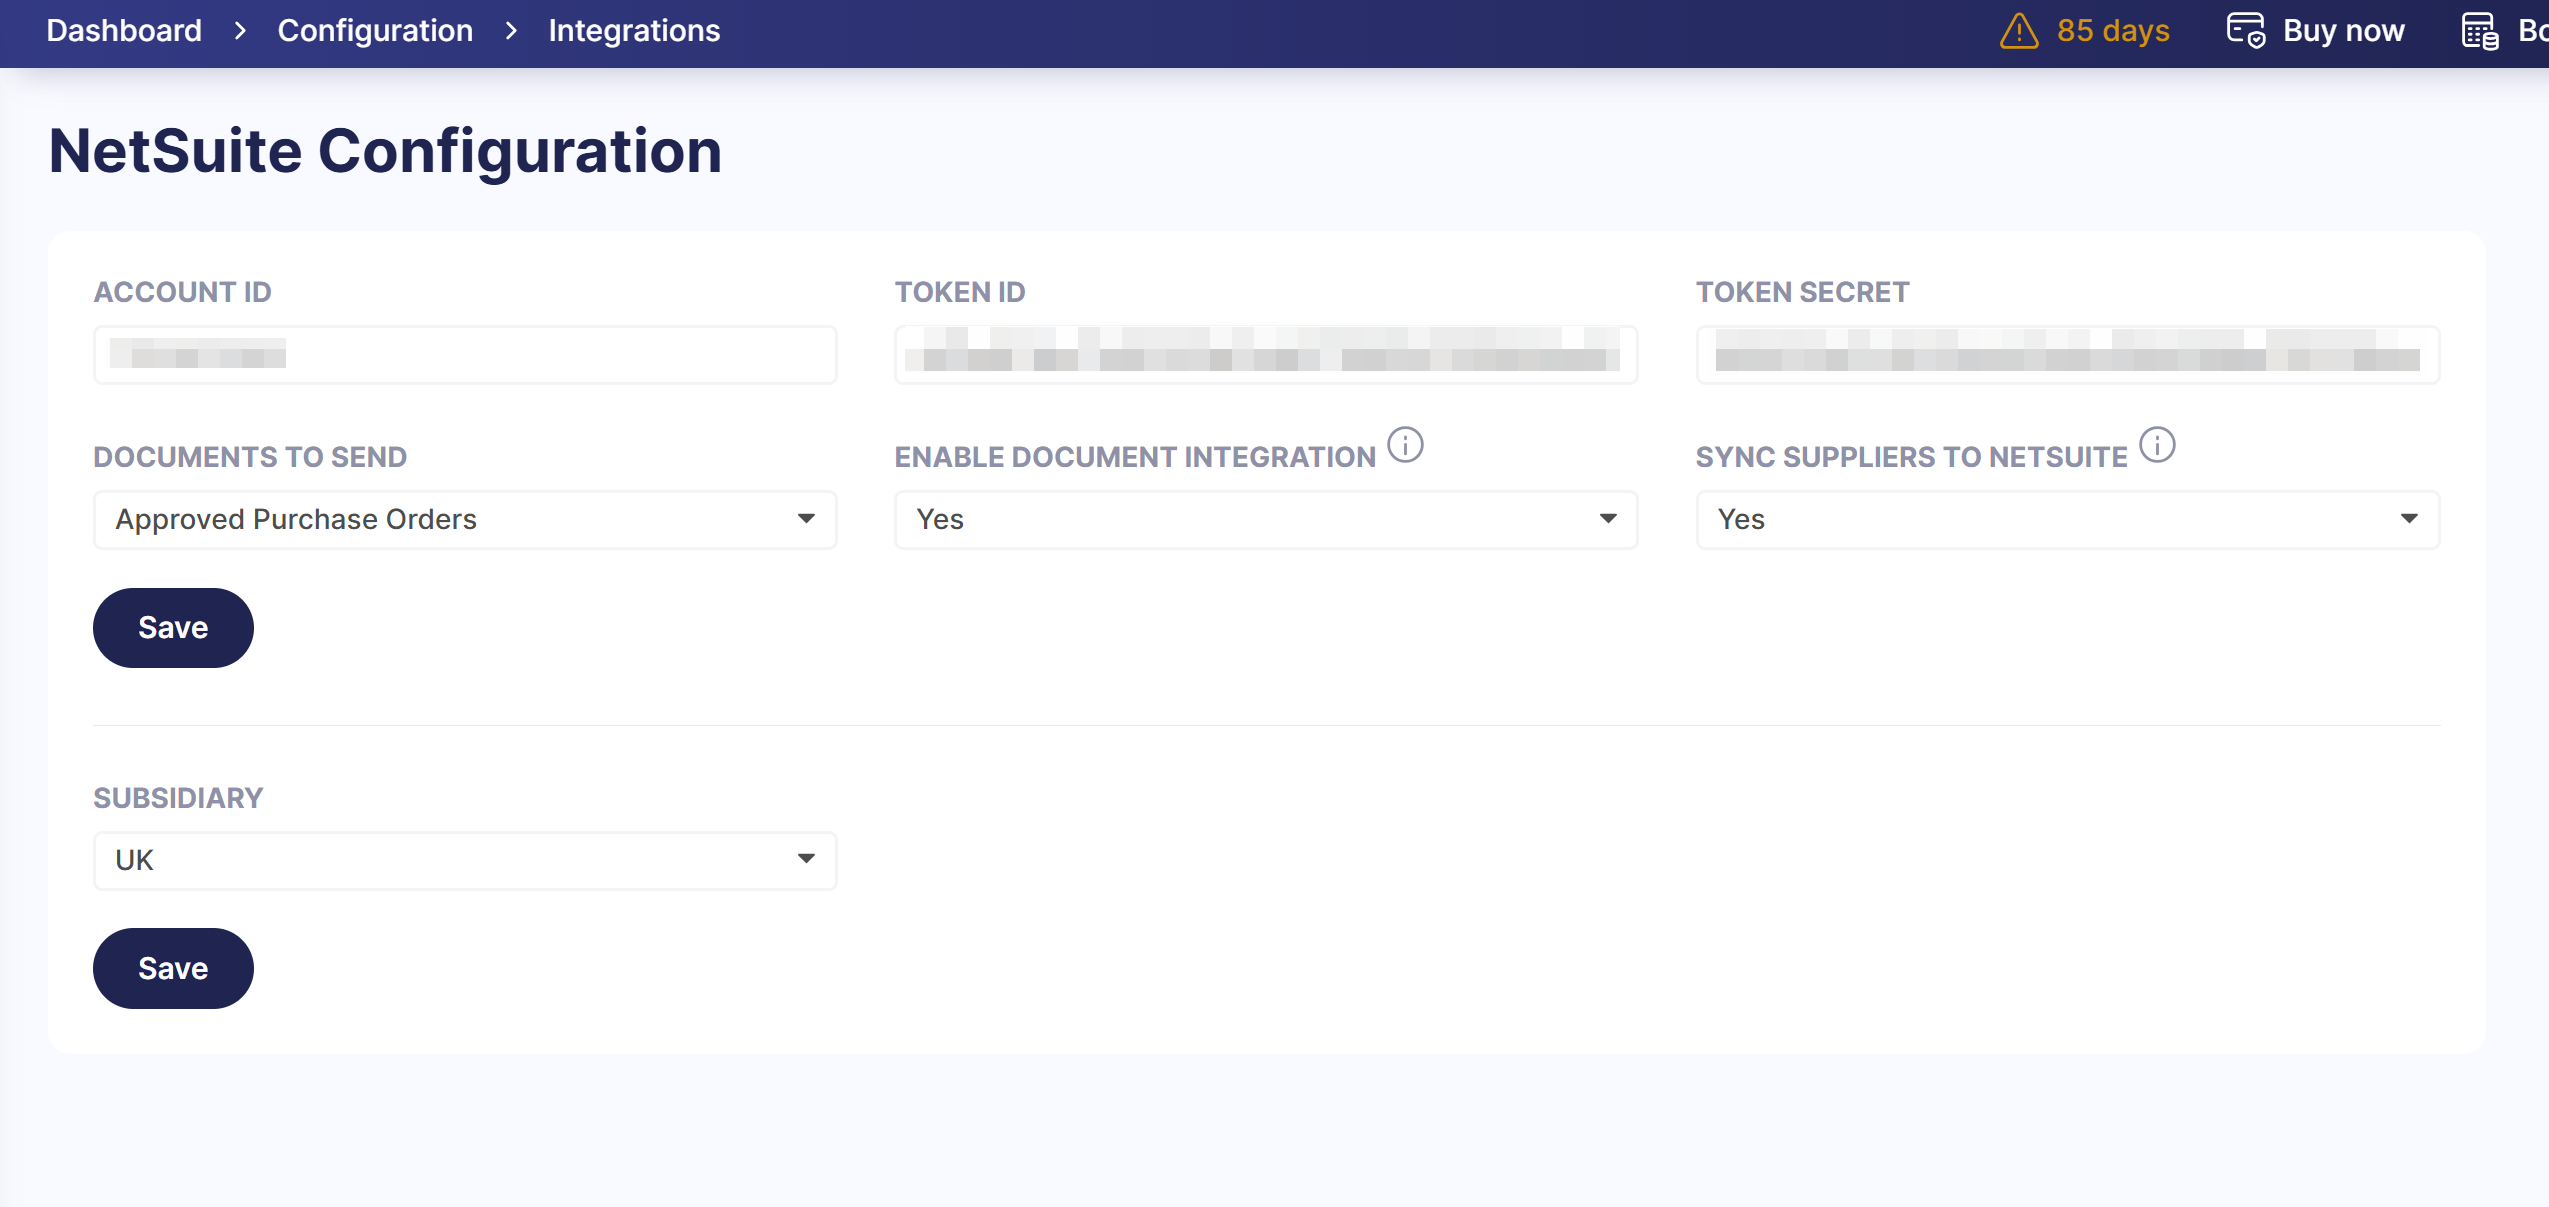
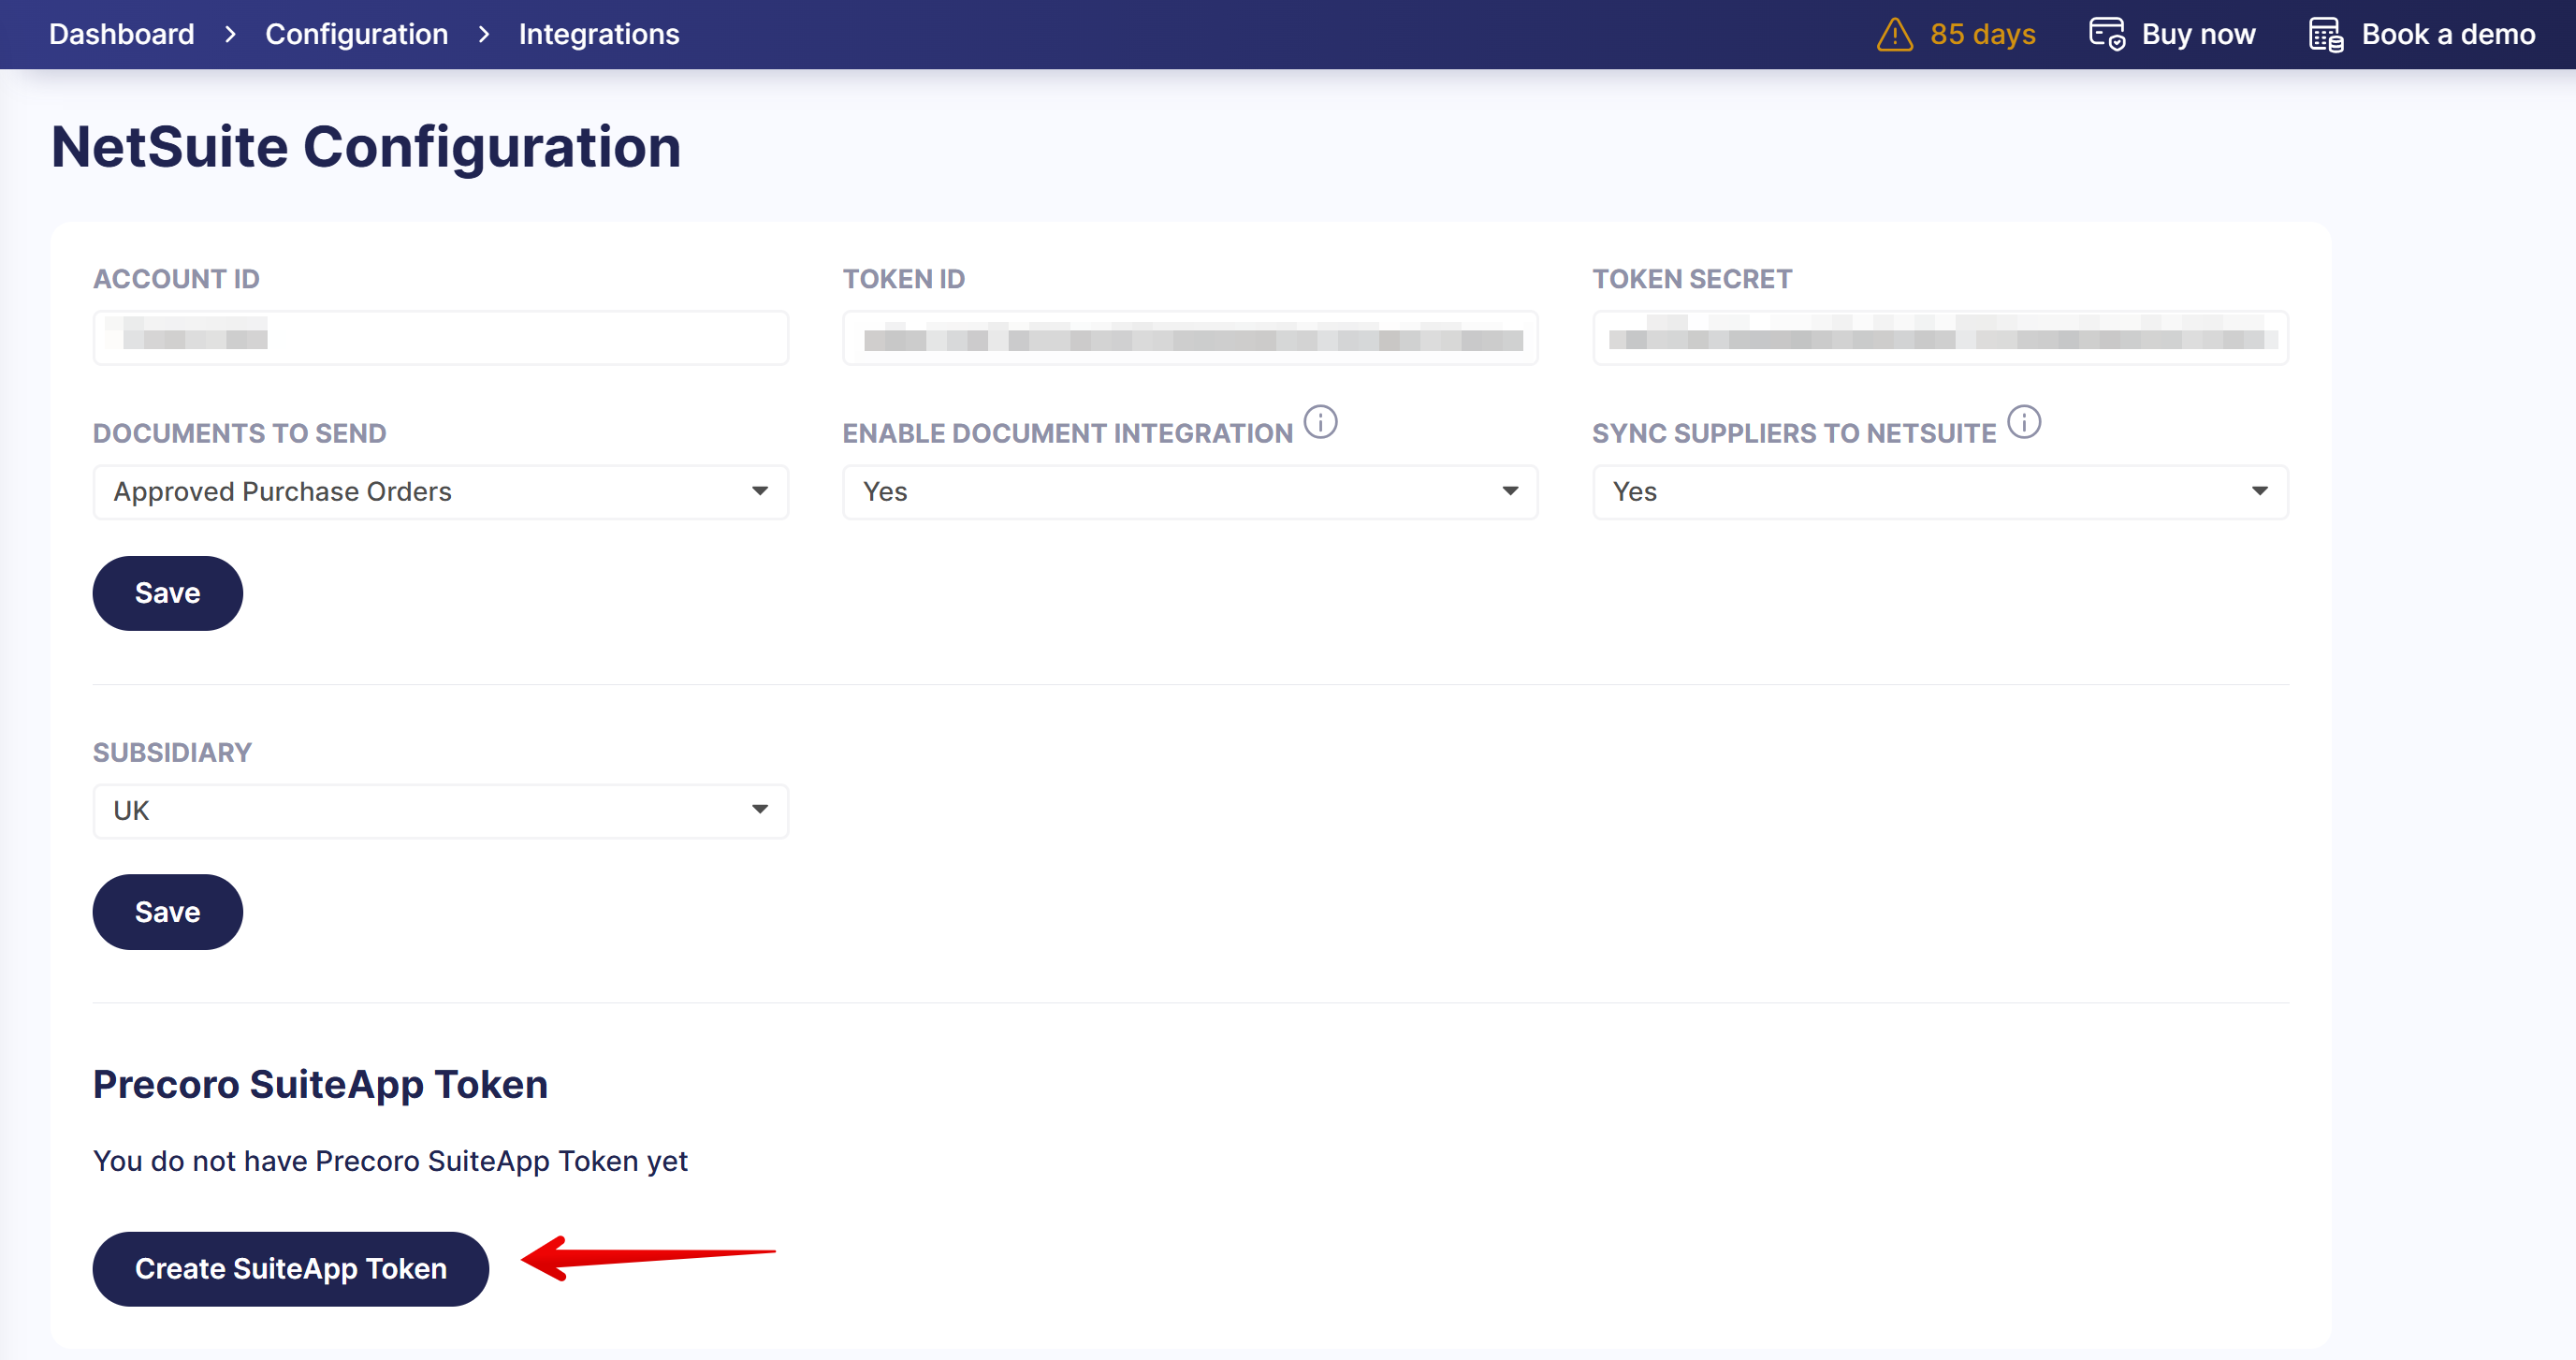
- Click the Create SuiteApp Token button and securely save the token.
💡Please note: The user generating the Precoro SuiteApp token must be reliable. If they are removed from Precoro or their Configuration role is revoked, the token will become invalid, and data synchronization will be disrupted.
2) Connect NetSuite to Precoro
To connect NetSuite to Precoro:
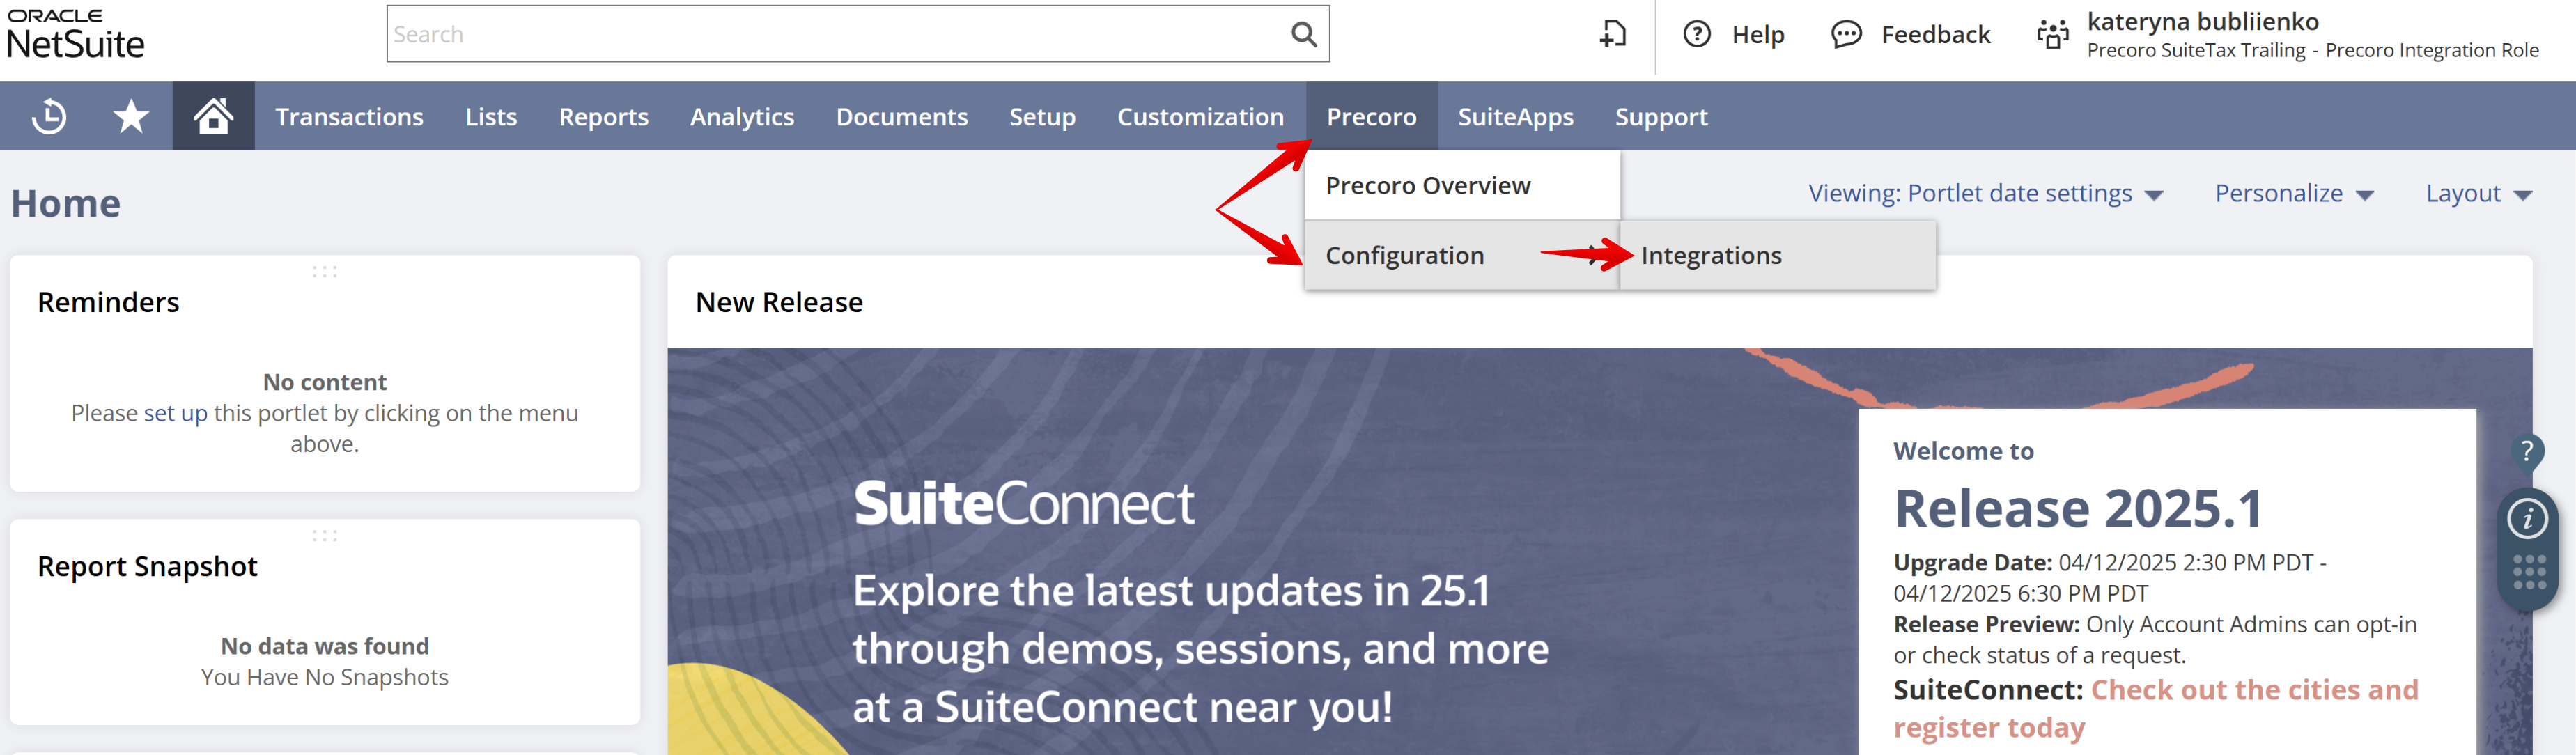
- Sign in to NetSuite with the Precoro Integration Role.
- Navigate to Precoro → Configuration → Integrations.

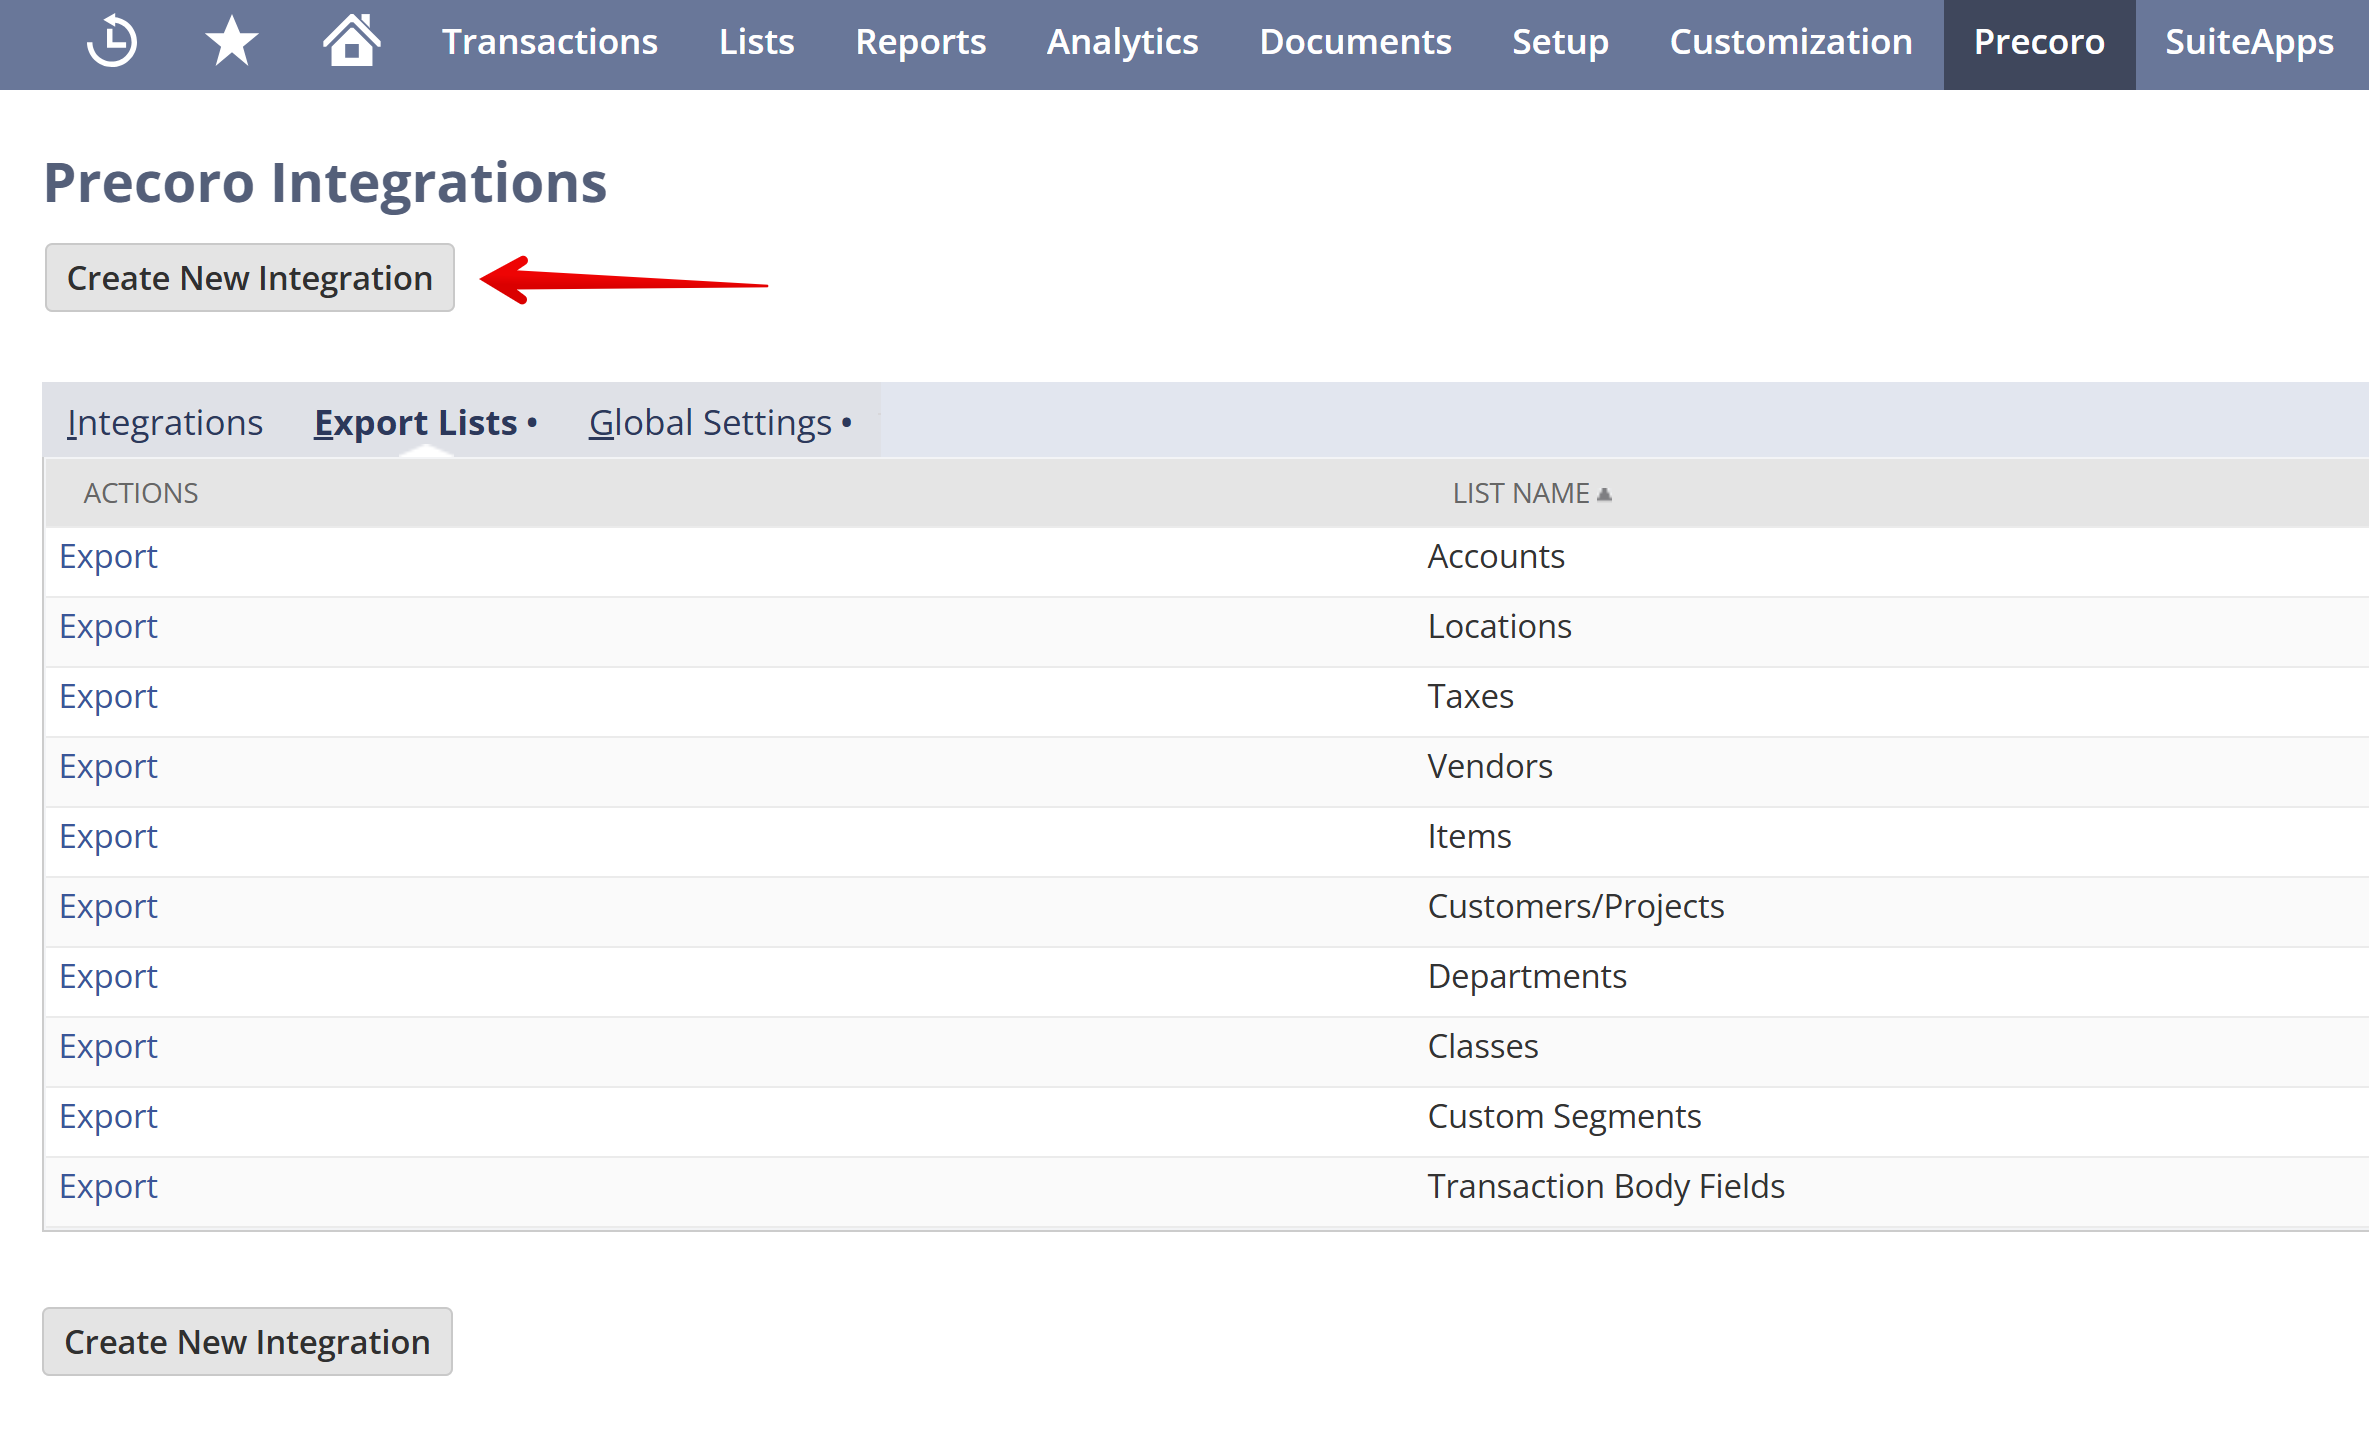
- Click Create New Integration.

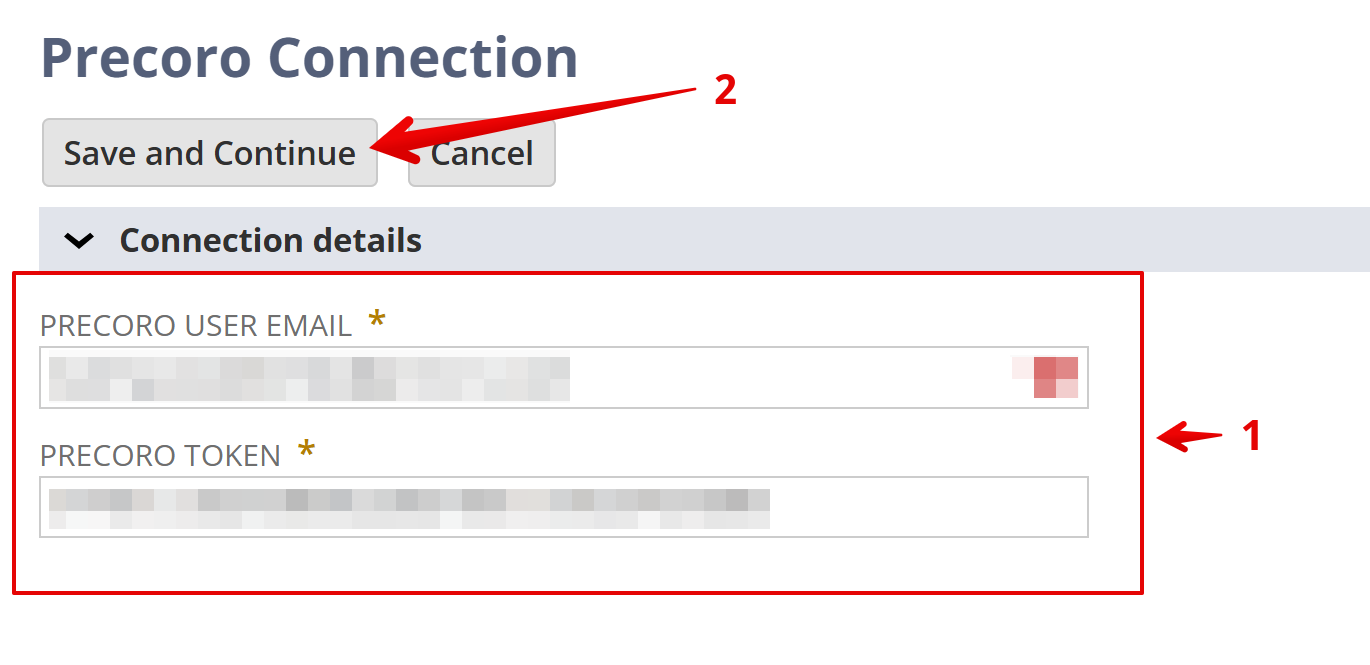
- Enter:
-
- Precoro User Email (the one who generated the SuiteApp Token)
- Precoro SuiteApp Token
-
- Click Save and Continue.
 6. Integrate company with NetSuite subsidiary or subsidiaries
Integrating one company with one subsidiary
If you integrate one company with one subsidiary, select the Subsidiary matching the one you previously chose in Precoro for the NetSuite configuration → click Save.
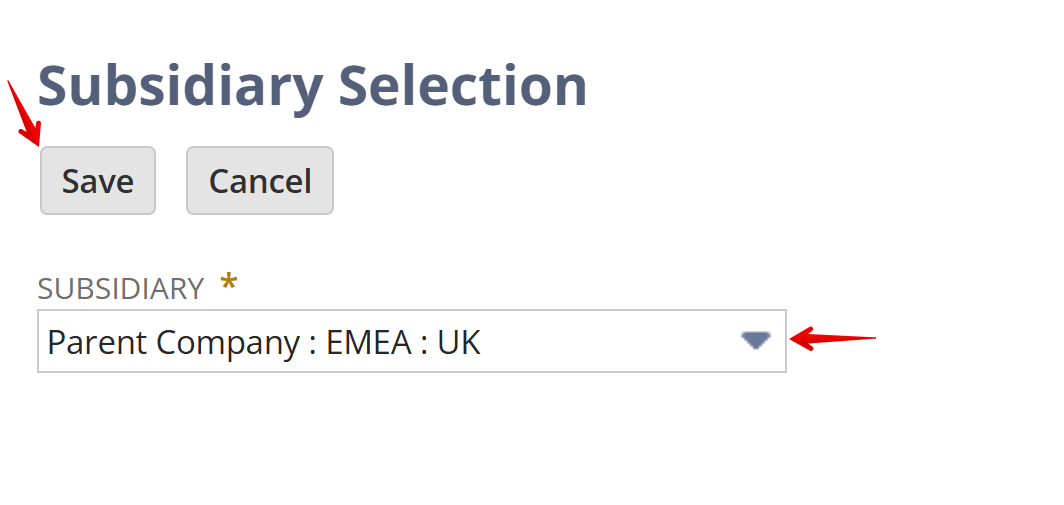
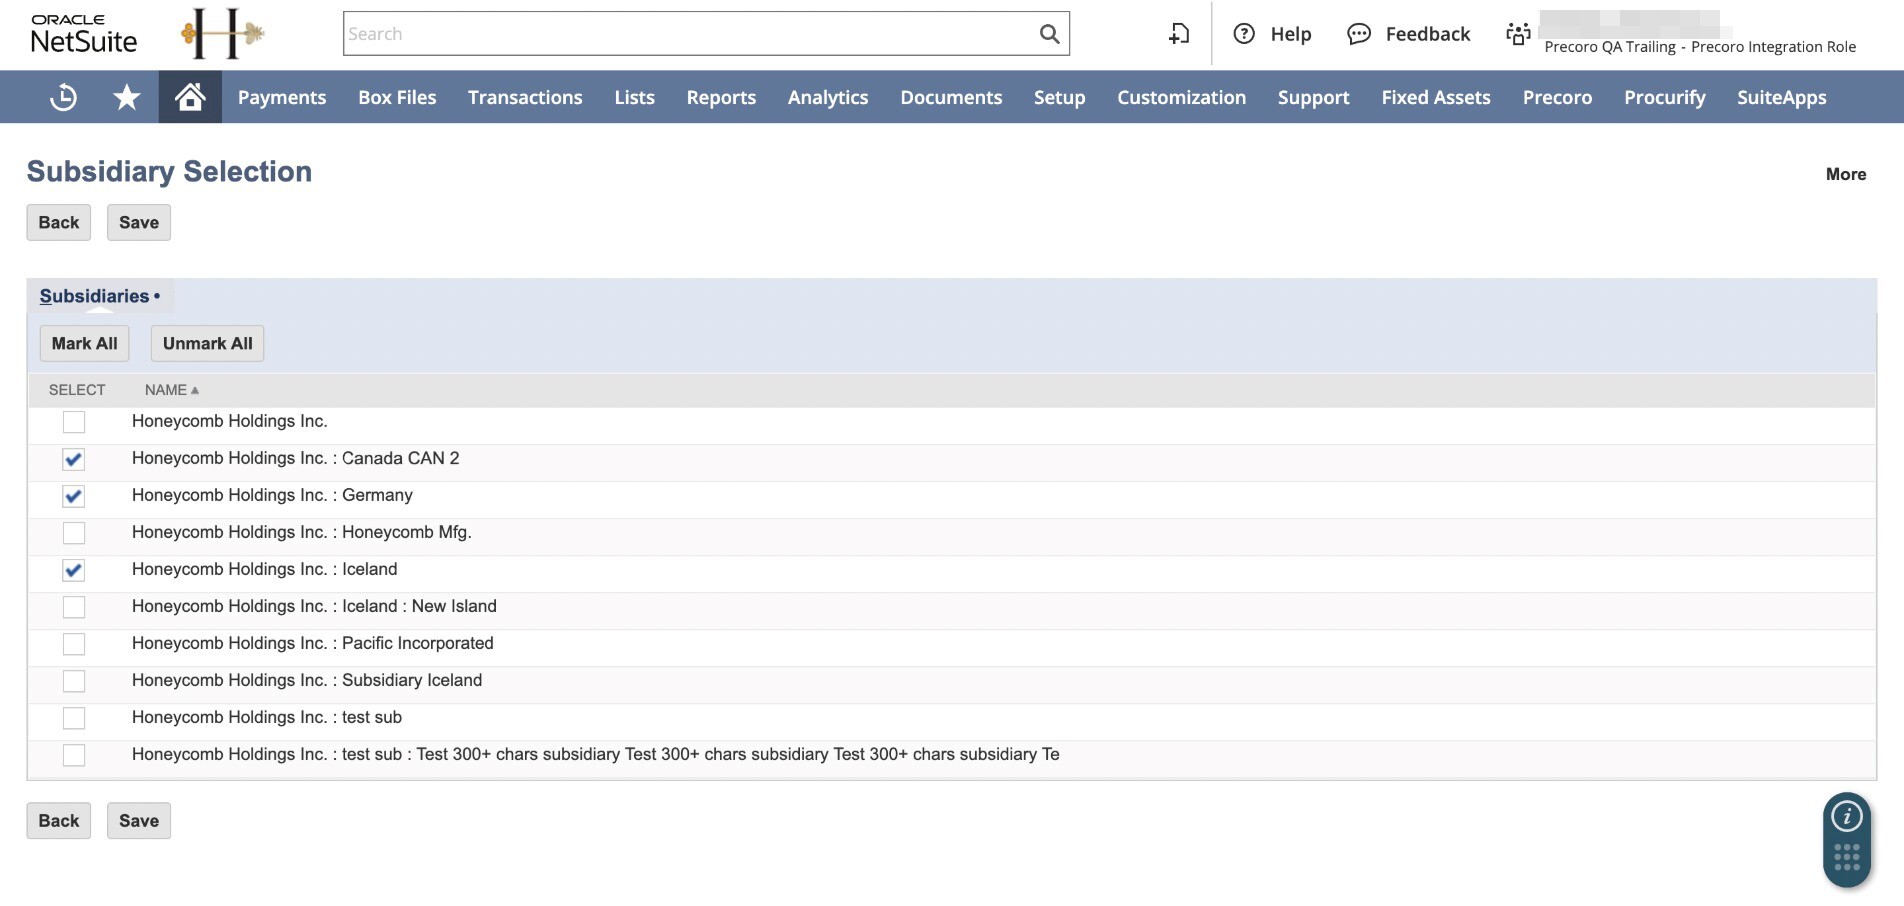
Integrating one company with multiple subsidiaries
If you integrate several subsidiaries with legal entities (if you use Multi-Entity Management), you will see the Subsidiary Selection screen as in the screenshot below. Select the subsidiaries you want to integrate and click Save.
In Precoro, you will see the integrated subsidiaries as legal entities on the NetSuite Configuration page.

If you already use Multi-Entity Management and have several legal entities established in Precoro, the subsidiaries you choose to integrate will be mapped with these legal entities by Name. Please note: an entity and a subsidiary can only be mapped if their names match completely, so ensure the names are identical.
If a legal entity with the same name isn’t found, it will be created automatically and available in documents. You may need to enter the necessary details in Configuration → Legal Entities.
Step 5: Finalize the Integration
Now, NetSuite and Precoro are fully connected. If you want to integrate multiple companies, repeat the steps for each of them.
You can track all existing connections under Precoro → Configuration → Integrations, in the Integrations subtab. 
Once all companies are connected, you can proceed with exporting lists and customizing settings.
Migrating to Multi-Subsidiary Integration
To centralize your operations and ensure full control, Precoro offers integration with multiple subsidiaries within a single company. Consider switching to this option if:
- You have one company integrated with one subsidiary, but there are more subsidiaries in your NetSuite account.
- You have multiple Precoro companies, each integrated with a NetSuite subsidiary.
To create a multi-subsidiary integration, you’ll need to follow these steps:
- Create a new Precoro company with multi-entity management enabled.
- Set up a new SuiteApp integration as explained in this article.
- Integrate subsidiaries as legal entities (see this section).
- Sync master data (access rules for legal entities will be carried over from NetSuite).