TABLE OF CONTENTS
Items Management is the key source for prices, GL assignments, and item descriptions that your company purchases.
Items Management in Precoro facilitates a purchasing process for businesses in the following ways:
- Purchase orders are filled out with the correct item names and SKU numbers, so there are no misunderstandings with suppliers.
-
GL accounts/cost centers are assigned automatically with predefined settings. It means that the accounting team will no longer worry about the account codes.
Import Items in Bulk from the Item Management Page
With this type of import, you will be able to add all the needed items to the Catalog in one go and use those items to add them to documents.
1. Navigate to the left-side menu, choose the Item Management tab, and go to Item Management.
2. Press Import Items and download a template file.
3. Fill out all the required fields marked with * in the template.
4. Upload the file and press Next Step.
When importing or updating items, you are free to include up to 7000 items per one upload and the file should be in XLSX format.
Please note that all items will be imported as active by default.
Required fields to fill out:
- SKU Number, Item Name, and Price.
There is a character limitation for the Item Name and SKU #: 300 characters.
- If the Inventory module is active, there will be one more required field: Item Type. There you should enter one of the following: Inventory, Non-Inventory, or Service.
- If the Items Custom Field is required in Item Management, you have to fill it out.
Please follow this link to learn how to Update Items in bulk.
On the preview page, you will see the imported unmatched fields highlighted in blue that will help you find and process Items with unmatched fields faster
The blue highlight is only affecting the unrequired fields. The required ones are highlighted in red if there are any issues with them.
Import Items in Bulk from the Document Page
You can make the import directly from the following document pages: Invoices, Purchase Requisitions, Expenses, Purchase Orders, and Requests for Proposals. With this type of import, you will be able to add all the needed items to the particular document in one go.
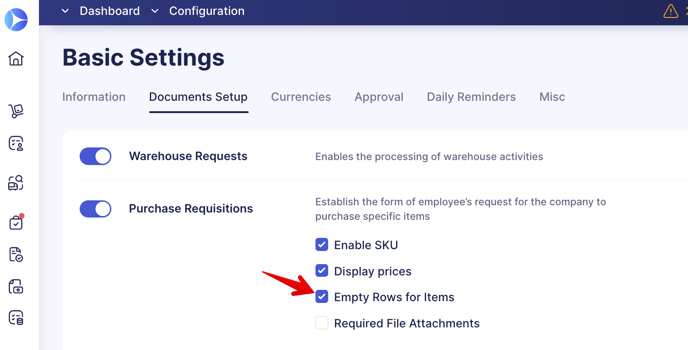
To be able to see the Import Items button in the documents you must first activate the Empty Rows for Items setting in the Configuration → Basic Settings → Documents Setup → for the type of document you need:
To activate additional Item fields you would like to upload, scroll down the Basic Settings → Documents Setup → Item Management tab and check the necessary options.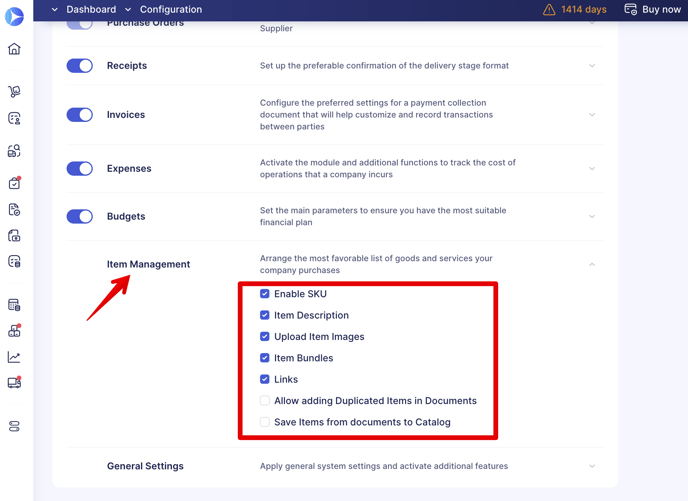
Follow these steps to make a successful import:
1. Open the needed type of document and click the Import Items button.
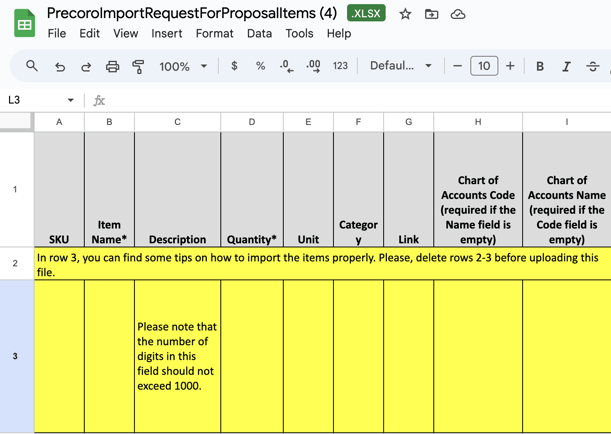
2. You will be redirected to the Import Items page. By following the instructions, you can download a template file, enter the necessary information, and upload it back to Precoro.
The file must be in XLSX format and should not contain the tips from rows 2 and 3, which you need to delete before the upload.
3. After Submitting the document, you will receive a system message about the download success, and you will see the imported items in the document.
The process for importing items in other types of documents is identical to the example in the recording:
Important Import Differences Between Documents
When importing into different documents, please keep in mind the following important information:
- In Purchase Requisitions, you will have a Supplier column for each item:
-xlsx%20-%20Google%20Sheets%202023-11-03%2010-39-23-png.png?width=688&height=322&name=Monosnap%20PrecoroImportPurchaseRequisitionItems%20(7)-xlsx%20-%20Google%20Sheets%202023-11-03%2010-39-23-png.png)
- In Requests for Proposals, you can import only the item’s basic information without the Supplier and Price.
- In Purchase Orders and Invoices, you can import Taxes and Discounts. If the document has a budget assigned to the Items Custom Fields when assigning those CFIs make sure they are included in the budget for a successful import.
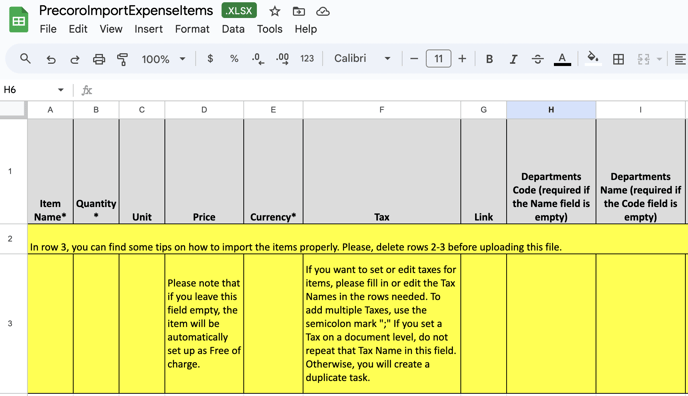
- In Expenses, there is no Supplier column, but you can import other information including Taxes and Discounts.
Working with Template Fields Step-by-Step
When downloading the template file directly from the document you will get a file with tips on how to fill it out: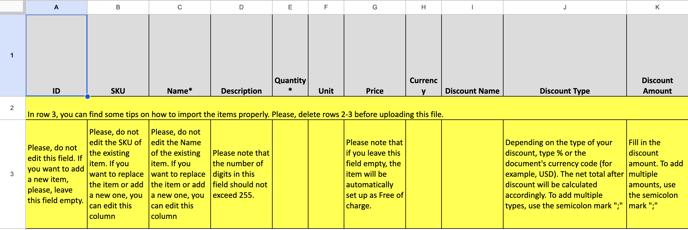
|
Name of the field |
How to fill in |
Where it is available |
| ID or # |
When you download the template for items update, you see the filled Item ID columns.
|
In direct import from the document template only. |
| SKU | Please, do not edit the SKU of the existing item. If you want to replace the item or add a new one, you can edit this column. | It is available both in the Items Management and direct import from the document templates. |
| Name | Please, do not edit the Name of the existing item. However, if you want to replace the item or add a new one, you can edit this column to do that. | It is available both in the Items Management and direct import from the document templates. |
| Description | Please note that the number of characters in this field should not exceed 255. | It is available both in the Items Management and direct import from the document templates. |
| Quantity | Enter the number of items/services you need. | In direct import from the document template only. |
| Price | Enter the price (it may differ from the one in the catalog). Please note that if you leave this field empty, the item will be automatically set up as Free of charge. | It is available both in the Items Management and direct import from the document templates. |
| Currency |
|
It is available both in the Items Management and direct import from the document templates. |
| Unit | Please make sure to use Units from your existing list in Precoro. You can add new ones on the Unit Management page to be able to import the related items. | It is available both in the Items Management and direct import from the document templates. |
| Category | Please make sure to use categories from your list. Add item categories to Category Management to be able to import related items. | In Items Management template only. |
| Supplier | Enter the Supplier Name here. Please make sure the Name is entered exactly as it is in Precoro. | In Items Management template only. |
| Link | Enter the Link you want to be uploaded to Precoro. | It is available both in the Items Management and direct import from the document templates. |
| Item Groups | Please make sure to use the created Item Groups from your list. To be able to import related items, add the Item Groups to the management page in the Item Management section. | In Items Management template only. |
| Item Bundles | When adding values in the column, please make sure to use Item Bundles from your list in Precoro. Add new options on the Item Bundles management page in the Item Management section to import the related items. You can enter several bundles by separating them with semicolons “;”. | In Items Management template only. |
| Item Type | Please choose and enter the Inventory, Non-Inventory or Service type. | In Items Management template only. |
|
Items Custom Fields |
|
It is available both in the Items Management and direct import from the document templates. |
| Discounts: Discount Name, Discount Type, Discount Amount | If you have enabled discounts, then you will see these three columns in the templates: Discount Name - enter the name of the discount here. This is an optional column, and you can set up a discount without a name. Discount Type – depending on the type of your discount, type %, or the document's currency code (for example, USD) for the fixed sum. The net total after the discount will be calculated accordingly. To add multiple types, use the semicolon mark ";" Discount Amount – fill in the discount amount. To add multiple amounts, use the semicolon mark ";" For example, if you need to give a 10% discount, enter % in Type and 10 in Amount. |
In direct import from the document template only. |
| Tax |
If you have enabled Taxes for your company, you will see them in the template. If you want to set or edit taxes for items, fill in or edit the Tax Names in the rows needed. To add multiple Taxes, use the semicolon mark ";" If you set a Tax on a document level, do not repeat that Tax Name in this field. Otherwise, you will create a duplicate one. |
In direct import from the document template only. |
Additional important points to consider when working with Discounts
- If you add a document-level discount, then when you import or add items with an update, it will be automatically assigned to all items.
- If you download the template of an update, the document-level discounts will be downloaded along with the items. Even if you delete the discounts in items, they will still be set when you download the template.
- To remove a discount from an item, you need to delete it at the document level, and then it will be removed automatically.
- Apart from the document-level discount, you can add as many discounts as you like at the item level. To add multiple amounts, use the semicolon mark ";"

Additional important points to consider when working with Taxes
- If you add a document-level tax, then when you import or add items with an update, it will be automatically assigned to all items.
- To remove a tax from an item, you need to delete it at the document level, and then it will be removed automatically.
- Apart from the document-level tax, you can add as many taxes as you like at the item level.
-xlsx%20-%20Google%20Sheets%202023-11-03%2011-01-28-png.png?width=243&height=328&name=Monosnap%20PrecoroUpdateInvoiceItems%20(7)-xlsx%20-%20Google%20Sheets%202023-11-03%2011-01-28-png.png)