TABLE OF CONTENTS
- How to Build Approval Workflow Step-by-Step
-
How to Ensure Approval Review for Documents That Skip Approval Workflows
-
How to Enable Auto-Approval of POs and Invoices with Related Documents
How to Build an Approval Workflow Step-by-Step
When setting up an approval workflow, there are several key factors to define:
-
The types of documents that need approval.
- Rules that impact the approval process, such as departments or projects.
-
The number of steps required to approve these documents.
- The approval hierarchy to follow.
-
The people responsible for approving each stage.
Now, let’s explore how to build this process in more detail.
Step 1: Decide What Rules Should Impact the Approvals
To effectively set up the Approval Workflow in Precoro, it’s essential to define the key variables that will impact the approval process. Here are the common ones:
- Departments
- Projects
- Locations
- Threshold
Here is how to set up rules for Departments, Projects, Locations, or other criteria in the approval workflow:
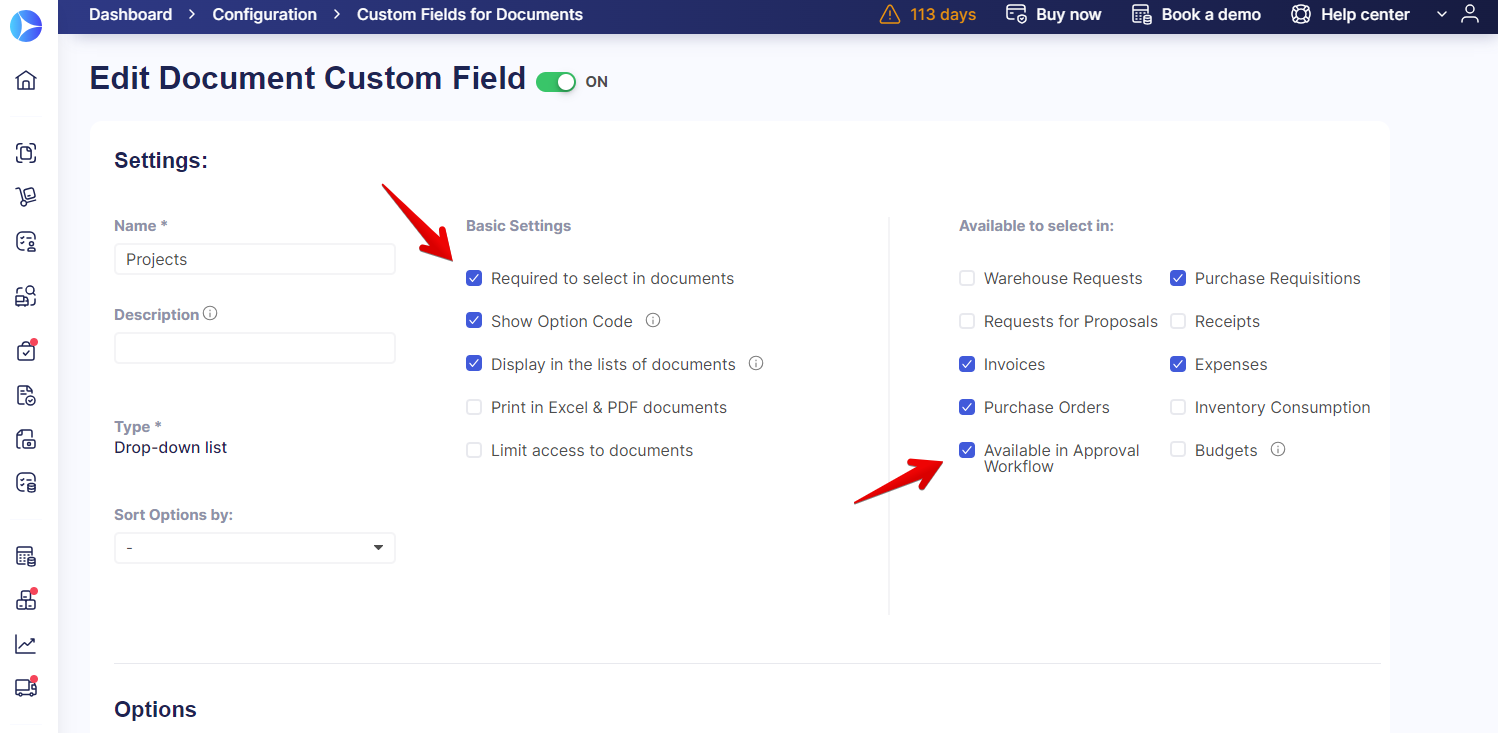
- Go to Configurations and select Custom Fields for Documents.
- Click Add Field in the top right corner.
- Complete the required information and select the document types for which the field will be available.
- Check the Available in Approval Workflow checkbox to enable the field for use in the workflow.
- Press Update to save the changes.
Once these steps are complete, the custom field will be available for selection in the approval workflow for the specific documents you have chosen.
Step 2: Configure Approval Steps
After defining document types and approval rules, determine the number of approval stages for each. Simple purchases may need 1-2 steps, while high-value or sensitive ones could require more, like finance and executive reviews.
To create approval steps:
- Go to Configurations → Approval Workflow, and choose the document type you want to create the approval workflow for.
- Once on the Approval Steps page, click Create New Step.
- Name the approval step and click Create. You can add multiple steps.
Step 3: Assign People Responsible for Each Approval Step
💡 Please note: To set users as Approvers, ensure they have the necessary role for the document and access to locations and custom fields. Approval roles, locations, and custom fields can be assigned on the User Management page. For more details on user roles, click here.
To add an approver:
- In the approval step, click the add button.
- From the drop-down list, select the user to be the approver.
- If needed, assign the same approver to multiple steps in the workflow.
- Set custom approval thresholds by clicking Customize Threshold. For instance, an approver may manage all purchases within the Administration department, while also approving purchases over $10,000 in the Finance department.
You can customize the approval workflow by assigning specific approvers to individual requesters. More about this feature in the next section.
How Approvers See Workflow Progress in Emails
Approvers can also get the context they need directly in their inbox—no need to open the document in Precoro to see where it stands in the workflow.
Approval-related emails display the adjacent steps in the workflow. You'll see this context in:
- The document is waiting for your approval
- The document is changed and awaiting your approval
Each email shows the previous and current approval step, based on how you've structured the workflow in Step 2. If the approver's step is the first one in the workflow, the email will also show the following step.
To see the entire approval chain, the approver can click View full flow in the email, which opens the document in Precoro.

How to Enable Approvals from My Direct Manager
Direct Manager Approval lets companies assign specific approvers to individual requesters. This functionality is particularly beneficial for ensuring that approvals come directly from the appropriate managers.
To activate the Direct Manager Approval feature:
- Go to Configurations → Basic Settings → Approval → Direct Manager Approval and enable the setting.
- Go to the Approval Workflow page and add or edit an approver.
- Select users from the Document Initiator list. You can filter Document Initiators by Creators Only (users with creation-only roles for documents) and Approvers (users who have permission to approve documents).
- Customize Threshold, Locations, and Custom Field settings as needed, and save changes.
You can also activate All Document Requesters to automatically assign new users for approval from this particular manager.
💡 Please note:
- Reapproval is triggered if the document creator changes.
- The Parallel Workflow works as usual with the Direct Manager Approval feature.
- Super Users can still approve documents with direct manager approval.
How to Ensure Approval Review for Documents That Skip Approval Workflows
To ensure proper oversight of documents, we’ve introduced the Approval Review feature, which automatically triggers a review when a document bypasses the usual workflow. Documents may skip the standard approval process due to the following factors:
- The approval workflow does not include the selected options in the Custom Fields for Documents (such as Location, Requester, or Threshold).
- Approvers don't have access to certain Document Custom Fields.
To set up the approval review feature:
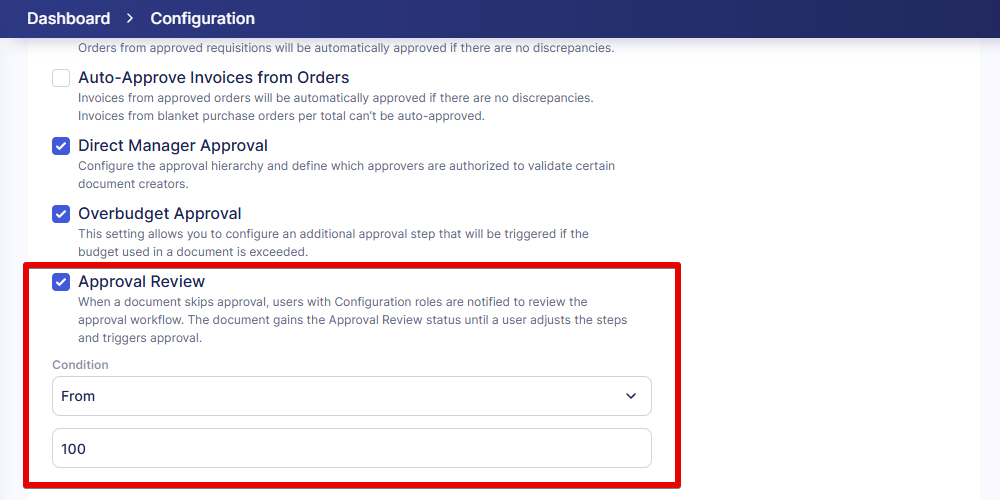
- Go to Configuration → Basic Settings → Approval.
- Enable the Approval Review checkbox.
- Define the document total threshold for triggering the approval review. You can choose from options like Any, Less or equal, From, or From To. For example, to auto-approve documents under $100 and review those over 100$, choose From $100.
- Click save to apply the settings.
How it will work with the feature activated:
- Documents that bypass standard approval will receive the "Approval Review" status and move to the review step. Administrators can examine why the approval was bypassed, adjust the workflow, return it to the initiator, or submit it for approval.
- Email notifications will automatically be sent to the relevant users, notifying them of the documents that need review.
- Additionally, reminders with the lists of documents that need approval review are sent on Mondays, Wednesdays, and Fridays (EU server—09:20 a.m. UTC; US server—05:20 p.m. UTC).
- You can deactivate “Notification about Approval Review” in Email Preferences.
How to Activate Auto-Approval for Recurring Documents
Effortlessly handle recurring documents with the feature that automatically approves future POs and invoices when the original document is approved.
To set it up:
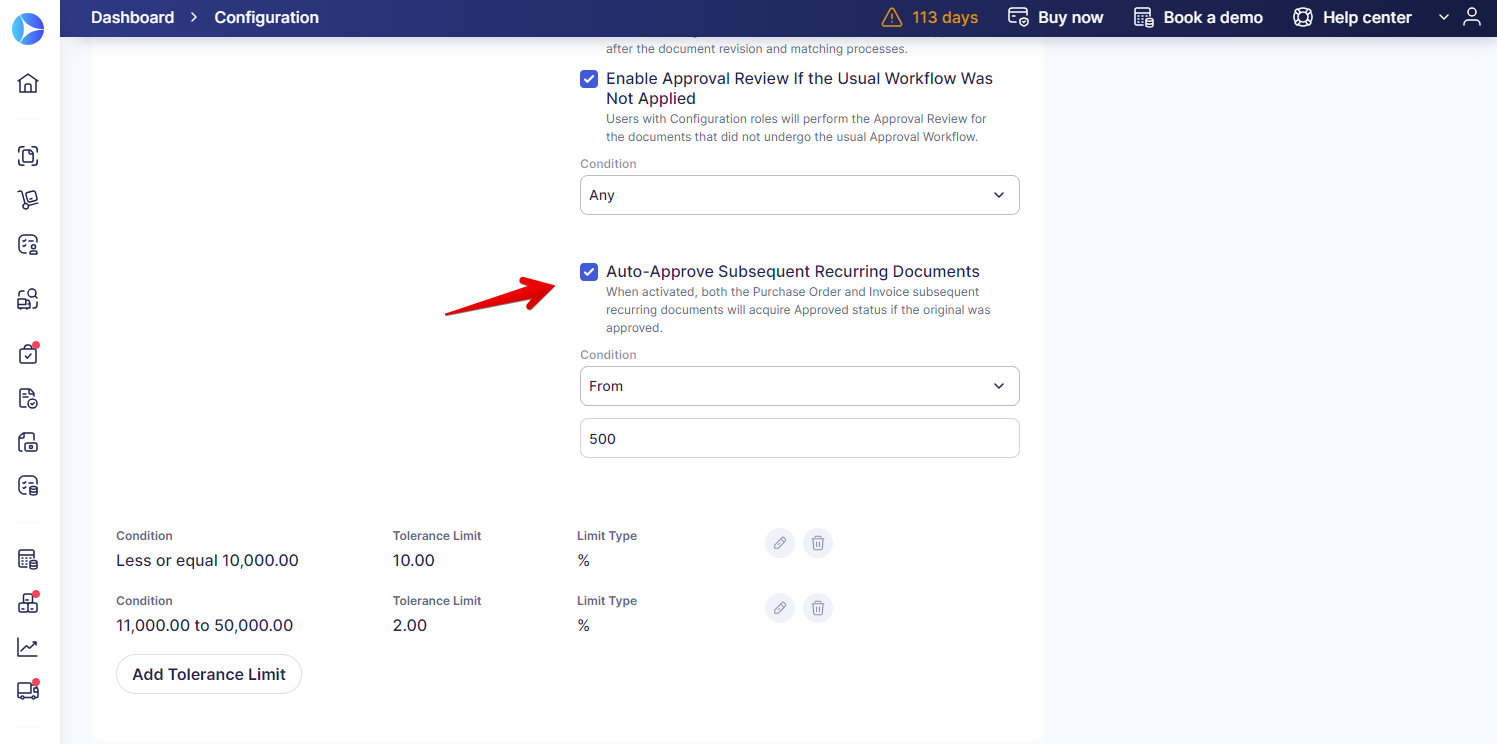
- Go to Configurations → Basic Settings → Approval tab and enable the Auto-Approve Subsequent Recurring Documents feature.
- Set a condition for automatic approval based on the document’s total amount. Options include Any, Less or Equal, From, or From To.
- Save your settings.
With this setup, any recurring POs or invoices will be automatically approved if the original document was approved. The approval steps from the original document will be visible, with a note saying, “Document was automatically approved as it is Recurring.”
💡 Please note: Adding new approval steps or making significant changes (e.g., to Total or Budget) will require re-approval of that document. Subsequent documents created from this will not require additional approval and will be automatically approved. Additionally, if the document is altered by a Super User, it won't require a re-approval.
How to Set Up the Overbudget Approval Step
Address the challenge of unregulated budget spending and budget overruns with an additional approval step for expenses that exceed the budget.
How to activate the overbudget approval feature:
- Navigate to the Basic Settings → Approval tab.
- Check the Overbudget Approval option. Note that this setting is visible only if you company has activated the Budget module.
- Once activated, head over to the document approval workflow page. Here, either create a new approval step or update an existing one by checking the Overbudget Approval box. The step will become active only for transactions that exceed the budget.
💡 Please note that the Overbudget Approval setting can only be activated for PRs and expenses if budgets are enabled for those specific documents under Configuration → Basic Settings → Document Setup → Budgets.
How to Enable Auto-Approval of POs and Invoices with Related Documents
Ensure your financial operations proceed without unnecessary delays by removing approval requirements for invoices generated from POs and POs generated from PRs when related documents have already been approved.
To enable these features, navigate to the Basic Settings → Approval tab and mark either the Auto-Approve Orders from Requisitions, Auto-Approve Invoices from Orders checkbox, or both if needed.
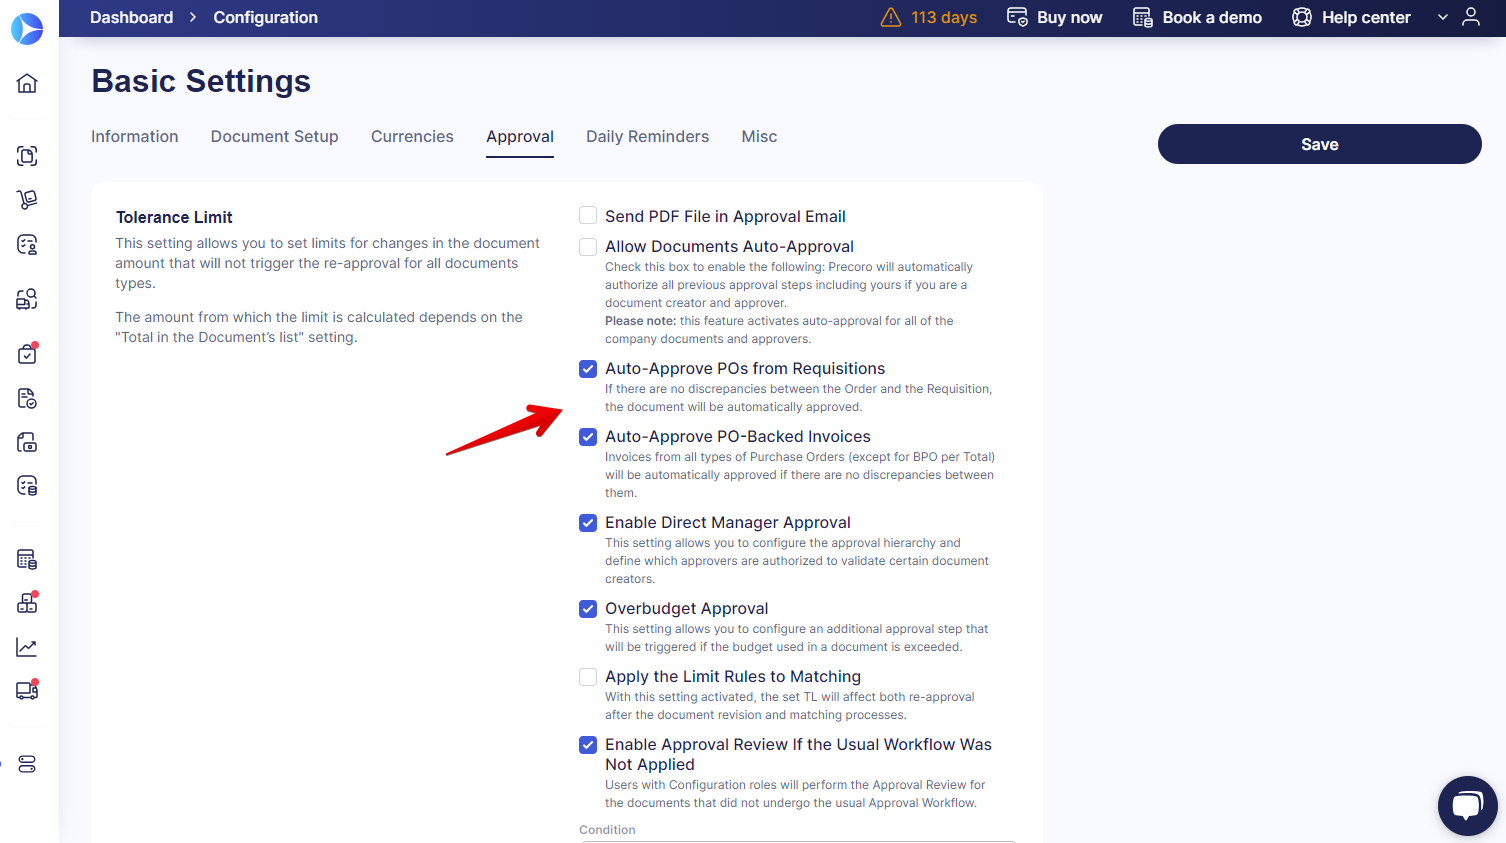
Here is how it works:
- Auto-Approve Orders from Requisitions: Activating this setting allows POs that are directly generated from approved PRs to automatically bypass additional approvals. However, re-approval will be triggered if there are discrepancies in total cost or item count, new items are added, or if there are differences in Location or Custom Fields. Changes to the PO’s budget or item custom fields affecting the budget line will also necessitate re-approval, unless at least one PR’s budget line is correctly selected.
- Auto-Approve Invoices from Orders: This setting allows invoices generated from POs to bypass the usual approval process, automatically marking them as approved once confirmed. However, if the invoice amount doesn’t match the one of the PO, then the matching will be triggered. Please see the cases in which you can trigger the invoice to PO matching here.