How to Create Payments for Invoices
Learn how to create payments for invoices in Precoro.
- How to Activate or Deactivate Payment Module
- How to Create a Payment in the Invoice
- How to Create Mass Payments for Invoices
- How to Cancel Payments in Invoices
- How to Search and Track the Necessary Payments
- FAQs
How to Activate or Deactivate Payment Module
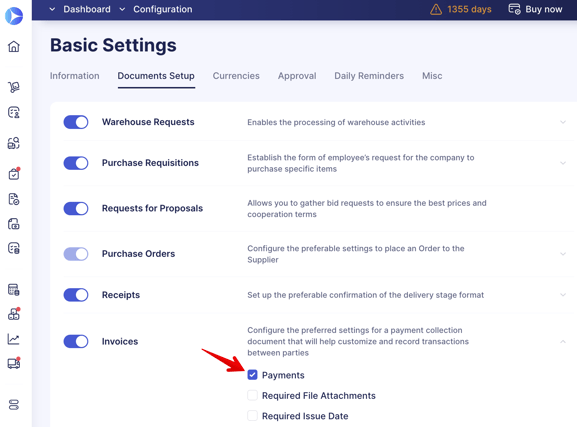
To start working with Payments in Precoro you first should activate that module in Configuration → Basic Settings → Documents Setup → Invoices.
When you activate this module, a new Invoices Pay option appears in user roles. Please enable this role for users who need the ability to mark invoices as paid.
💡Please note: You'll need to enable the invoice payment role for users when activating the Payments module, even if it used to be enabled at any point and then deactivated.
To deactivate the module, simply uncheck the Payments in Documents Setup and press Save to apply the changes.
💡 Please note: After disabling the Payment module, all your Invoices with Approved status will be marked as Paid. The Invoices Pay role will be cleared for all users and removed from the interface.

How to Create a Payment in the Invoice
To mark the Invoice as Paid, follow these steps:
1. Open the Invoice you wish to create Payment for.
2. Scroll the page down and fill out the required fields. Add the Payment Date and Sum to pay, then click the Pay button.
3. Confirm your action, and you will see the new record created in the section, and the Invoice document will change the status either to Partially Paid or Paid.
How to Create Mass Payments for Invoices
There is no need to create separate payments for different suppliers for each Invoice. Instead, select all the necessary documents and pay for them with one click.
You can do that:
On the Payments page
1. Open the Create Payment page, where you can use an advanced set of filters to help you quickly find the necessary documents.
2. Select the needed Invoices by checking the box on the left and choosing the Payment Date.
💡 Please note: The Payment Date you enter in the settings will be the payment Creation Date.
3. After doing so, press the Add Payments to Selected button.
On the Invoices page
You can also multi-select the necessary documents and pay them in bulk.
💡 Please note: Only Invoices that fall under the To be paid and Overdue categories are available for multi-select and mass payment.
How to Cancel Payments in Invoices
You can make a Payment cancellation:
On the Payments page
1. Select the Payment you wish to get Cancelled and press the corresponding button.
2. Confirm the action, and in the Invoice document, you will see the status changed to Cancelled.
In the Invoice document
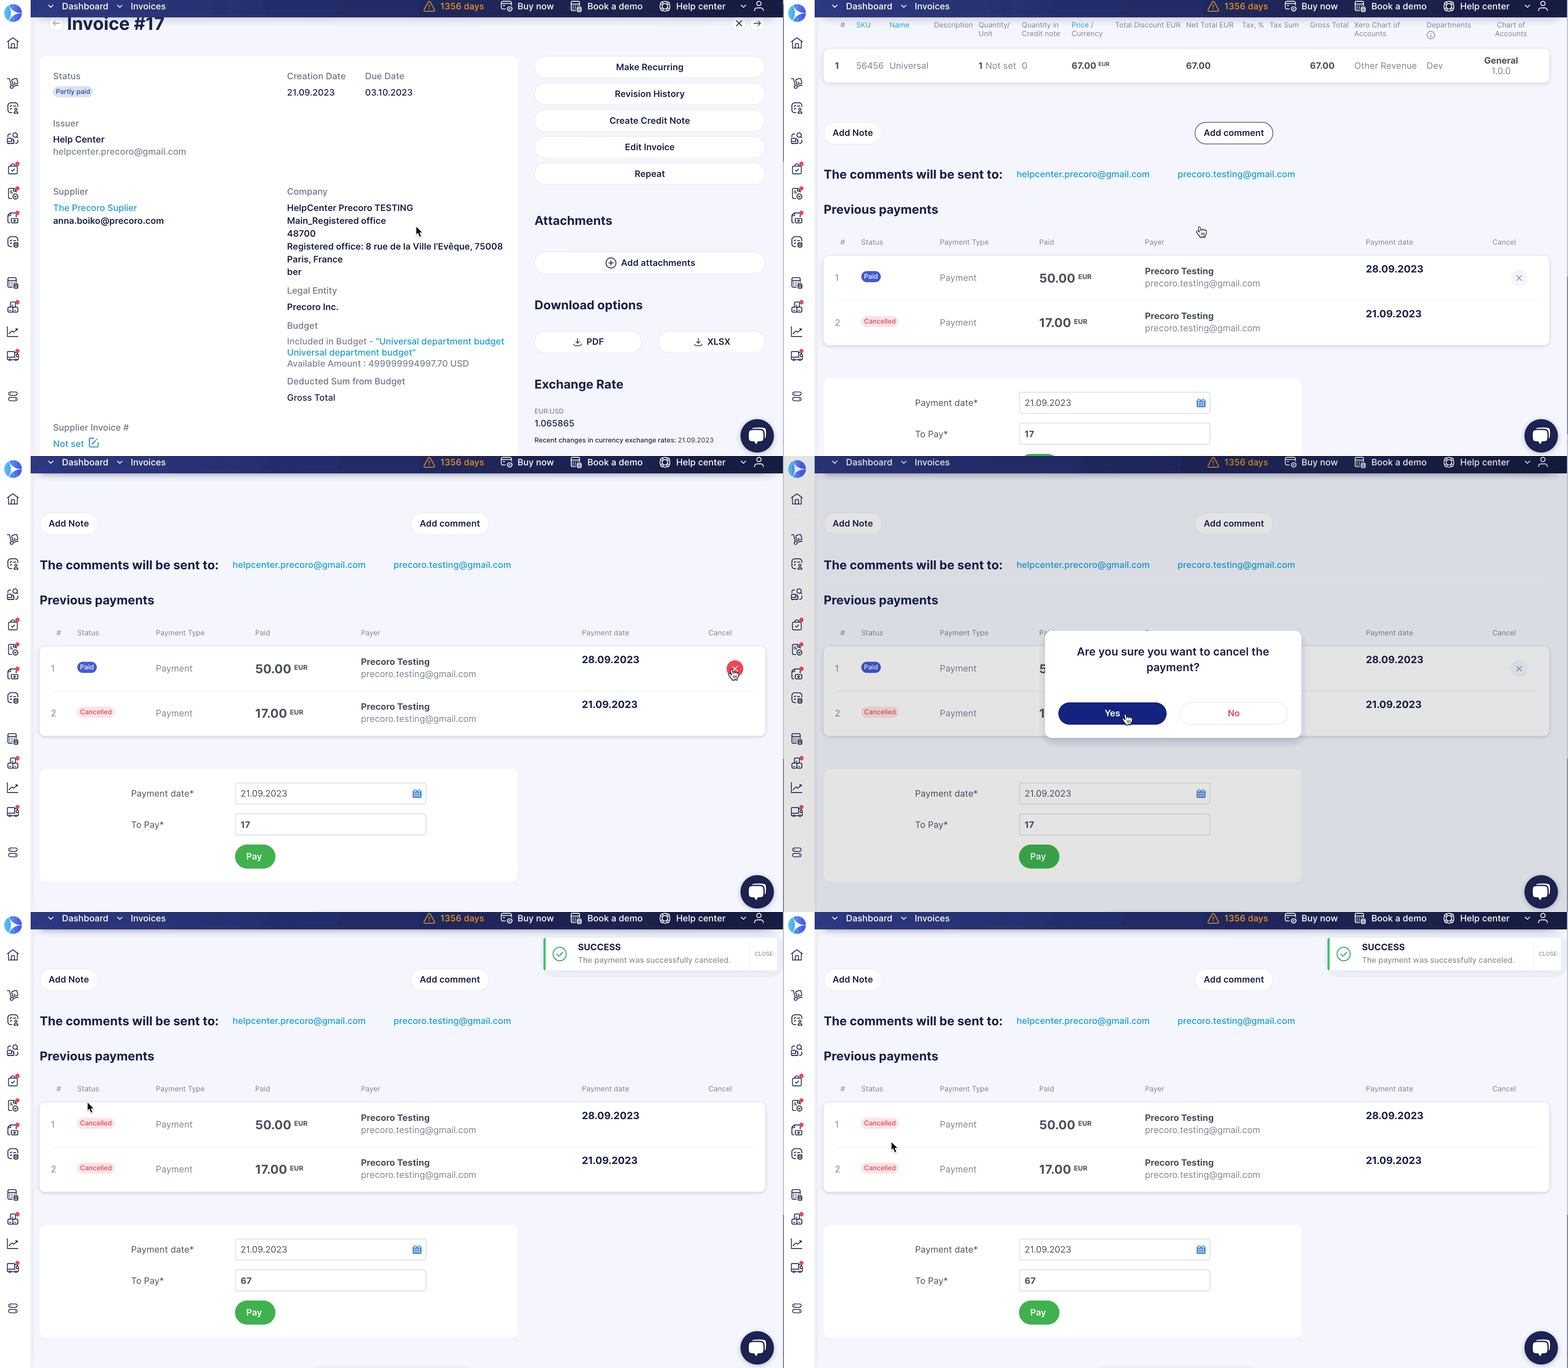
1. Open the Paid or Partially Paid Invoice where you wish to Cancel the Payment.
2. Scroll down to the Previous Payments and press the Cancel button.
3. Confirm the action, and in the Invoice document, you will see the Payment status changed to Cancelled.

How To Search and Track the Necessary Payments
You can use the set of filters on the Payments pages to sort and display a list of the needed payments:
You can use the Payment Type filter to receive the following information:
- All Prepaid Docs — displays all documents with prepayment.
-
Prepayment Without Paid Invoices — displays prepaid POs both without related Invoices and with Invoices that are not Paid or Partially Paid.
-
Invoice Credit Note — displays Credit Notes with which the Invoices were paid.
-
Credit Note for Prepaid PO — displays Credit Notes that have related Purchase Orders in the Prepaid status and may not have related Invoices.
-
Invoice and PO Credit Notes — displays Credit Notes that have related Purchase Orders in the Partly Paid or Paid statuses and must have related Invoices that can have Approved, Partly Paid, or Paid statuses.
When you hover over the filter option names, you will see the tips, which will help you identify in which cases those filters can be used.
FAQs
Can I pay invoices while the supplier is not approved?
You cannot add payments when the supplier has a Pending or In Revision status. The Add Payment button on the invoice document page will be greyed out; hover over it to see a message explaining the reason. This way, users cannot add payments until the approver confirms all necessary supplier information, such as bank details. You can also filter such invoices for reporting. Add the Supplier Status column from the Supplier Data section when creating invoice custom report.
