TABLE OF CONTENTS
How to Integrate Precoro with QuickBooks Online
💡Please note: The Plus or Advanced QuickBooks subscription is required for full integration with Precoro. The Essential plan supports invoice integration only.
Before proceeding with the integration steps, check the following diagram on fields mapping between Precoro and QuickBooks Online: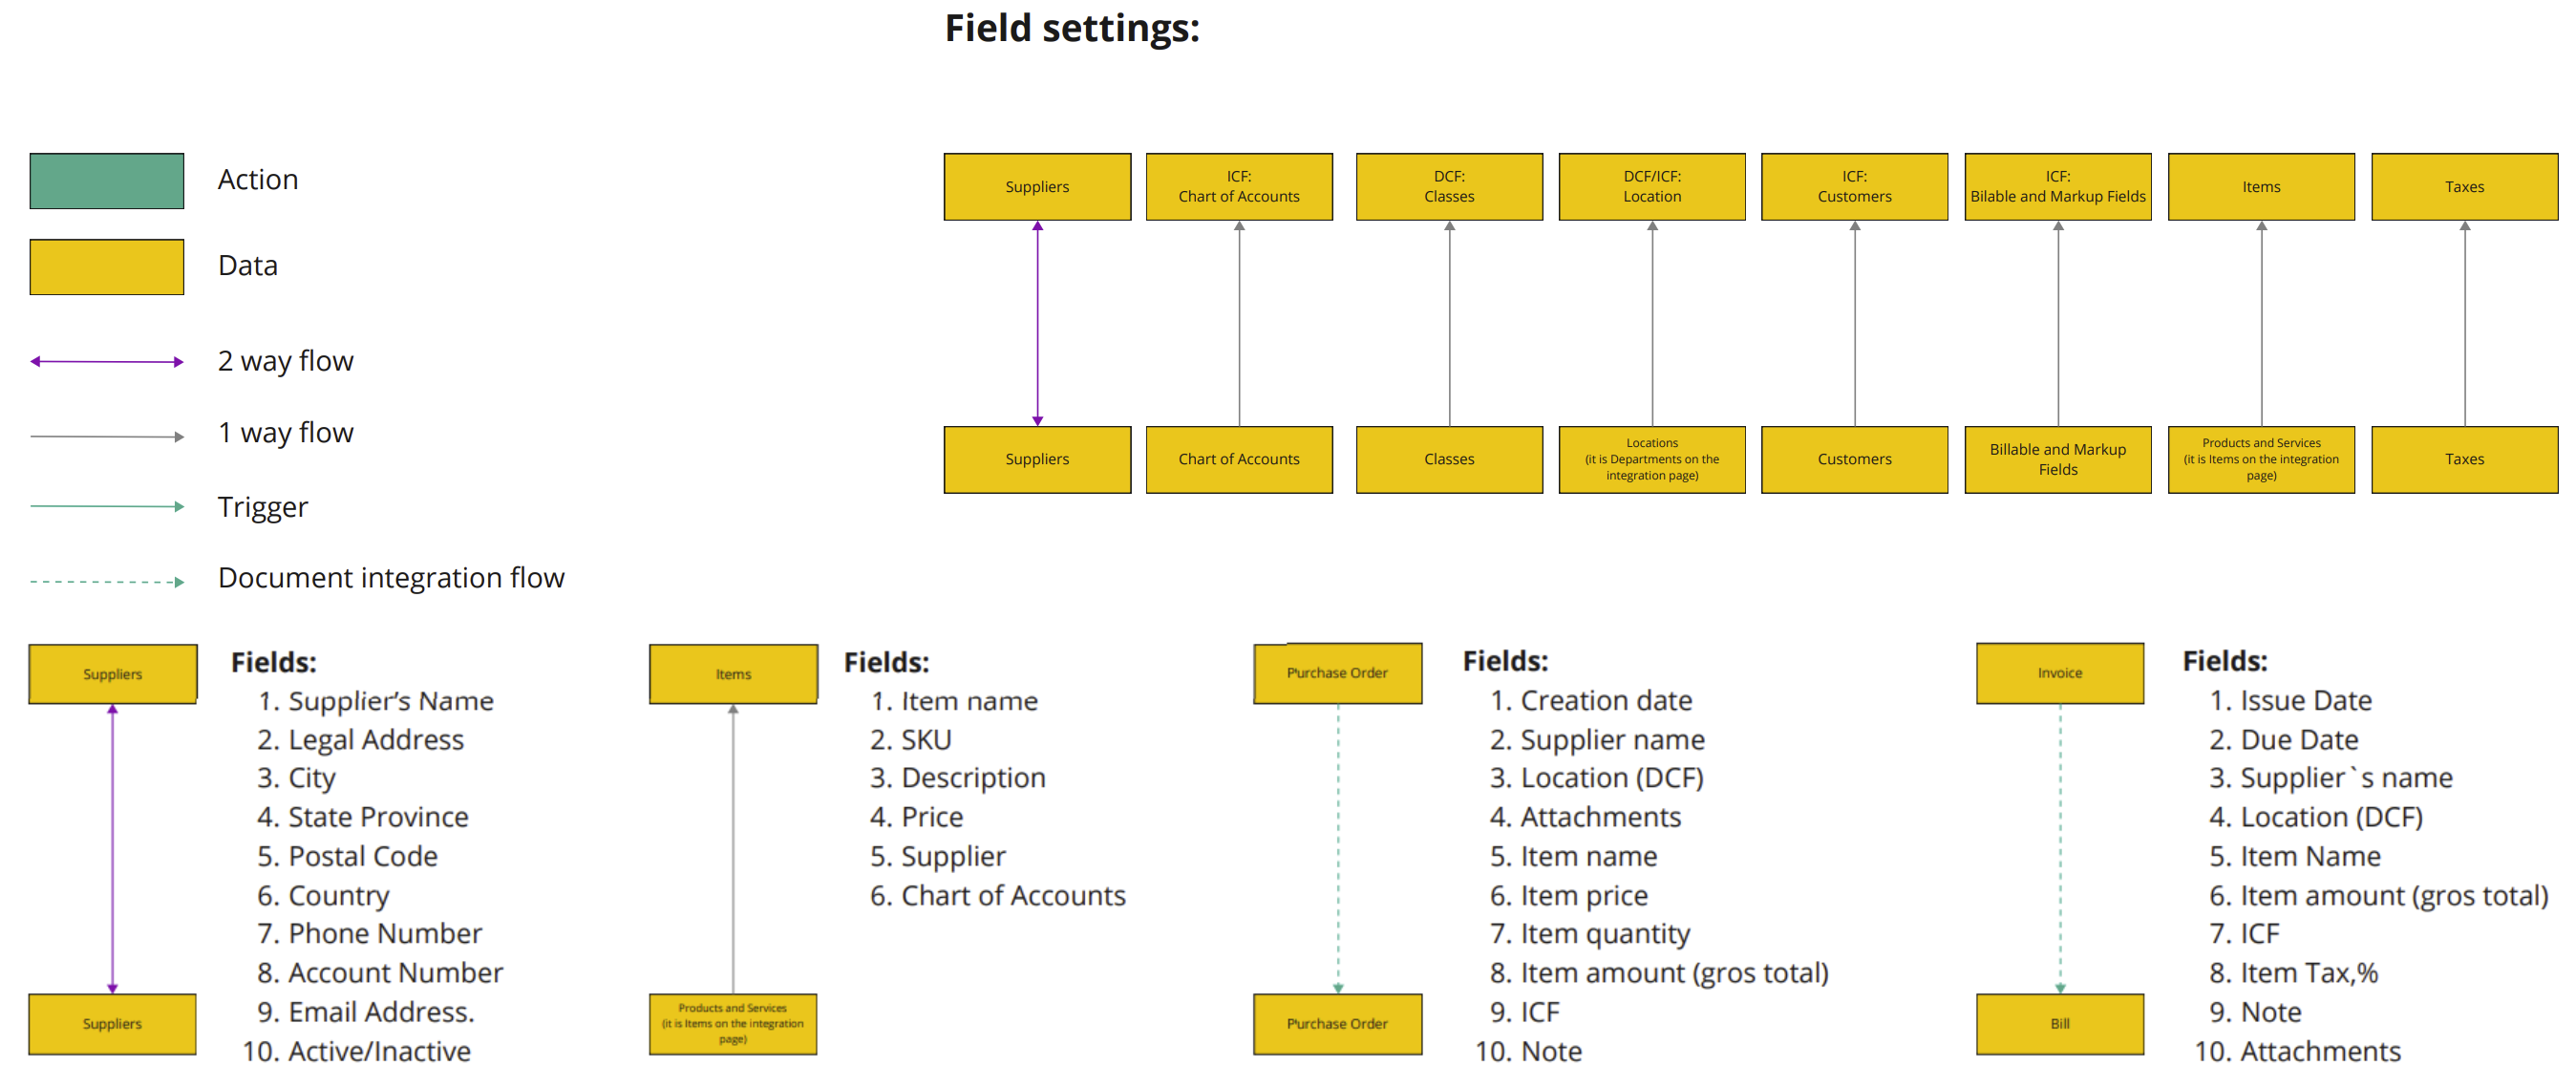
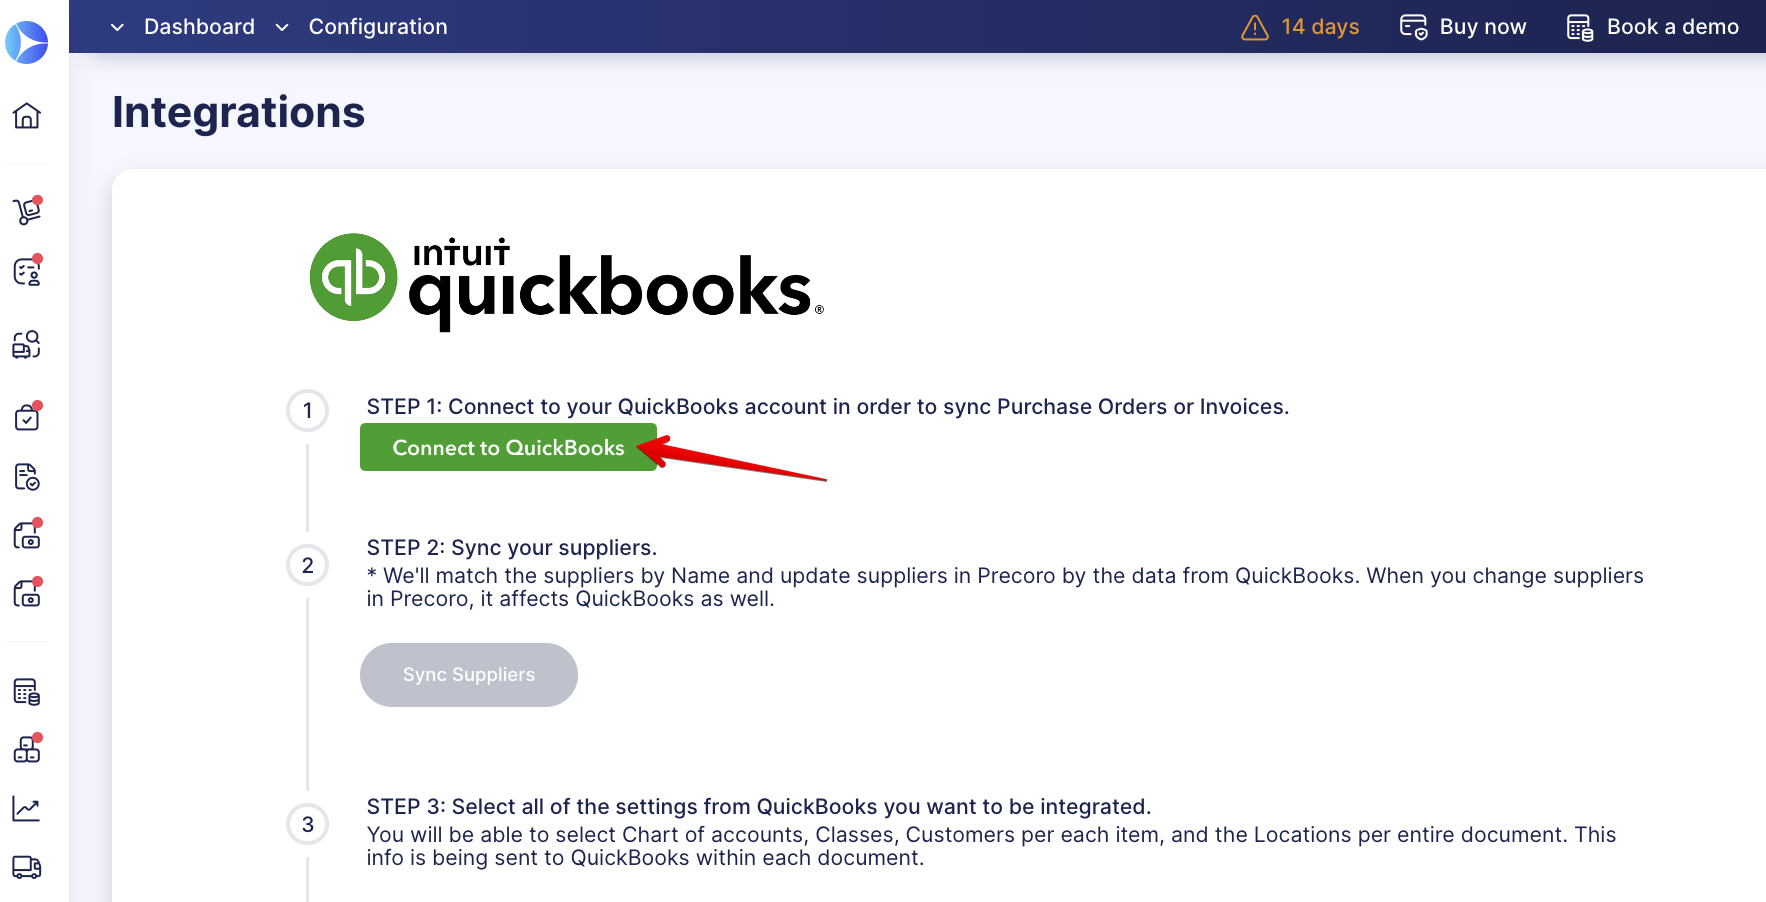
Step 1: Connect Your QuickBooks Account
- Navigate to Configuration → Integrations in Precoro.
- Click the Connect to QuickBooks button.
- Sign in to your QuickBooks Online account via Precoro to complete the connection.
If you want to speed up your setup, use Smart Integration to automatically import the most relevant data from QuickBooks based on your recent activity.
See how it works in this article.
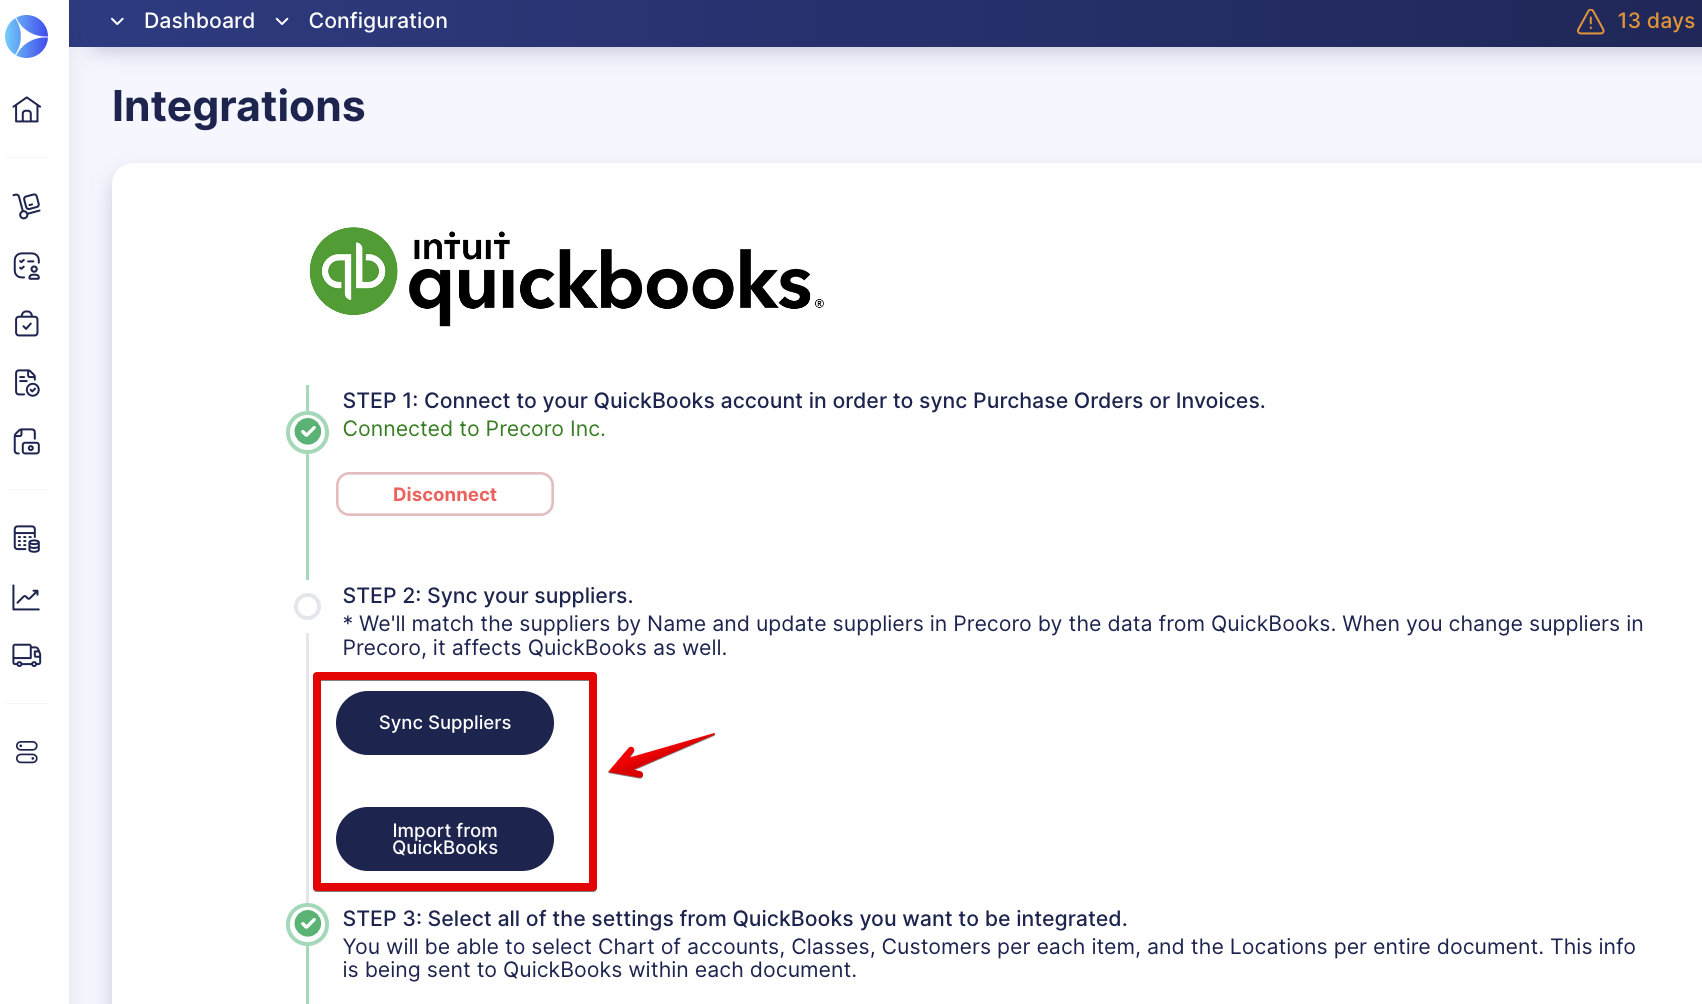
Step 2: Sync Your Suppliers
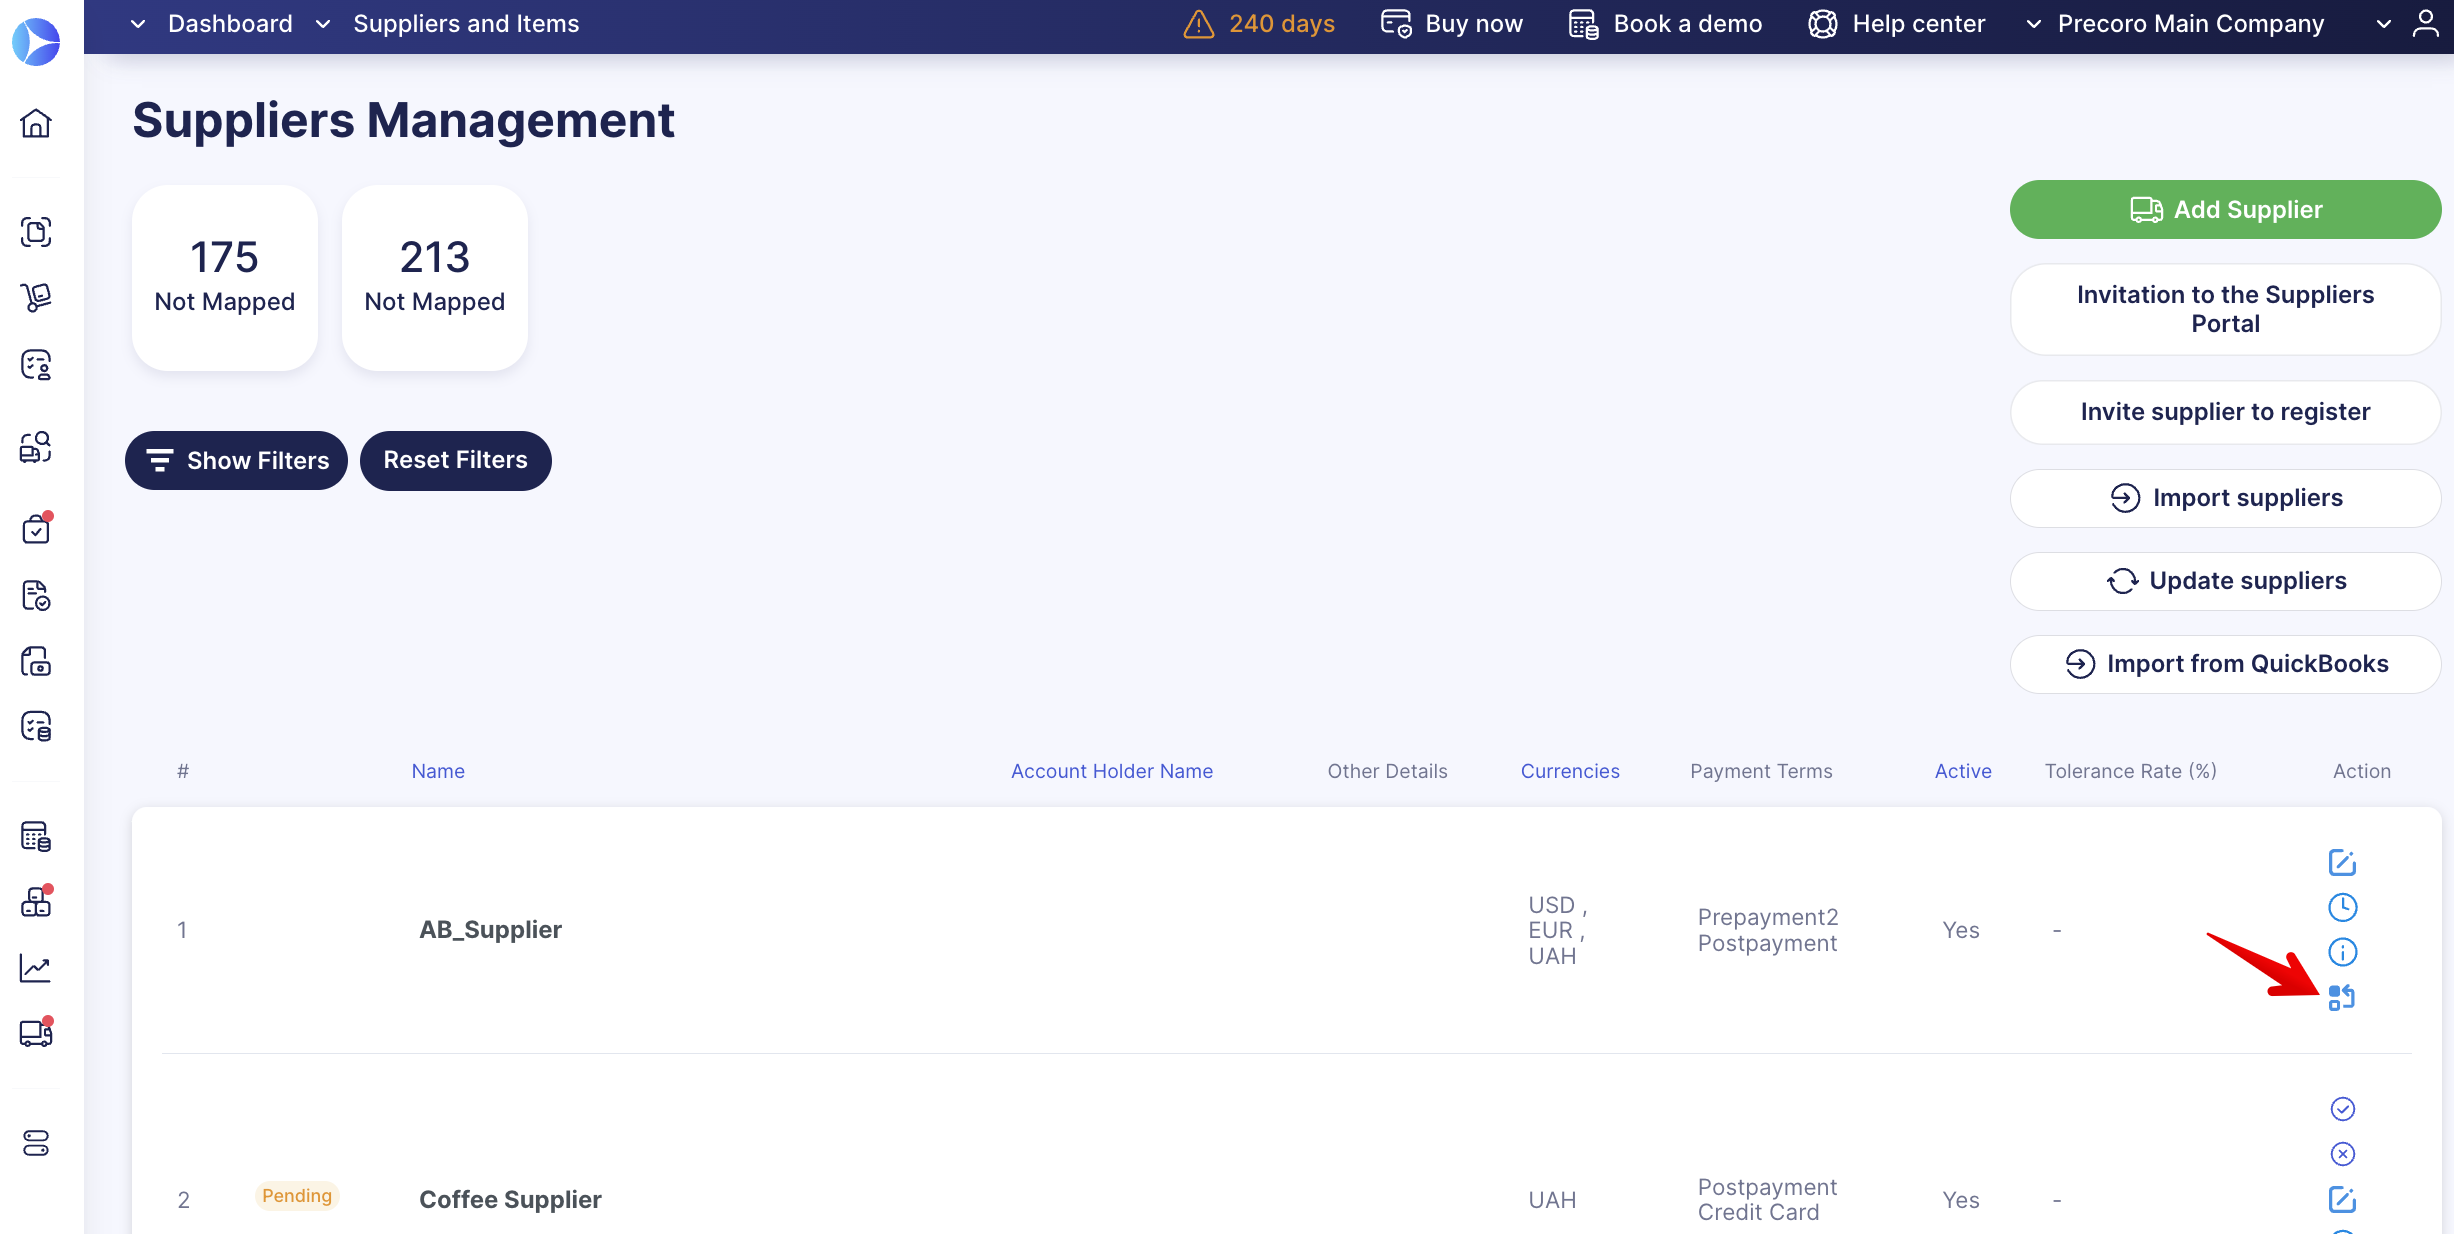
- On the same page, click the Sync Suppliers button if you already have a suppliers list in Precoro or use the Import from QuickBooks option to import your suppliers into Precoro.

- Check if every supplier in Precoro matches one in QuickBooks. You can manually sync unrecognized suppliers via the Supplier Management page or create them in QuickBooks.
💡Please note: The currency of suppliers should be the same in both systems.
The following fields are synced automatically: Supplier Name, Legal Address, City, State/Province, Postal Code, Country, Phone Number, Email Address, Account Number, and Status (Active/Inactive).
For additional details, refer to the Suppliers and Items Integration article.
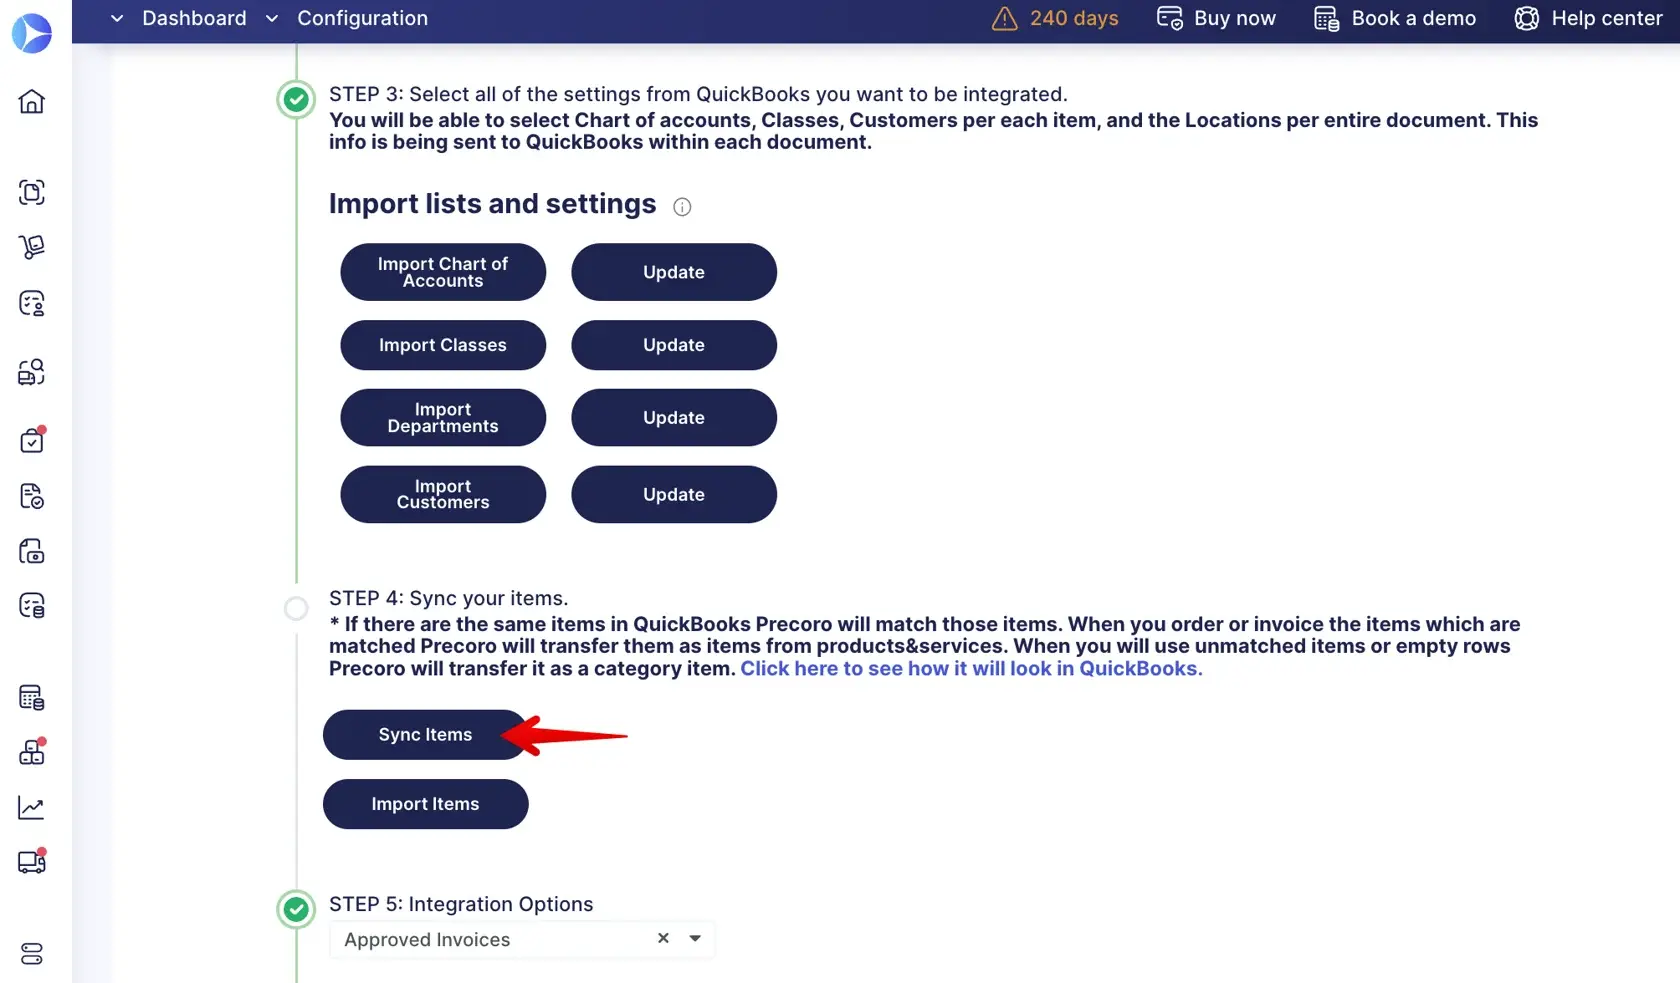
Step 3: Choose the QuickBooks Settings to Integrate with Precoro
You can select and mirror the following lists in Precoro:
- GL Accounts (Chart of Accounts)
- Customers and Projects
- Classes / Departments
- Locations
To integrate a list:
- Navigate to Step 3 in the integration settings.
- Select the options you want to import by checking them.
- Click the Import button.
Once imported, the selected options will be available in Precoro and used in purchase orders or invoices exactly as configured in your QuickBooks account.
💡 Please note: Buttons labeled "Import…" in Step 3 include only previously unintegrated data from QuickBooks. For example, if a new Account is added to QuickBooks, use the Import Chart of Accounts button to sync it in Precoro.
Accounts can be manually deleted on the Edit Custom Field page.
The Update button in Step 3 only refreshes integrated data without importing new options. For instance, changes made in QuickBooks will be reflected in Precoro after clicking Update.
Step 4 (Optional): Sync Items
If you manage products, services, or inventory in QuickBooks, they can also be synced with Precoro.
Key details:
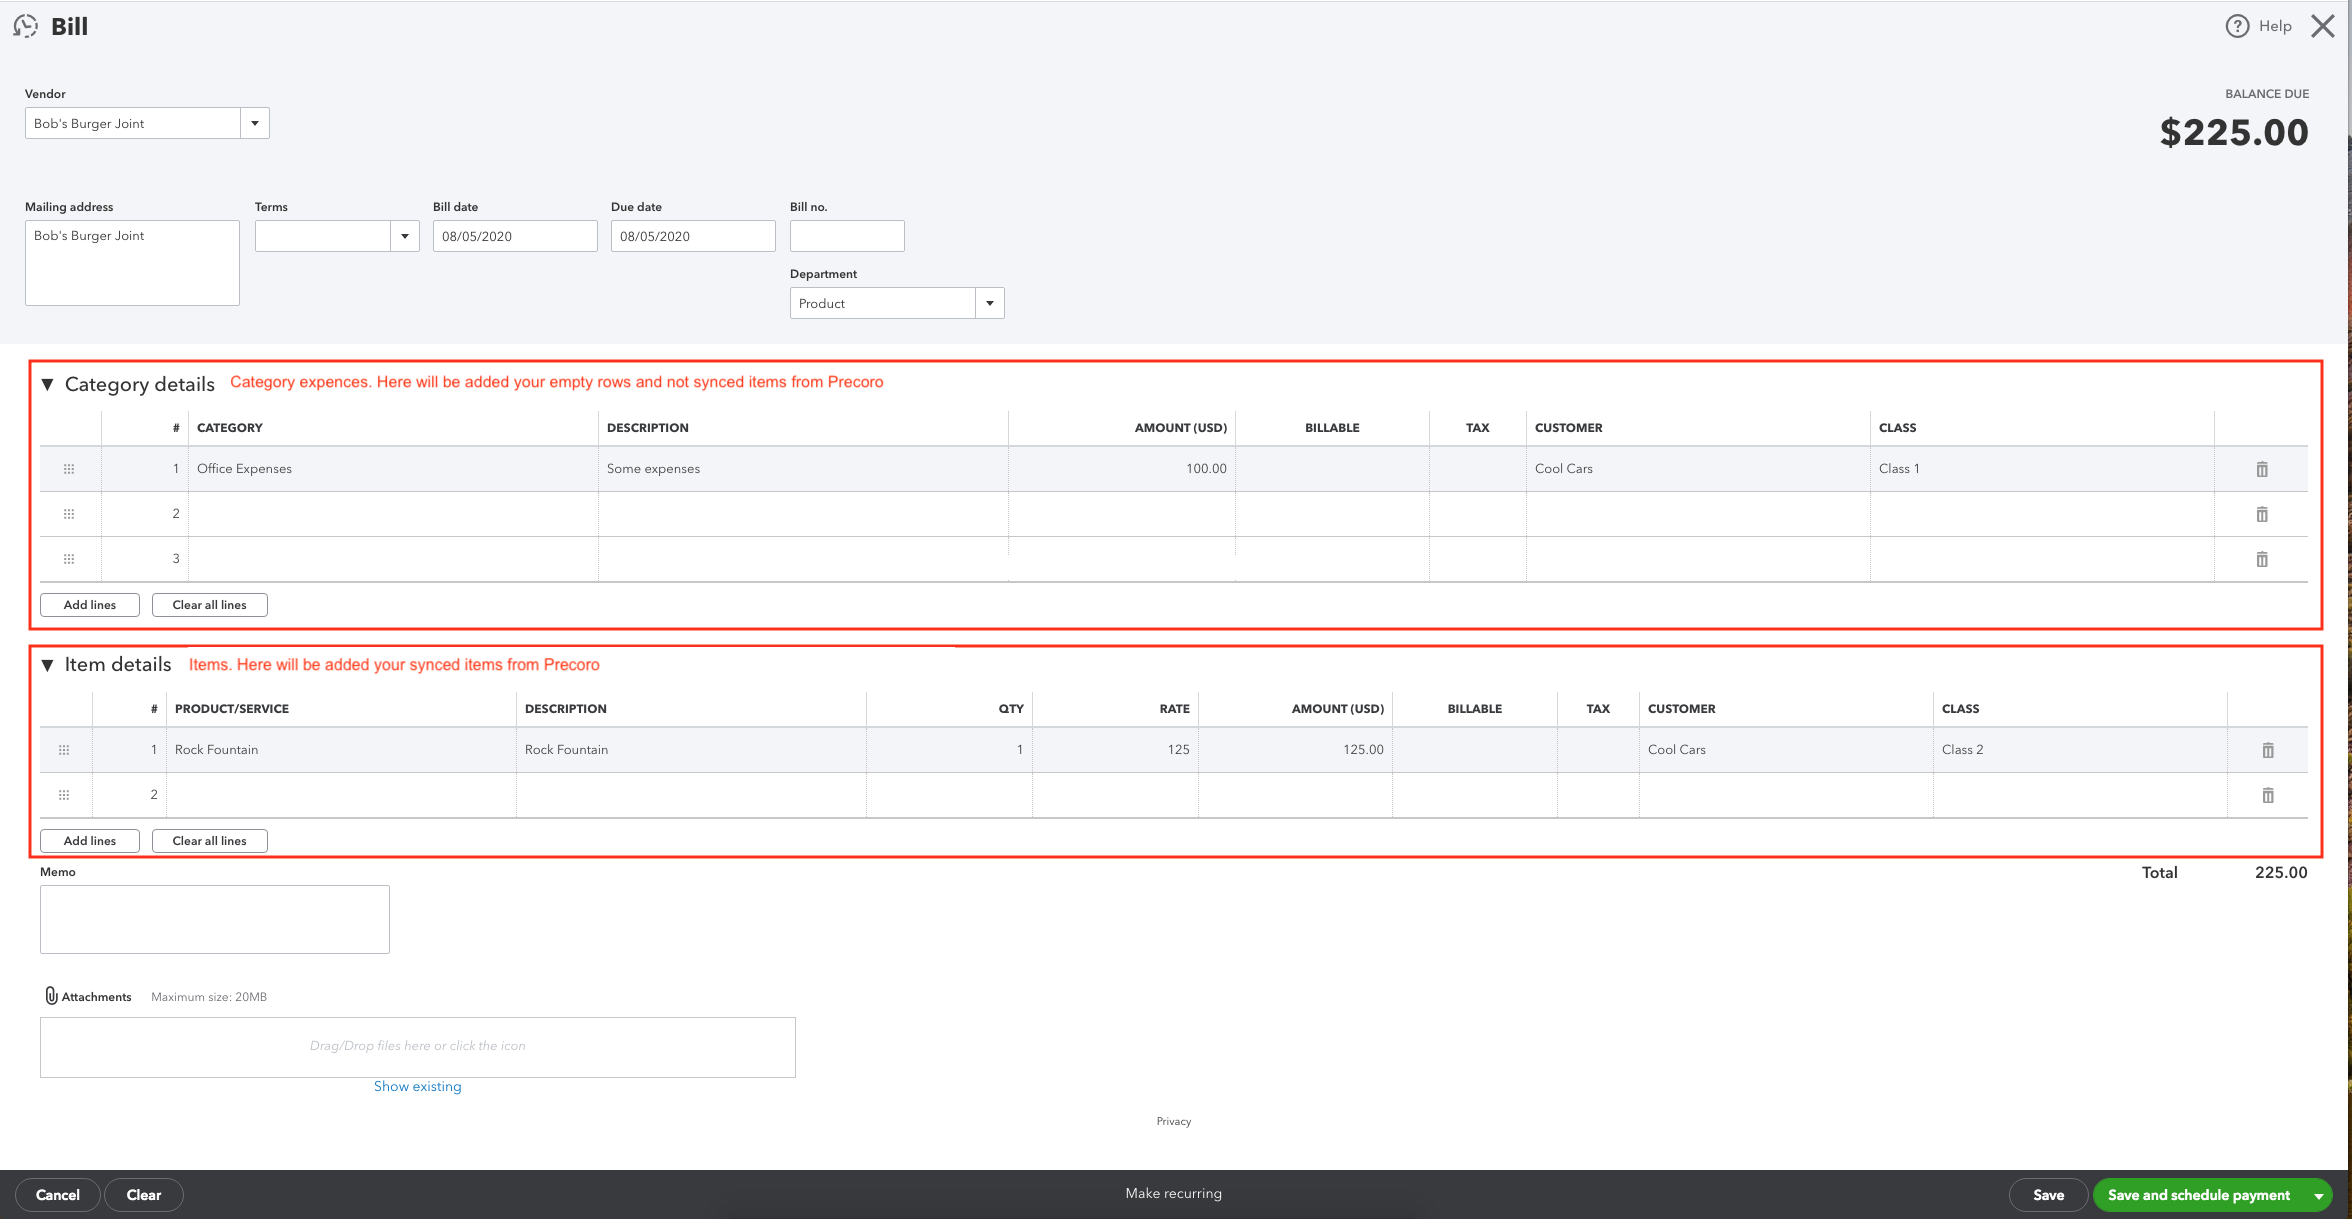
- Synced products from Precoro are sent to QuickBooks as items.
- Other details are sent as categories.
- Any changes made in QuickBooks related to products, services, or inventory should be synced via the Sync Items button on the integration page.
For more information, see the Suppliers and Items Integration guide.
Step 5: Select the Integration Option
You can choose between:
- Approved Purchase Orders
- Approved Invoices
- Core Document Set
When Core Document Set is selected, Precoro sends Purchase Orders, Invoices, and Credit Notes to QuickBooks as a connected document flow.
Here’s how it works:
- If a PO is already synced, an Invoice created from that PO is sent to QuickBooks with a reference to the related PO.
- If an Invoice is created from a PO that hasn't been synced yet, the Invoice isn't sent until the related PO is synced.
- Standalone Invoices, created without a PO, are sent to QuickBooks normally.
- If a PO is marked as Internal, any Invoice created from that PO is also marked as Internal and isn't sent to QuickBooks.
- Service POs are supported and can be synced as part of the Core Document Set flow.
Additionally, if Approved Invoices is selected, you can enable the Import payments from QuickBooks option. Payments and their statuses will be automatically synced between Precoro and QuickBooks in this case.
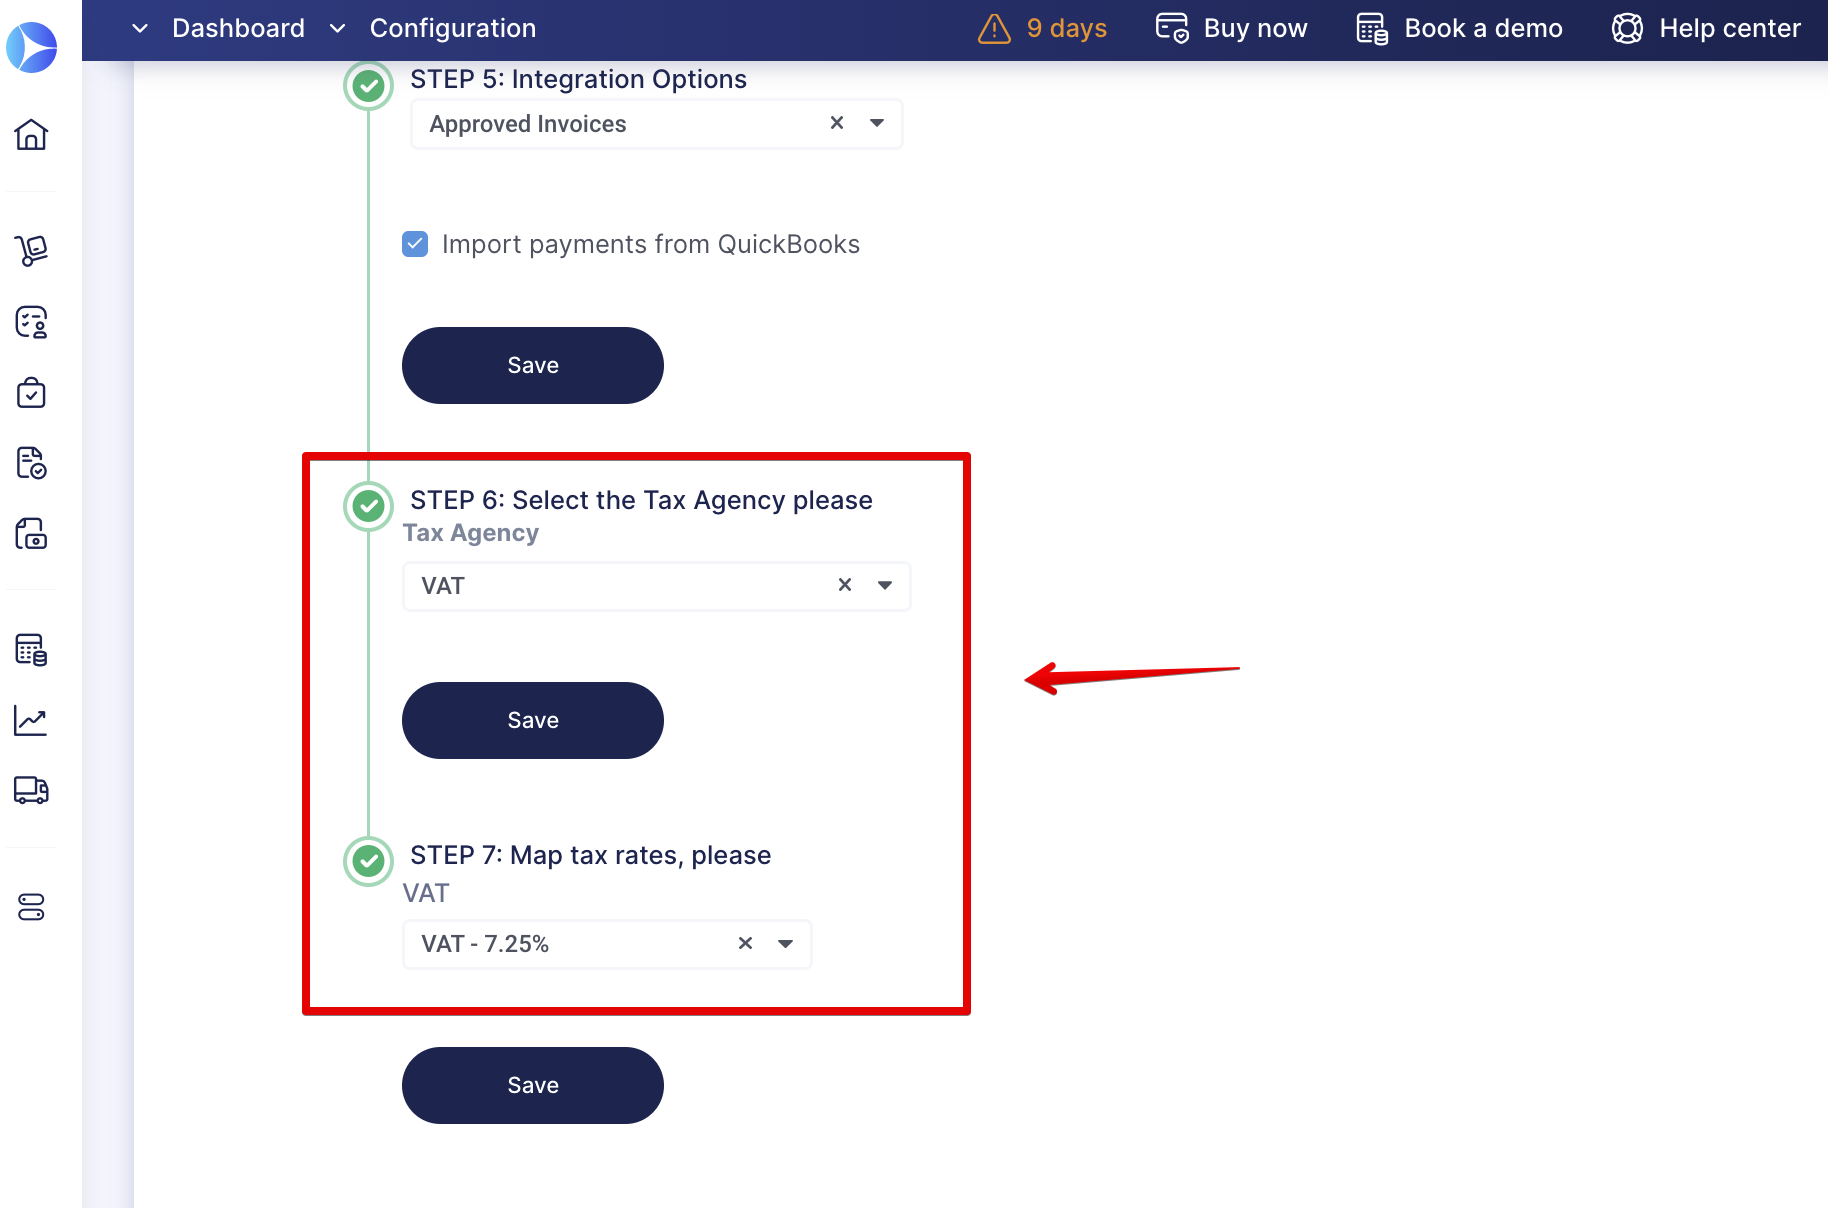
Steps 6-7 (Optional): Select the Tax Agency and Map Tax Rates
These steps are only visible if you are using Taxes in Precoro.
To integrate Tax Agency and map rates:
- Set the default agency in Step 6.
- Select the tax rate in Step 7. The selected tax rate in QuickBooks should match the one in Precoro.
Once the setup is completed and your changes are saved, all future approved purchase orders or invoices will be automatically transferred to QuickBooks.
For more details on how Precoro and QuickBooks interact in document management, refer to these articles:
- Chart of Accounts, Classes, Customers, Billable Fields, and Projects in QuickBooks
- QuickBooks Purchase Order
- QuickBooks Invoices, Payments, and Credit Notes
💡Please note: Frozen accounts or companies with a demo period that expired more than 30 days ago will have their QuickBooks integration automatically disconnected.
How to Disconnect or Remove QuickBooks Integration
To turn off the integration:
- Go to the Configuration page.
- Click the Disconnect button.
- Choose one of the following options:
- Remove Integration: Unsyncs all data, allowing you to set up a new integration from scratch.
- Disconnect Integration: Keeps your settings and field synchronization intact, so you can reactivate the integration anytime.
If the QuickBooks Online integration is disconnected, here's how you will be notified:
- Flash Message
Company admins will see a flash message in Precoro notifying them about the disconnection. The message will prompt admins to go to the Configuration page and resolve the issue. - Email Notifications
You can enable the Notification about disconnected QuickBooks integration option in Email Preferences.
If activated, users with Configuration roles in Precoro will receive an email detailing the issue, such as:
- The QuickBooks subscription has been transferred to another user.
- The QuickBooks subscription has been canceled or expired.
- The QuickBooks admin has been removed from the QuickBooks organization.
Documents, suppliers, items, and tracking categories will not be created or updated in Precoro until the integration is re-established.