TABLE OF CONTENTS
Lists Available for Integration
Before you start integrating documents and payments, please sync all the necessary lists between Bill.com and Precoro. Here’s what can be imported or updated based on the information in your Bill.com account.
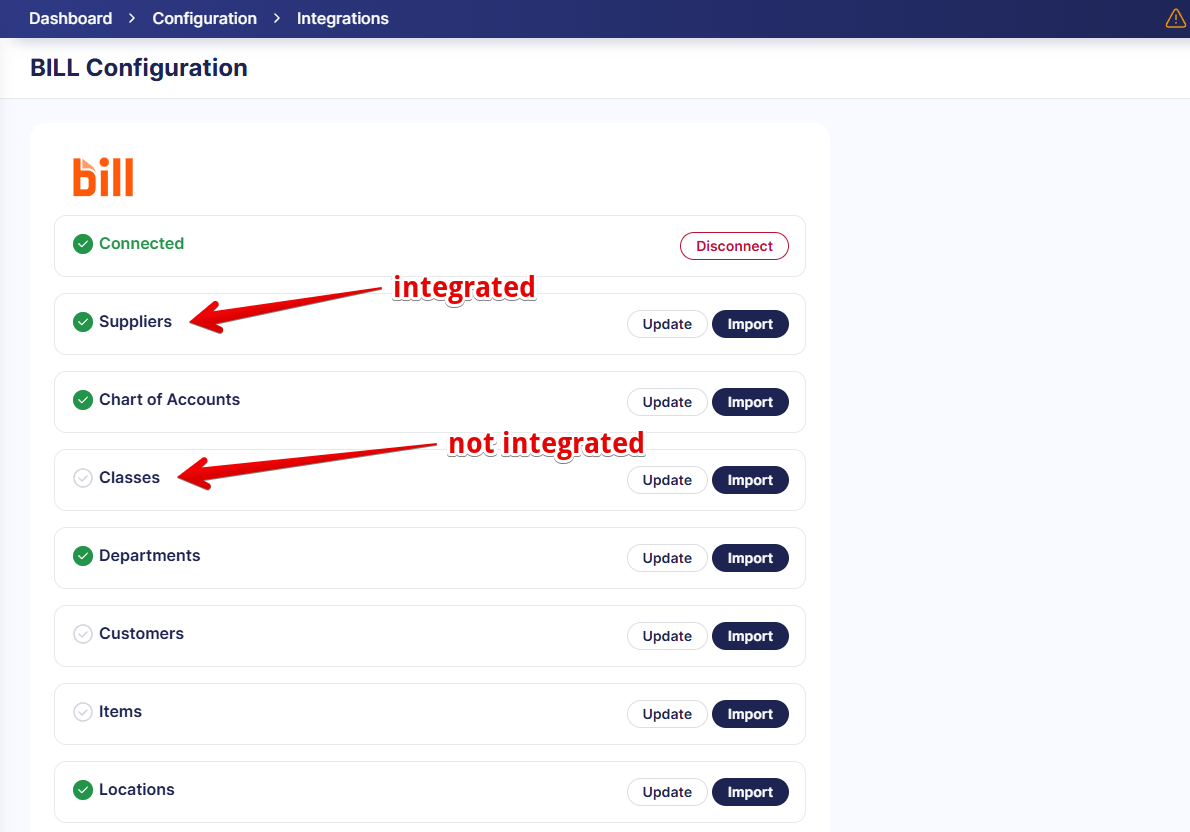
First, you need to establish a connection with Bill.com as explained in this article. After that, the master data can be imported or updated from the BILL Configuration page in Configuration → Integrations. On this page, you’ll see the list where:
- If the entity is yet to be integrated, the “check” sign is greyed out.
- If there’s at least one imported option on this list, you’ll see a green check opposite it.
How to Sync Suppliers
Importing Vendors
Importing vendors from Bill.com is the first necessary step once you’ve set up the integration. Please note that only invoices from the integrated suppliers can be sent to Bill.
Follow these steps to import vendors:
- On the BILL Configuration page, find the Suppliers section and press Import.
- You’ll see the list of vendors from Bill. It’s easy to spot the already integrated suppliers by the blue checkbox.
- Check the suppliers you want to sync and press Import.
- If this supplier doesn’t exist in your Precoro company, it will be created with the details extracted from Bill.com.
- If there’s already a supplier with the same name in Precoro, it will be mapped with the Bill vendor, and information in their supplier card will be updated.
- Integrated suppliers will be shown with the Integrated with Bill.com tag on the Supplier Management page.
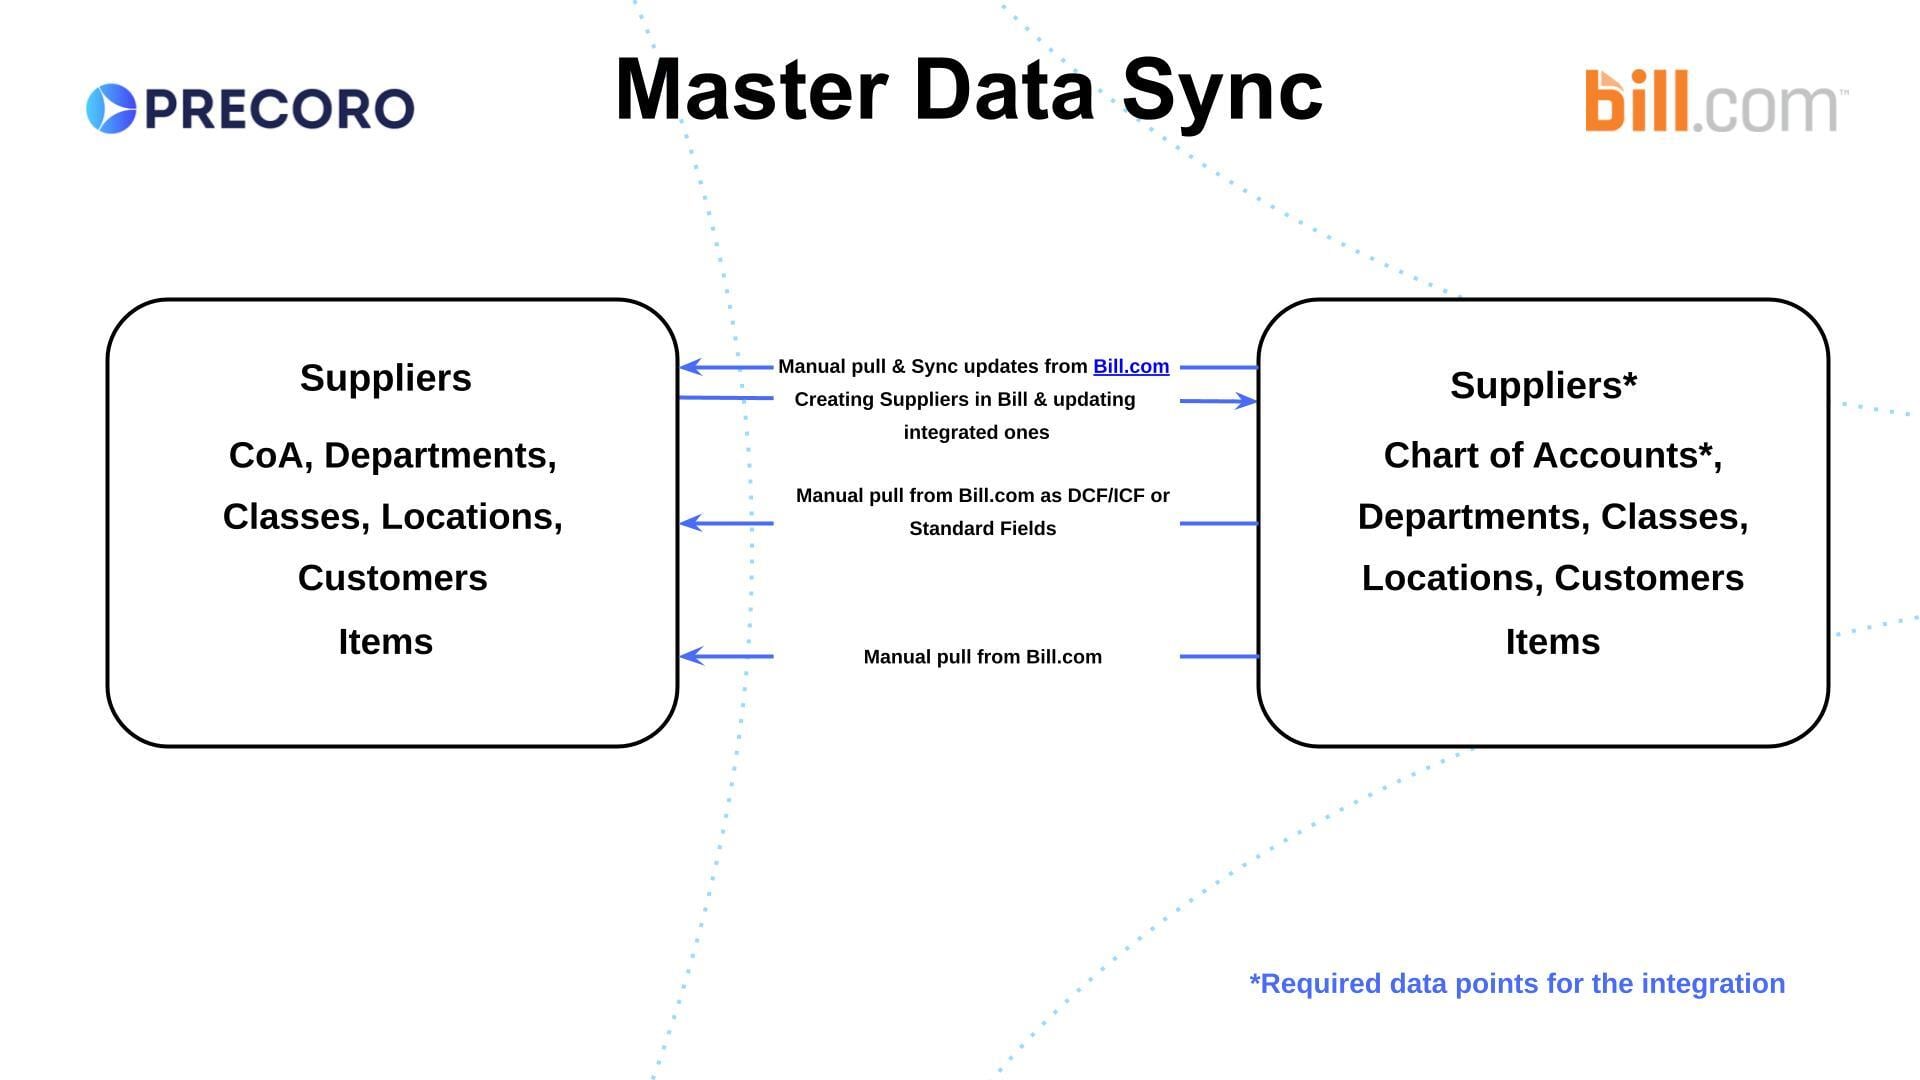
This supplier data is transferred from Bill.com to Precoro:
|
Field in Bill.com |
Field in Precoro |
|
name |
Name |
|
accountNumber |
Bank Account Number |
|
|
Email Address (of a supplier contact) |
|
phone |
Phone Number (of a supplier contact) |
|
address |
Address (split into corresponding fields) |
|
currency |
Currency |
Syncing New Suppliers
When you create a new supplier in Precoro and enable the Sync with BILL option, Precoro looks for a corresponding vendor in Bill.com.
- If there's a match, Precoro maps the suppliers and pulls data from Bill.com to Precoro.
- If not, a corresponding vendor is created in Bill.com.
When a new vendor is created in Bill.com, it's not added to Precoro automatically. You'll need to import it on the BILL Configuration page in Precoro.
Updating and Mapping Existing Suppliers
If you have already integrated suppliers and want to update the data in their cards based on the information in Bill.com, just click Update on the BILL Configuration page.
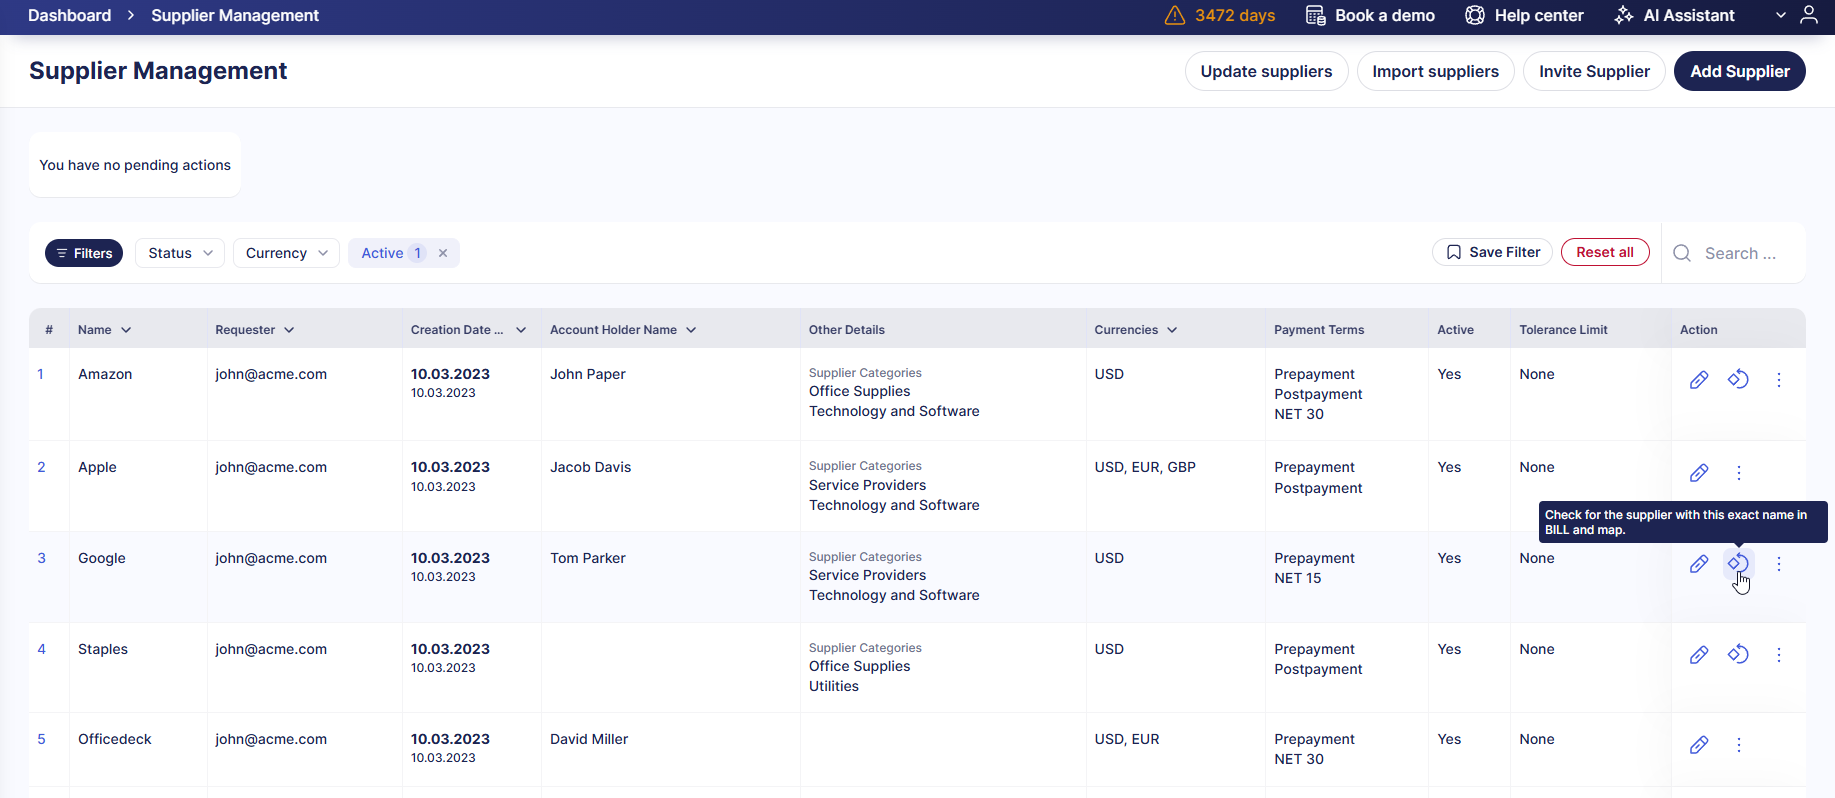
You can also integrate existing suppliers in Precoro with Bill.com. Open the Supplier Management page, find the needed supplier, and press the Map button. Precoro will check for a vendor with the identical name in Bill and map the supplier if the corresponding Bill vendor is found.
Excluding Suppliers from Integration
If needed, you can control which suppliers are synchronized with Bill and exclude specific ones from integration.
When a supplier is marked as Internal, it remains in Precoro but is not mapped to Bill, and its documents are not sent to the integration.
To mark a supplier as Internal:
- Navigate to the Supplier Management page.
- Open the supplier’s card by pressing Edit.
- Disable the Sync with BILL checkbox.
- Press Confirm.
Please note:
- Suppliers are synchronized by default when the Bill integration is active.
- If the integration is inactive, all suppliers are excluded from synchronization, and this option is unavailable.
- If you re-enable synchronization for a previously internal supplier, their past documents are not sent automatically, but can be integrated manually if needed.
How to Import Fields and Options
On the BILL Configuration page, you’ll find all the lists you can import, including
- Chart of Accounts
- Classes
- Departments
- Customers
- Locations
Here’s a step-by-step import process:
- Navigate to the BILL Configuration page, find the needed list, and press Import.
- On the following page, you’ll see a list of this field’s options available in Bill.com.
- In the Import as: field, select if you want to import the list as a custom field for documents or items. Locations can also be imported as Locations (standard document field in Precoro).
- Check the options you want to integrate. The search bar at the top of the list helps you navigate long lists quickly.
- Press the Import button in the top-right corner.
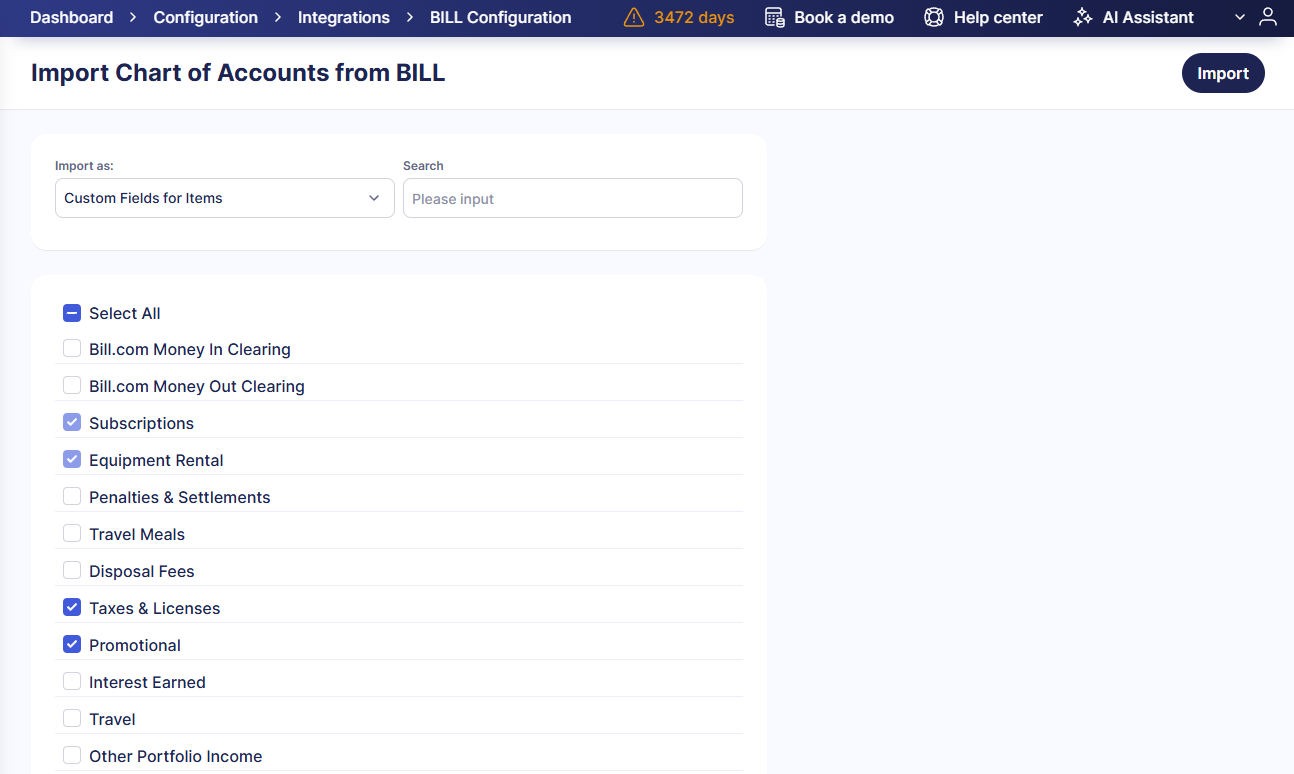
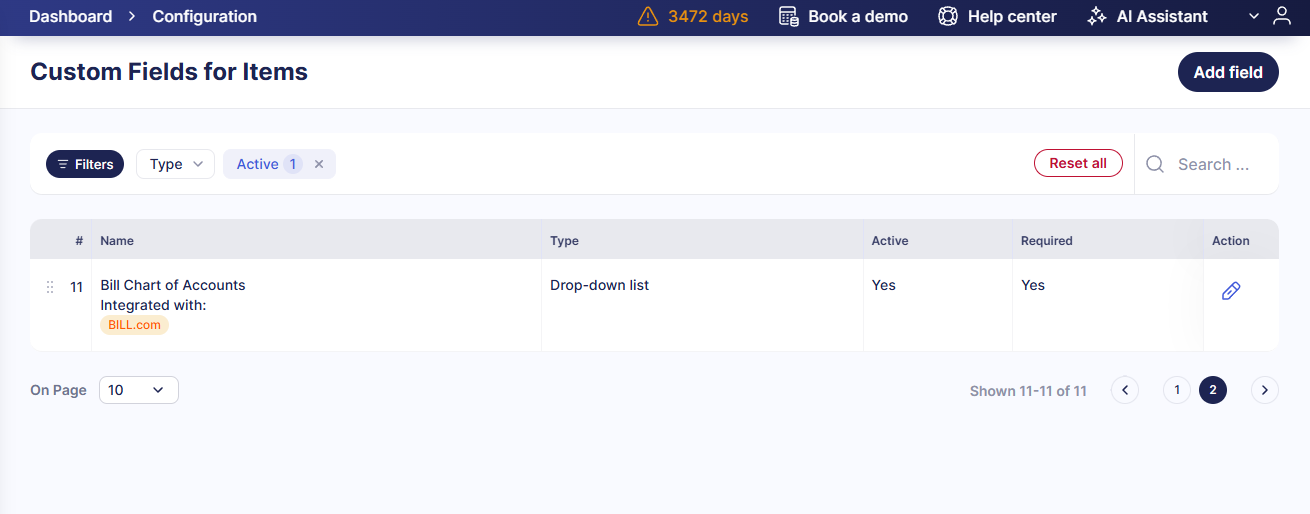
The imported fields will appear in the selected Configuration section (Custom Fields for Documents or Items) with the Bill prefix and integration tag. Precoro will also save the option hierarchy.
If the field has already been integrated, you can still use the Import functionality to add more options from Bill to Precoro. Previously integrated options are marked with light-blue checkboxes on the import page.
If changes are made to the integrated options in Bill.com, please press Update opposite the integrated field on the BILL Configuration page to keep the values up to date.
How to Import Items
The BILL Configuration page also allows you to import items.
- Find the Items section and press Import.
- Select the items to add to the catalog in Precoro.
- Press Import.
The items from Bill.com will appear on the Item Management page. You can import more items anytime or update the integrated items’ details from the BILL Configuration page.
Here’s what item data is imported from Bill.com to Precoro:
|
Field in Bill.com |
Field in Precoro |
|
name |
Item Name |
|
price |
Price |
|
type |
Item Type (Inventory, Non-Inventory, Service, Tax) |
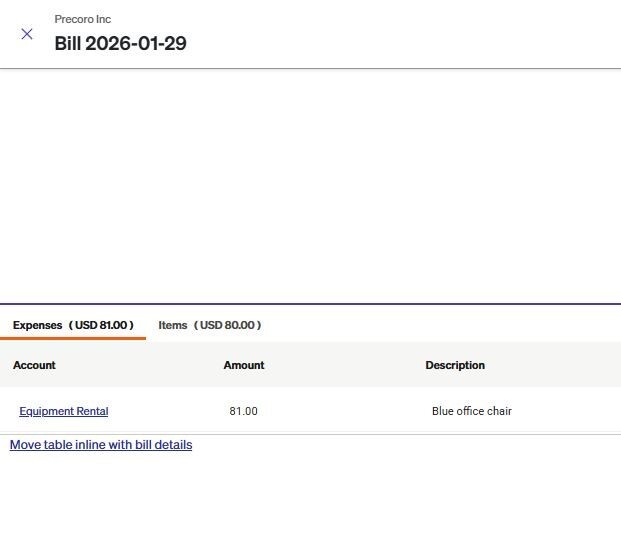
When you send invoices from Precoro to Bill.com, integrated items will be in the Items section, while non-integrated items from the catalog and items added manually will appear under Expenses. To start integrating invoices, please follow this guide.