TABLES OF CONTENTS
- Added Ability to Enter Free of Charge Items in Service Orders
-
Quantity in Pending Invoices Will Be Displayed in the Add to Receipt Column
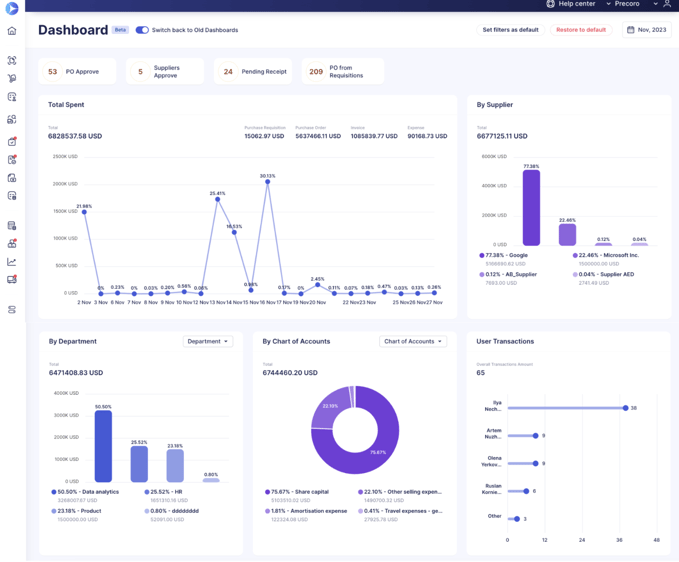
New Dashboard Page
We are excited to announce the BETA phase of the new Dashboard — a single page for you to track and control the essential spending information. You can get it simply by enabling the latest version of the page by activating the Try the Newest Dashboards Version toggle on top of the page.
The new Dashboard page will be available for users with Purchase Orders, Invoices, Expenses, and Super User Roles. We are actively improving this functionality and will add other roles in the upcoming iterations.
With the latest page version, you will be able to use new awesome features and analytics from graphs to optimize your workflow:
-
Promptly view a breakdown of essential spending information and, if needed, easily switch between the two versions of the page.
- See all the actions required from you and get redirected to the necessary page.
- Receive information from pre-configured graphs and charts by:
-
Total Spent
-
Item and Document Custom Fields
-
Supplier’s Gross Total
-
User Transactions.
-
-
Gather more information from the Item and Document Custom Fields graphs by using filters.
-
Customize the available graphs and charts by Date range and set chosen filters as default for the page.
Read this Dashboard article to learn more about the new page.
Updated Users Report for Multi-Companies
We have added the ability for multi-companies to export the list of all users and their accesses across your companies. You can customize your request with filters and get the necessary information on your users in Precoro in a few moments.
To access the report, you must have a Configurations Role.
1. Go to Reports and click the Users Report one.
2. Filter the information if needed to build a customized report. In the Company field, you can multi-select those companies from which you want to receive the users list.
3. Click Run Report, and you will get a list of information that you can Export and continue working on in the XLSX format.
The structure of the multi-companies report will be as follows:
- All users across all the selected companies in the report filters will be displayed with their accesses listed for all the chosen companies.
If the user does not have access to the company, you will see the specification for the company that No access rights are available for that user.
- All user accesses are grouped by company. One company has one access group, which includes Main Location, Available Locations, Available Document Custom Fields, Roles, and whether the user is Active. Above the access group columns, you will see the company name to which this group is affiliated.
Added Ability to Enter Free of Charge Items in Service Orders
Now, when adding items to the Service Orders, you can utilize the Free of Charge function, which can be useful in the following situations:
- Ordering or receiving free samples from the Suppliers or Partners.
- Custom duties invoices that include a $0 value of service, but there is an amount of tax payable (GST on customs).
- Packaging that does not need additional payment must still be displayed in the order.
To use this function, activate it by checking the Free of Charge checkbox.
Please note that the document’s Total must still be greater than 0 to confirm it. Thus, you cannot create a document with only Free of Charge items.
You can add the Free of Charge item from the Service Order to the Invoice document. The Total in the Invoice must also be greater than 0. When you are attempting to create a Credit Note, the Free of Charge items will not be displayed in it.
You can also add the Free of Charge item from the Service Order to the Receipt document. In the Receipt preview, you will see that the Free of Charge items do not have the Received column. Also, when downloading the printed document form in PDF or XLSX formats, the Free of Charge items will have the following values:
- Ordered = 0
- Net Total = 0
Added the Prepaid Amount Display for Pending Invoices
You can see the display of the Prepaid amount from the Purchase Order in the Invoice document on the Pending status as well as on the Approved one.
The Prepaid amount in the Pending Invoice will be displayed in the Paid field.
If the Invoice has a prepaid amount, the To Pay value will be reduced by this prepaid amount: To Pay = Invoice Total - Paid.
If you use the Block Invoice Confirmation without Receipt functionality, then the Invoice Prepaid amount will be displayed on the Pending Receipt status as well.
You will also be able to see the Previous Payments button in the Pending Invoice.
Quantity in Pending Invoices Will Be Displayed in the Add to Receipt Column
We have improved the working logic of the Add to Receipt column when selecting items to add to the Receipt from PO with Invoice Without Receipt Blocking Functionality enabled. Now, it includes the values from the Quantity in Pending Invoices column.
Please open this article to learn more about the Invoice Without Receipt Blocking Functionality.
If there are no Quantity in Pending Invoices, then the working logic stays the same: Add to Receipt = Quantity - Received.
Please note that for Service Orders, the Quantity in Pending Invoices is called the Net Total in Pending Invoices.
-png.png?width=675&height=769&name=image%20(27)-png.png)
Added Purchaser Data to the Custom Invoice Reports
Now, you can receive more information about the Purchaser, from whom the action is required to create the Receipt document that blocks the Invoice.
Please open this article to learn more about the Invoice Without Receipt Blocking Functionality.
Two new fields, Purchaser Email and Purchaser Name, you can add from the General Data in the Invoice Custom Report:
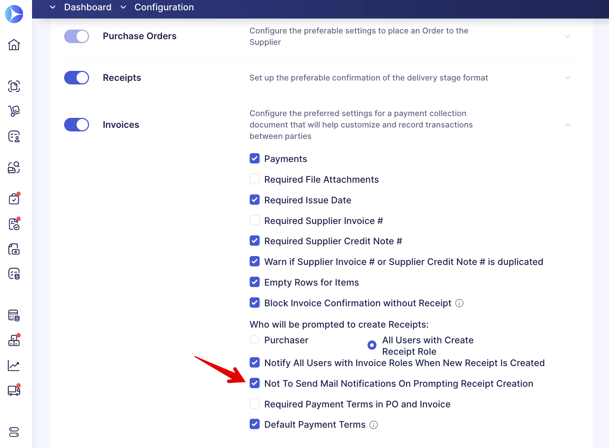
Added New Letter to the Email Preferences
You can now configure the settings for the Purchase Order is waiting for Receipt letter in the Email Preferences. This letter is activated by default, and only the users with Create Receipt Roles can access it.
Please note that users will be able to see and turn off this letter if your company has an active Invoice Without Receipt Blocking functionality and has configured that the letter should be sent to all involved.
If you still do not wish to receive this type of email notification, you can simply turn them off in the personal Email Preferences:
In case your company has deactivated sending this letter for all the users in the Basic Setting, this Purchase Order is waiting for Receipt letter option will not be displayed for you in the Email Preferences, as the company has set the preferences for all.
The Purchase Order is waiting for Receipt letter contains the following information:
Select the Xero Document Status for Sending
We have added an ability for you to select the Xero Document Status in the new corresponding field, and your chosen status will be set for the documents sent to Xero: