TABLE OF CONTENTS
Document Custom Forms
The Document Custom Forms feature will help you build your own tailored document layouts in Precoro. Currently, it is available for the Purchase Requisition documents.
In future updates, the functionality will be available for Purchase Orders, Invoices, and Expenses.
You can also set dependencies between the fields on the document level and make the workflow even more automated.
Please note that this functionality is in the BETA stage. To get it now, contact your Customer Success Manager, who will gladly activate it for you.
How to Set Up and Use Custom Forms
Users with Configuration Roles can create new forms.
To start using Custom Forms, you should first:
- Decide on the type of document you wish to adjust.
- Go to Documents Custom Fields and create new fields for adding to the forms.
Find more information on working with Documents Custom Fields in Precoro here.
To create a new Form:
1. Go to the Configuration → Custom Form Settings.
2. Press the New Custom Form button and enter the required information:
- Custom Form Name — this name will be displayed on the document page, so it should be evident to a user what kind of form this is.
- Custom Form Type — you need to select for which type of document you want to configure a new form.
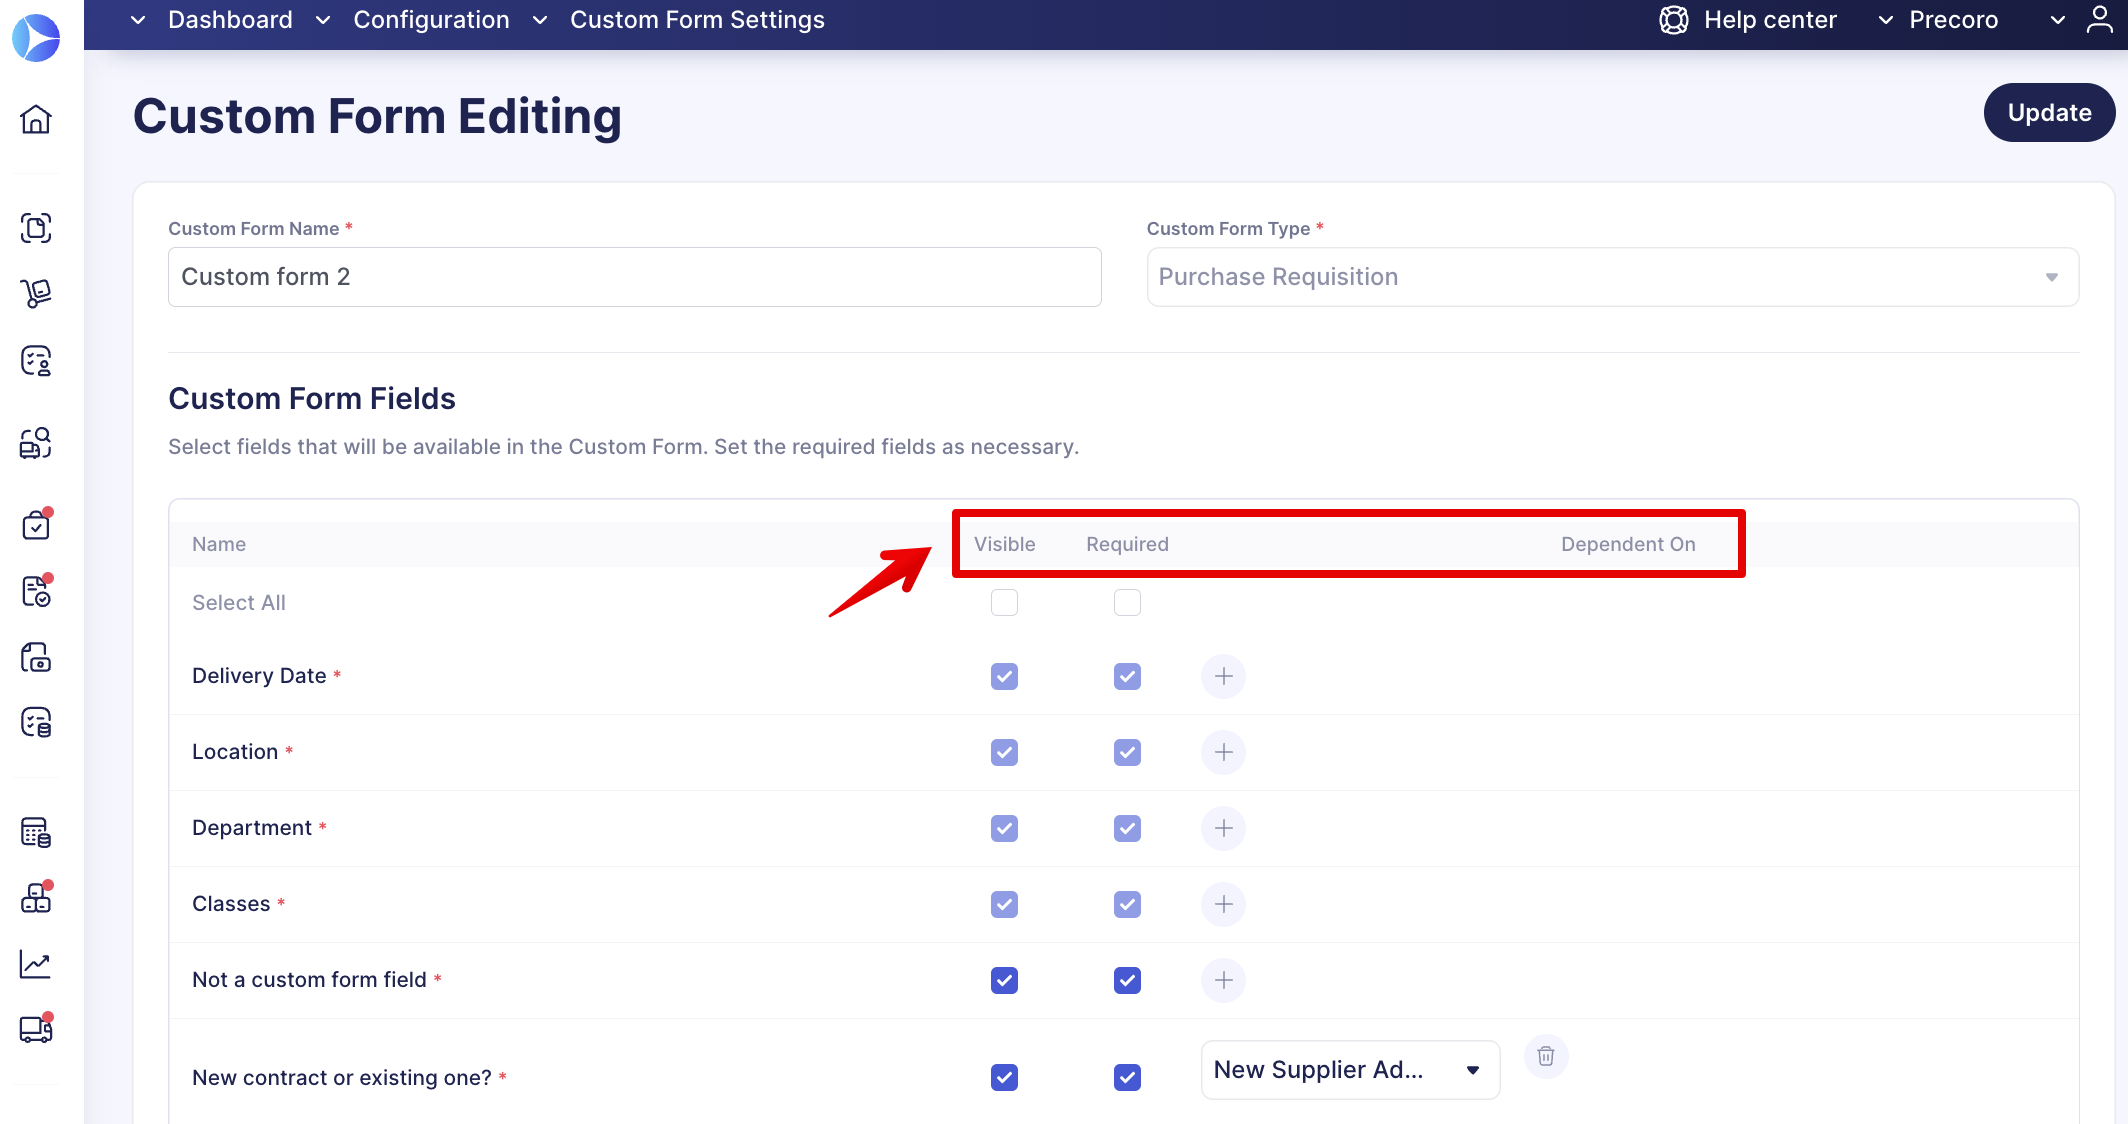
3. You will see the list of all the Documents Custom Fields available for the chosen type of document. What you can do with those fields is:
- Make them Visible so that the users can see and enter information without any requirement.
- Make them Required, which means that users need to fill out those fields to be able to submit the form.
Please note that fields marked required in the DCF settings are mandatory throughout the company, and you cannot make them unrequired.
- Make them Dependent On the other fields. This setting will determine when the specific field will be triggered.
Please see more information on how to work with dependencies in the article:
4. Press the Create button in the top right corner after setting up the form.
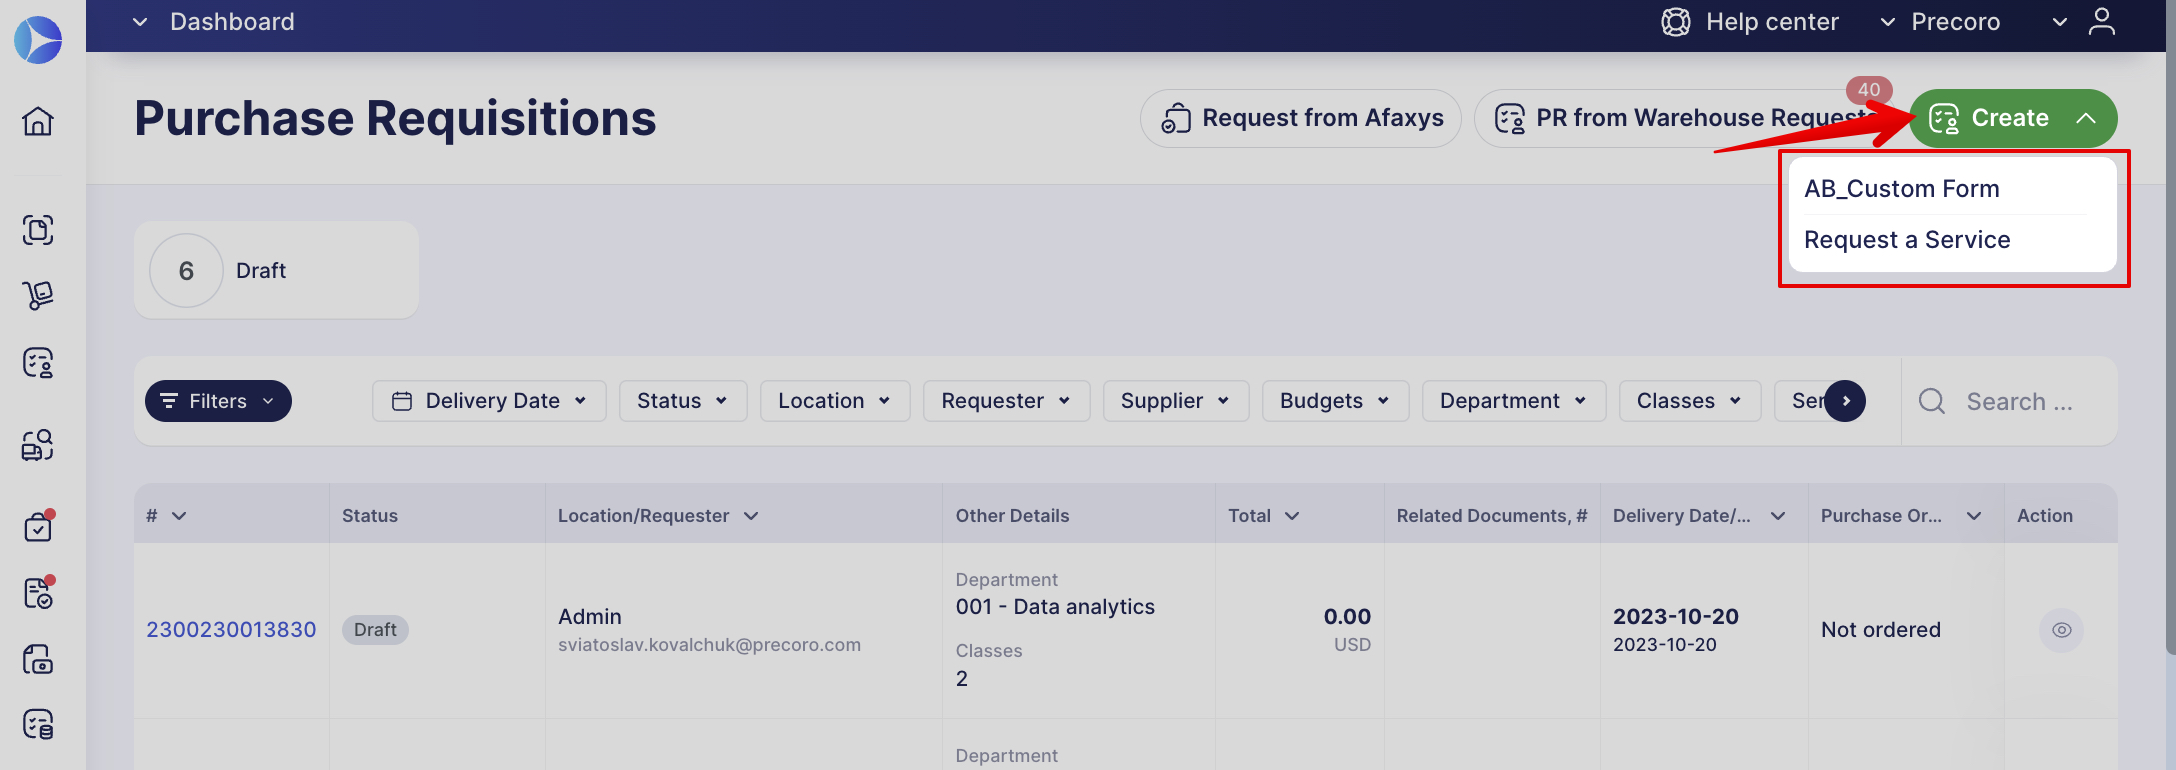
Now, when creating new documents and hovering over the Create document buttons, users will be able to select the forms you have created:
Learn more about setting up and using the Custom Forms here.
New Budget vs. Actual Report
We have created a new preset report that will provide you with detailed information on the breakdown of expenses by document and general information on your allocations: how much was spent in total, how much is reserved, how much is left, and what percentage of the budget was spent.
To access this preset report, users must have the Report and Budget Roles.
1. Go to Reports and click the Budget vs. Actual one.
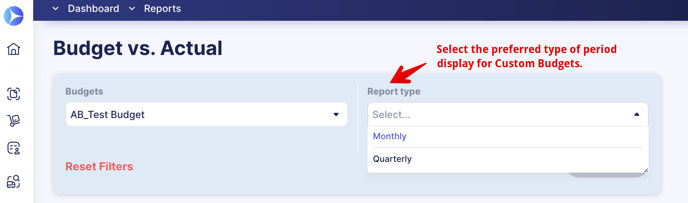
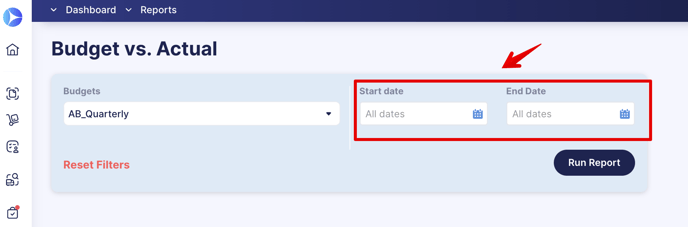
2. Select the Budget and Date range:
- For the Custom Period Budgets, you have to select the preferred type of period display, Monthly or Quarterly.
- For the Monthly and Quarterly Period Budgets, you can select the needed date range in the Start and End Date fields:
3. Click Run Report, and you will get a list of information that you can Export and continue working on it in the XLSX format.
A new report will be built based on the information specified in your chosen budget: Locations, DCF, ICF (and their sub-lines).
The report’s structure will differ depending on the data in the budget, whether you have only budget lines or budget lines with the sub-lines.
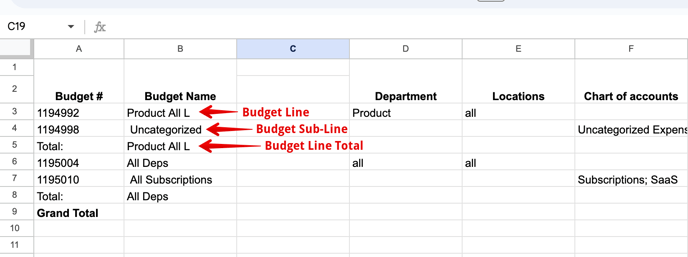
Structurally the report consists of three main sections:
- General info — the basic information from the budget.
- Document expenses breakdown by budget periods — displays information on each document with expenses breakdown by the budget periods.
- Total expenses calculation — displays summed information on each document for the entire period.

General Info
In this section, you will see the following fields: Budget #, Budget Name, DCFs, Locations, and ICFs.
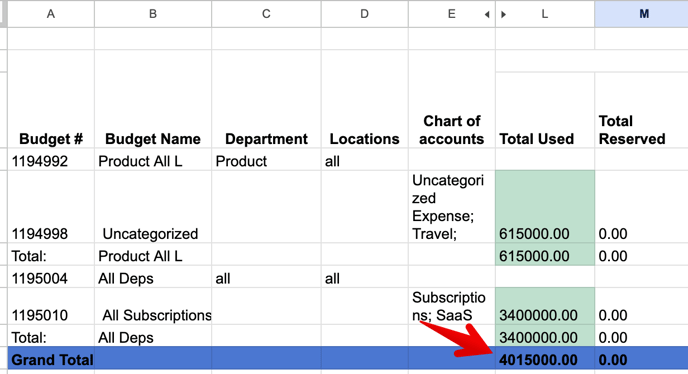
Document Expenses Breakdown by Budget Periods
In this section, you will see a calculation of how much was spent, broken down by documents for a specific budget period. The period can be monthly or quarterly (depending on the budget settings).
Here, you will see the following fields:
- Used in Document — displays the spent amount in documents for a particular budget in a specific period.
- Reserved in Document — displays the reserved budget amount for the documents in a specific period.
- Total Used — sums all the values in the Used in Document columns (Used in POs + Used in Invoices + Used in Expenses + Used in PRs...).
- Total Reserved — sums all the values in the Reserved in Document columns (Reserved in POs + Reserved in Invoices...).
- Planned — displays the amount for which the budget was initially set (this information comes from the Total filed within the budget).
- Available — displays the amount that remains available in the budget. It is calculated in the following way: Planned - (Total Used + Total Reserved).
- Use of Budget — displays the percentage of the budget used against the planned one.
Total Expenses Calculation
Here, you can see the following calculated columns:
- Total Used in Document — displays the sum of all Used in Document columns.
- Total Reserved in Document — displays the sum of all Reserved in Document column.
- Planned — displays the expected amount of the entire parent budget.
- Available — displays the amount that remains available in the entire parent budget.
- Use of Budget — displays the percentage of the entire budget being used against the planned one.
- The Grand Total column below — calculates and displays the Total of each column.
New Users Report
We have created a new Users Report that allows you to customize your request with filters and get the necessary information on your users in Precoro in a few moments.
To access the report, you must have a Configurations Role.
1. Go to Reports and click the Users Report one.
2. Filter the information if needed to build a customized report.
3. Click Run Report, and you will get a list of information that you can Export and continue working on in the XLSX format.Repeat Service Order Function
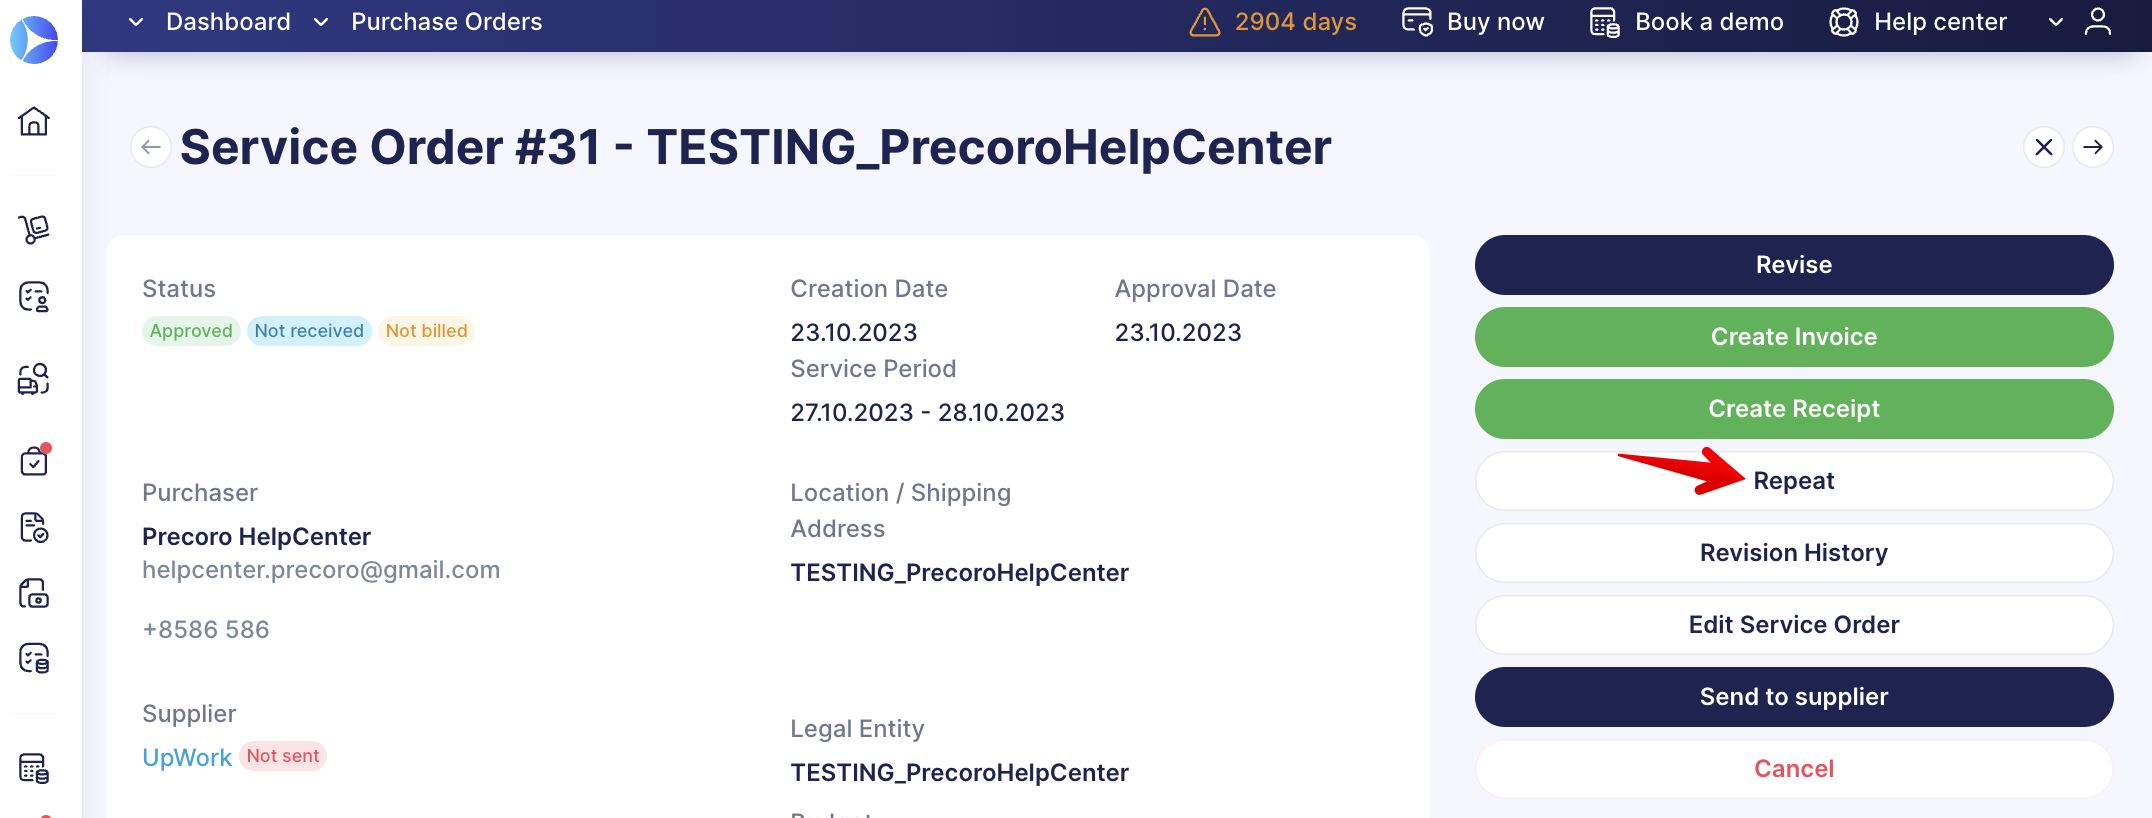
You now have the option to repeat Service Orders, which will save you lots of time if you regularly re-order the same services. This function will fill all fields and add the items exactly as they were in the original document.
To repeat an Order, click the Repeat button. You can repeat Orders with Pending or Approved statuses.
Clarified Filter Name in Payments
On the Create Payments page, we have changed the Filter Payment Date name to Invoice Due Date. This filter can help you promptly find the needed Invoice documents by their Due Date:
Block Invoice Confirmation Functionality Improvement
We have improved the notification process in the Block Invoice Confirmation Functionality, as now you can select the following options:
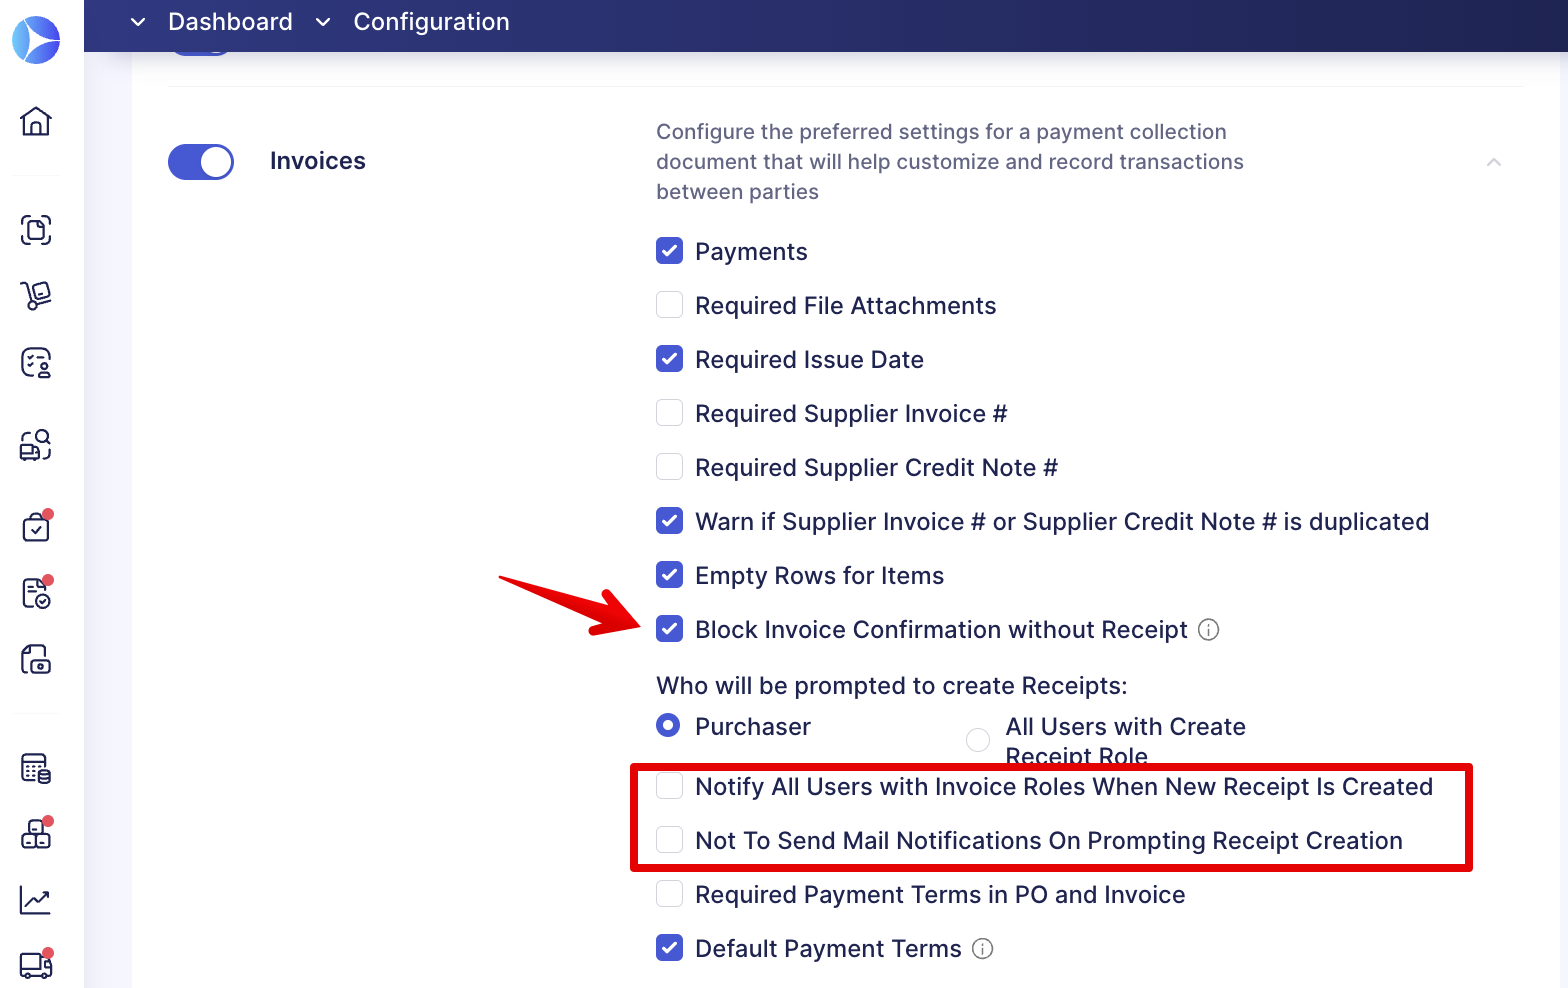
- Notify All Users with Invoice Roles When New Receipt is Created — if this setting is activated, then all users who have Invoice Roles will receive the following email notification when a new receipt is created. That way, the person responsible for payment will know when to proceed:
- Not To Send Mail Notifications On Prompting Receipt Creation — if this setting is activated, then nobody in your company will get an email notification prompting them to create a document for the Pending Receipt Invoice.
If you have already selected the option in Who will be prompted to create Receipts, and then you have activated the Not To Send Mail Notifications On Prompting Receipt Creation setting, then users will not be notified.
Better Google Account Integration Management
Now, you can manage the Google integration option in Precoro for your users, whether they will be able to connect their Google accounts and export the data from Reports to Google Sheets.
We have added a new setting in the Configuration → Basic Settings → Documents Setup → General Settings → Allow the Users to Connect Google Accounts for Reports Exporting:
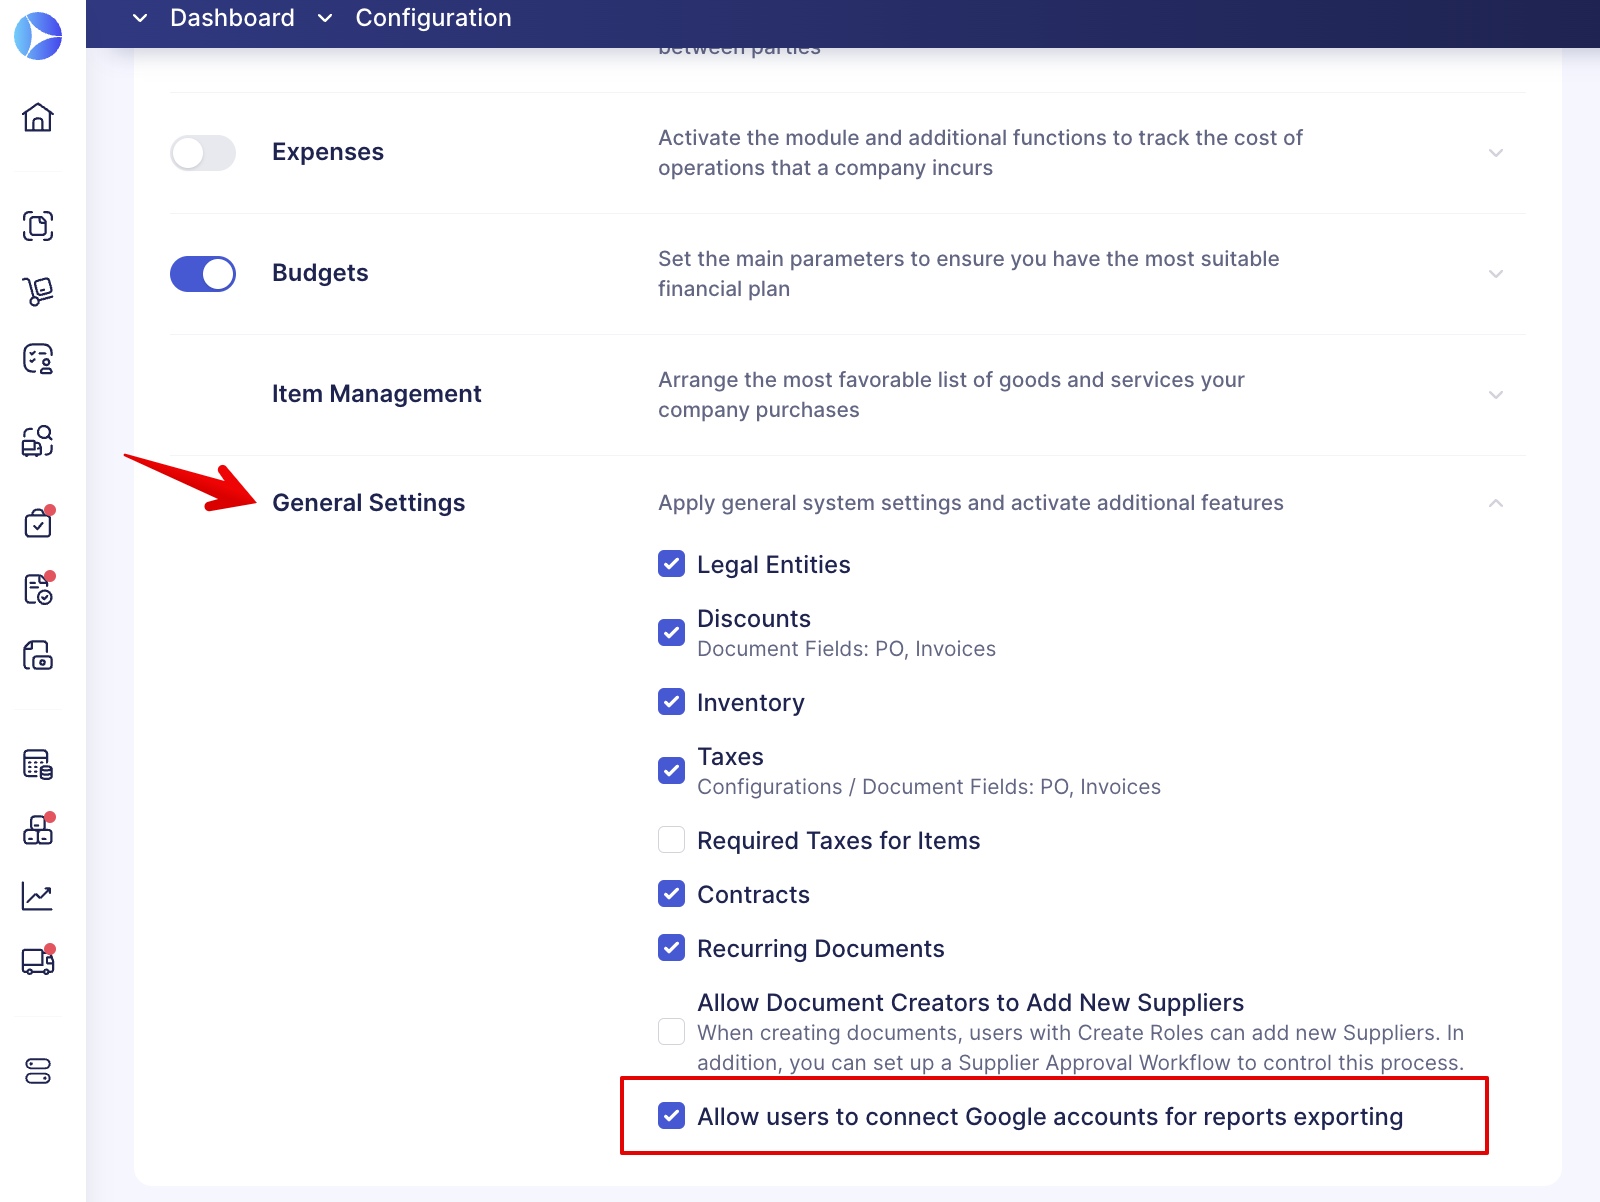
Please note that this setting is activated by default, and all the users in your company are allowed to connect their Google accounts and export data.
With this setting deactivated, users in your company will not see the option to establish the connection in the Profile settings. Subsequently, if they are not connected to Google Sheets, they will not see the export report option in Precoro.
Please read this article to learn more about the Google Sheets integration in Precoro.
Blanket Purchase Order Functionality Update
If you turn off the Invoices module, the Blanket PO per Total functionality will become unavailable. If you also had BPO per Items functionality deactivated, then the Create Blanket PO button will not be displayed and subsequently will not be available.
Please read this article to learn more about the Blanket Purchase Order functionality.
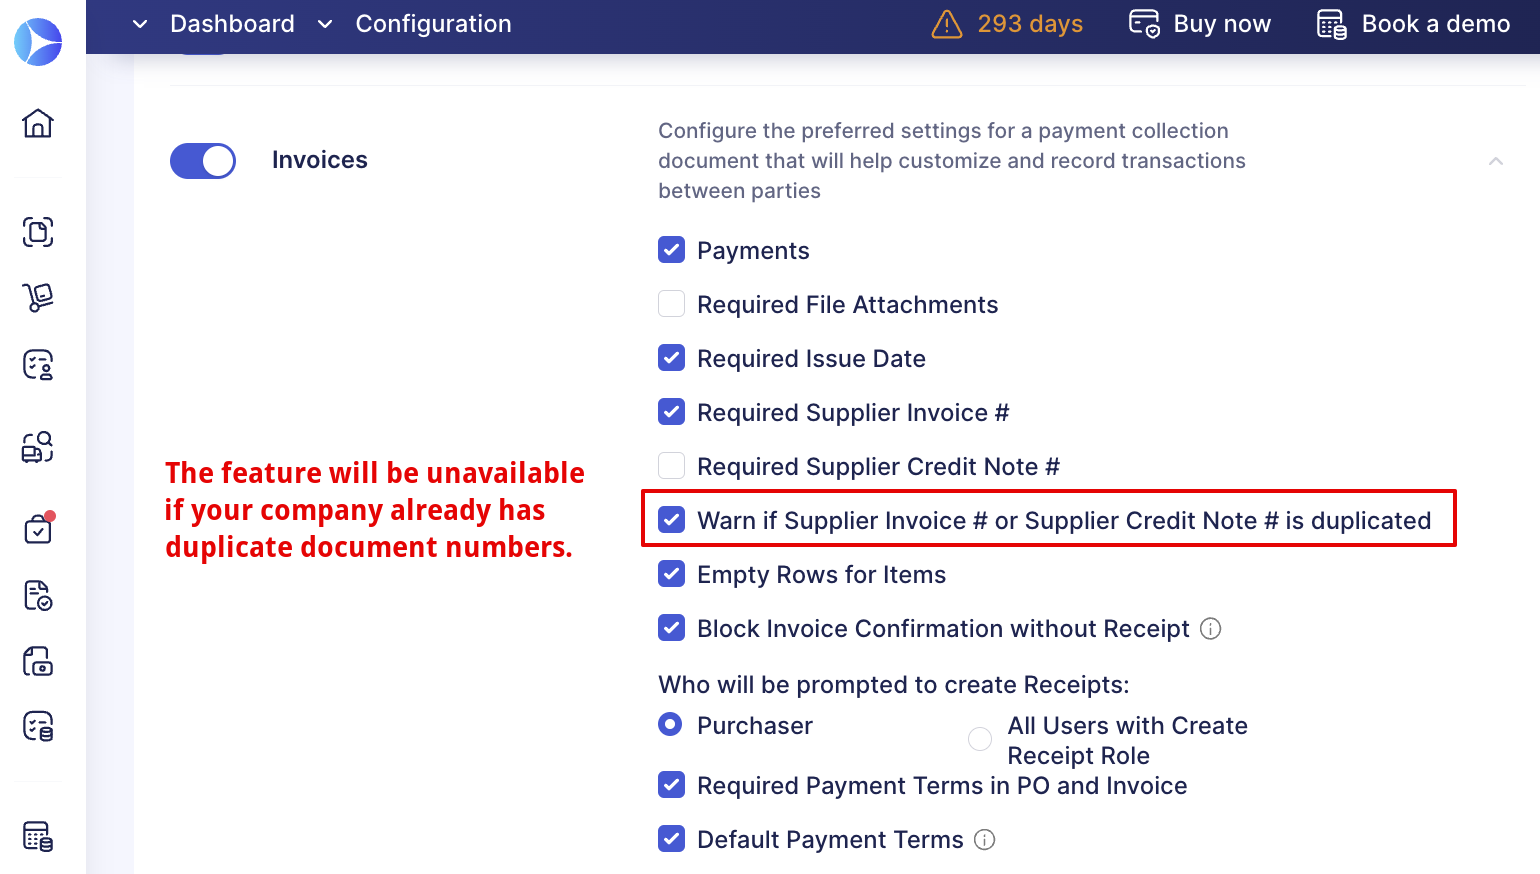
Duplicate Numbers Functionality Update
We have updated the working logic of the Warn if Supplier Invoice or Credit Note # is duplicated function, and now, you will not be able to enable this setting if the duplicates already exist in your company.
Better OCR Processes
We are constantly improving our OCR processes, and this week, we have the following update:
- We have improved the Tax processing and mapping. You need to create a document with OCR once, and Precoro will remember your choice of the tax rate for use in future documents.
- Better Location Address mapping with your existing options and selecting the location for the document based on them. The mapping applies to the Ship to Address field first, and then the Receiver Address field will be a second reference.
- Single-line enhancement — if you have enabled this function for the company, all your Suppliers will automatically have the single-line setting available for activation.