For the app.precoro.com users, the updates are available starting April 1.
For the US-based Precoro users, all these updates are on the way and will be launched in a week on April 4.
TABLE OF CONTENTS
- Updated the Supplier Import and Update Templates By Adding the Supplier Custom Fields
-
Added Ability to Exclude Invoice from PO and PO from PR from Approval
-
Added Ability to Grant Access to View Only Self-Created Documents When Creating New Related Ones
-
Displaying the ICFs When Creating a CN from an Invoice With OCR
Updated the Supplier Import and Update Templates By Adding the Supplier Custom Fields
Now you can quickly and conveniently upload to Precoro the Supplier Custom Fields by using the Import or Update templates on the Supplier Management page.
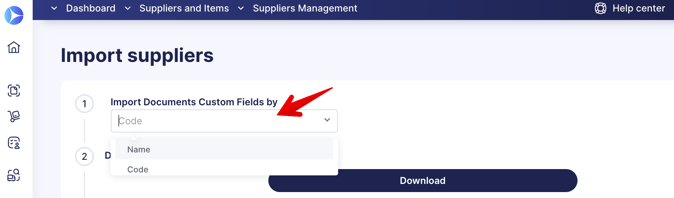
- Depending on the settings selected on the Supplier Import or Update pages, you can assign the SCFs by Code or Name:
- If you have selected the Name option in the settings, then SCFs of the selected type will be assigned by the name values you are entering. Please fill in the names exactly as they are in Precoro. If not, the corresponding flesh will prompt you to correct the values.
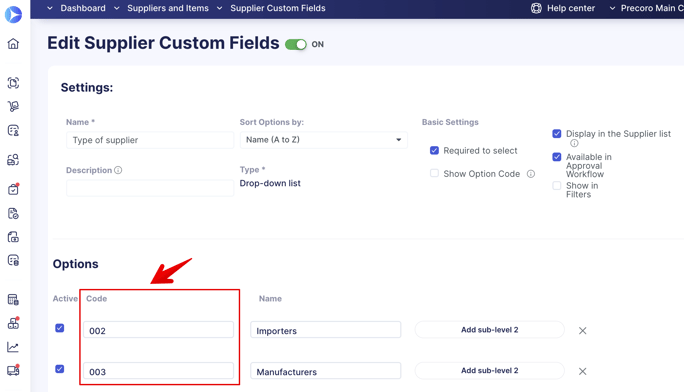
- If you have selected the Code option in the settings, then SCFs of the selected type will be assigned by the code values you are entering. Please make sure to fill in the codes exactly as they are in Precoro. If not, you will see the corresponding flesh prompting you to correct the values.
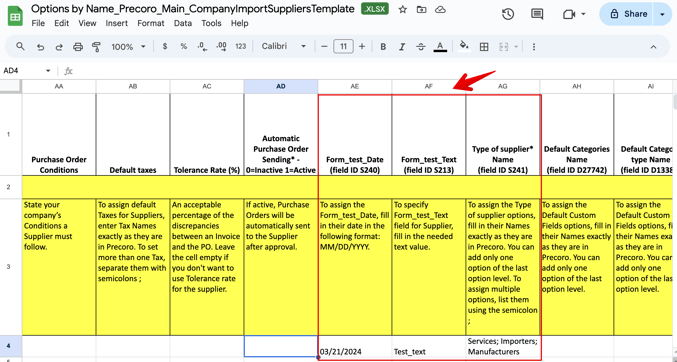
Supplier Custom Fields can be of three types: Multi-select, Text, and Date.
- In the multi-select type, you can assign several options by using the semicolon as a separator ;
- In the text type, enter the text value in the field.
- In the date type, enter the date value. Please note that the date must be in the format you have chosen in the Basic Settings:
- Please pay close attention to the fact that you need to set the column format in Excel to text in order to import or update the date.
- When the file is imported, the date format will be validated, and you will see the corresponding tip if the date was not imported correctly.
- If the field was marked as mandatory, you will not be able to upload a template without this field being completed.
The turned-off options will not be displayed in the template file. Also, all the fields will be automatically marked as Not to Show by default in the template.
Added Ability to Exclude Invoice from PO and PO from PR from Approval
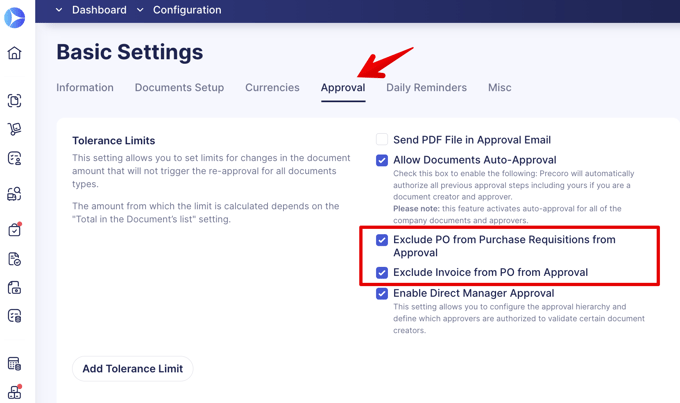
We have added two new options in the Basic Settings → Approval tab:
-
Exclude Invoice from PO from Approval
-
Exclude PO from Purchase Requisitions from Approval.
Please note that to see those settings, your company must have active Invoice, PO, or PR document modules in Precoro.
If the checkbox is active, the corresponding document will never undergo the approval process. Instead, it is immediately Approved after confirmation.
The approval or re-approval process will get triggered:
- If you have activated the Exclude Invoice from PO from the Approval setting, the re-approval process will not be set off even if changes were made to the Invoice. Instead, the Matching process can be activated. Please see the cases in which you can trigger the Invoice PO matching here.
If the Matching is approved, then no additional Invoice approval is required afterward.
Please note that the Invoices from Blanket Purchase Order per Total and Invoices from the Supplier Portal will always be sent for approval.
- If you have activated the Exclude PO from Purchase Requisitions from Approval setting:
- If there are no differences between the PO and PR, the document will automatically be approved without any approval process.
- In the PO, a check will be initiated for changes in the Net Total and the number of items in the PO relative to the number of items in the Purchase Requisition. If the Net Total or the number of items in the PO is greater than in PR, the re-approval will always be triggered regardless of the set Tolerance Limit.
- If a new item is added, the re-approval will be activated.
- The check will be initiated to determine whether the same options were selected for the Location and the Document Custom Field (involved in the approval) in the PO and the related Purchase Requisition. If the POs were created for several PRs, then we initiate a check that ensures that at least one of these PRs has the same option selected, and in that case, the re-approval will not get activated. But if the options differ and no matches are found — the re-approval gets triggered.
- If the budget in the Purchase Order is changed, the re-approval will be activated.
- If the changes were made in the Purchase Order Item Custom Field and that, in turn, triggered budget line change, then the re-approval will be activated. But if you have added various items from different PRs to a PO, then we initiate a check that ensures that at least in one of these items, the required budget line is selected, and in that case, the re-approval will not get activated.
Better Item Deleting Functionality
We have optimized the process of item bulk deletion in the catalog and made it more evident which items can be deleted and which cannot.
Now, the selection checkbox and the bin icon next to an item that is already used in documents or integrated are unclickable. That way, such items will not be automatically selected when deleting them in bulk.
Also, after successfully deleting items in bulk, you will see one success flash stating the number of successfully deleted items.
Supplier Custom Form From the Document
Using the Custom Forms functionality, you can create a Supplier Form Type and select the forms needed in the document when requesting a new Supplier.
Follow the steps described below:
1. Open the Custom Form Settings and press the New Custom Form button.
2. Enter the Name and select the Supplier option in the Form Type field.
3. Edit the Form according to your specifications and click the Create button in the top right corner.
4. Create the document of your choice, either Purchase Order, Purchase Requisition, or Invoice. Click on the Supplier field and press the Add New Supplier button.
5. You will see the selection field "What type of Supplier Request do you want to create?" where you are able to see the list of all available Supplier Custom Forms. By default, users also can see and select the Standard Supplier Request. Select the needed Form and click the Next button.
Please note that the "What type of Supplier Request do you want to create?" field will only be displayed if you have previously created the Supplier Custom Form, so the users will be able to select one.
6. After selecting the Form, the user proceeds to fill out all the required fields and places a new request by pressing the Request button below.
Custom Purchase Order Report Improvements
We have enhanced the Custom Purchase Order report by adding:
- Gross Total Invoiced/Uninvoiced Document Currency, Net Total Invoiced/Uninvoiced, Document Currency fields.
-
Receipt Date field.
Added Ability to Grant Access to View Only Self-Created Documents When Creating New Related Ones
We have added a new setting to the Configurations → Basic Settings → Document Setup → General Settings → View Only Self-Created Documents.
By default, this checkbox is turned off. If the checkbox is activated, users will be able to view and create related documents only from the documents they have initiated. But please note that if users have the Approve roles, they will see all the documents available to them by DCF and Locations.

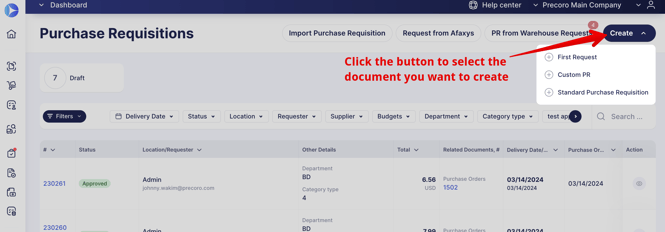
Simplified the Process of Creating Custom Documents
We have made the process of creating custom documents more convenient on the document management page. Now, to create any type of document, Standard or Custom, you must click the Create button and select the necessary option from the drop-down list.
To create a Standard document, please select the corresponding option from the list.
Please note that the drop-down list of documents will only be available for those who are using the Custom Forms and have created forms for the specific document type.
OCR Auto Creation Rules Improvements
We have simplified the process of document auto-creation with OCR by adding a new Invoice to Order Mapping Rules:
- Selective Mapping — documents must match at least one of the set rules.
-
Complete Mapping — documents must fully comply with all the set rules without exception.
Please note that the Invoice to Order Mapping Rules are only available if you have previously selected the PO-based Invoices in the Invoice Type for Auto Creation field.
To apply the new settings, please contact our Support Team, who will gladly help you with the configurations.

OCR Custom Split Screen Resizing
To improve your experience with the OCR feature, we have added the ability to resize the split screen with the attachment to your needs:
Displaying the ICFs When Creating a CN from an Invoice With OCR
We have added a display of the Items Custom Fields from Invoice when you create a Credit Note with OCR. This way, you will have more complete information to help you keep track of the needed data and save time.