TABLE OF CONTENTS
-
Add Service Items to the Catalog Directly Through the Document
-
Improved the Process of Importing and Updating Items to the Catalog
-
Added the Unavailability of Selecting Inactive Locations for Creating New Documents
-
Improved the Document Requester Functionality in the Approval Workflow
-
Added the Ability to Not Display Prices for Receipt Creators and Approvers
-
Better Tracking of the Undelivered Documents to the Suppliers
-
Better Tracking of the Undelivered Letters to the Company Users
-
Improved the NetSuite Tracking Process of the Integrated Users
Create Recurring Service Orders
The Service Order document type can help you conveniently create, pay, and track all your utilities and services. Many subscription services are annual or quarterly, and the recurring functionality can effectively assist you in building a more automated process that will require a minimum of your time. The recurring Orders will also be recorded in your selected Budget, allowing you to forecast the spending pipeline.
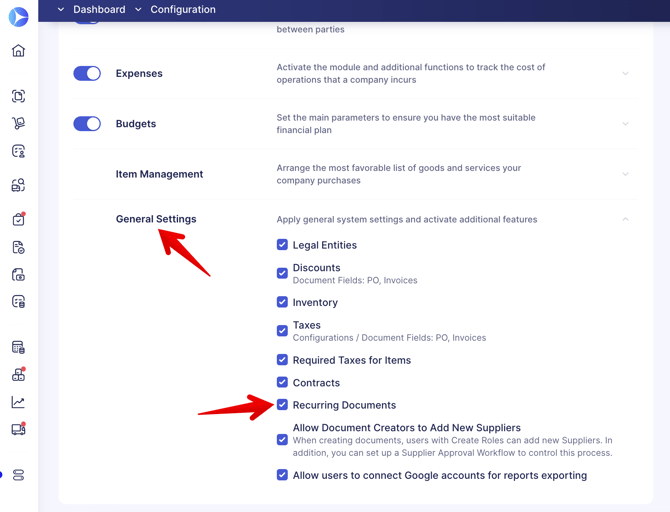
To create recurring documents in Precoro, please make sure you have switched on the corresponding setting in the Configuration → Basic Settings → Document Setup → General Settings → Recurring Documents.
Please note that you cannot make the SO recurring if the Service Order document has an active Budget Breakdown. You will not see the Make Recurring option displayed on the action panel.
Also, you will not be able to create a recurring Invoice for the SO if that Invoice has a related Purchase Order.
To make a recurring document, follow these steps:
1. Open the SO you want to make recurring and press the Make Recurring button on the right action panel.
2. Select the Validity Period and the Repeat frequency.
3. Select the Budgets for future recurring documents. You can use the Apply to All action button to automatically select the chosen Budget for all the periods instead of manually entering them.
Depending on the date you set when creating a Recurring Service Order, Precoro will create a new Service Order automatically and send it for approval.
The new recurring documents will be created automatically with all the exact data from the original. If you had an Approval Workflow in place, the recurring documents would automatically undergo the same Approval Workflow.
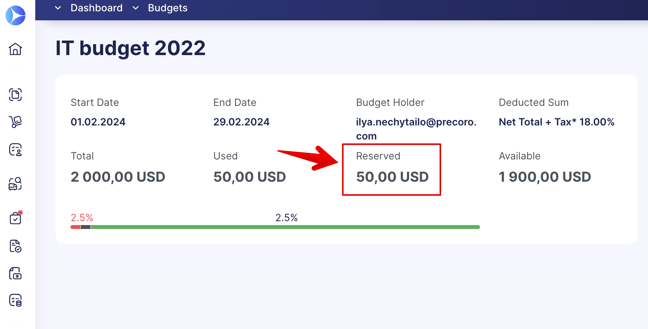
If you have chosen a budget for a specific Recurring Service Order, Precoro will Reserve the budget amount depending on the Total of your Service Orders.
Add Service Items to the Catalog Directly Through the Document
Create a more automated workflow by adding items to the Catalog directly from the Service Order or related Invoice documents.
To be able to do that, please make sure:
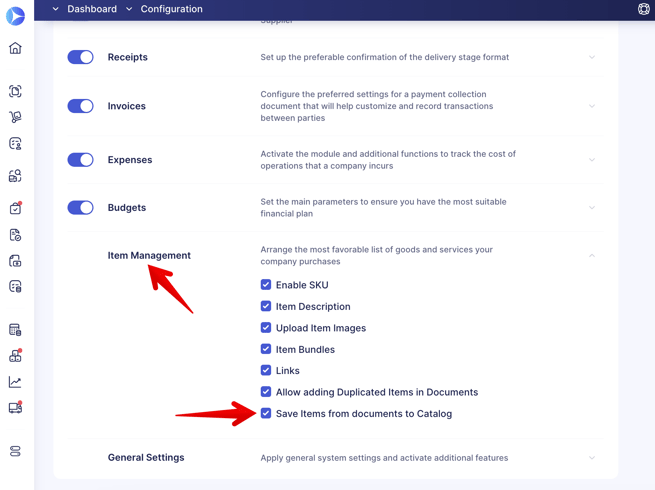
1. Your company has activated the Save Items from Documents to Catalog option in the Configuration → Basic Settings → Document Setup → Item Management.
2. Users have the Suppliers and Items Role to add new items to the Catalog.
The process of adding new items works as follows:
1. When you are adding new items in the Service Order or its related Invoice, you will see the Add to Catalog checkbox. Please note that this setting is, by default, not activated.
2. After saving the newly created item with the activated checkbox, it will be automatically added to the Catalog.
3. In the Catalog, the item will be created with the Service type, and the following data will be transferred:
- SKU
- Name
- Description
- Net Total will be transferred to the Price field in the Catalog
- Supplier.
Improved the Process of Importing and Updating Items to the Catalog
We have enhanced the current Import and Update templates for items in the Catalog.
Changes in the Import Template
- Added a new Item Bundles column, so now you can import them from the file. This column will be displayed for those who have activated the Item Bundles functionality in their company.
When adding values in the column, please make sure to use Item Bundles from your list in Precoro. Add new options on the Item Bundles management page in the Suppliers and Items section to import the related items. You can enter several bundles by separating them with semicolons “;”.
To learn more about the Item Bundle functionality, please visit the corresponding Knowledge Base article.
- Added a new Item Group column, so now you can import them from the file. This column will be displayed for those who have activated the Item Group functionality in their company.
When adding values in the column, please make sure to use Item Groups from your list in Precoro.
To learn more about the Item Group functionality, please visit the corresponding Knowledge Base article.
- The information you have added to the Link column will be imported to Precoro.
- You can import the Free of Charge item with Price = 0.
- You can view and edit the Category field on the Check and press Import page.
- We have unified the supporting flash messages about import errors. Now, the fields in which problems are detected will be highlighted in red.
- If you incorrectly filled in an optional field during import, we will import it empty, and on the Check page, you can still edit it.
Changes in the Update Template
- Improved the logic of displaying error flashes. Now, when uploading a file with incorrectly completed fields, all the error flashes will be displayed on the screen at once, so you can fix all of them without having to constantly upload the file to see the next flash.
- Improved the SKU and ICF flashes to give you a clearer description of the error.
- We have unified the supporting flash messages about import errors. Now, the fields in which problems are detected will be highlighted in red on the Check page.
Enhanced Super User Rights
We are enhancing the Super User role even further by providing them with the opportunity to Mark as Completed the Purchase Order, Purchase Requisition, and Request for Proposal documents without additionally having Approval roles for those documents.
Improved the Display of Pending Receipt Quantity in PO
We have added a new Quantity in the Pending Invoices column to the Purchase Order that displays the number of items in Invoices blocked by Pending Receipts. This display will be helpful for those users who are utilizing the Block Invoice Confirmation without Receipt functionality.
Please note that if you have no blocked items, the column will not be displayed.
Added the Unavailability of Selecting Inactive Locations for Creating New Documents
Now, when you are creating new documents, the inactive Locations will not be displayed in the list of available options.
The only exception is when you are creating a Purchase Order from Purchase Requisition or Invoice from PO, and you have previously used the Location that is now inactive. In that case, when creating a related document, you will still be able to see and use that Location.
Improved the Document Requester Functionality in the Approval Workflow
We have recently added a new Document Requester field to the approval workflow functionality, and now, we have added two new sections that will help you quickly identify users for:
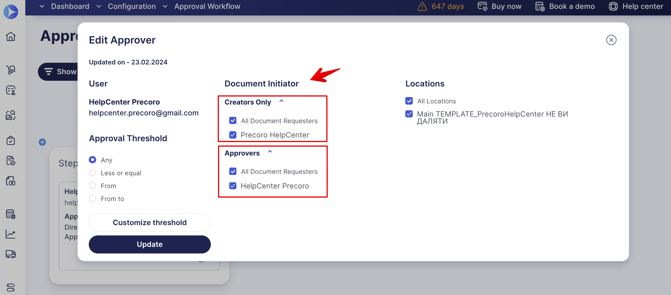
Creators Only — here, you will see filtered all the users who have the Create role (with no Approve role) and Create + Approve roles of the selected document, but they are NOT added to the approval workflow of this document.
Approvers — here, you will see filtered all the users who have the Create and Approve roles of the selected document, and they are ADDED to the approval workflow of this document.
For both the Creators and Approvers, you will be able to separately activate the All Document Reequesters functionality:
- If it is activated and a new Creator or Approver of this document type is added to the company. In this step, the Approver will automatically be granted access to this user in the corresponding option.
That means the current step approver will be able to approve the documents for the newly added user.
- You can activate the All Document Requesters for both the Creator and Approver at the same time, or you can select either Creator or Approver separately to activate this function.
Added the Ability to Not Display Prices for Receipt Creators and Approvers
We have added the ability to Not Display Prices in the Configuration → Basic Settings → Document Setup → Receipt. You can activate this new setting, and users with Create or Approve Receipt roles will not see prices in the document preview. Except for the Service Order Receipts, we will still display the Net Total amount even if the Not Display Prices setting is activated.
However, please note that users with Invoice or Purchase Order roles will always see the prices displayed, regardless of this setting.
Better Tracking of the Undelivered Documents to the Suppliers
We have improved the process of tracking the undelivered documents to Suppliers by:
New Infocards
- Undelivered POs to Suppliers — here, we filter all the Orders that have the Failed email status. This infocard will be displayed on the Purchase Order list management page.
However, please note that if the PO has been delivered to at least one supplier, such PO will not be displayed in this infocard. - Undelivered RFPs to Suppliers — here, we filter the Proposals where all the supplier inboxes have the Failed email status (as one supplier can have more than one inbox). This infocard will be displayed on the Request for Proposal list management page.
New Notification Letter
You can activate the new notification letter Your emails from Precoro were not delivered to your Supplier in the Suppliers section of the Email Preferences settings.
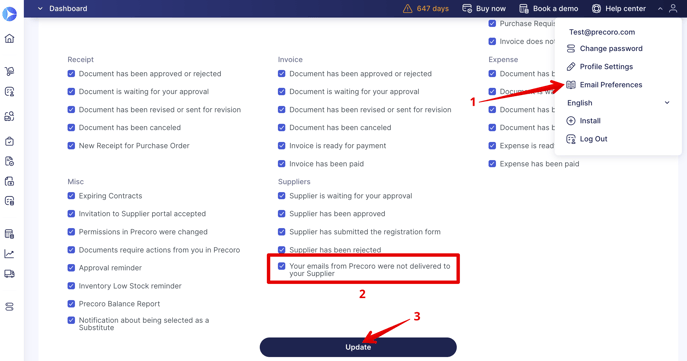
After the activation, it will be sent to the Purchase Order or Request for Proposal Creators.
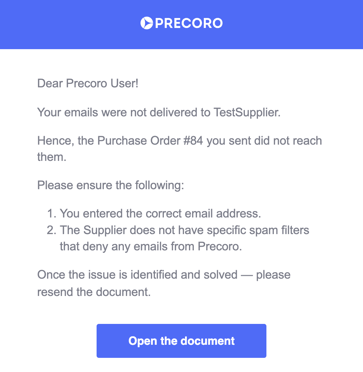
This reminder gets triggered whenever:
- Purchase Orders have the Failed email status.
- All the supplier inboxes have the Failed email status in the Request for Proposals (as one supplier can have more than one inbox).
The letter will contain the following information:
Better Tracking of the Supplier’s Invitations to Register
We have improved the process of tracking the undelivered invitations to Suppliers by adding:
New Statuses Under the Emails
We have added the following statuses:
-
Email Not Sent
-
Email Sent
-
Email Opened.
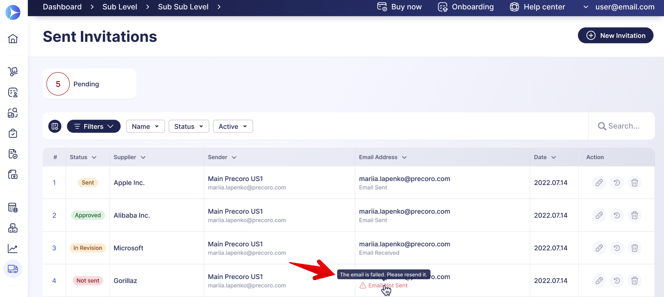
If an email obtains a Not Sent status, you will see a red notification regarding that, prompting you to resend it.
New Infocard and Letter Notification
On the Sent Invitations page, you can see the new Undelivered Request Form to Suppliers infocard that will filter out all the invitations you have created that were not sent to the supplier.
-png.png?width=672&height=502&name=Group%2020%20(1)-png.png)
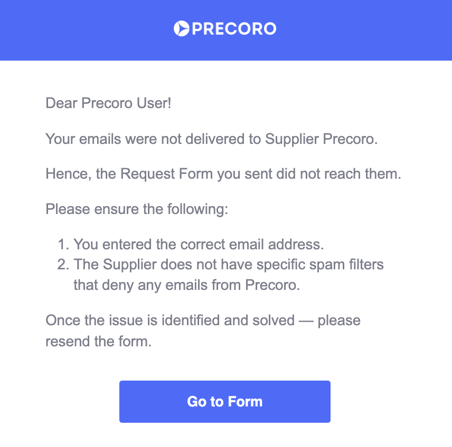
When the invitation letter has obtained the Not Sent status, you will automatically receive a notification in your inbox regarding this event.
Better Tracking of the Undelivered Letters to the Company Users
We have improved the process of tracking the undelivered letters to the company users by adding:
New Status for the Bounced Letters
We have added a new Failed status for the undelivered invitations to new users.

New Infocard
- Undelivered Invitations — will help you filter out users with Failed invitation sending status.
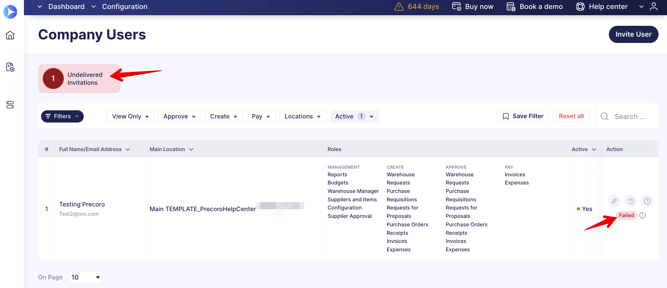
By using this infocard and a new status, you can quickly identify those who did not receive the letter and make another attempt by clicking the Resend button on the Action panel.
Better Tracking of the Suppliers Portal Invitations
We have improved the process of tracking the undelivered invitations to Suppliers by:
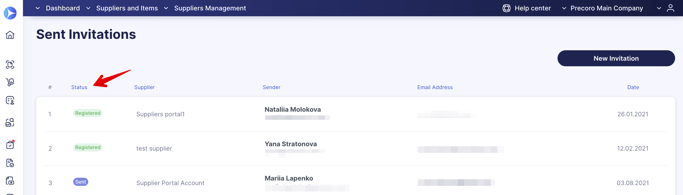
Updated the Layout of the Invitation to the Suppliers Portal Page
We have improved the page layout by highlighting the statuses and updating the table outlook.
Added New Statuses
We have included new statuses based on the supplier actions, and now you can track them by the following:
- Sent — when the invitation has been sent.
- Opened — when the supplier opens the letter for the first time.
- Registred — when the supplier enters the Precoro for the first time.
- Failed — when the letter you sent did not reach the supplier’s inbox for one of the possible reasons listed below:
- The letter was sent, but the server rejected it.
- The mail does not exist.
- Any other unexpected error that prevented the email from reaching the recipient.
Integration Updates
This week, we have prepared several exciting updates that concern integrations:
Improved the NetSuite Tracking Process of the Integrated Users
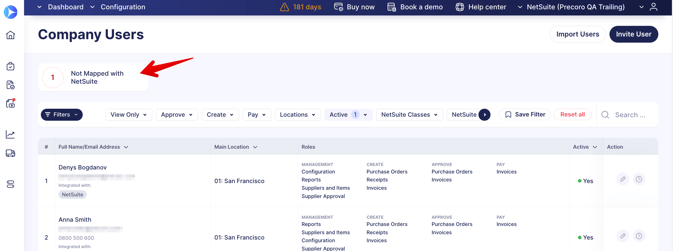
On the User Management page, we have added the new:
- NetSuite Integrated filter with the Yes and No options available for selection.
If you choose the Yes option — you will see all the users who are integrated with NetSuite.
If you choose the No option — you will see all the users not integrated with NetSuite.
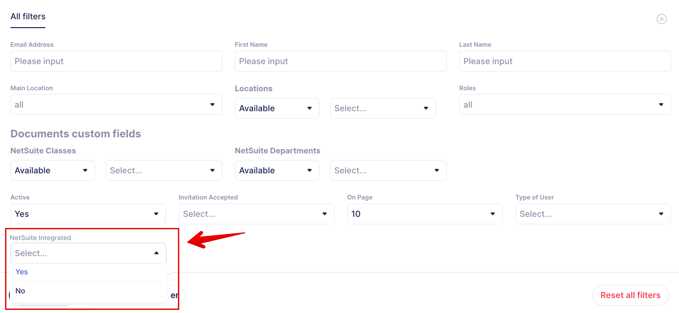
- Not Mapped with NetSuite Infocard — it will filter and show you all the users who are not integrated with NetSuite.
Improved the Slack Tracking Process of the Integrated Users
On the User Management page, we have added the new:
- Slack Integrated filter with the Yes and No options available for selection.
If you choose the Yes option — you will see all the users who are integrated with Slack.
If you choose the No option — you will see all the users not integrated with Slack.
-png.png?width=651&height=1811&name=Group%202414%20(1)-png.png)
- Not Mapped with Slack Infocard — it will filter and show you all the users who are not integrated with Slack.
-png.png?width=681&height=1865&name=Group%202416%20(1)-png.png)
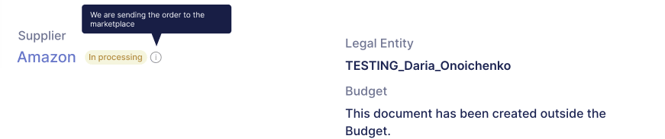
New Statuses for Amazon and Afaxys Purchase Orders
We have added new, more informative statuses for when the Purchase Orders are being sent to the Marketplace. So the document itself will have the In processing status, which means that the PO has been approved and is in the process of being sent to the marketplace, but has not yet been received by it.
When the Order has been sent, the document will obtain the Sent to Marketplace status: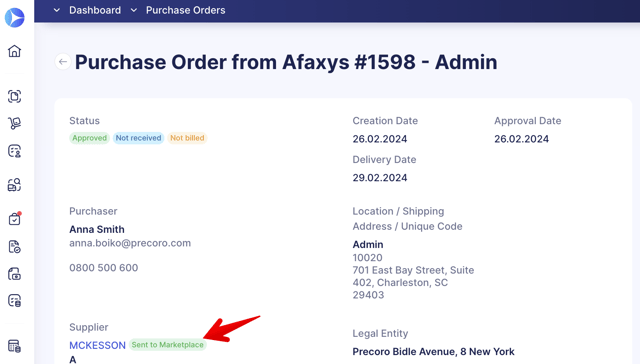
In case the Order did not reach the marketplace, the document will obtain the Not Sent to Marketplace status which will help you track these problematic documents and resend them faster.
OCR Functionality Improvements
There are several important updates this week, which we are glad to share with you:
Updated the URL for AP Inbox Page
We have changed the URL from https://app.precoro.com/ocr/documents to https://app.precoro.com/ap/inbox/.
We have set an automatic redirection from the old link to the new one.
URL changes also affect the following:
- https://app.precoro.com/invoice/ocr/create/*/from_ocr to https://app.precoro.com/invoice/ap/create/*/from_inbox
- https://app.precoro.com/invoice/ocr/create/*/from_order/from_ocr?waitingForInvoiceCreation=1&per_page=10&page=1&enableMarketSupplier=0 to https://app.precoro.com/invoice/ap/create/*/from_order/from_inbox?waitingForInvoiceCreation=1&per_page=10&page=1&enableMarketSupplier=0
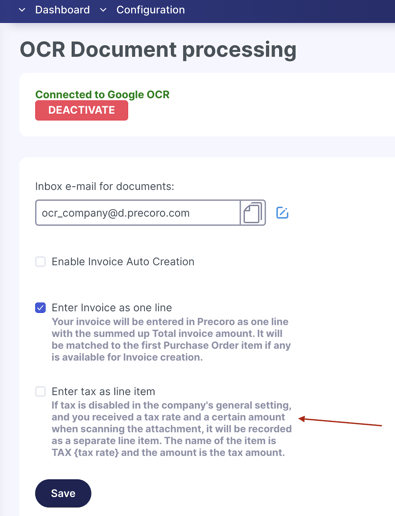
Entering Tax as Separate Line Item with OCR Processing
In the OCR configurations, we have added the ability to activate the Enter Tax as a line item setting. That way, if taxes are turned off in your company’s Basic Settings, but the document includes the tax amount, it will be recorded as a separate line item. The created item’s name will be TAX {tax rate}, with the recorded tax amount indicated in the document.
Please note that this setting applies only to the document-level tax and not to the individual items one.
To activate the new setting, please contact our Support Team, and we will gladly assist you with that.
Added Ability to Manage OCR Email Flow
We have added the ability to turn on or off the inbox notifications regarding the attachment processing status with the OCR. You can manage those letters by going to the Email Preferences → MISC → Document has been processed with OCR checkbox.