TABLE OF CONTENTS
- Ability to Add New Item Lines in Invoices Without Matching
-
Added Ability to Activate or Deactivate the Direct Manager Approval
-
Custom Limits for the Document Requester Field in the Approval Workflow
- Updated the Filtering Process in the Payment Type Filter on the Payments Page
-
Updated the Block Invoice Confirmation Without Receipt Functionality
-
Added Pending Receipts for the Required Substitute Actions Infocard
Ability to Add New Item Lines in Invoices Without Matching
We have added an Adding New Items Without Matching setting in the Configuration → Basic Settings → Documents Setup → Invoices.
Please proceed to the Matching Process article in our Knowledge Base to learn more about how it works.
This new setting will allow you to add new item lines to Invoices without triggering the Matching process:
- When you add new item lines with positive prices that are within the set Tolerance Rate.
- When you add new negative item lines, the Matching will always be skipped.
Please visit the corresponding Knowledge Base article to learn more about the Negative Item Lines.
Please note that if the amount of the added item line increases the allowed Tolerance Rate percentage, the Matching process will be triggered.
Transferred All Infocards to the New Dashboard Page
We are constantly improving the new Dashboard page functionality, so we have transferred all of the Infocards along with the document breakdown there. You can conveniently see the My Documents list and Actions required from me Infocards in one place.
Added Ability to Activate or Deactivate the Direct Manager Approval
We have recently added a new Document Requester field to the approval workflow functionality, and now, we are giving you the opportunity to activate or deactivate this setting for your company yourself through the Configurations → Basic Settings → Approval → Direct Manager Approval.
Custom Limits for the Document Requester Field in the Approval Workflow
With the new Document Requester field, we are now giving you the option to customize limits for this field.
We have added a new Document Requester option to the Customize threshold settings. To proceed, you need to confirm that you want to customize approval thresholds, and after the confirmation, you will see the edit icons next to the Requester Names. Click on the edit icon, and you will be able to set the custom limit with the help of these filters:
- Any — no matter what the document total is, you will always approve the documents created by this Requester.
- Less or Equal — lets you set the minimal and equal thresholds for the document total. So, by selecting Less or Equal 3000, you will be approving only those documents whose total is less or exactly 3000. If the total in the document is 3001, the document will not be sent for your approval.
- From — lets you set the starting threshold for the document total. So, by selecting From 3000, you will be approving only those documents whose total is greater than 3000. If the total in the document equals 2999, the document will not be sent for your approval.
- From To — lets you set the threshold for the document total, setting the minimum and maximum amount where your approval for the document will get triggered. For example, by selecting From 3000 To 6000, you will be approving only those documents whose total is greater than 3000 and less than 6000. If the total in the document equals 2999 or 6001, the document will not be sent for your approval.
After setting up the limits, you will also be able to use the Reset Approval Threshold function and make the necessary changes.
Enhanced the Custom Form Functionality
We have added the ability to not add mandatory Documents Custom Fields to the form but only if they are not a part of the Approval process.
More about the Document Custom Form feature you can learn from our Knowledge Base article.
So, those fields in the custom forms can now be optional and if you need, you can still make them required. Also, you now can add them into dependencies with other fields (set the conditions under which they will or will not be displayed).
Please note that if the DCF is involved in the approval, the restrictions remain — by default, required fields cannot be hidden into dependencies.
Updated the Filtering Process in the Payment Type Filter on the Payments Page
We have updated the current filtering logic on the Payment page in the Payment Type filter:
- All Prepaid Docs — displays all documents with prepayment.
-
Prepayment Without Paid Invoices — displays prepaid POs both without related Invoices and with Invoices that are not Paid or Partially Paid.
-
Invoice Credit Note — displays Credit Notes with which the Invoices were paid.
-
Credit Note for Prepaid PO — displays Credit Notes that have related Purchase Orders in the Prepaid status and may not have related Invoices.
-
Invoice and PO Credit Notes — displays Credit Notes that have related Purchase Orders in the Partly Paid or Paid statuses and must have related Invoices that can have Approved, Partly Paid, or Paid statuses.
When you hover over the filter option names, you will see the tips, which will help you identify in which cases those filters can be used.
Improved the Purchase Order Email Flow
You can now track all the emails sent to suppliers, make changes, and resend them as needed:
-
You can send a PO document to several addresses at once. Regardless of the recipient number, you will see a status for each email sent to the Supplier.
-
If the email does not reach the recipient, we will highlight it for you with a new Failed status.
-
We have added the informational tip. If the letter fails to reach the recipient, we will include the possible reasons for that.

Improved the Request For Proposal Email Flow
Now you can find out when your proposal did not reach the Supplier and resend it:
- You can send an RFP document to several addresses at once. Regardless of the recipient number, you will see a status for the emails sent to the Supplier.
- If the email does not reach the recipient, we will highlight it for you with a new Failed status, which can be displayed in case:
- The letter was sent, but the server rejected it.
- The mail does not exist.
- Any other unexpected error that prevented the email from reaching the recipient.
- We have added the informational tip. If the letter fails to reach the recipient, we will include the possible reasons for that.

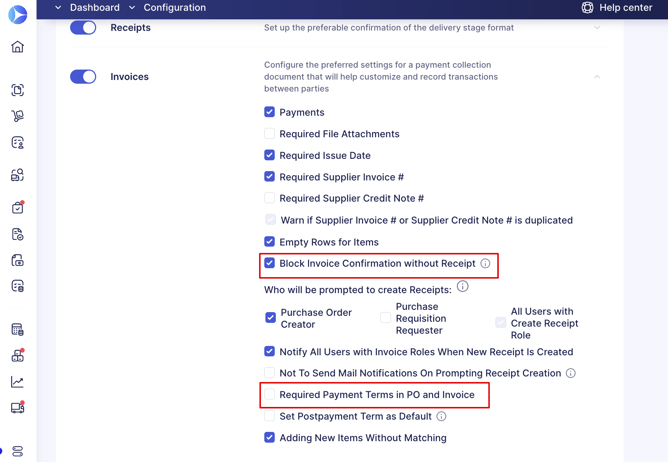
Updated the Block Invoice Confirmation Without Receipt Functionality
We have made the checkboxes for activating the Block Invoice Confirmation Without Receipt functionality and the Required Payment Terms in PO and Invoice separate from each other.
Thus, you can activate the Blocking function and not select the Required Payment Terms.
Added Pending Receipts for the Required Substitute Actions Infocard
We have added Pending Receipts to the Required Substitute Actions Infocard, which is very important because the Invoice cannot get paid until the Receipt is created.
-png.png?width=674&height=842&name=Untitled%20design%20(3)-png.png)
Added the Ability to Integrate Credit Notes with QuickBooks
We have added the ability to integrate Credit Note documents with QuickBooks. To do that, follow the steps below:
1. On the Integration page in Step 6 for Integration Options, select the Approved Invoices one.
2. You will see the Send Credit Notes checkmark. If activated, the Credit Note documents will be automatically sent to QuickBooks when Approved.
3. When the Credit Note is created in QuickBooks, you will see the corresponding message in the Integration Logs in Precoro.
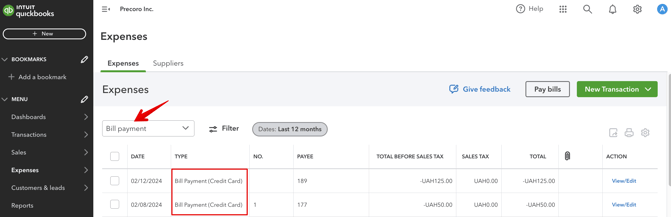
In QuickBooks, you will be able to find the integrated Credit Notes in Bill Payment transactions of the Credit Card type in Expenses:
Add Multiple Credit Notes to An Invoice Through OCR
You can now add several Credit Notes to the Invoice with OCR. This functionality can be really useful when one CN does not cover the Invoice Total, and you need to add another to cover the difference.
Please note that you can only keep adding other documents from the AP Inbox list to the Invoice, not the same one.
Also, to be able to use this functionality, your Invoice must have more than one item in it. Otherwise, you cannot add more Credit Notes to it. The system only allows one Credit Note per item, regardless of whether it is fully or partially paid.
Follow the steps below to do that:
1. Proceed to the AP Inbox page, select the needed document from the list, and press the Create Document action button.
2. Select the Credit Note type and go on to select the Invoice.
3. Select the item for which you wish to create a Credit Note and fill out the needed information.
4. Go to the AP Inbox page, select another document from the list, and press the action button to create another Credit Note document.
5. In the Select the Invoice list, you will see the previous Invoice, where you can still add the new Credit Note for the item left.
Showing Who Canceled the Document on the AP Inbox
On the AP Inbox page, when the document has been Canceled, and the corresponding status has been obtained, when you hover over that status, you will see the first and last name of the user who has canceled it.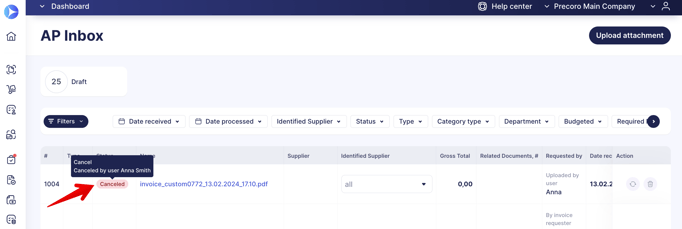
Added New Email Notification Upon Creating New API Key
Now, whenever you create a new API key, we will send you this letter below, with the tips and useful links to improve your experience working with this functionality: