TABLES OF CONTENTS
- Improved the Invoice and Service Order Matching Process with Adding Split Lines Functionality
-
Improved Invoice Without Receipt Blocking Functionality Notifications Process
-
New Infocard for Users with No Access to the Required Documents Custom Fields
-
Removed the Approval Steps Numeration in the Documents Display
-
Purchase Order Report Update for Canceled and Rejected Receipts Display
-
Added Ability to Integrate Billable and Markup Fields with QuickBooks
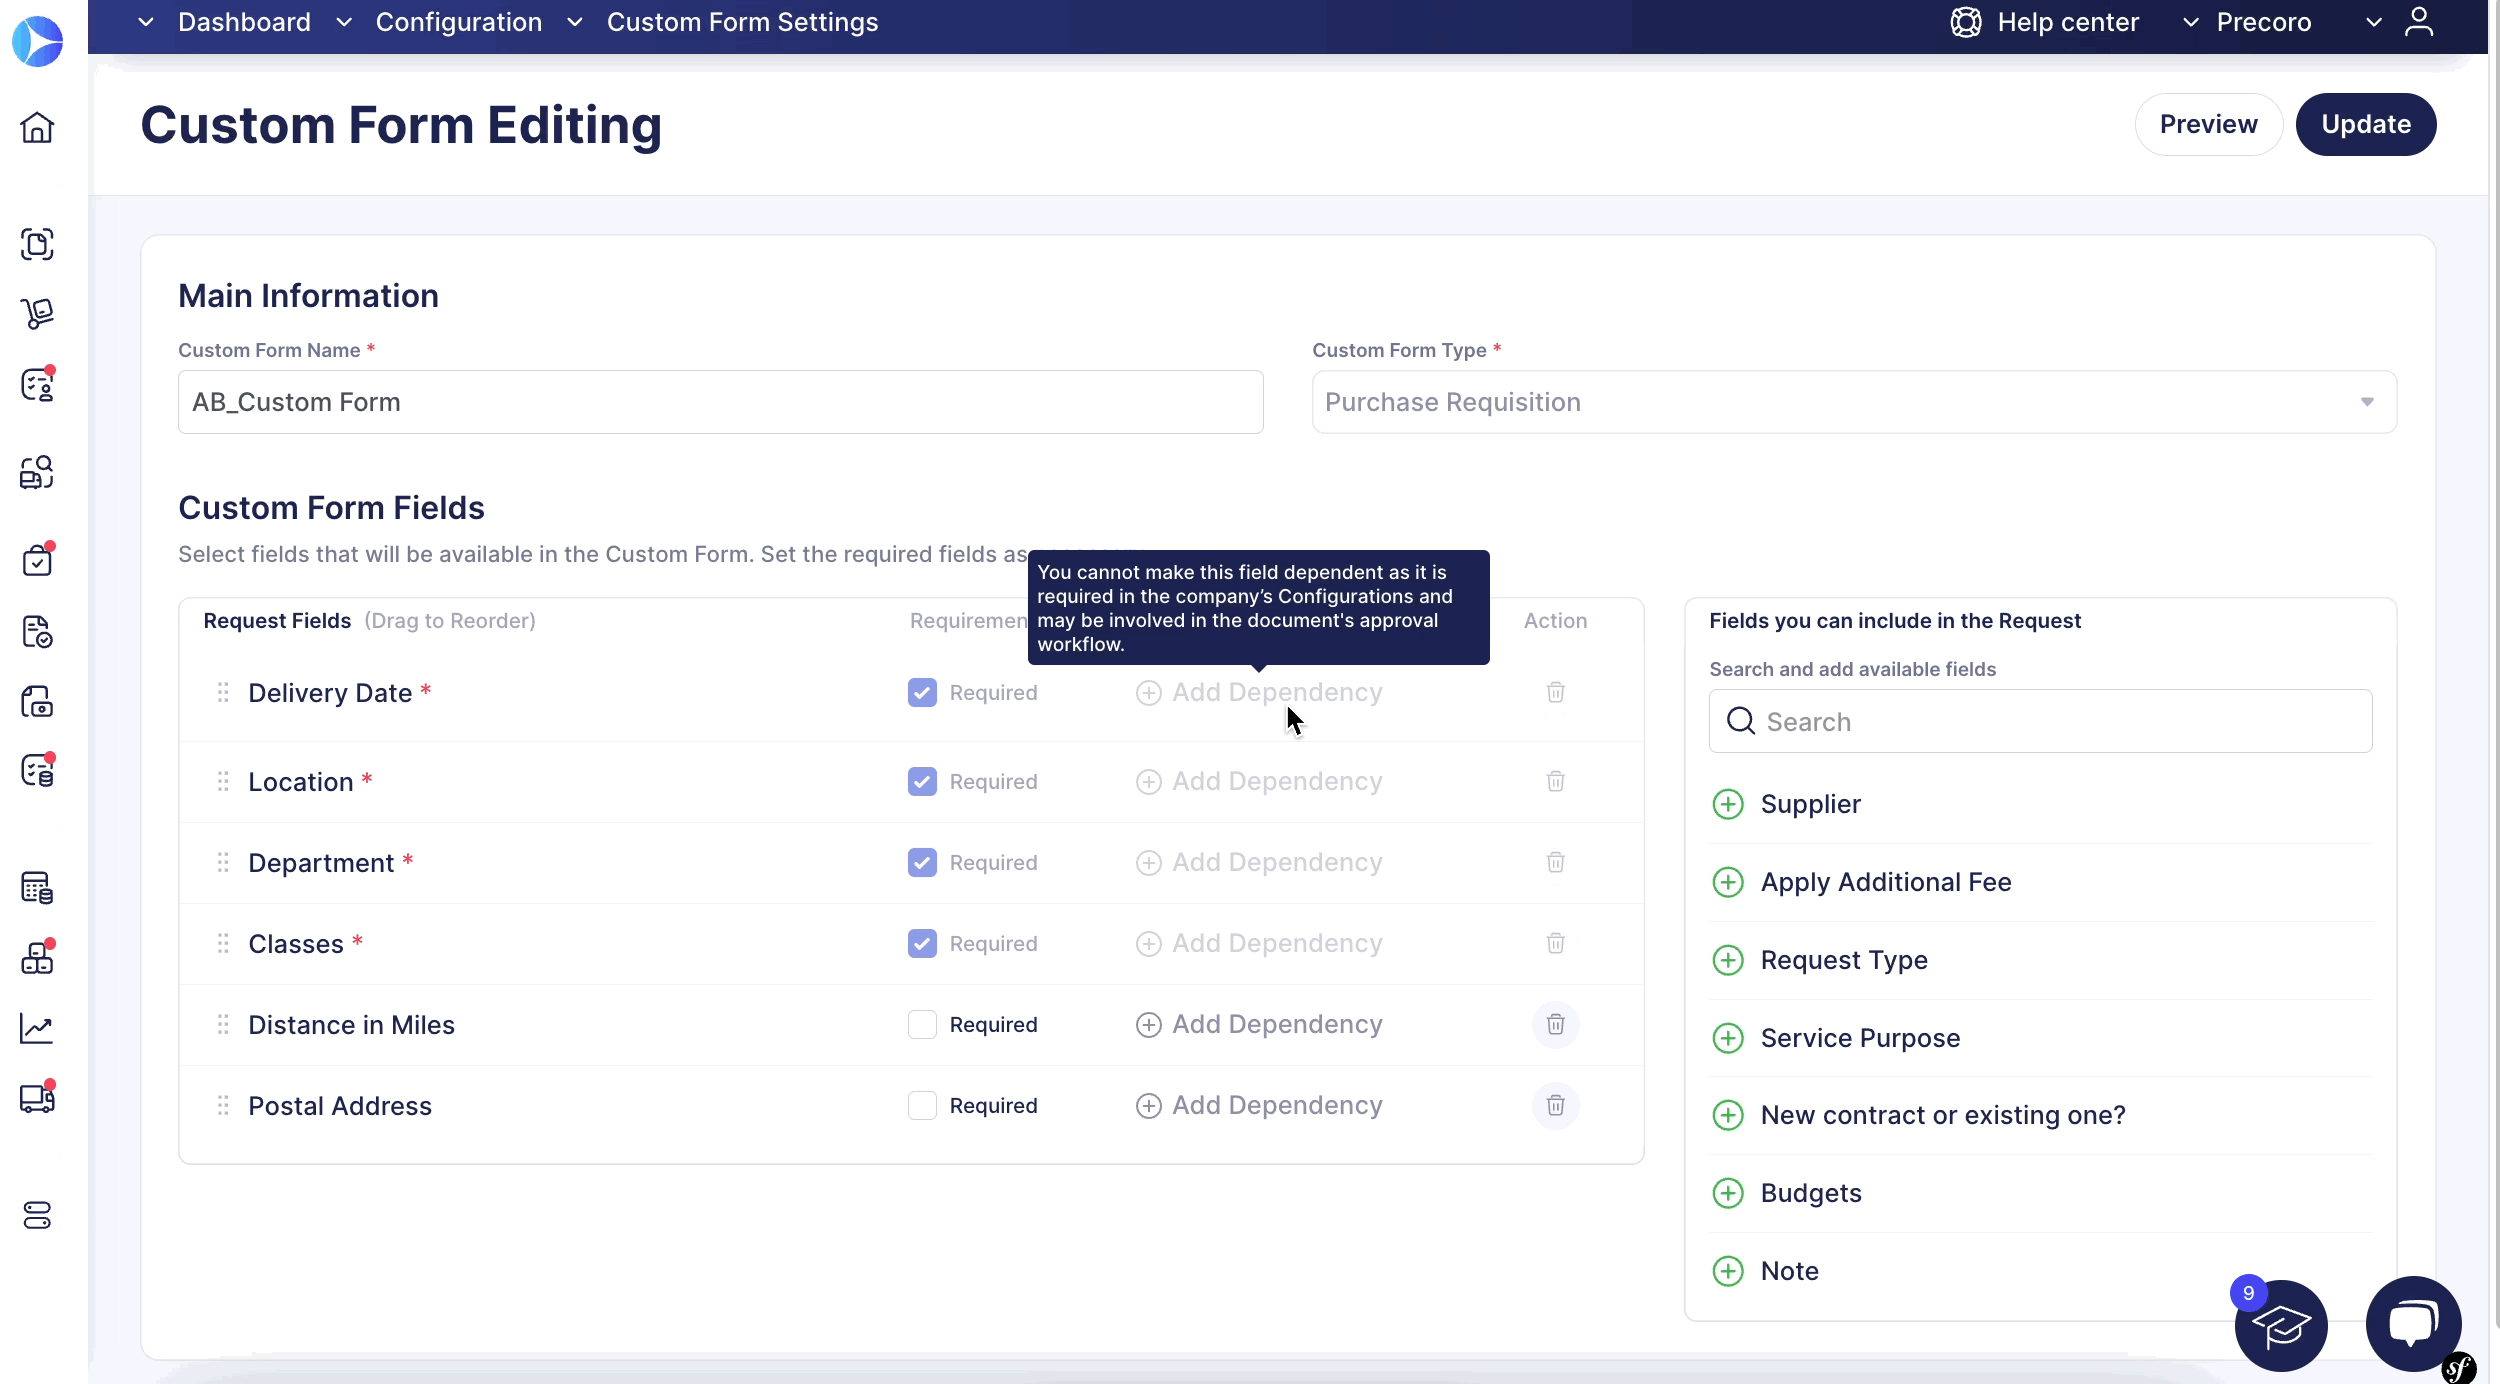
New Document Custom Forms Functionality in BETA Mode
Create as many Custom Forms as your company’s process needs for the Purchase Orders, Purchase Requisitions, Invoices, and Expenses types of documents.
Please note that this functionality is in the BETA mode, and we are still improving its work.
- Build your own tailored document layouts in Precoro.

- Appoint which fields will be required to fill in by your employees.
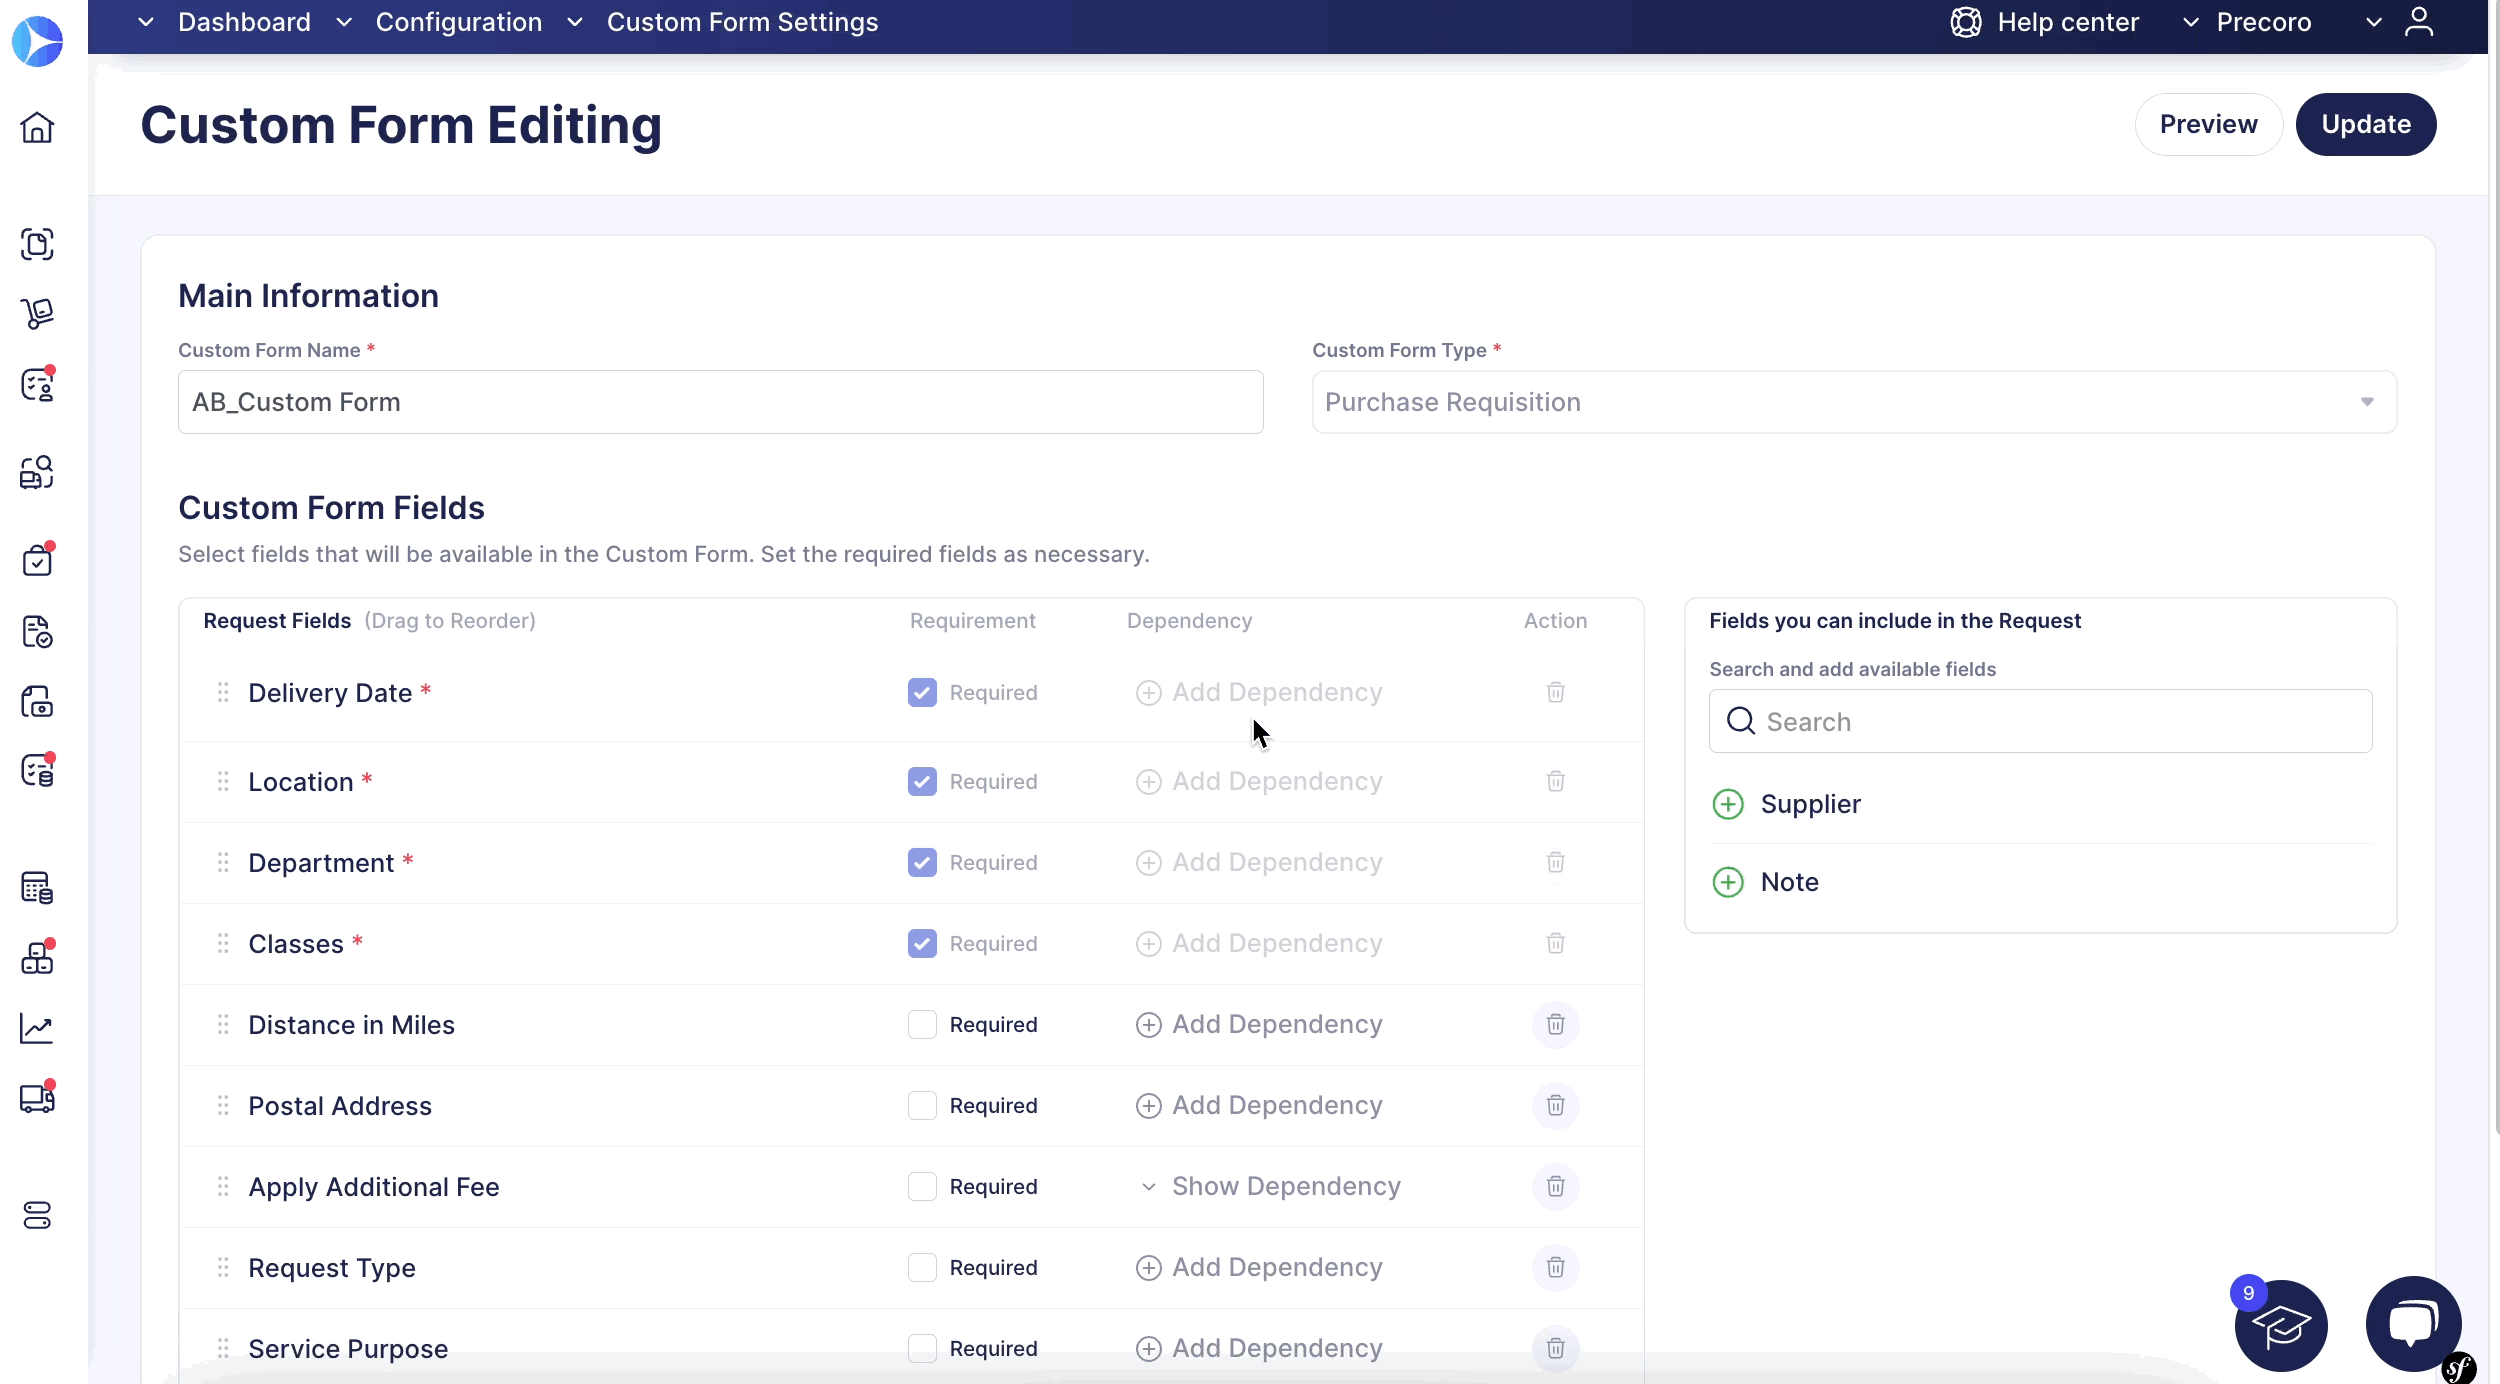
- Configure dependencies between the fields in a form to make the workflow even more automated.
Please continue to this Document Custom Forms article and learn how to set this functionality up and use it in your company’s business process.
Improved the Invoice and Service Order Matching Process with Adding Split Lines Functionality
We have improved the Invoice and Service Order Matching process by adding the new Split Lines functionality that will be helpful in the following cases:
- When you need to split the current item, add a new item line to the Invoice document without triggering the Matching process in the related Service Order.
The amount in split lines must not exceed the Total amount stated in your Tolerance Rate. Otherwise, the Matching process will be triggered.
- If you need to split the current item and enter different Item Custom Fields like Charts of Accounts or Departments for a better accounting process.
To use the Split Lines functionality, please follow the steps below:
1. Create the Service Order document and the related Invoice for it.
2. Scroll down to the item section and press the Split Line button to create a new line.
- You can enter the new item information into the following fields: SKU, Name, Description, Net Total, Discount, Tax, and Item Custom Fields.
- The added Tax or Discount values in the split lines of the Invoice will not be displayed in the general item line of the Service Order. They affect the Gross Total of the Invoice, which is going to be recorded in the SO.
- The Net Total amount will be automatically recalculated between the lines in equal amounts. For example, if the original line was 500 and in the split line, you entered 250, then the original amount will be recalculated to 250 as well (splitting in equal parts).
- If the new lines in the Invoice were added with the Split Line function and the original Total amount has not exceeded the limit in the Tolerance Rate, the Matching process will not be triggered.
- In split lines, you can specify different ICFs, but only within the selected budget.
After the Invoice Confirmation:
- The Invoice Gross Total amount will be added to the Service Order Invoiced amount.
- The split lines amount will be recorded in the Invoiced amount of the Service Order.
- New lines from the Invoice will not be transferred to the Service Order.
The amount of split lines should not exceed the non-invoiced amount in the SO. If the Gross Total of such an Invoice exceeds the non-invoiced amount in the Service Order, the Matching process will be activated.
Added the Ability to Confirm Documents with Zero Total
Now, you can Approve and Confirm documents with zero total value for the whole document and also send them to integrated partners. This functionality is available for Purchase Orders, Purchase Requisitions, Expenses, Credit Notes, and Invoices.
This functionality can be really useful in case your company:
- Has a prepayment process that needs approval.
- Orders free samples.
- Receives additional free items from Suppliers.
To use this function, proceed with the following steps:
1. Create the needed document and add items to it.
2. In the items, activate the Free of Charge function.
3. You can proceed to Confirm and Approve the document even if the Total amounts to zero.
Afterward, you can also create related documents as usual.
Please note that in the related Invoice, after the Approval or Confirmation (if your company does not use Approval functionality), the status of such document will be automatically set to Paid. The payment will also be recorded at the time and date of confirmation or approval.
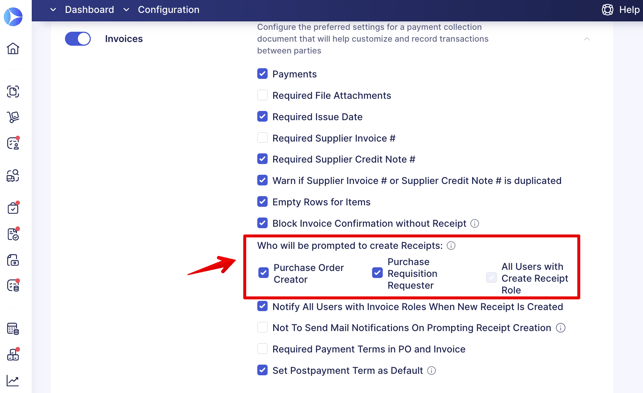
Improved Invoice Without Receipt Blocking Functionality Notifications Process
We have adjusted the notification process for those utilizing an Invoice Without Receipt Blocking. Now, you can split the notifications for users depending on their actions with the document. You can choose to send prompting letters to Purchase Order Creators, Purchase Requisition Requesters, and All Users with the Create Receipt Role.
You can simultaneously select the Purchase Orders Creators and Purchase Requisition Requesters.
To send notifications for All Users with the Create Receipt Role, make sure to unselect the Purchase Orders Creators and Purchase Requisition Requesters.
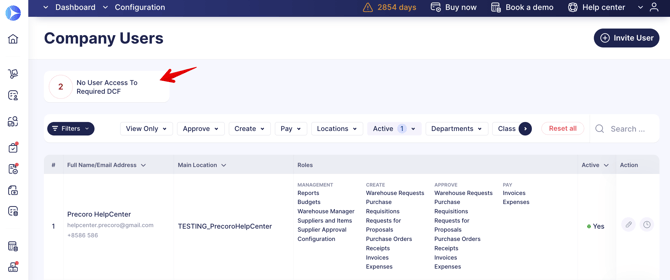
New Infocard for Users with No Access to the Required Documents Custom Fields
We have added a new Infocard No User Access To Required DCF on the User Management page, with the help of which you will be able to quickly identify users who do not have access to any options in one or all of the required Documents Custom Fields in your company.
To promptly fix those issues:
1. Open the User Management page and click on the No User Access To Required DCF Infocard.
If you do not see the No User Access To Required DCF Infocard, then all your users have access to the required DCFs, and there is no need to correct their rights.
2. You will see the list of users who need access modifications. Open their profiles in the editing mode and provide them with the necessary Documents Custom Fields options.
3. Save the changes made, and those users will have all the needed accesses for continuing the working process with documents.
Removed the Approval Steps Numeration in the Documents Display
To have a more unified and clear Approval Workflow, we have removed the automatic step numeration display in the documents to avoid confusion: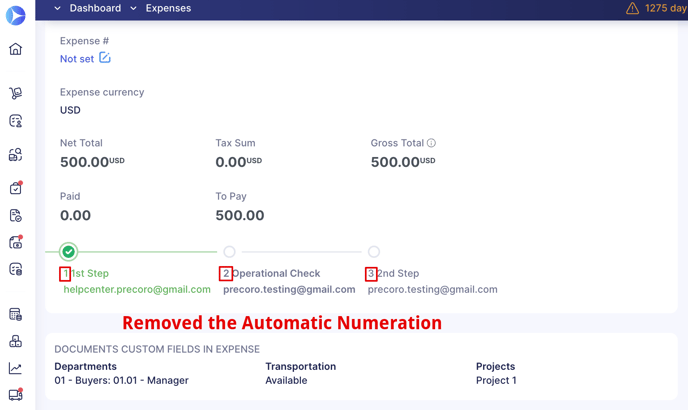
Now, in the document, those step numbers are not displayed: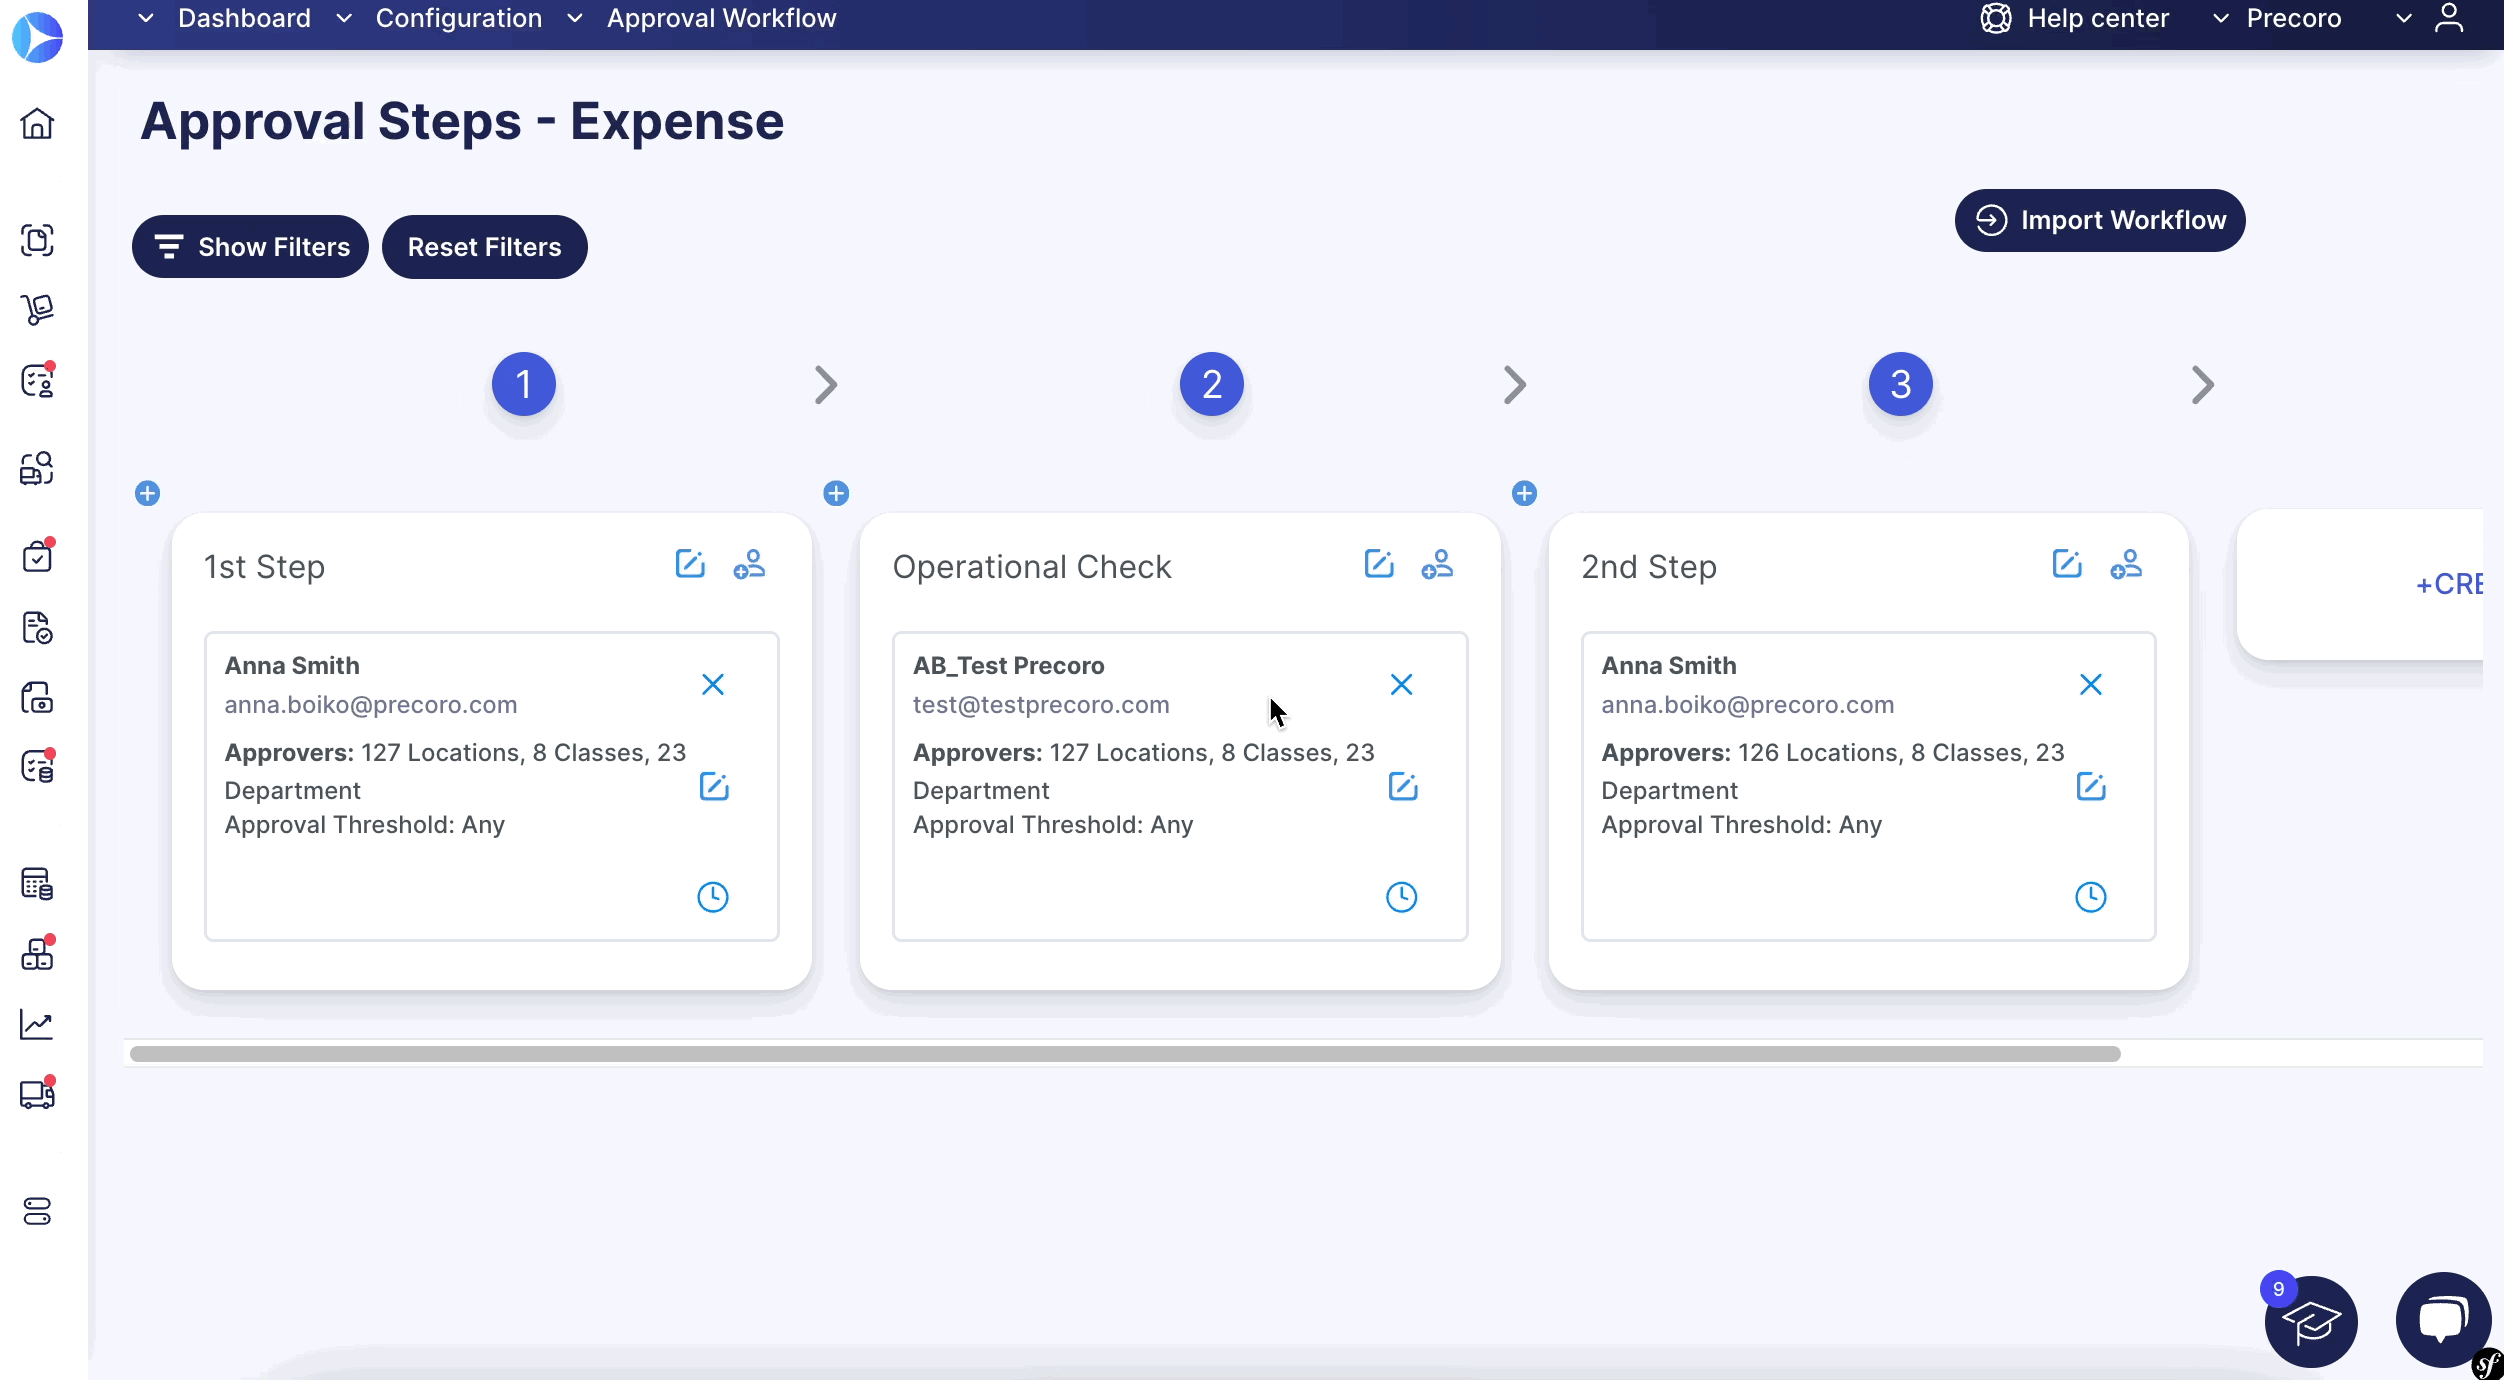
Purchase Order Report Update for Canceled and Rejected Receipts Display
We have removed the Rejected and Canceled Receipts from displaying in the:
- Custom Purchase Order Report.
- Preset Purchase Order Export by Items Report.
The Rejected and Canceled Receipts will not be displayed anymore in the following columns:
-
Receipt #
-
Supplier Receipt #
-
Receipt Custom #
-
Receipt Dates.
Please note that in the custom Receipt and Stock Transfer Reports, the displayed information will not change and will still contain the data on the Rejected and Canceled Receipts.
NetSuite Integration Improvements
This week, we have prepared for you two NetSuite integration improvements:
- Now, if NetSuite is unavailable, in 10 minutes, the document will be automatically resent, and no manual checking and resending will be required.
- Added the ability to send Credit Notes documents to NetSuite.
To send a Credit Note type of document, please follow the steps below:
1. Go to the Integrations page and select the Approved Invoices and Credit Notes option in the Documents to Send field.
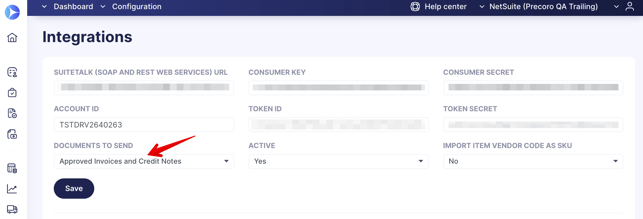
2. Create a Credit Note Document, Confirm it, and it will be automatically sent to NetSuite. You can also click on the Send to NetSuite button and send it manually.
In NetSuite, you can find the integrated document in the Transactions → Payables → Enter Supplier Credits.
%202023-12-13%2015-08-24-png.png?width=661&height=1122&name=Monosnap%20Bill%20Credit%20-%20NetSuite%20(Precoro%20QA%20Trailing)%202023-12-13%2015-08-24-png.png)
You can revise, edit, or cancel the document and then send the changes to NetSuite.
Added Ability to Integrate Billable and Markup Fields with QuickBooks
You can find the new option for Import Billable and Markup% in the Import lists and settings section.
When imported, there will be created ICF options with settings:
Available in Invoice — check if you want this field to be available in the Invoice.
Billable — here, you need to select the type.
Markup% — here, you can type a text value.
If you have activated the Available in Invoice option, the Billable value will be transferred to QuickBooks along with the Invoice.
OCR Functionality Improvements
We have prepared several improvements this week for you:
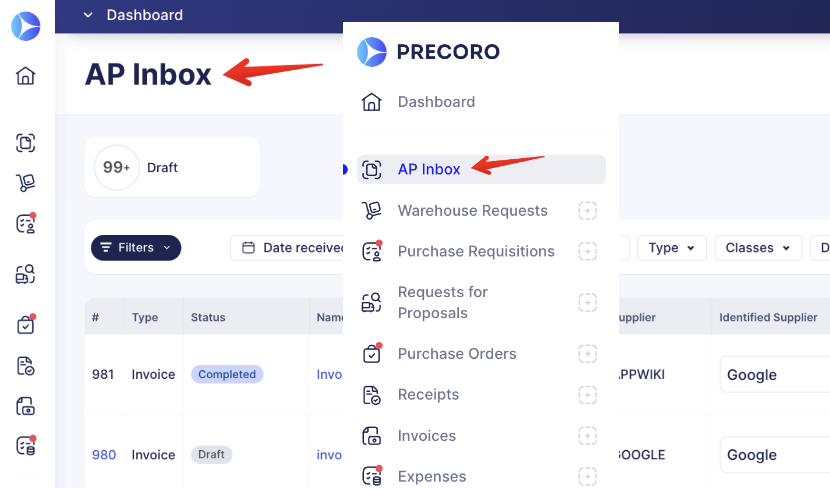
OCR Inbox Renamed Into AP Inbox
To add more clarity to the functionality, we are going to rename the OCR Inbox into AP Inbox (Accounts Payable Inbox) titles on the page and in the menu on December 14.
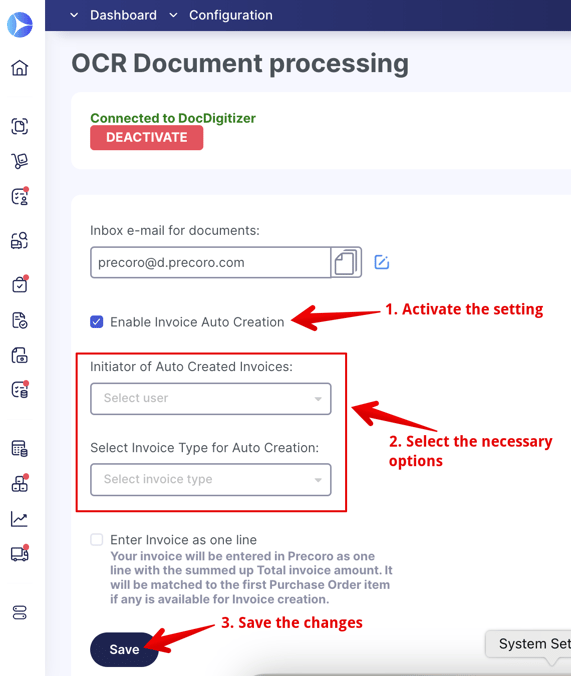
Use the New Invoice Auto Creation Function
Enable the Invoice Auto Creation function on the Configuration page. After activation, you will be able to select the necessary settings for Initiator of Auto Created Invoices and Invoice Type for Auto Creation.
Purchase Order based Invoices will be auto-processed if there is a PO number on the Invoice matched with the Precoro PO number or if there is only one PO for the particular Supplier.
A Standalone Invoice covers all the other cases. The default Invoice initiator will be notified via email once the Invoice is created.