TABLE OF CONTENTS
New Invoice Without Receipt Blocking Functionality
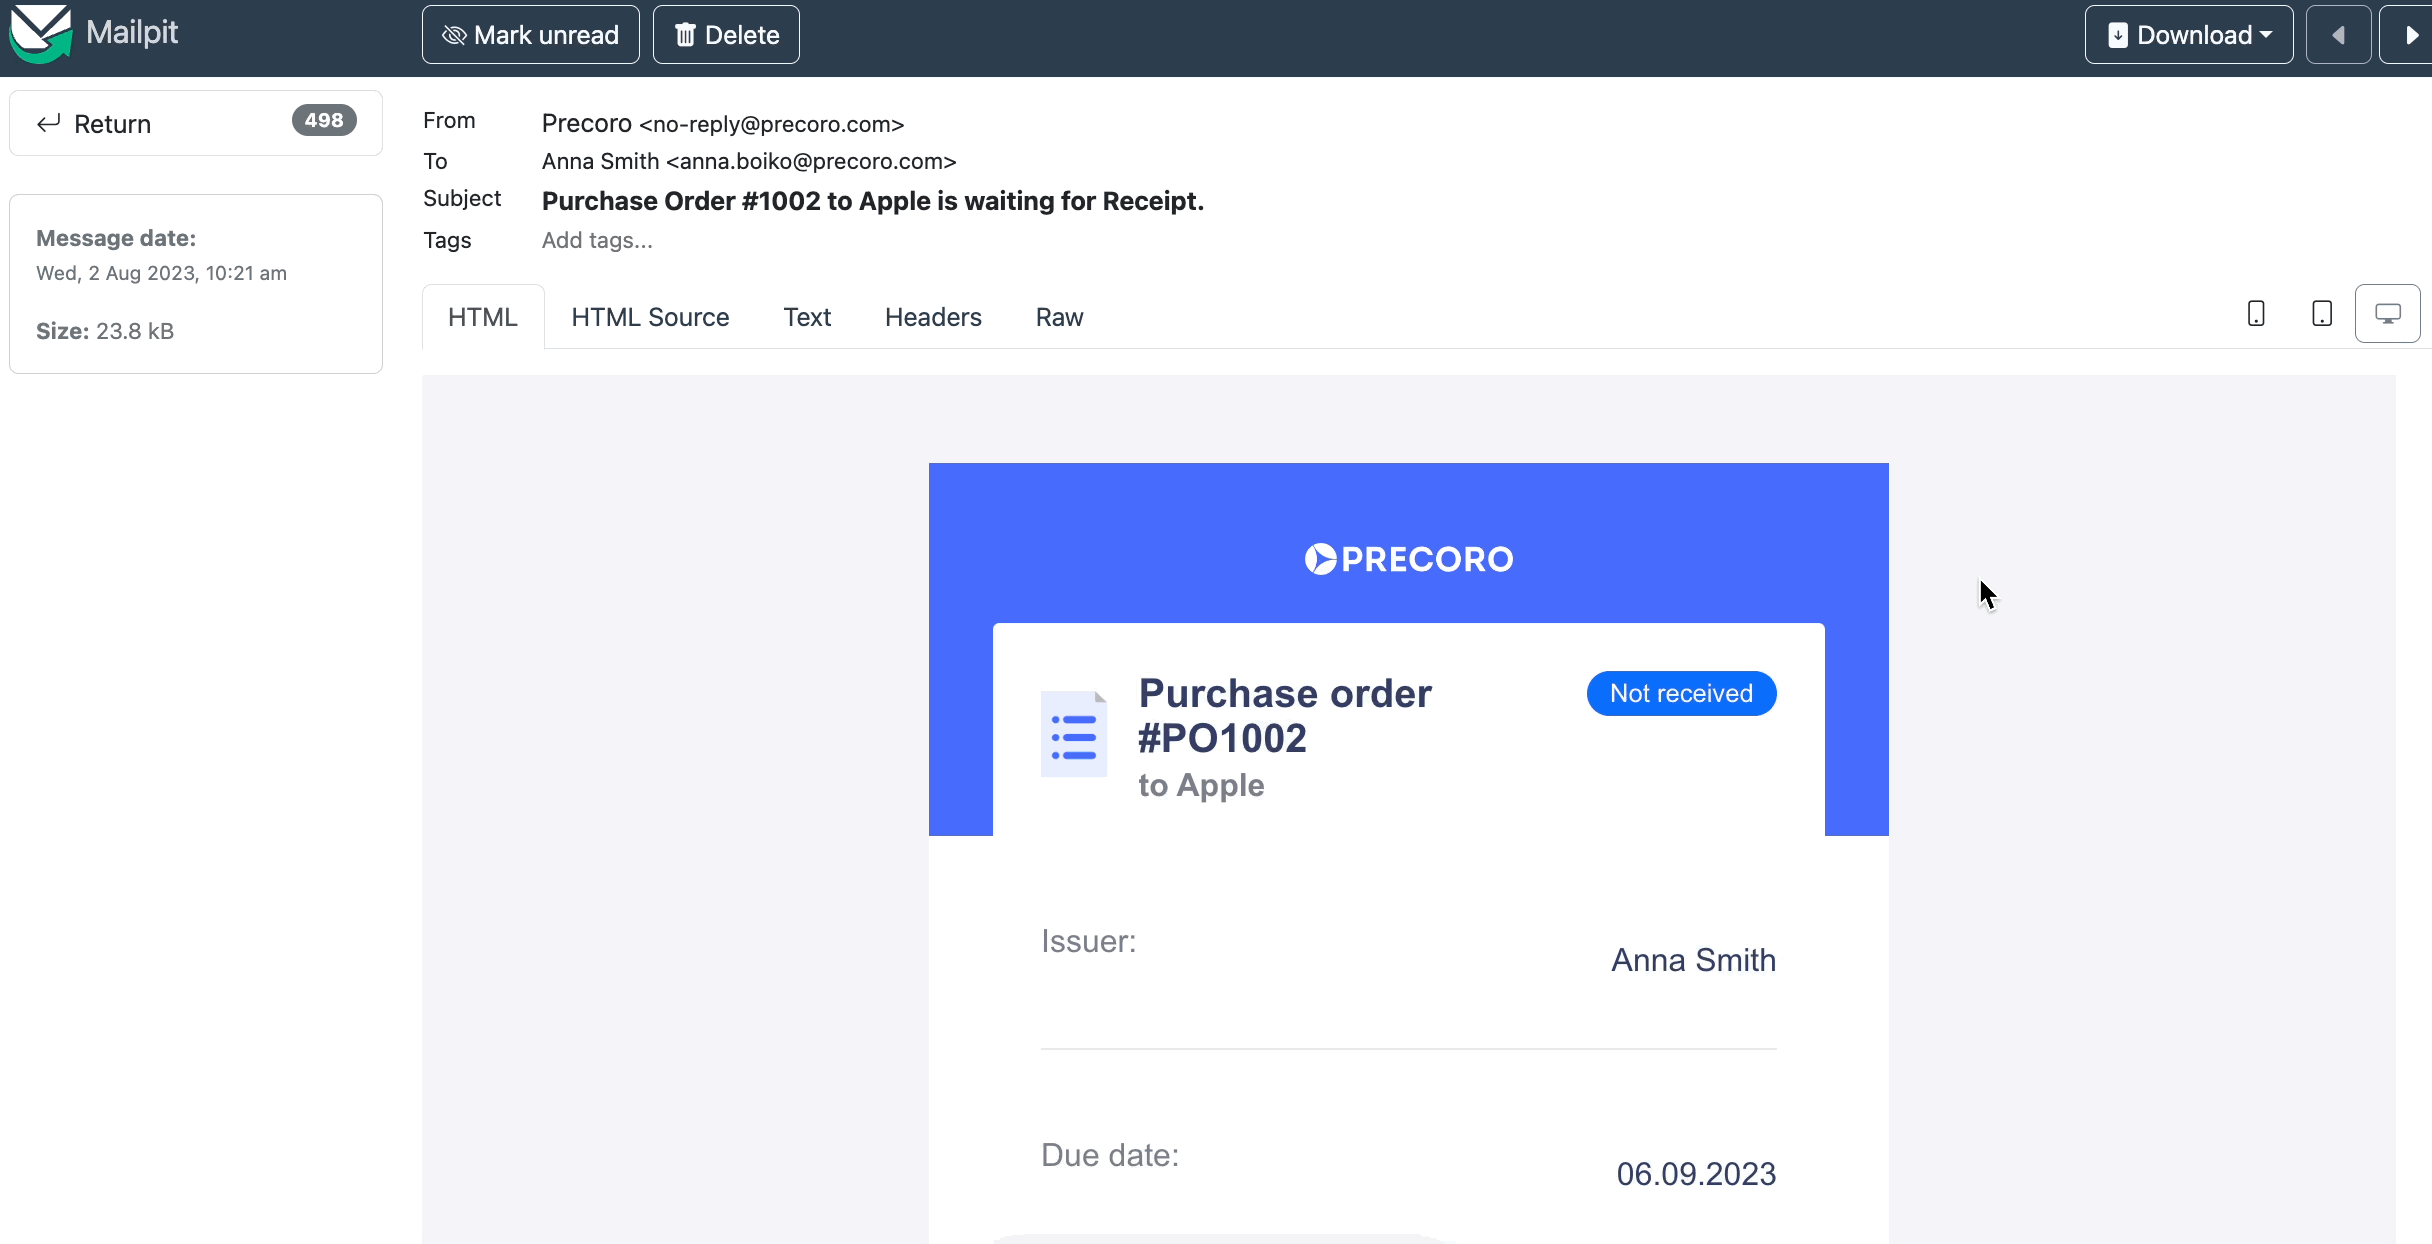
You can now block the document’s Invoice Confirmation without Receipt. After the Receipt creation, the Invoice will be automatically forwarded to the next Step in your Workflow.
How to set up:
- Activate a checkbox in Configuration → Basic Settings → Documents Setup → Invoice → Block Invoice Confirmation without Receipt.
You can also select whom you wish to prompt to create Receipts. Those responsible will receive an email notification.
Please note that this checkbox is not activated by default.
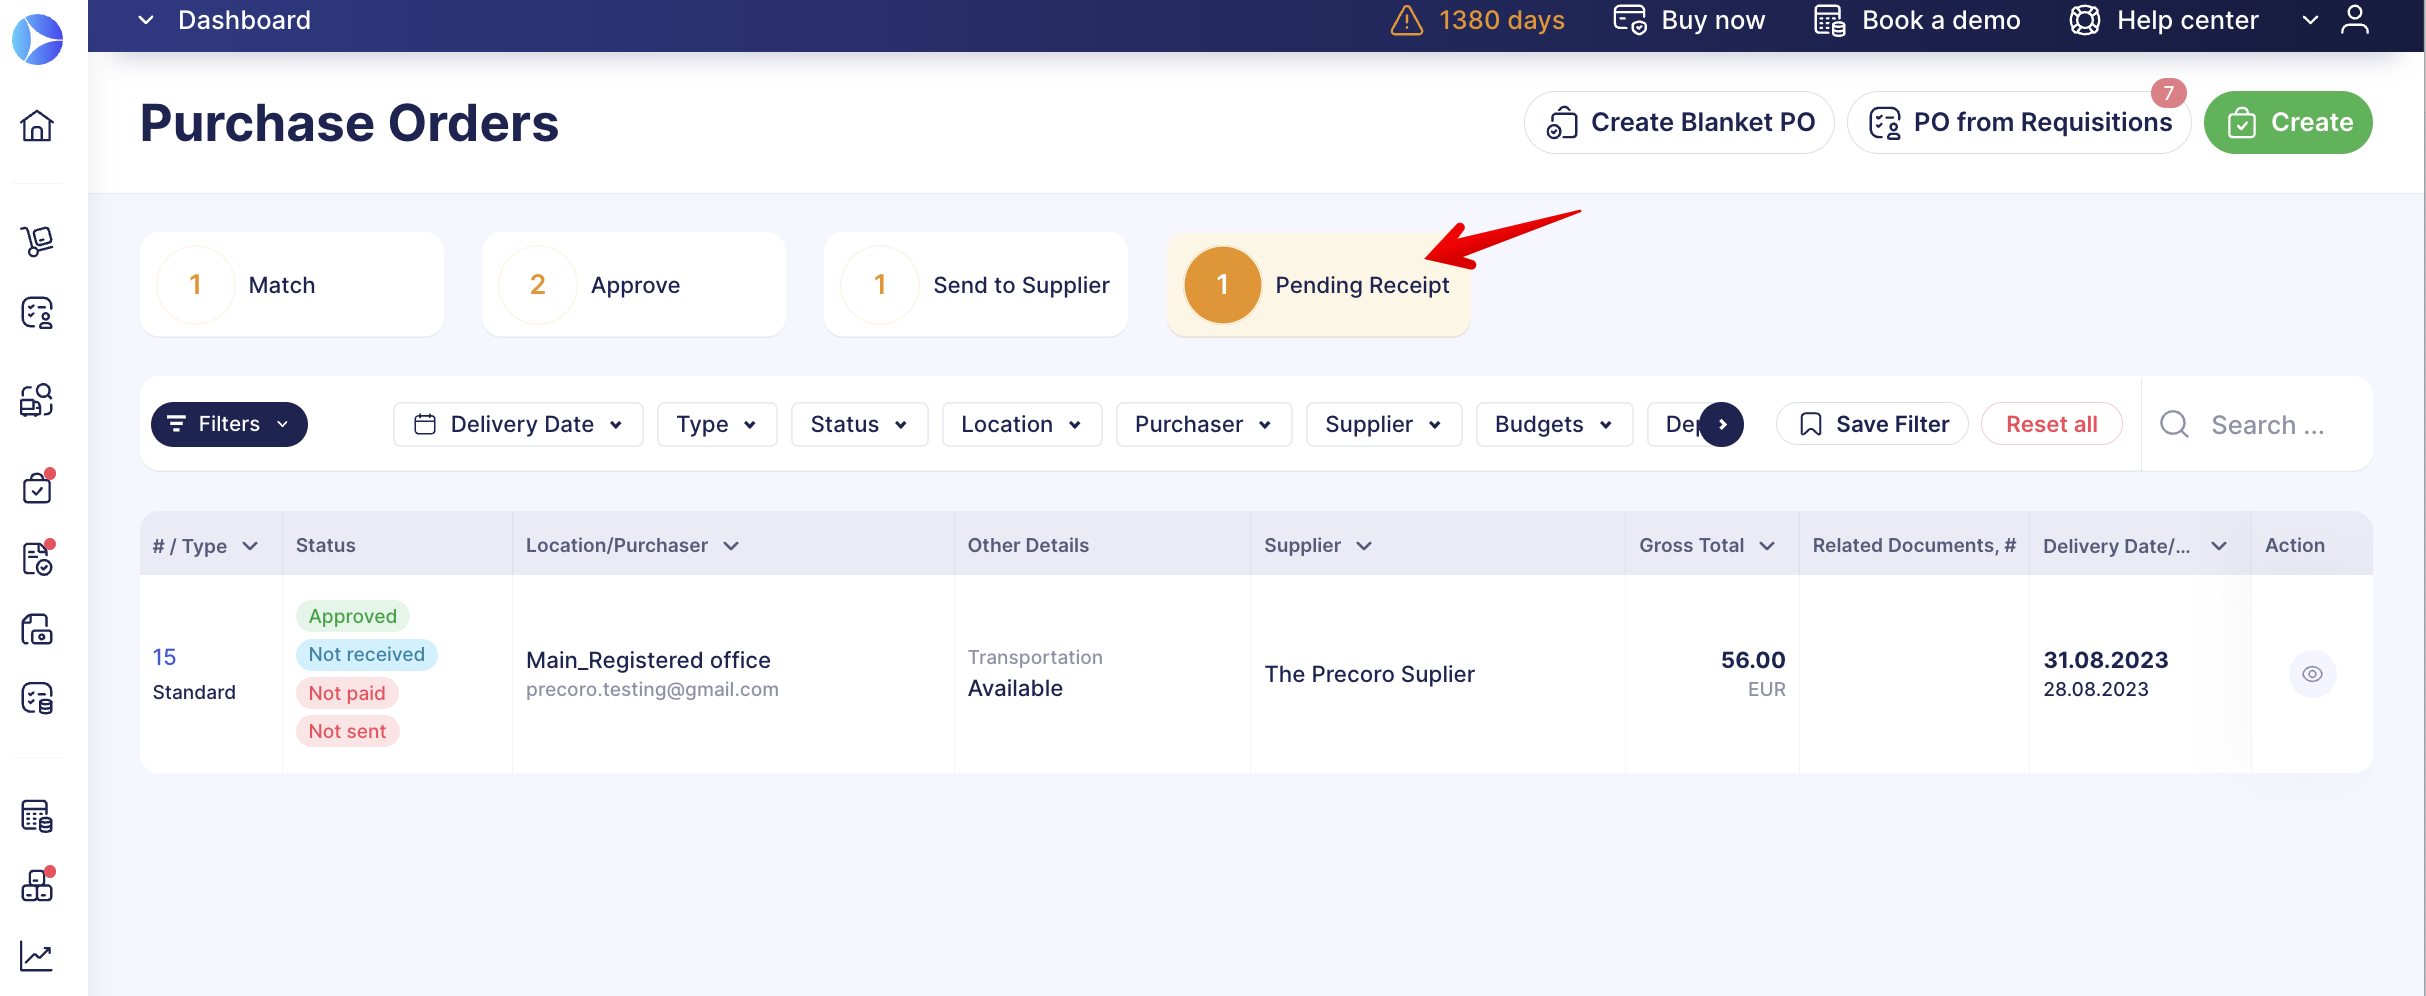
- The Payment Terms field will be required when creating a Purchase Order or Invoice from PO with the checkbox Block Invoice Confirmation without Receipt activated. In Invoices with Payment Terms → Postpayment, the document will obtain the Pending Receipt status if not all items were received.
- When creating the Invoice document, fill out the document as usual and click the Confirm button when you are done. That way, after receiving all the items, the Invoice document will be automatically forwarded to the next Step in your Workflow.
- On the Show Invoice page, you can see an added Received column in items, which displays the received item quantity (same as in the related Purchase Order).
- To promptly filter data, use the Pending Receipt Infocard when creating Receipts for Purchase Orders.
- Automatic sending of letters to those in charge of Receipts creation for the documents where we have an Invoice and the received quantity is less than the invoiced one.
Added Units of Measurements to Warehouse Requests
In the Warehouse Request document, you can now enter the Unit of measurement by selecting previously created options in Unit Management or by entering new ones directly into the document (in that case, new Units will be added only to the document and will not be saved in Unit Management).
Place the cursor in the field and enter the data to add the new option to the document.
The Unit will also be displayed in the related Purchase Order and Purchase Requisition from Warehouse Request.
Improved User Deactivation Process
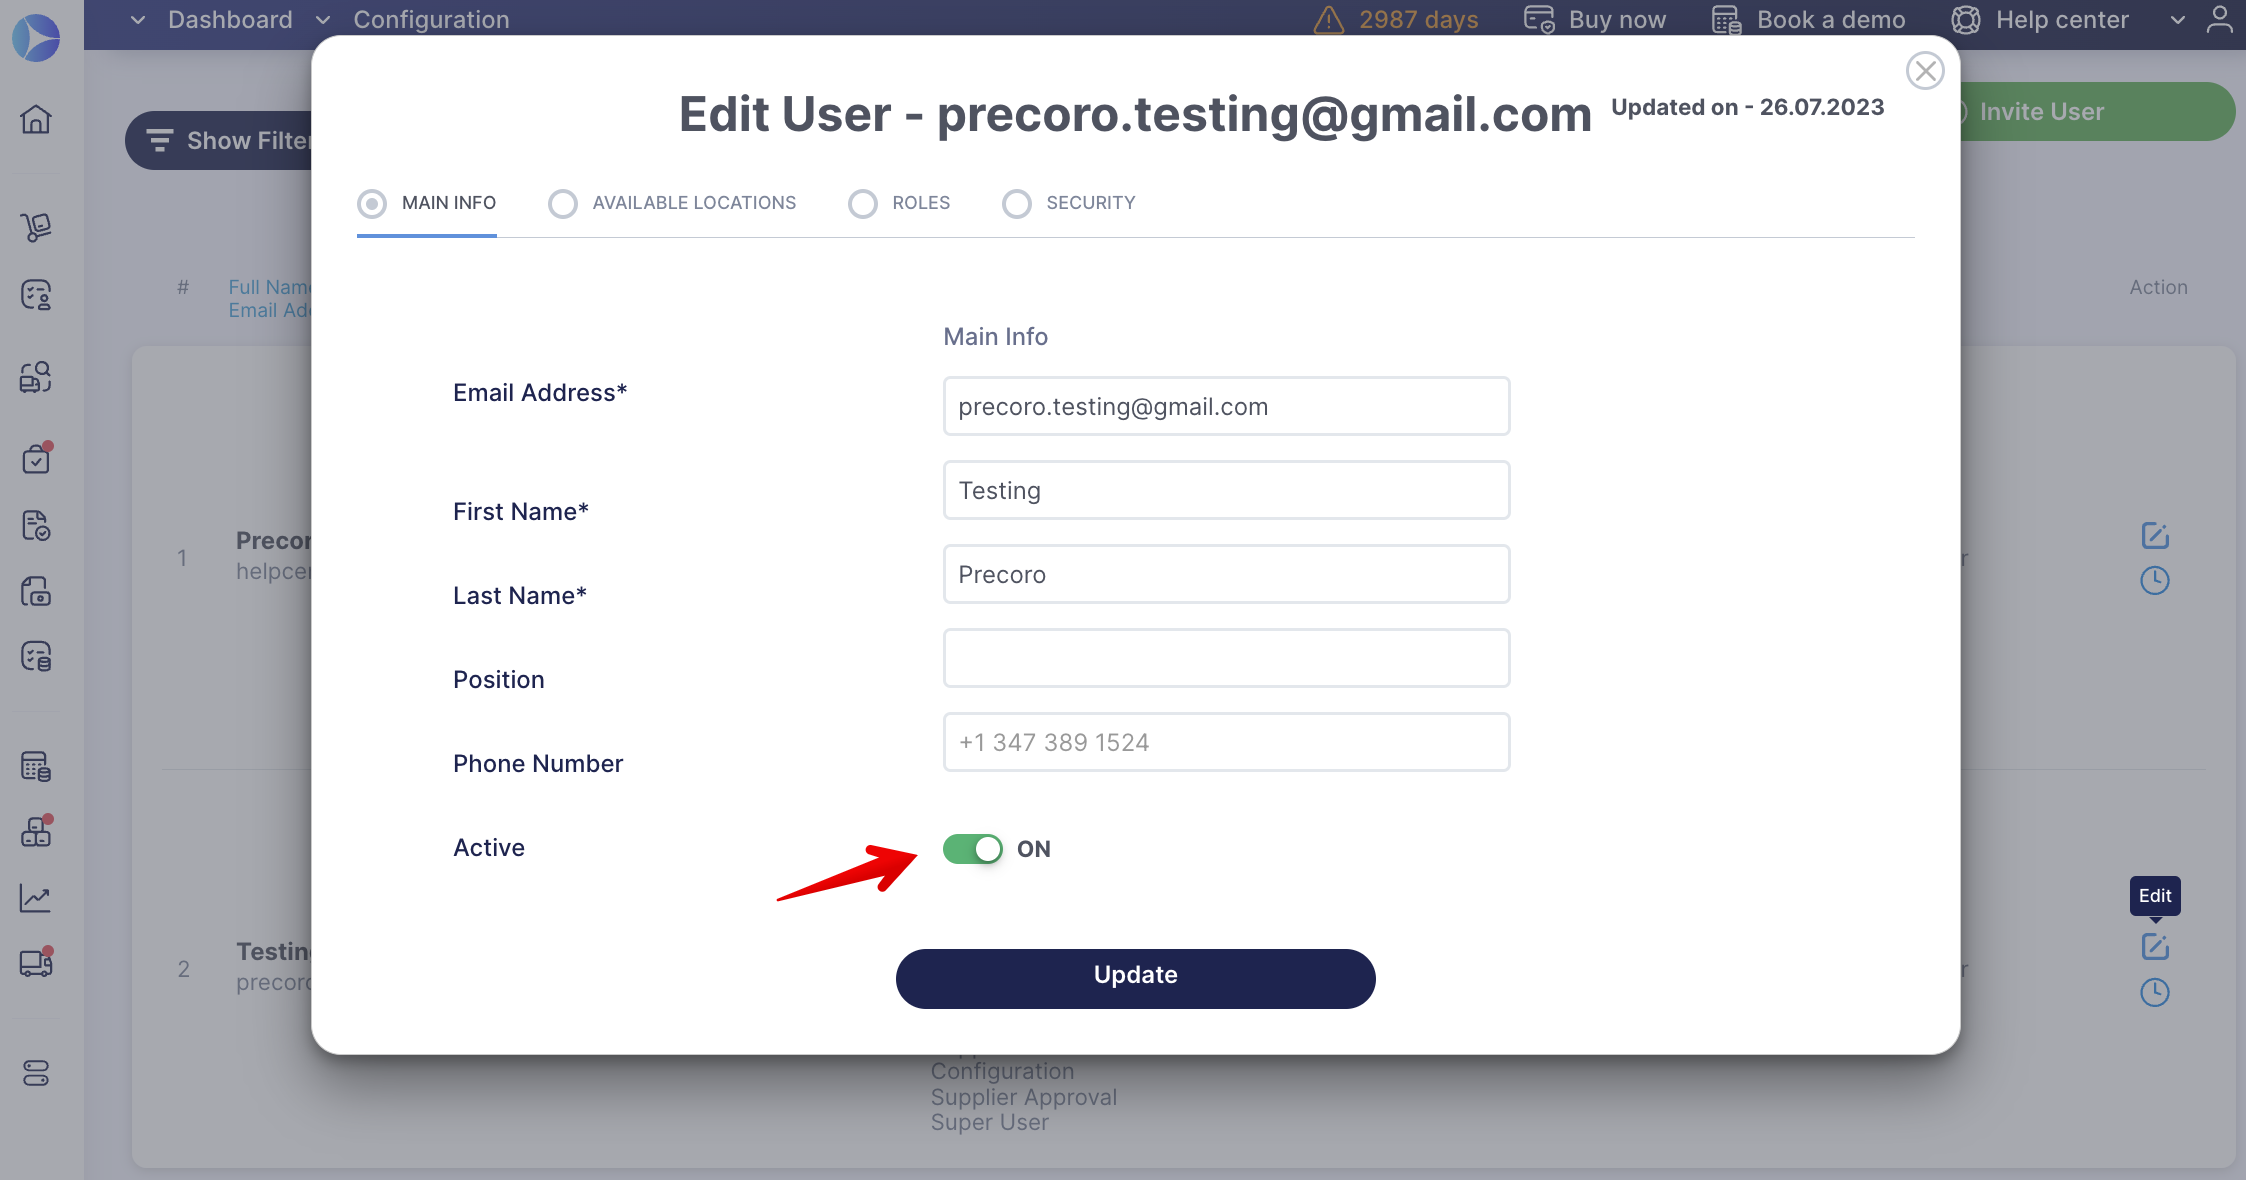
We are constantly optimizing processes, and now you can easier and faster deactivate users even if they are part of your company’s Approval Workflow.
- Now the toggle to Deactivate users is active even if they are part of your company’s Approval Workflow.
- When deactivating users, who are part of the Approval, they will be first deleted from the Workflow and then get deactivated in the whole company. Thus, you would not have to remove the user from the Approval Workflow manually. This process will be completed automatically.
- If users who are part of the Approval have documents in the Pending status, then:
- If the Pending document is on its last Approval Step and the person responsible for the Step is the user whom you wish to deactivate. Also, that person is the only one with the right to Approve the Location. Then the document will be forwarded for re-approval.
- If there were other Approvers on the Step with the same accesses, the document re-approval would not get triggered.
- Already Approved documents will not be forwarded for re-approval.
Select Substitutes for Vacation Mode Users
You can now assign a Substitute for a user in Vacation Mode.
The Substitute User can work with all documents in Pending, Matching, and In Revision statuses.
In turn, the Backup Approver can only approve documents but not perform any matching or revision actions. More about this functionality you can find here.
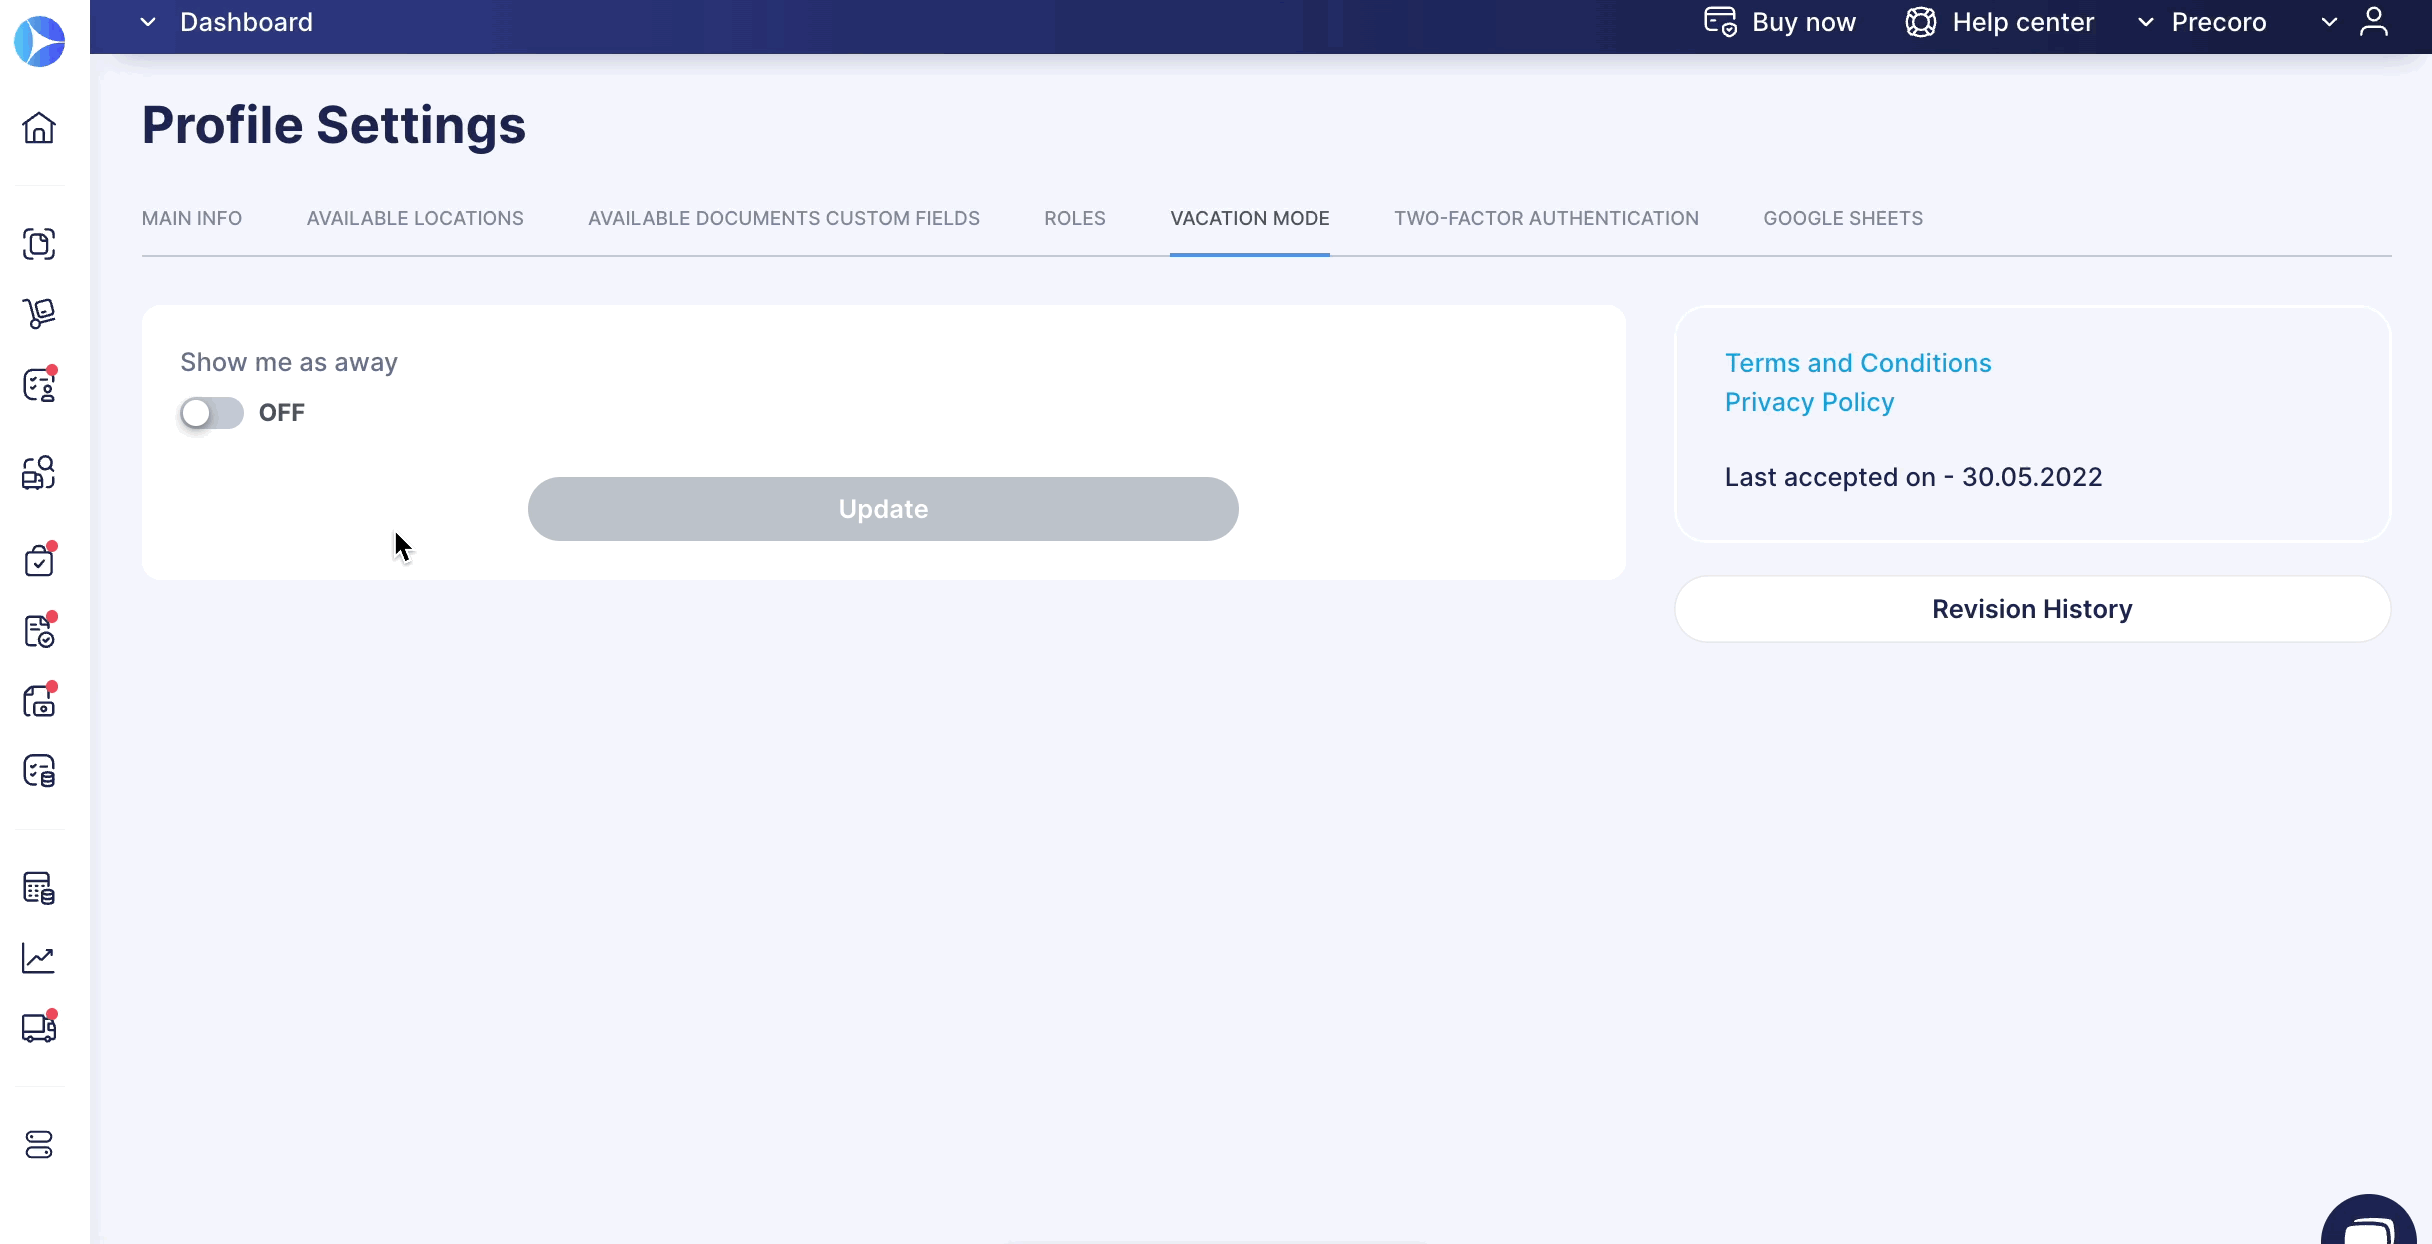
How to set up:
1. Open Profile Settings → Vacation Mode tab.
2. Activate the Show me as away toggle and press the edit button to assign a Substitute User.
You will see that for each company where this user is present, you can choose a Substitute from the list of those with the same roles and access in the needed company.
You can select the same user for different companies simultaneously.
3. Press the Update button below and enjoy your vacation.
Pay for Purchase Orders with a Credit Note Balance
You can now pay for Purchase Orders with the Credit Note balance directly on the Purchase Orders page in the same way as you do on the Invoice page.
In the Payment Type field, select the Credit Note type of payment, and you will see system-generated information on the current Supplier credit balance.
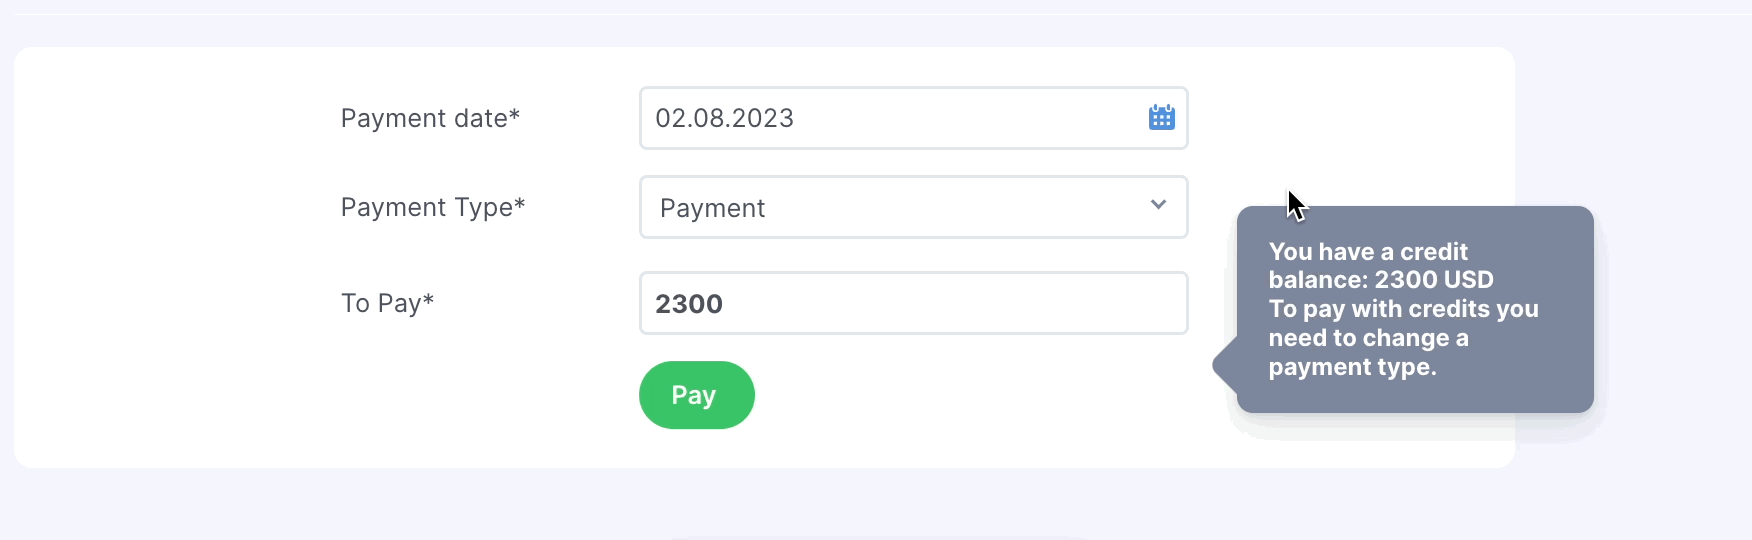
These payments will be recorded in the Purchase Order and displayed in the Previous payments in the Invoice.
Visit this article to learn more about the work of Credit Note documents in Precoro.
Disable Contact Mapping Option in NetSuite
Previously, by default, when a user reconnected or established a new connection, all the accounting contacts from NetSuite and purchasing contacts from Precoro were mapped.
However, you can now turn off the default NetSuite Contact Mapping for your users by enabling the corresponding checkbox on the Integrations page.
Changes in Precoro will not affect synced Suppliers in NetSuite and vice versa.
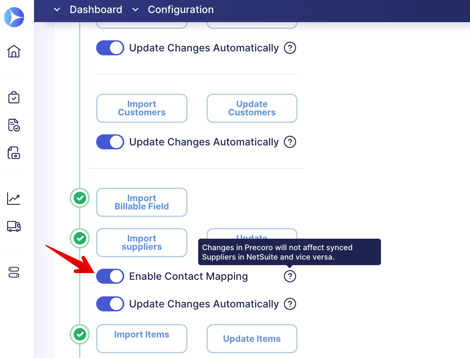
With Disable Contacts Mapping checked, NetSuite and Precoro contacts will be disconnected from each other. This will affect the contact integration in the following ways:
- If you already have contacts in Precoro, they will remain in Precoro and will not be transferred to NetSuite.
- If you already have contacts in NetSuite, they will remain in NetSuite and will not be transferred to Precoro.
- If you have contacts in both systems, then contacts from Precoro will remain in Precoro, and contacts from NetSuite will remain in NetSuite without being transferred.
This function applies to all mapping types: manual, import, update, auto-update, and creating a new Supplier in Precoro.