For app.precoro.com users, the updates will be available starting April 18.
For the US-based Precoro users, all these updates are on the way and will be launched in a week on May 16.
TABLE OF CONTENTS
- Added the Overbudget Approval Functionality
-
Added the Ability to Customize Access for Creating PR from WR Documents
-
Added the Ability to Integrate Approved Expenses with QuickBooks
Added the Overbudget Approval Functionality
With this new functionality, you can configure an additional approval step that will be triggered if the budget used in a document is exceeded. It is available for the Purchase Requisition, Purchase Order, Invoice, and Expense document approvals.
To activate the feature, go to Configuration → Basic Settings → Approval → Overbudget Approval.
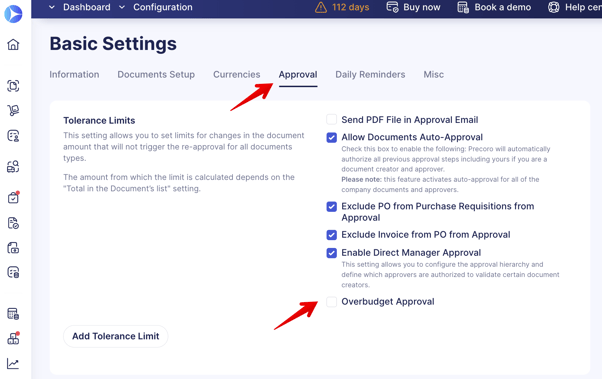
To see this setting, you must have the activated Budget module for your company.
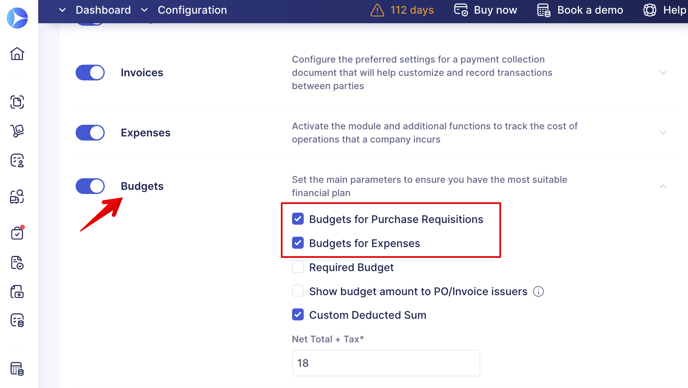
Also important to note that the setting will be available for activation on the approval step for PRs and Expenses only if you have activated budgets for the specific document in Configuration → Basic Settings → Document Setup → Budgets:
To set up the Overbudget step:
1. Proceed to Approval Workflow and select the needed type of document.
2. In the Approval settings, you can edit the existing step and activate the Overbudget Approval feature or continue to create a new step (as shown in the video below).
3. To the step with activated Overbudget Approval, you can add the approvers as usual and configure all the necessary accesses for them: DCF, Locations, Document Initiator, and Thresholds.
These approval steps are only triggered when the budget is exceeded. In other cases, these steps are going to be omitted.
If several approvers with the same accesses are involved in a step, you would need approval from at least one of them.
Also, these approval steps can be triggered in parallel with others (if you have set up the parallel process). This approval will only be required if somebody triggers the overbudgeting.
Currency Change for Different Purchase Order Types
After the creation and document approval, you might need to change the currency in PO for a variety of reasons:
- When creating the document, mistakes were made in the currency field.
- It is unclear yet which currency the transaction should be made with initially, and you will need to update it.
- It is necessary to replace the supplier, which entails a change of currency.
In all those cases described above, you can proceed and replace the currency in the existing document instead of canceling the current one and creating a new one.
We continue to enhance this feature and plan to introduce the ability to change the currency in Invoices and custom documents in the upcoming releases.
Please proceed to the Currency Change for Different Purchase Order Types article in the Knowledge Base to find information regarding the currency change in various PO types: Blanket PO, Service Order, Recurring, POs from Requisitions, and POs with related documents. You will learn how and in which cases you can change the currency and what it will lead to.
More Automated DCF Access Assignments For Users
To avoid the situation when a Document Custom Field is added, and users do not have access to any options, we will automatically add access for all company users to the first created DCF option and the subsequent ones. The administrator can easily edit accesses and remove unnecessary options from users if they do not need to have access to those.
This new process will work as follows:
1. A new Document Custom Field is created, and all users in the company will get access to the added options.
2. You add the subsequent options. Since users already have access to one option of this DCF (Select All at the DCF level is activated), all those options will automatically be available to them.
3. The administrator can edit the access in User Management and remove the unnecessary options from users, thereby turning off the Select All setting; thus, all the following added options will no longer be automatically assigned to the edited user.
Supplier Custom Fields Available in Supplier Portal
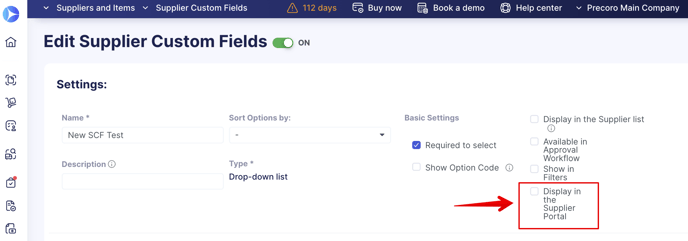
We have added the display of Supplier Custom Fields to the portal, allowing suppliers to fill in the data themselves and making the supplier management process more convenient and efficient. To activate this feature, please follow the steps below:
1. Proceed to Suppliers and Items → Supplier Custom Fields → open the existing SCF option to edit or create a new one → activate the Display in the Supplier Portal setting and save the changes.
The setting will only be displayed if the Supplier Portal functionality is enabled in the company.
2. There is a convenient and constant exchange of information between the two parties as these fields are still available for editing from the supplier and your side as well.
The changes will be transferred to their profile if the supplier adds any information to SCF in the portal. If you add new information about the supplier, it will also be uploaded to the portal for the supplier to see.
Added the Ability to Customize Access for Creating PR from WR Documents
We have added a new setting in the Configuration → Basic Settings → Documents Setup → Purchase Requisitions → Enable creation PR from WR:
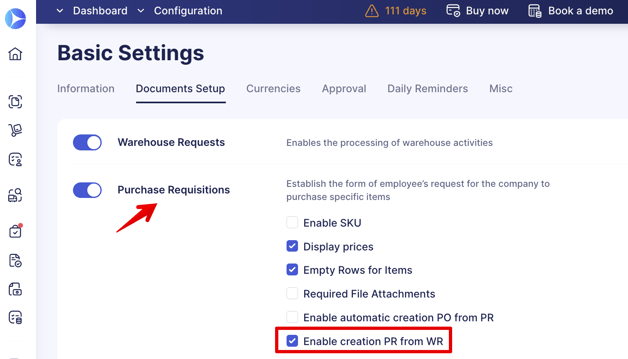
The checkbox will only be displayed if the Warehouse Requests module is enabled in the company.
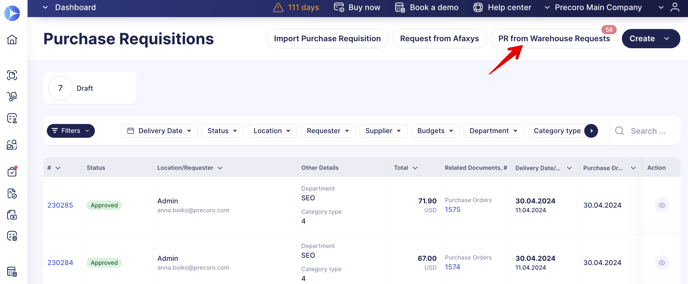
If the checkbox is disabled, the PR from Warehouse Requests button will not be displayed on the Purchase Requisition management page as well as there will be no Infocard on the dashboard page for that document type:
Improved the Item Import/Update Process
We have added the ability to edit item Names when importing or updating, even when the SKU is disabled for the company on the Check and Press Import page:
-png.png?width=688&height=245&name=image%20(37)-png.png)
Added the Ability to Integrate Approved Expenses with QuickBooks
Integrating Expenses with QuickBooks is a valuable feature that can automate your accounting process. It allows you to send expense data directly to QuickBooks without any manual data entry, which is a significant time saver. All you need to do is connect your account and configure the settings. That way, your expenses will be automatically pushed to QuickBooks. This process will ensure that your financial records are always up-to-date and accurate.
To send Expenses to QuickBooks, the user should have an Expenses Role.
To integrate the Expense documents with QuickBooks, follow the steps below:
1. Open the Integration page, go to STEP 6: Integration Options, and select the Approved Invoices document type.
2. You will see additional available options below, including the Send Approved Expenses feature, which you should activate.
3. To send Expenses to QuickBooks, you need to import additional fields: Payment Accounts and Payment Methods created within your QuickBooks account. Payment Accounts are Charts of Accounts with Account Type "Credit Card" or "Cash at bank and in hand."
To do that, press the Import Payment Accounts/Methods, select the needed options, and press Import, as shown in the video below.
If the needed settings are in place, the Expense documents will be automatically sent to QuickBooks when Approved.
In QuickBooks, you will be able to find the integrated documents in the Expenses module of the Expenses transactions type:-png.png?width=688&height=405&name=Untitled%20(6)-png.png)
Important to note:
- Before importing the document, please ensure the Expense currency matches the one used in your QuickBooks company.
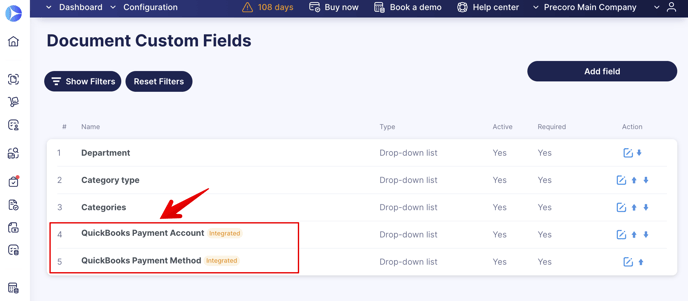
- The Payment Method and Account need to be imported and integrated from QuickBooks. You can verify this setup in the Document Custom Fields.
- After sending the document, you will see the corresponding information in the Integrations Logs.
OCR Functionality Improvements
This week, we have prepared several improvements in the OCR segment:
Better Split Screen, Document Quality, and Ability to Copy and Paste Text
We have continued the process of improving the split-screen functionality and now, you can customize the screen when you have already created a document from AP Inbox and enter the data. It is available for the Invoice and Credit Note document types. Also, we have improved the display quality of the uploaded file, so it retains its original resolution and contrast.
Additionally, you can select and copy the information you need directly from the file. This way, you will save time by manually entering the data and avoid manual input errors.
Improved Working With Taxes
We have added the ability to add the Taxes directly through the document without having to go to the settings, add a new tax, and then return to the document to apply the newly created tax. This shortcut tax creation process will reduce the time spent processing documents in your AP Inbox.
To add the new tax through the document:
1. Click the Taxes field and press the Add New Tax button on top of the drop-down list of options.
2. Enter the needed Tax information and press the Save button below.
More information on creating Taxes in Precoro can be found in this article.
3. Now, you can see the added option available for selection in the list.
Another OCR improvement with regard to Taxes is the automatic fill-out of the Tax Rate field in the document. We will map the tax values recognized by OCR with your existing Rates and record this data in your document. This process will speed up document autocomplete and help reduce manual errors.
Added Notification Regarding the Unprocessed Documents
We have added a new notification to Email Preferences → Misc → Notification with the List of OCR Unprocessed Documents:
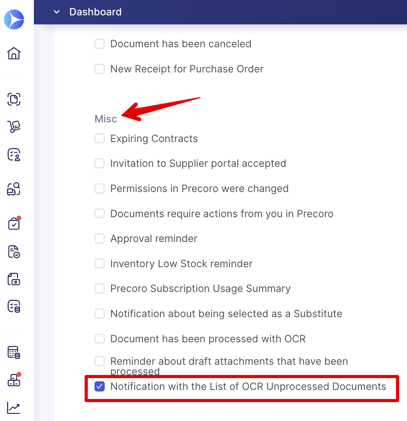
With this option activated, users with OCR Roles will receive emails once a week with the list of all the OCR unprocessed documents from Precoro.
Please consider the reasons why the attachment might not get processed below:
1. Check that the document type sent is an Invoice.
2. Ensure your document format is either pdf, jpeg, png, or tiff.
3. Make sure the document is not password-protected or encrypted.
Automatically Filling Out the Supplier Name When Creating Requests
When requesting a new supplier, the supplier name will be automatically filled out by the OCR recognized value in the form. The auto fill-out is available on the:
- AP Inbox page.
- Invoice creation page.
- Invoice from PO creation page.
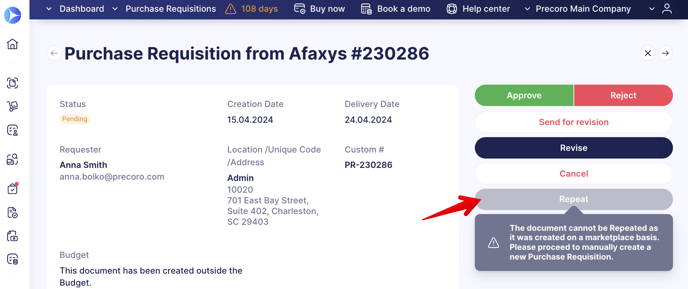
Repeat PR Created From Afaxys Manually
To avoid any confusion, we have turned off the Repeat button for the Purchase Requisition documents created from Afaxys.
The document cannot be Repeated as it was created on a marketplace basis. If you want to create another Afaxys-based Requisition, please proceed to add a new document manually.