TABLE OF CONTENTS
Working with Master Data
How to Retrieve and Update Suppliers
Usage scenario: Keep supplier records in Precoro current automatically, instead of manually updating the same information in two systems.
Steps to set it up:
- To fetch all approved suppliers, make a GET request to
/suppliers?modifiedSince=2022-12-12T00:00:00&status[]=2 - To filter only active suppliers, add
?enable=trueto the request. You can use any parameter from the response to further filter suppliers as needed. - To retrieve full information for a supplier, use the
/suppliers/{id}endpoint. - To ensure your records stay current, set the
approvalDateormodifiedSinceparameter to the date of your last data retrieval in future requests. - To update a supplier’s information, use a PUT request to
/suppliers/{id}. - To add new suppliers, make a POST request to
/suppliers.
How to Manage Items of a Specific Supplier
Usage scenario: Efficiently retrieve a list of items by supplier and make updates to existing items or create new ones as necessary.
Steps to set it up:
- To retrieve a list of items, make a GET request with a filter. Use the endpoint
https://api.precoro.com/items?supplier[]={id}to fetch all items of this supplier from Precoro.
To stay current with updates, add themodifiedSincefilter to receive only items created or updated since your last check. - Review the details of the retrieved items to identify which require updates or need to be created.
- To modify the item’s information, send a PUT request. Use endpoint
https://api.precoro.com/items/{id}for item updates. - To add new items to your system, use a POST request. The endpoint is
https://api.precoro.com/items.
Working with Documents
How to Retrieve Approved Purchase Orders
Usage scenario: Retrieve approved purchase orders and integrate them into your accounting system.
Steps to set up:
- To retrieve all approved POs, make a GET request using the endpoint
https://api.precoro.com/purchaseorders?modifiedSince=2023-10-10T00:00:00&approvalDate[left_date]=01.12.2023&approvalDate[right_date]=31.12.2023&status[]=2. - To access full information for each PO, use the request
https://api.precoro.com/purchaseorders/{idn}. - To keep your records up to date, set the
approvalDateormodifiedSinceparameter to the date of your last data retrieval for subsequent requests.
Get Documents With a Certain Status
Usage scenario: Get documents by a specific status, such as Approved or Pending, instead of retrieving all documents and filtering afterward.
To receive documents with a certain status, include status[]=2 and the status number in the request.
Example of request: https://api.precoro.com/purchaseorders?status[]=2&per_page=50&page=1
The request will return the first 50 purchase orders with the Approved status. Requests for PO lists return paginated responses. Learn how to work with them in this section.
How to Download Attachments from Documents
Usage scenario: Pull files attached to POs, invoices, or receipts through the API, so you can store or process them without logging in to Precoro.
Steps to set up:
- Identify documents with attached files. Use a GET request with the endpoint
https://api.precoro.com/purchaseorders?modifiedSince=2023-10-10T00:00:00&attachedFile=1to retrieve all POs created or updated after the specified date with attached files. - Retrieve attachment IDs. Send a GET request to
https://api.precoro.com/purchaseorders/{idn}to access the document details. Within the document information, locate the attachments field, which contains the IDs of the attached files. - Download attachments. With the attachment IDs in hand, initiate a GET request to
https://api.precoro.com/attachments/{id}for each attachment you want to download. This will allow you to download the associated files.
-gif.gif?width=670&height=354&name=ezgif-com-gif-maker%20(1)-gif.gif)
How to Get Custom Fields for Documents and Items
Usage scenario: Your integration needs to read and match the custom fields set up in your Precoro account, such as Department, Project, or Class, to the values stored on each document and item.
It's essential to fetch the list of all available custom fields for documents and items prior to requesting any documents.
Steps to complete:
Step 1. Get all information about custom fields for documents.
Send a GET request /documentcustomfields to receive data on custom document fields, and a GET request to itemcustomfields to receive data on custom item fields.
The response contains:
- Custom field ID
- Field name
- Field type (number, text, date, dropdown, etc.)
- Options (for dropdown type)
- Additional configuration (required, limit access, etc.)
Store this data locally (in a cache, database, or in memory) for later use in Step 2.
💡Please note: This data is defined in company configurations and changes rarely. It doesn’t need to be requested per document.
Step 2. Fetch documents and read custom field values
For example, let’s take a request for PO: https://api.precoro.com/purchaseorders/45
In the response, you should find dataDocumentCustomFields and dataItemCustomFields. These fields contain a collection of custom fields for documents and items, respectively.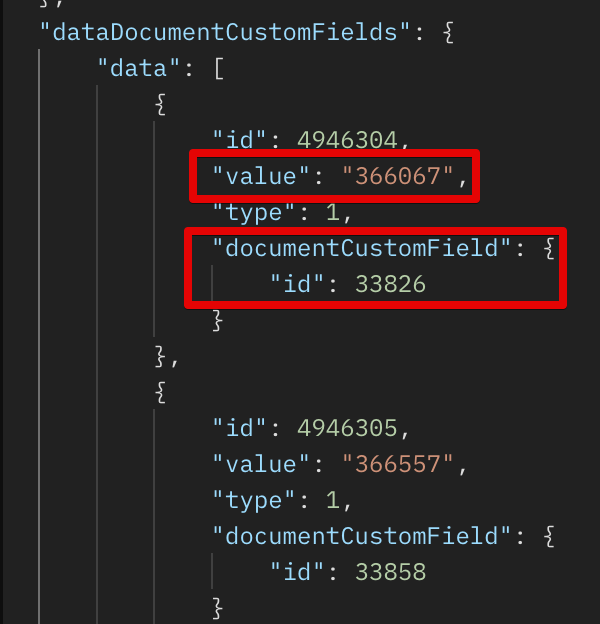
dataDocumentCustomFields contains:
- "documentCustomField"—the ID of the custom field.
- "value"—the ID of the selected option (for Drop-down list type) or the value itself
(text or date).
To get the names of the fields or selected options, map these IDs to the field list you fetched
in Step 1.
dataItemCustomFields contains:
- "itemCustomField"—the ID of the custom field.
- "value"—the ID of the selected option (for Drop-down list type) or the value itself (text or date).
To get the names of the fields or selected options, map these IDs to the field list you fetched
in Step 1.
Step 3. Get uploaded data.
We recommend using webhooks if you want to be aware of any changes. Select the necessary fields, save them, and configure webhooks for custom fields. As soon as you receive a webhook, you'll know which field it refers to and can continue working with it.
More about webhooks usage can be found here.
After that, as soon as you receive a webhook, you will know which field it refers to and continue working with it.
How to Work with Split Documents via API
Usage scenario: Retrieve documents with split costs, check whether a document is a parent document or a cost allocation, and manage cost allocations: create, update, or delete them via API.
💡 Please note:
- In API requests, a cost allocation is referred to as a split (or child document), and the document it belongs to is referred to as the parent document. For example, in endpoints
/invoices/split/{id}and fieldsparentData. - Split Costs functionality is available with Split Costs enabled in your company settings. All split-related endpoints return an access error if this feature is turned off. To learn more about Split Costs, refer to this guide.
Steps to follow:
Step 1. Identify split documents in the list.
With Split Costs enabled, every response from https://api.precoro.com/invoices and https://api.precoro.com/purchaseorders automatically includes two additional fields per document:
- parentData—contains the parent document's idn, sum, and netSum if this document is a cost allocation; for regular and parent documents, the value is
0. - splitPercentage—the percentage allocated to this cost allocation (e.g., 40.0); for regular and parent documents, the value is
0.
| parentData | splitPercentage | Document type |
| null | 0 | Regular document (no splits) |
| null | 0 | Parent document with splits check isWithSplits |
| { "idn": "...", ... } | > 0 | Split (child) document |
To identify parent documents, add isWithSplits to your request https://api.precoro.com/invoices?includeGroup[]=isWithSplits.
If isWithSplits is true, the document is a parent document with at least one cost allocation.
Step 2. Retrieve all cost allocations for a document
Each cost allocation has its own unique idn and appears as a separate entry in the list together with the parent document.
To retrieve all cost allocations for a parent document, use GET requests with the next endpoints:
https://api.precoro.com/invoices/{parent_idn}/splitshttps://api.precoro.com/purchaseorders/{parent_idn}/splits
The response returns an array of cost allocation documents with details such as id, idn, status, splitPercentage, sum, budget, location, and item-level allocation data.
Step 3. Retrieve a single cost allocation
Since each cost allocation has its own idn, you can retrieve it directly through the standard endpoint: https://api.precoro.com/invoices/{split_idn}
The response will include a parentData field with the parent document's idn and sums.
Step 4. Create a cost allocation
To create a new cost allocation, send a POST request to:
https://api.precoro.com/invoices/{parent_idn}/splithttps://api.precoro.com/purchaseorders/{parent_idn}/split
Include the following fields in the request body:
{"location": { "id": 12 },"splitPercentage": 40,"budget": { "id": 5 },"budgetLine": { "id": 18 },"budgetParts": [{ "id": 3 }],"dataDocumentCustomFields": {}}
Please note:
- The document must be in Draft status (if the user who sends the request is the creator) or In Revision.
- A document can have from 2 to 5 cost allocations.
- The total of all
splitPercentagevalues must equal 100% before the document can be submitted for approval. - Cost allocations aren’t supported for recurring documents.
- If the invoice already has cost allocations and is linked to a PO, adding new cost allocations is disabled unless the PO type is
blanket_per_total. - If the PO already has cost allocations and active linked invoices, adding new cost allocations is disabled.
Step 5. Update a cost allocation
To update an existing cost allocation, use the allocation database id returned in the GET response.
Please note: Use the allocation id, not idn.
Send a PATCH request to:
https://api.precoro.com/invoices/split/{id}https://api.precoro.com/purchaseorders/split/{id}
Send only the fields you want to update. You can use the same fields as in the POST request.
Step 6. Delete a cost allocation
To delete a cost allocation, send a DELETE request using the allocation database id:
https://api.precoro.com/invoices/split/{id}https://api.precoro.com/purchaseorders/split/{id}
Please note:
- The parent document must be in Draft status.Cost allocations can't be deleted during revision.
- For purchase orders, the parent PO must have no active linked invoices.
A successful deletion returns a 204 No Content response.
Additional recommendations:
- To retrieve only recently changed documents with cost allocations, use modifiedSince together with isWithSplits:
https://api.precoro.com/invoices?modifiedSince=2024-01-01T00:00:00&includeGroup[]=isWithSplits. - Each cost allocation has its own approval workflow. When syncing cost allocation documents with an external system, treat each allocation as a separate document and use its own idn and status for tracking.
How to Integrate Delivery Tracking Tools via API
Usage scenario: You need to create a receipt on another platform and want it added to Precoro automatically—linked to the related purchase order and sent for approval, if your company uses an approval workflow for receipts.
Endpoint: POST /receipts/{purchase_order_id}
Required fields:
- requiredDate—ISO-8601 format (for instance, "2025-07-24T00:00:00+00:00").
- dataDocumentCustomFields.data—if there are required custom document fields. The array should contain all required fields’ values in the necessary format:
- Date fields—ISO-8601 format
- Text fields—text
- Drop-down lists—option ID
- selectedItems—an associative array with at least one element;(the PO item ID is used as the key). Each element should contain the following:
- purchaseOrderItem.id (required)
- received (required)—quantity of items received
- dataItemCustomFields (optional)—custom item field values
Optional fields:
- warehouse—warehouse ID
- Note—text, or leave it null
- receiptNumber—a unique custom number, mostly used for integrations
Please note:
- If the Automatically Transfer Notes from PO to Receipt setting is active in your company, notes from purchase orders are automatically added to receipts if the Note field is null.
- If you fill out the Note field in the receipt, the new value will be saved, and the note from the order won’t be transferred.
Working with Payments
How to Mark Precoro Invoices as Paid After Recording Payment in Your Accounting System
Usage scenario: Payment has already been recorded in your accounting system, and you need to reflect it in Precoro too.
Steps to set up:
- To retrieve a list of unpaid or partly paid Invoices in Precoro, send a GET request to
https://api.precoro.com/invoices?page=1&per_page=10&status[]=2&status[]=4 - If those invoices are unpaid in your system as well, create a payment for them.
- To create a new payment for the corresponding invoices, send a POST request to Precoro
https://api.precoro.com/paymentswith the required payment details.
How to Keep Precoro Payments in Sync with Another Integration
Usage scenario: Create payments and ensure the information about paid invoices in Precoro is consistent with that on other platforms you use.
Steps to set up:
Step 1. Retrieve a list of paid invoices in Precoro.- Make a GET request to
https://api.precoro.com/invoices?page=1&per_page=10&status[]=5. - Save the received IDs of paid invoices for further verification.
- Send a request to the service where your payments are stored.
- Ensure there is a way to map invoices in the service and in Precoro.
For example, you can map invoices by filling out your external ID or another similar field with the Precoro Invoice ID.
Step 3. Check for new invoices.
-
-
Compare the received list with the previously saved list of paid invoice IDs from Precoro.
- Determine if there are any new invoices (invoice IDs not already in your database).
-
Step 4. Create payments in your system if new invoices are found.
Additional recommendations:
- To keep your data up to date, use request parameters, such as the last synchronization date, in future requests.
- Ensure the invoice mapping between your system and Precoro is configured correctly to avoid duplication or errors when creating invoices.