How to Set up the Sage Intacct Integration
Discover how to seamlessly integrate Sage Intacct with Precoro to make accounting processes smooth and free of manual labor.
TABLE OF CONTENTS
How Does the Integration Work?
The Precoro and Sage Intacct integration simplifies accounting tasks and keeps your financial data synced across both systems. Best of all, you don’t need to be tech-savvy to make it work.
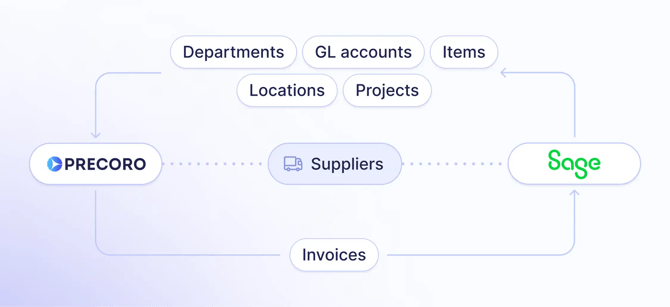
Instead of manually updating invoice information between platforms, the Sage Intacct AP integration handles everything in three easy steps:
-
Request items and approve invoices in Precoro.
-
Once approved, the invoice details flow directly into Sage Intacct.
-
After payment in Sage Intacct, the payment info syncs back to Precoro automatically.
You also get two-way syncing for suppliers and automated transfer of the following lists from Sage Intacct to Precoro:
-
Departments
-
GL accounts
-
Items
-
Locations
-
Projects
With the Sage Intacct accounts payable automation, you can have peace of mind from manual labor and real-time data in both systems for better control over spend.
Setting Up the Sage Intacct Integration
💡Please note: This integration is a paid add-on, available for purchase if you have the Automation or Enterprise package. For pricing details, please contact your Customer Success Manager.
Additionally, you must have an active Sage Intacct Web Services developer license, which includes a Web Services sender ID and password. To obtain this license, please contact your Sage Intacct account manager.
A single sender ID can be authorized for multiple companies and tracked via an audit history report.
Once you get the license, please follow these simple steps to configure the integration:
Step 1: Obtain Required Credentials
Start by gathering the following Sage Intacct credentials:
-
Company ID
-
Sender ID
-
Sender Password
-
User ID
-
User Password
To get these credentials, create a Web Services user:
-
Go to Company > Admin > Web Services Users and create a new user.
-
Fill in the fields:
-
User ID
-
Last Name
-
First Name
-
Email: Email of the person managing the integration
-
User Name
-
User Type: Business
-
Admin Privileges: Full
-
-
Then, go to Company > Admin > Roles, find the user you just created, and assign a new role with permissions for the data you want to sync.
-
If not already set up, go to Company > Setup > Company, click "Security," and then "Edit." Under Web Services authorizations, click "Add" and enter the Sender ID exactly as provided by Precoro or Sage Intacct team.
💡Please note: For syncing with Precoro, enable full permissions for Company, General Ledger, Inventory Control, and Accounts Payable.
Step 2: Get the API Token
Create an API token:
-
Navigate to the Configurations > Integrations page in Precoro.
-
Click on the API section.
-
Select the Generate API Key button.
-
Save the generated token for future use.
You can find more details on retrieving the API token in this article.
Step 3: Choose Connection Preferences
Decide on how your integration should work:
-
Invoices: Sync approved invoices from Precoro to Sage Intacct.
-
Suppliers: Maintain two-way syncing of supplier information between both platforms.
-
Payments: Update payment statuses automatically in Precoro from Sage Intacct.
-
Departments, GL Accounts, Items, Locations, Projects: Sync these details from Sage Intacct to Precoro for consistent reporting and management.
Step 4: Contact the Customer Success Team
Once you have the setup details ready, reach out to Precoro’s Customer Success team. They will help configure the integration based on your provided preferences.
Frequently Asked Questions
What types of documents can I sync with the Sage Intacct integration?
You can synchronize invoices and supplier information from Precoro to Sage Intacct and update payments, departments, GL accounts, items, locations, and projects from Sage Intacct to Precoro.
How often can the data sync occur?
Choose a sync frequency that fits your workflow, from every 30 minutes to daily or weekly.
How do I see if my documents have been sent to integration?
Please refer to this article to learn more about the integration process and associated statuses.
