TABLE OF CONTENTS
The integration works only with the NetSuite OneWorld account. Here, you can find an overview.
To start setting up Precoro integration with NetSuite, first, you have to get your company credentials from NetSuite and save them on your integration page at Precoro.
The list of the company’s credentials includes:
- Consumer Key
- Consumer Secret
- Token ID
- Token Secret.
Please note that any integration between NetSuite and Precoro depends on your NetSuite process.
Here are some key points that affect integration:
- Purchase Order / Bill form. Every required field in your NetSuite form should exist in Precoro at the same level (document or item/product). If you have duplicated fields in NetSuite and both are required, then you have to set up the same in Precoro.
- If your Purchase Order / Bill items you are required to select catalog items from NetSuite, you have to use an integrated product catalog in Precoro without any “Empty rows” (manually input items) in documents.
- You can integrate only one company in Precoro with one subsidiary in NetSuite. If you have multiple subsidiaries in NetSuite and you want to integrate them, you have to create respective companies in Precoro with the same currencies.
Necessary Settings on the Part of NetSuite*
*Only people with admin roles in NetSuite can perform these actions.
1. Retrieve Account ID
To find your account ID, go to Setup —> Integration —> Web Services Preferences.

Your Account ID will be listed under Account ID. Please copy and forward this information to your Customer Success Manager at Precoro.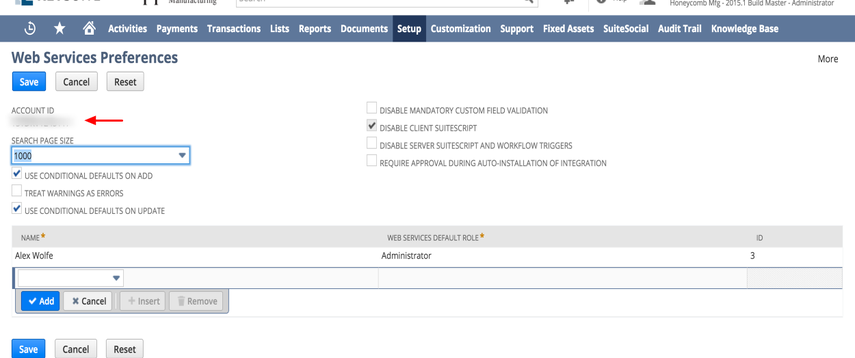
2. Enable Token Based Authentication (TBA), SuiteScript, SuiteTalk (Web Services), and SuiteCloud Development Framework
Make sure that all of these features are enabled in the Company Settings. Go to Setup —> Company —> Enable Features.
Mark the following checkboxes in the SuiteCloud tab:
-
In the SuiteScript section:
1. Client SuiteScript and Server SuiteScript:
Click “I Agree” on the SuiteCloud Terms of Service page. -
In the SuiteTalk (Web Services) section:
1. SOAP Web Services.
2. REST Web Services.
-
In the Manage Authentication section:
1. Token-based Authentication box:
Click “I Agree” on the SuiteCloud Terms of Service page. -
In the SuiteCloud Development Framework section:
1. SuiteCloud Development Framework:Click “I Agree” on the SuiteCloud Terms of Service page.
-
In the Analytics tab:
1. SuiteAnalytics Workbook.
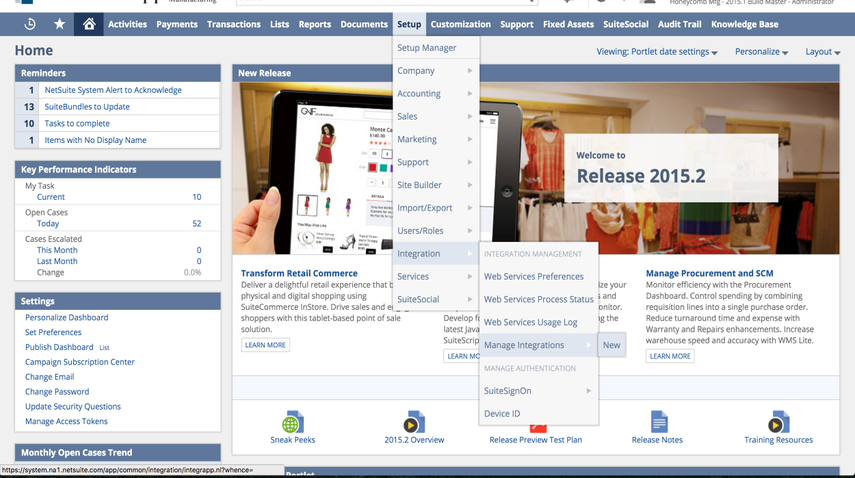
3. Set Up Data Integration
Go to Setup —> Integration —> Manage Integrations —> New.
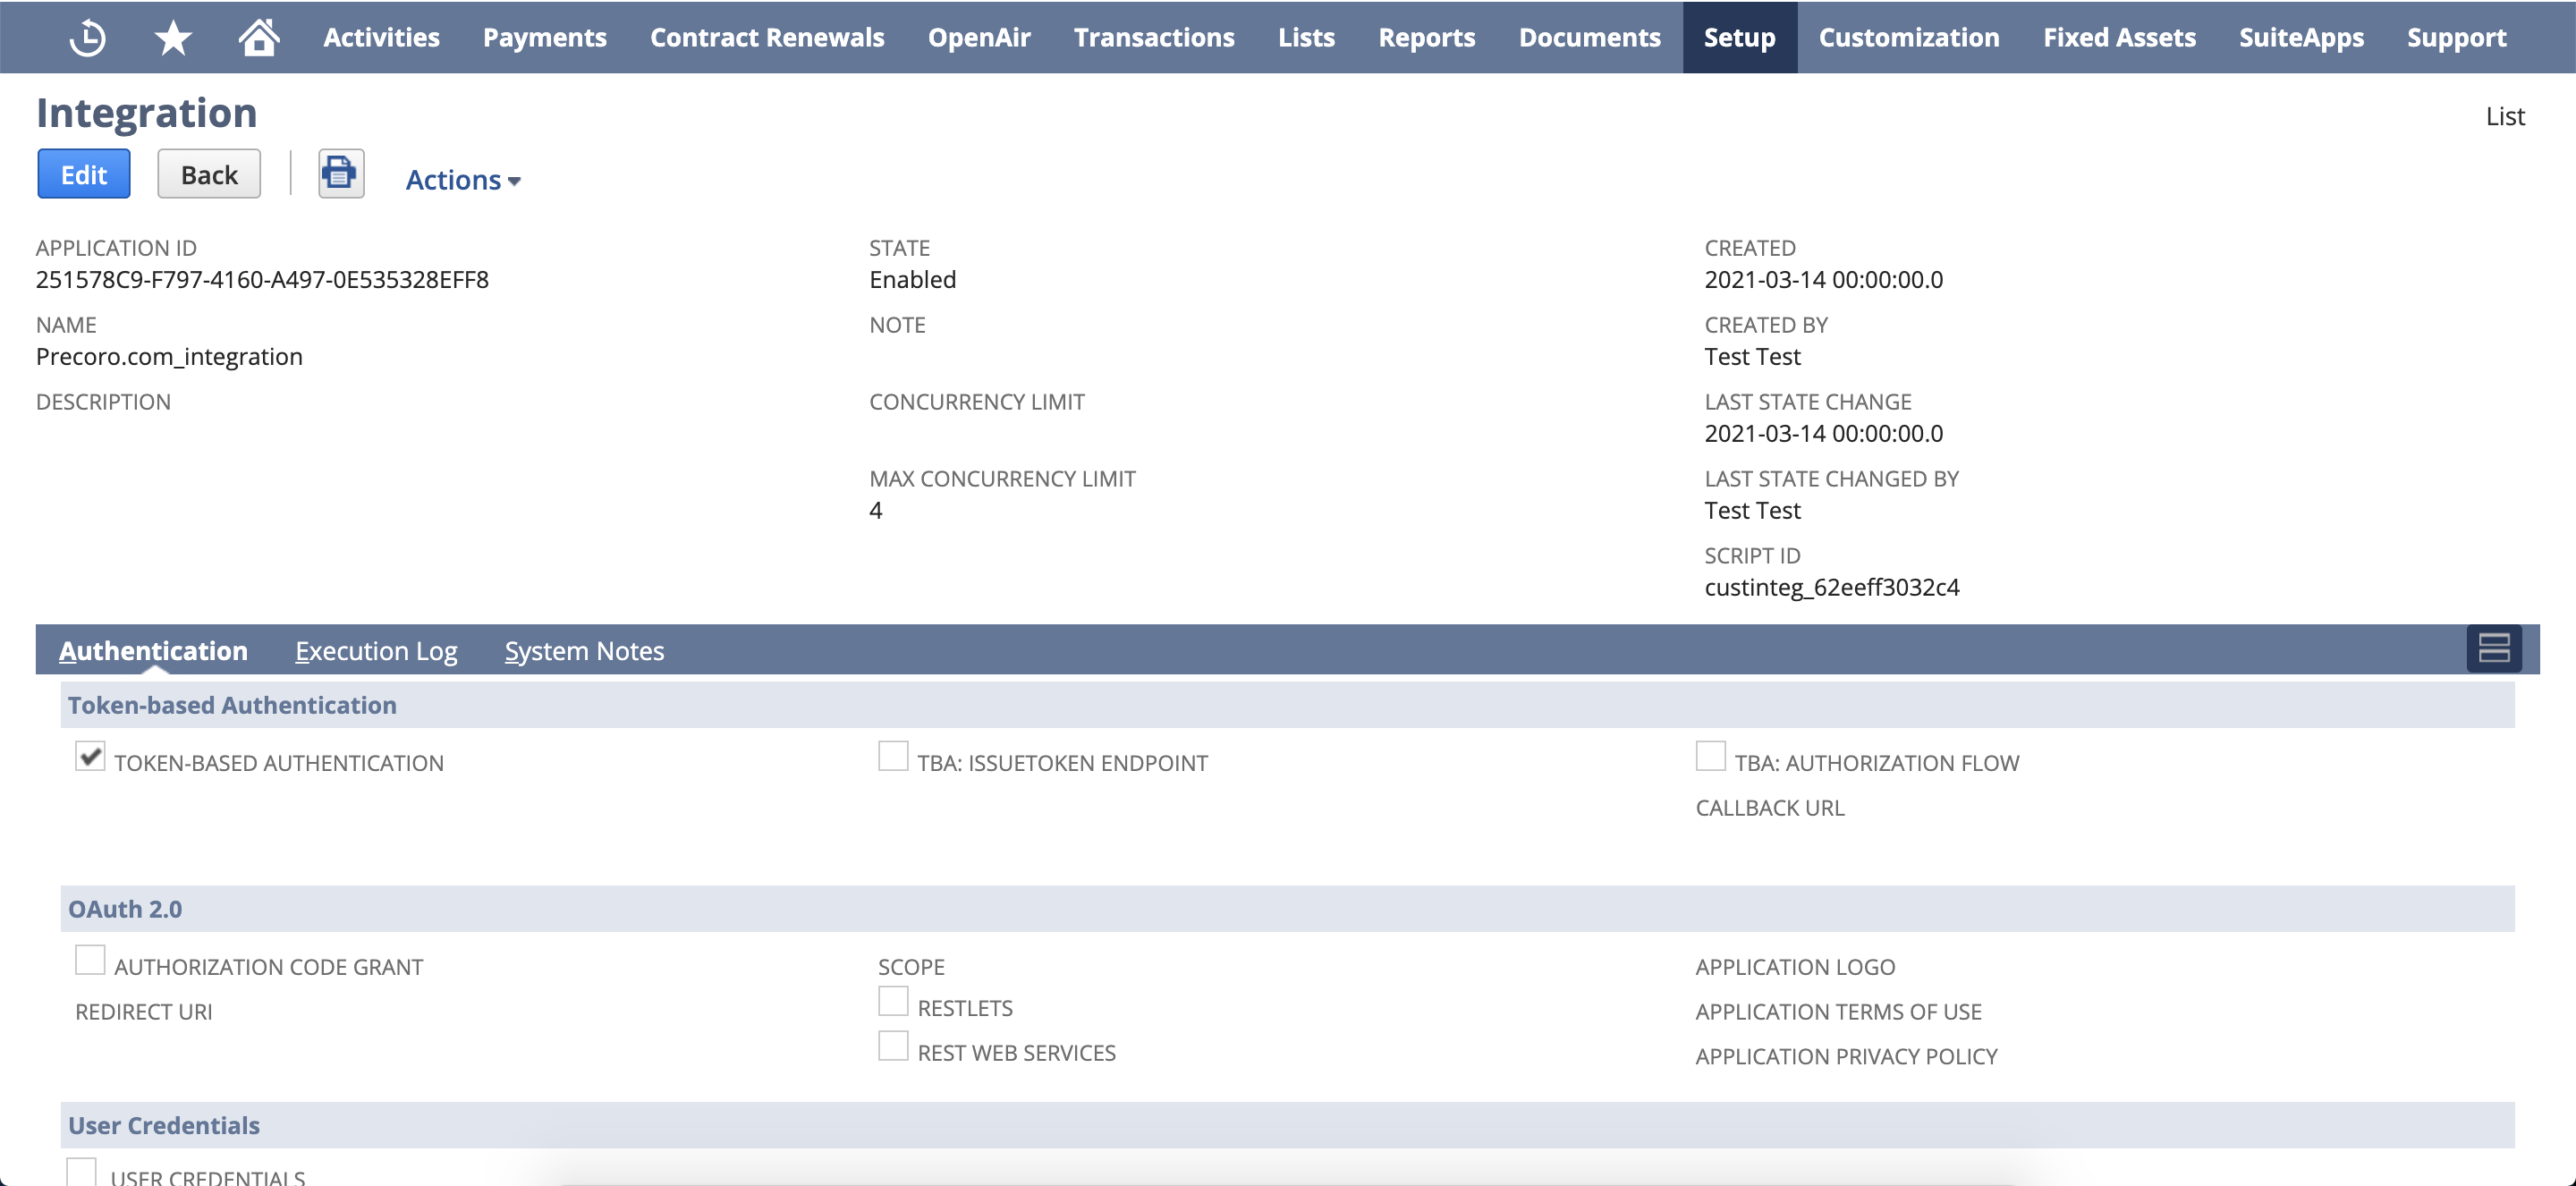
- Create a New Integration:
- Add Precoro as the integration name. Adding a description is optional.
- Make sure the State is enabled.
- Select TOKEN-BASED AUTHENTICATION and make sure that USER CREDENTIALS, TBA: AUTHORIZATION FLOW, and AUTHORIZATION CODE GRANT are not checked.
- Click Save.
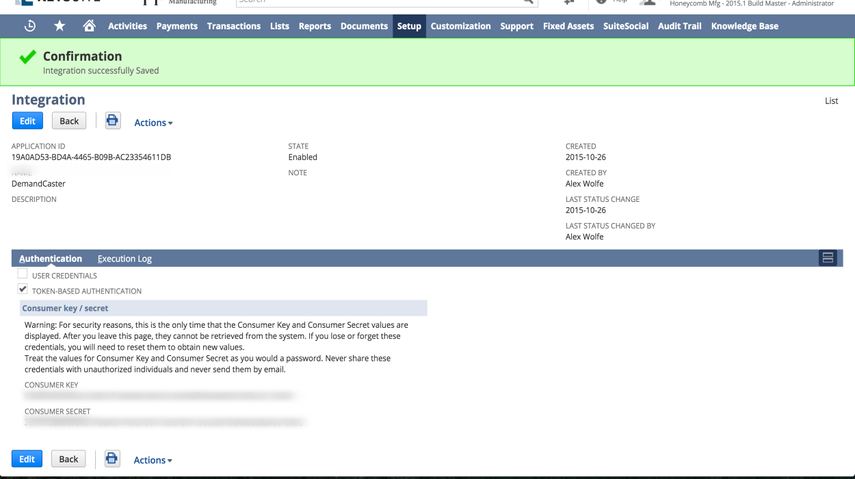
- Copy the Consumer Key and Consumer Secret
The Consumer Key and Consumer Secret will be generated. Please copy the values for each and forward this information to your Customer Success Manager at Precoro since this information will be unavailable.
4. Set the Appropriate Role
Make sure the existing user has access to a relevant role. Please edit the role and add permissions as needed.
Please use an existing user account that will remain active on an ongoing basis. This way, you do not need to add another license.
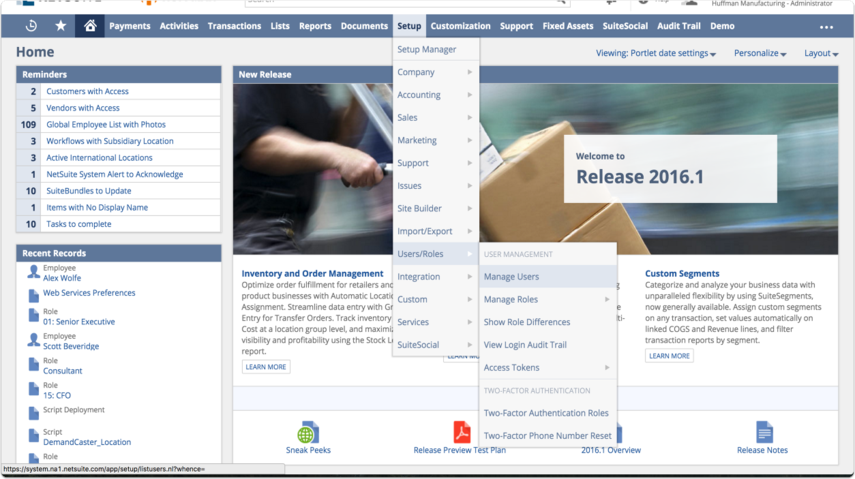
- Go to Setup —> User/Roles —> Manage Users —> Select a user and click Edit.
- Edit Existing Role: Click the Access tab —> click on a role to add permissions.
- Modify Role. Go to the Setup tab —> click Edit at the bottom —> from the drop-down, add the following permissions to the role:
Please note that the user should have access to all of the entities, lists, setups, and report tabs that need to be integrated.
|
Tab
|
Permission
|
Level
|
|
Lists
|
Accounts
|
View
|
|
Lists
|
Classes
|
View
|
|
Lists
|
Currency
|
View
|
|
Lists
|
Departments
|
View
|
|
Lists
|
Documents and Files |
Full
|
|
Lists
|
Items
|
Full
|
|
Lists
|
Locations
|
Full
|
|
Lists
|
Perform Search
|
Full
|
|
Lists
|
Subsidiaries
|
View
|
|
Lists
|
Vendors
|
Full
|
|
Lists
|
Units
|
View
|
|
Lists
|
Tax Records |
Full |
|
Lists
|
Integration Applications
|
Full
|
|
Lists
|
Employees |
Full
|
|
Lists
|
Employee Record |
Full
|
|
Lists
|
Projects |
Full
|
|
Lists
|
Customers |
Full
|
|
Setup
|
Access Token Management
|
Full
|
|
Setup
|
Custom Transaction Fields
|
View
|
|
Setup
|
Custom Transaction Forms
|
View
|
|
Setup
|
Deleted Records
|
Full
|
|
Setup
|
Integration Application
|
Full
|
|
Setup
|
Enable Features
|
Full
|
|
Transactions
|
Access Payment Audit Log
|
Full
|
|
Transactions
|
Bills
|
Full
|
|
Transactions
|
Pay Bills
|
Full
|
|
Transactions
|
Item Receipt
|
Full
|
|
Transactions
|
Purchase Order
|
Full
|
|
Transactions
|
Find Transactions
|
Full
|
|
Transactions
|
Receive Order
|
Full
|
|
Reports
|
SuiteAnalytics Workbook
|
Edit
|
Please note that the accesses listed below are required for the integration to work:
|
Setup
|
SuiteScript
|
Full
|
|
Setup
|
User Access Token
|
Full
|
|
Setup
|
Log in using Access Tokens
|
Full
|
|
Setup
|
REST Web Services
|
Full
|
|
Setup
|
SOAP Web Services
|
Full
|
|
Setup
|
Set Up SOAP Web Services
|
Full
|
|
Setup
|
View SOAP Web Services Logs
|
Full
|
|
Setup
|
Control SuiteScript and Workflow Triggers in Web Services Request
|
Full
|
When updating suppliers, items, departments, or other lists, you might see the following issue, in case you do not have a role “SUITEANALYTICS WORKBOOK” under the reports tab:
-png.png) To fix this problem:
To fix this problem:
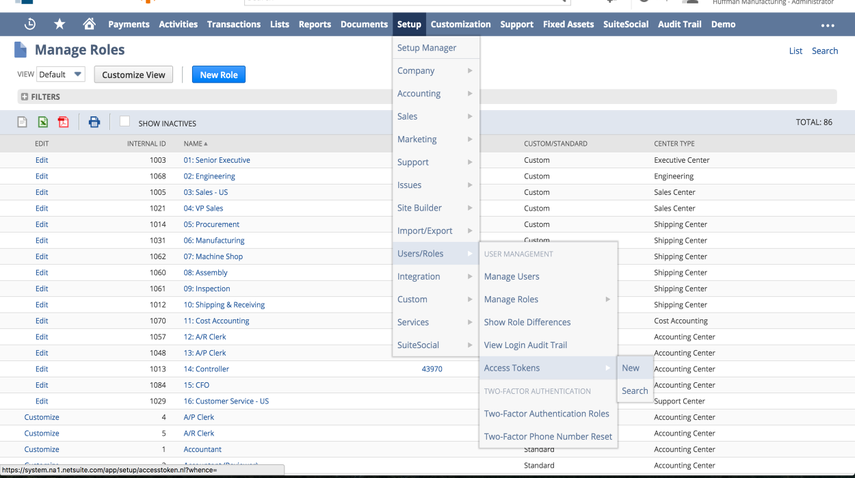
- Go to Setup —> Manage Users —> User/Roles —> Manage Roles —> select a role that should be used for your Precoro-NetSuite integration* and open to edit.
*You can see this role on the Access Token page. - Add the role “SUITEANALYTICS WORKBOOK” under the Permissions —> Reports tab and click the Save button.
Please refer to this article if you have questions or issues with the integration.
5. Create Access Token
Once the permissions are added to the user, go to Setup —> Users/Roles —> Access Tokens —> New.
Select Precoro Data Integration to apply the Access Token
2. From the drop-down list, select the USER account that will be available for the integration.
3. Enter the user ROLE (previously edited role).
4. The TOKEN NAME will be generated.
5. Click Save.
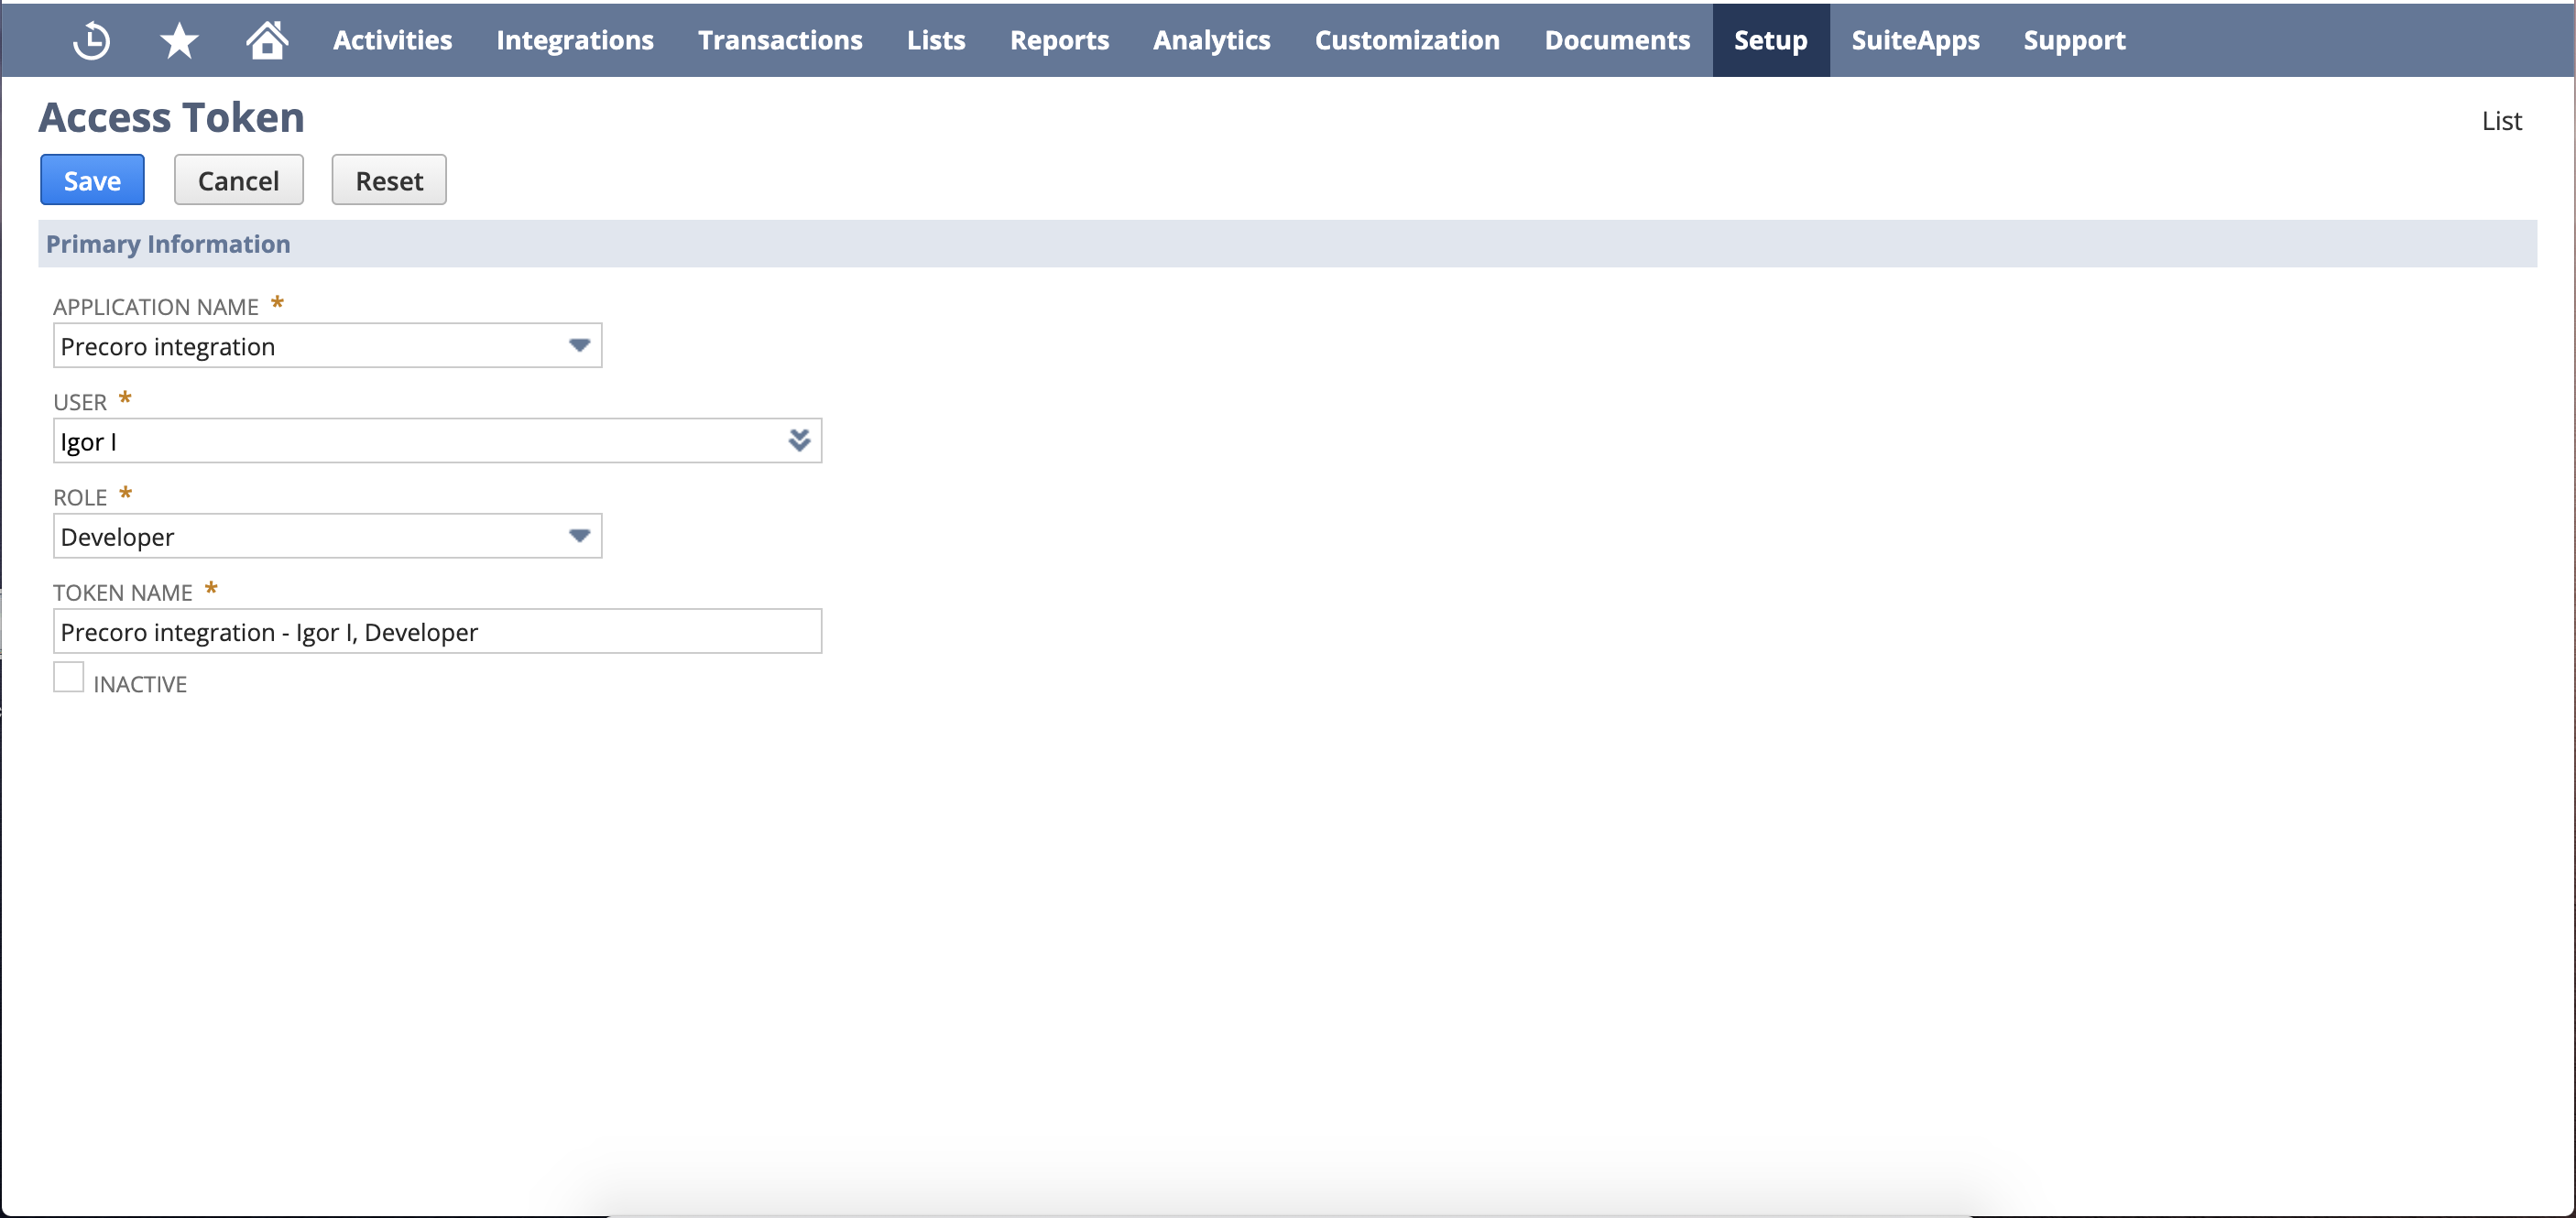
Find the TOKEN ID and TOKEN SECRET on the shown page, copy the values, and send them to your Customer Success Manager at Precoro.
Please note that these values will be available only once on this page.
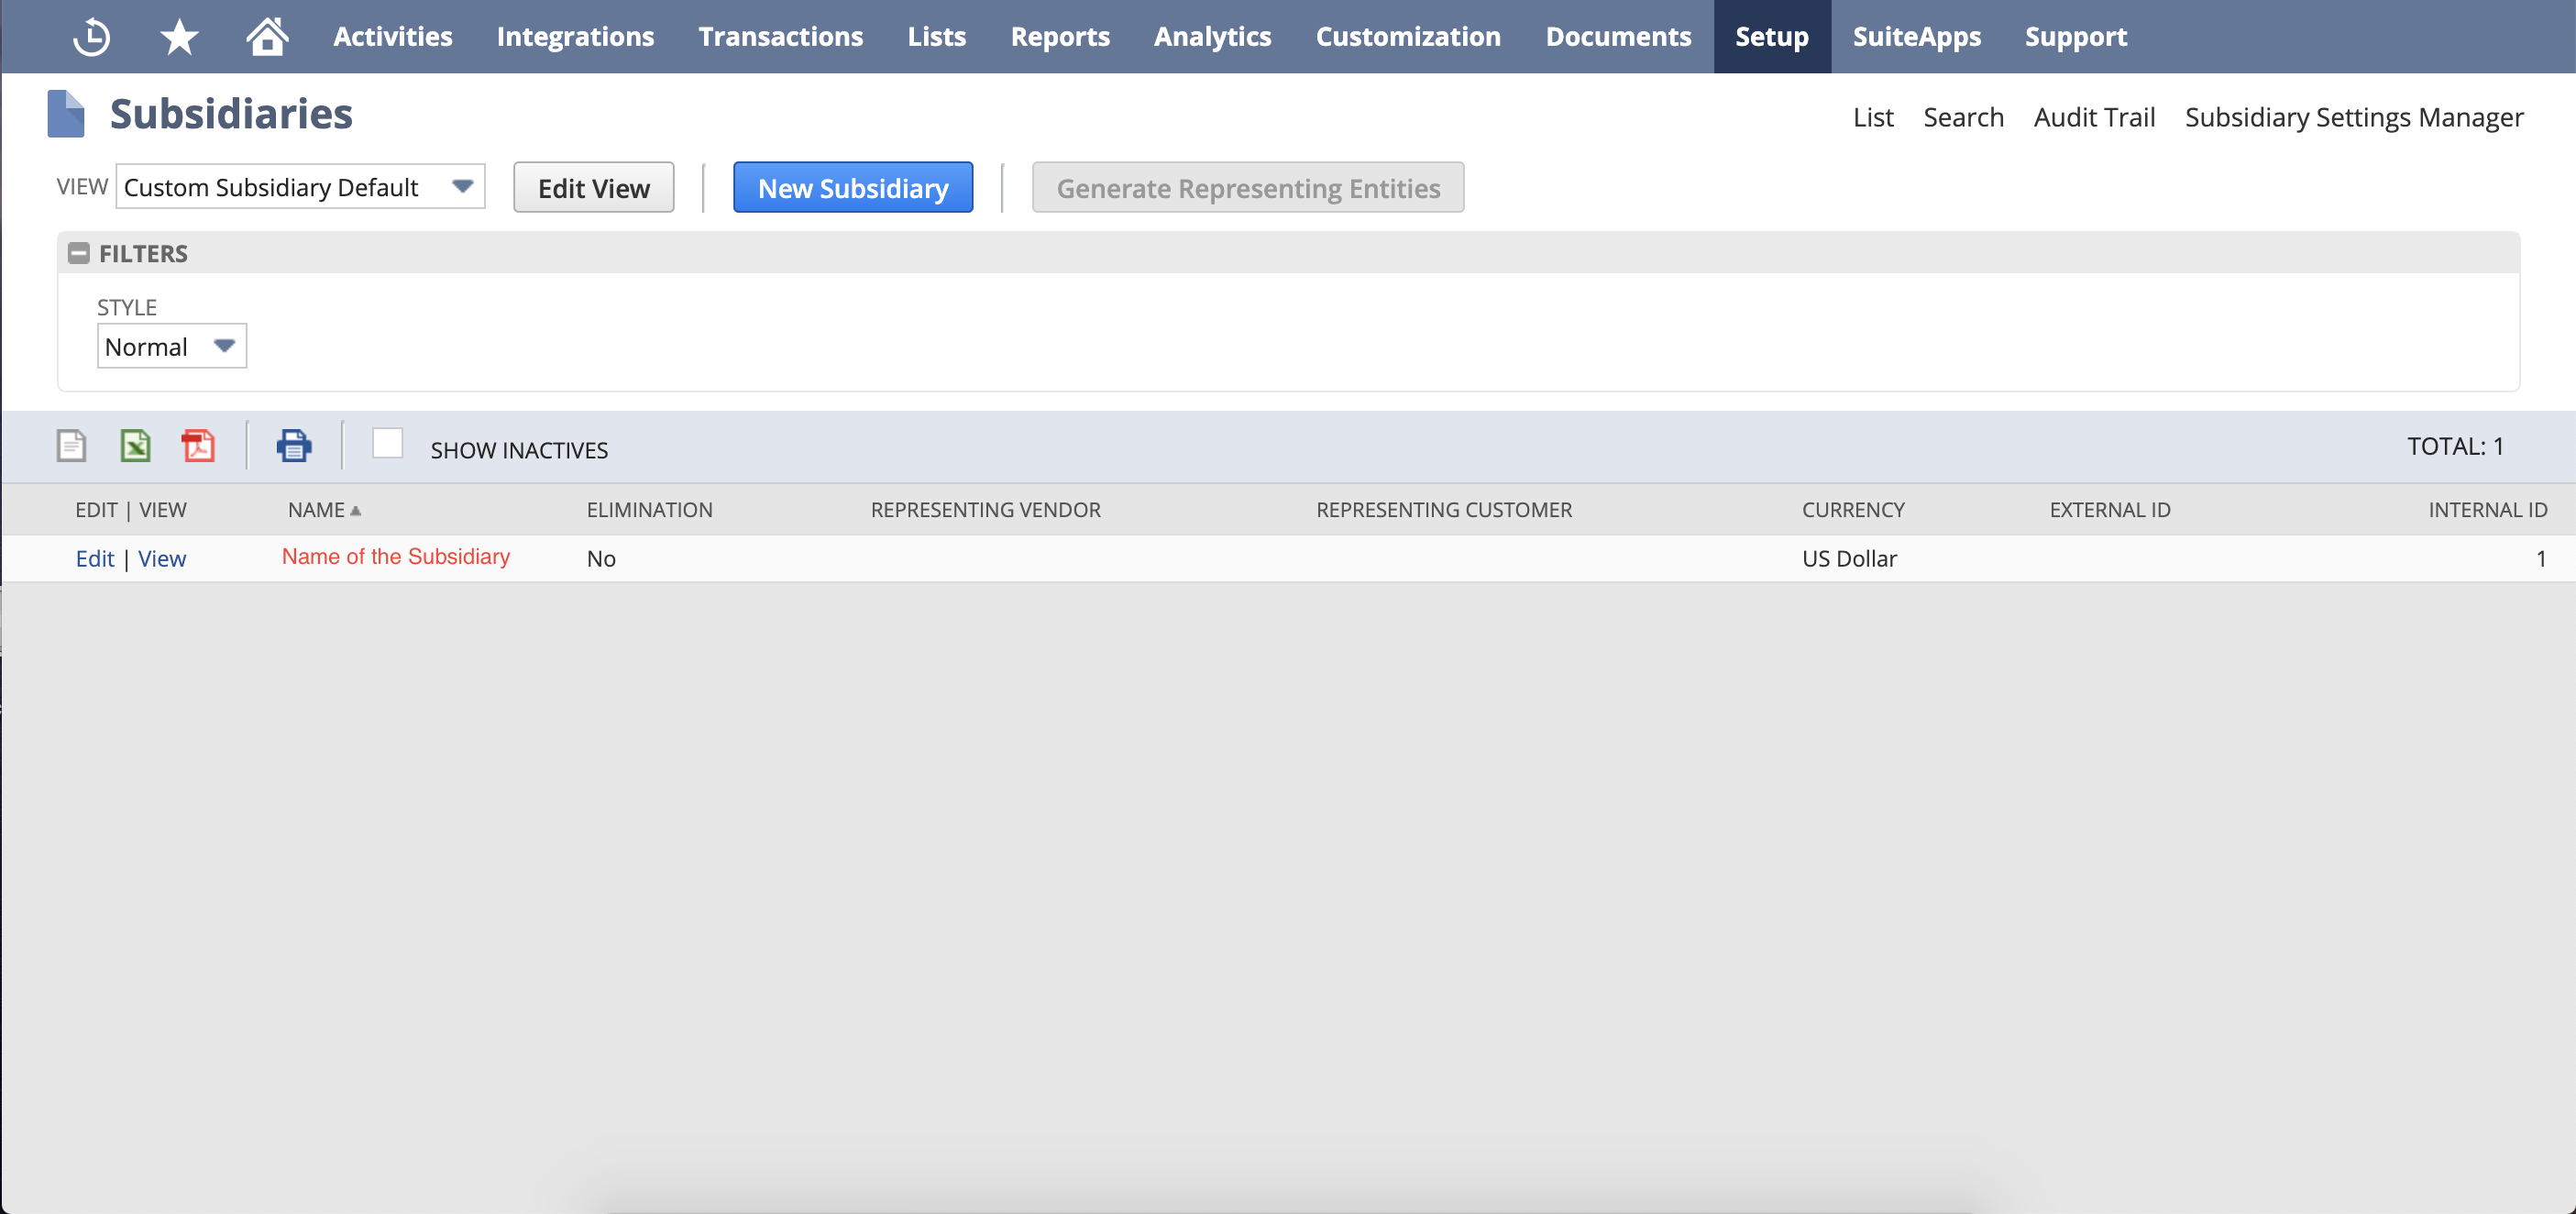
6. Find Your Subsidiaries and Export or Copy Them along with the Internal IDs and Currency

7. Send the Data to Your Precoro Customer Success Manager
Send email to your Customer Success Manager at Precoro with the following copied data:
- Account ID
- Consumer Key
- Consumer Secret
- Token ID
- Token Secret
- Subsidiary ID
- Available Currency.
Next Steps
Get more information on working with integration from this FAQs article.
Minimize Data Discrepancies
During the integration setup stage make sure your general information coincides within both systems Precoro and NetSuite to avoid potential problems during data updates.
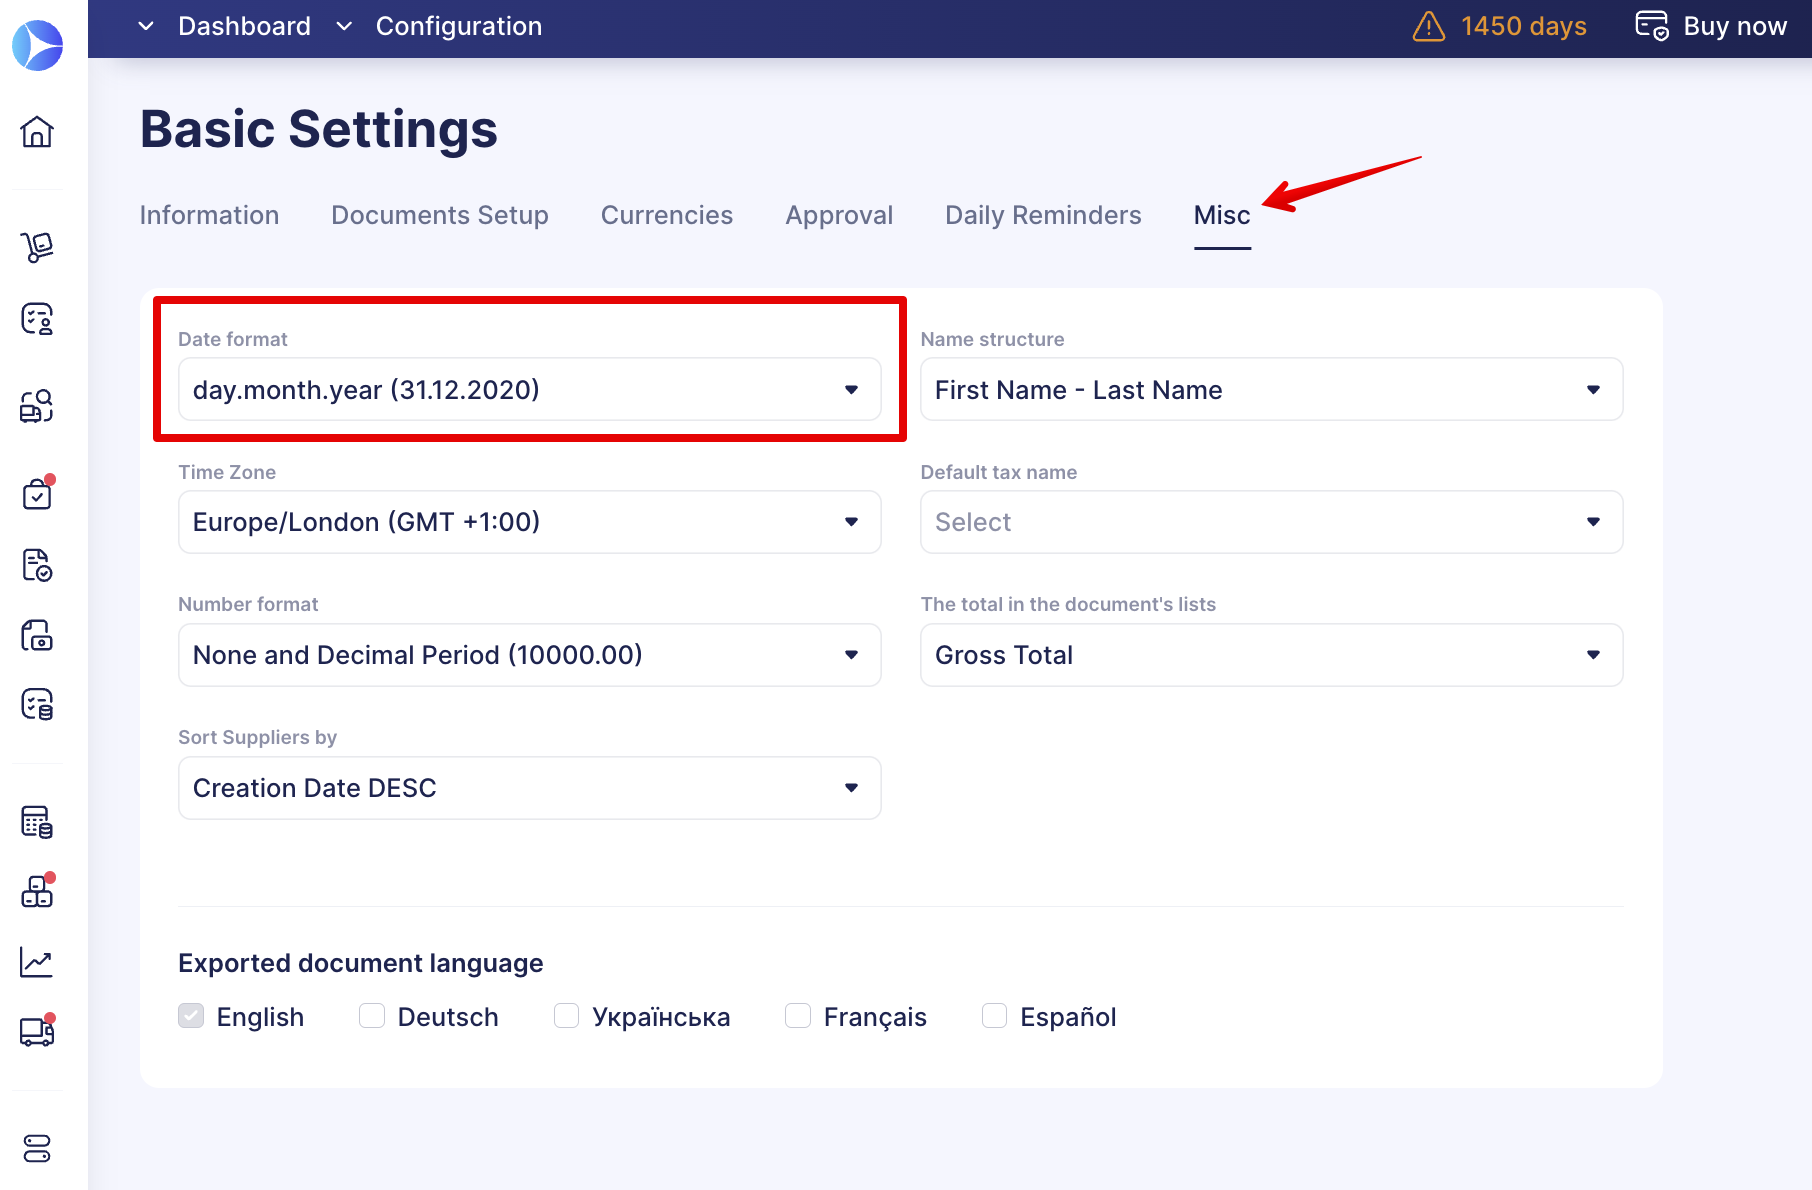
Choose Equivalent Date Formats
Make sure you have the exact Date Formats in both systems.
In NetSuite, open the Setup → Company → General Preferences → Date Format.
-png-1.png)
In Precoro, go to the Configuration → Basic Settings → Misc → Date Format.
Choose Equivalent Time Zones
To send and synchronize documents correctly, make sure you have the exact Time Zones in both systems.
In NetSuite, open the Set Preferences → Time Zone.
-png.png)
In Precoro, go to the Configuration → Basic Settings → Misc → Time Zone.
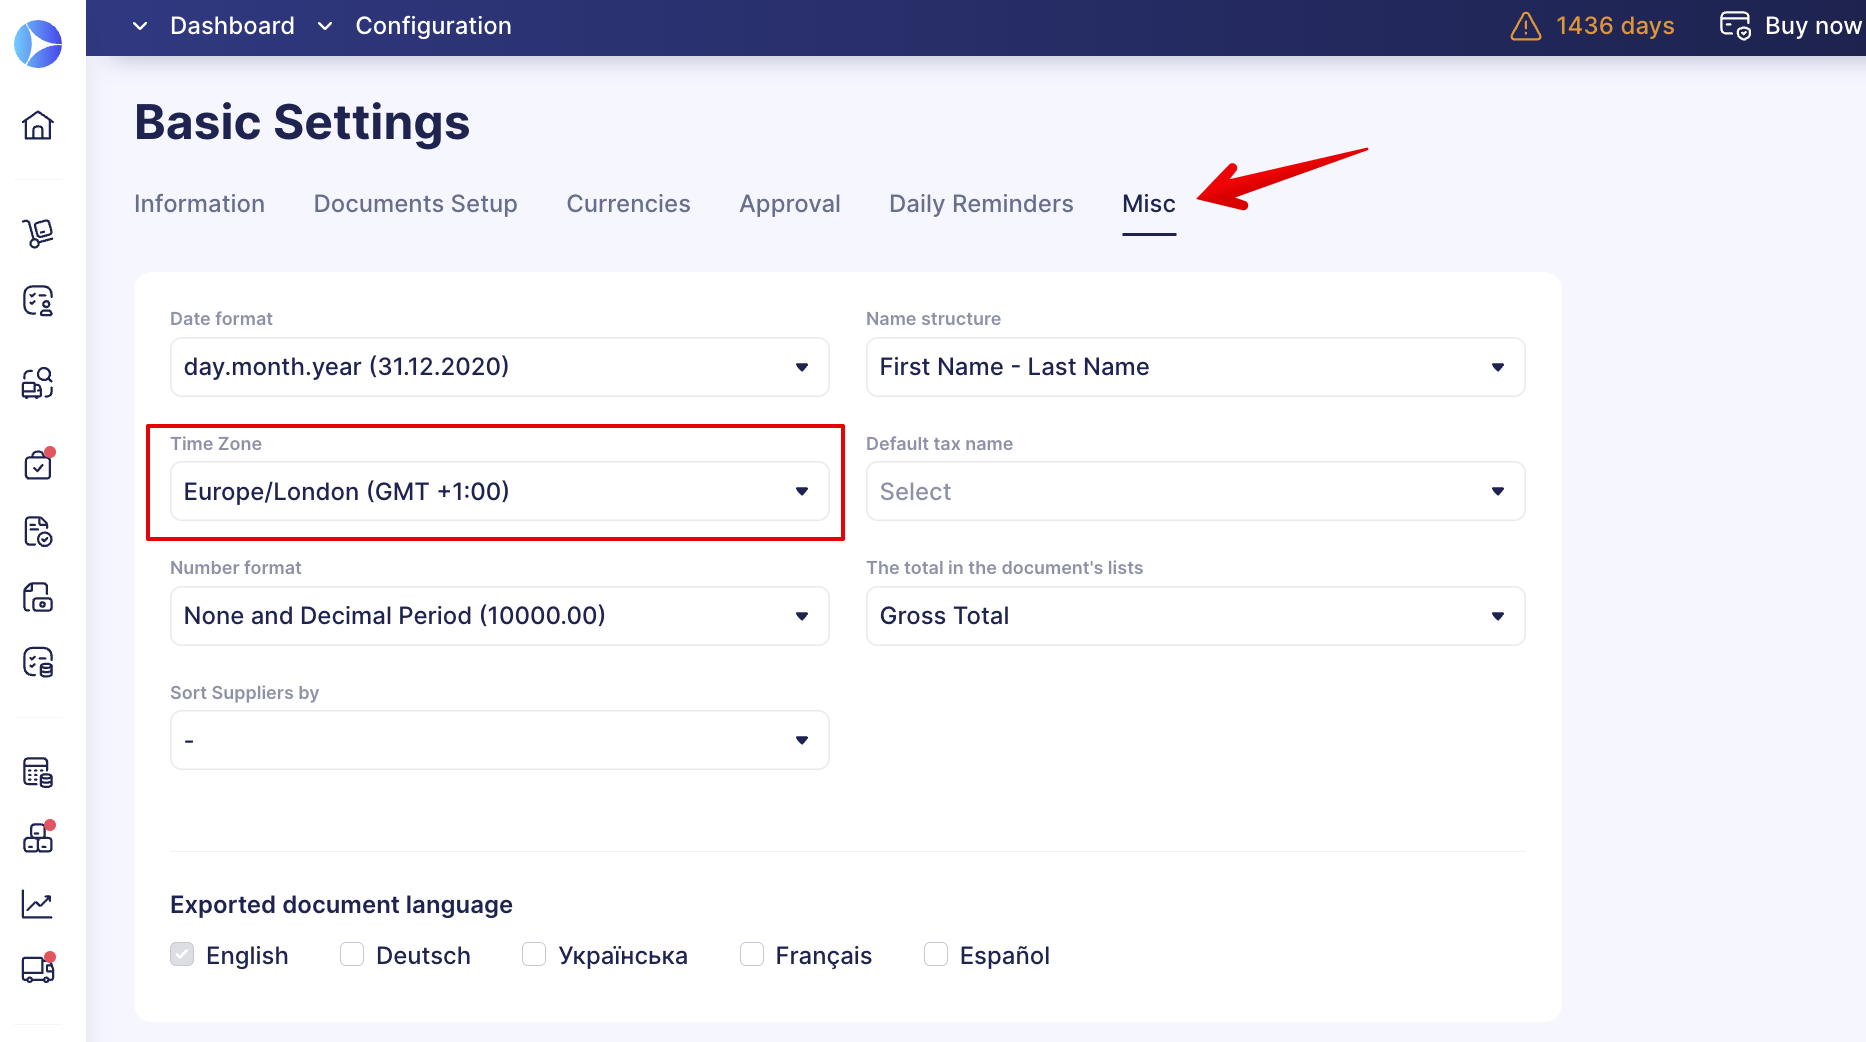
If the Times Zones do not match, the documents will be sent with the wrong date. Please take this into account when configuring your settings.