TABLE OF CONTENTS
- How Can I Integrate Document Numbers (PO #, Invoice #) Between Precoro and NetSuite?
- How Can I Reconnect a Disconnected NetSuite Integration?
- How Do I Fix the “Transaction Date Outside Accounting/Posting Period” Error?
- How Do I Troubleshoot Permission Errors in NetSuite Integration?
- Why Do I Receive the “Document Cannot Be Cancelled in NetSuite” Email?
- What Will Be the Posting Period in NetSuite If the Document Is Sent Later than Its Issue Date?
- How Can I Find Available Permissions for the Precoro Integration Role?
- How Do I Change the User Responsible for NetSuite SuiteApp Integration?
- How Can I Check the Available Classes, Locations, and Departments for a Subsidiary?
- What Happens If I Edit Accounts or Add a New Account in NetSuite?
- Сan I Delete the Integrated Options (Chart of Accounts/Classes/Projects)?
- Can I Add an Integrated Supplier to the Supplier Portal?
- How Does the Time Zone in My Precoro and NetSuite Accounts Affect the Document?
- How Do I Enable the “Allow Expenses on Purchases” Feature in NetSuite?
- What Happens If I Delete an Item from a Purchase Order in Precoro After It’s Been Received in NetSuite?
- How Do I Fix the “An nlobjSearchColumn contains an invalid column” Error During Synchronization?
- Can Number Formatting for Prices and Totals Differ Between Precoro and NetSuite?
- Why Do I See the “Precoro SuiteApp Installed in Your NetSuite Account Is Outdated. Please Contact Your Account Administrator To Update It.” Error?
How Can I Integrate Document Numbers (PO #, Invoice #) Between Precoro and NetSuite?
To send custom or auto-generated document numbers (like Purchase Order # or Invoice #) from Precoro to NetSuite, you’ll need to adjust settings in your NetSuite account:
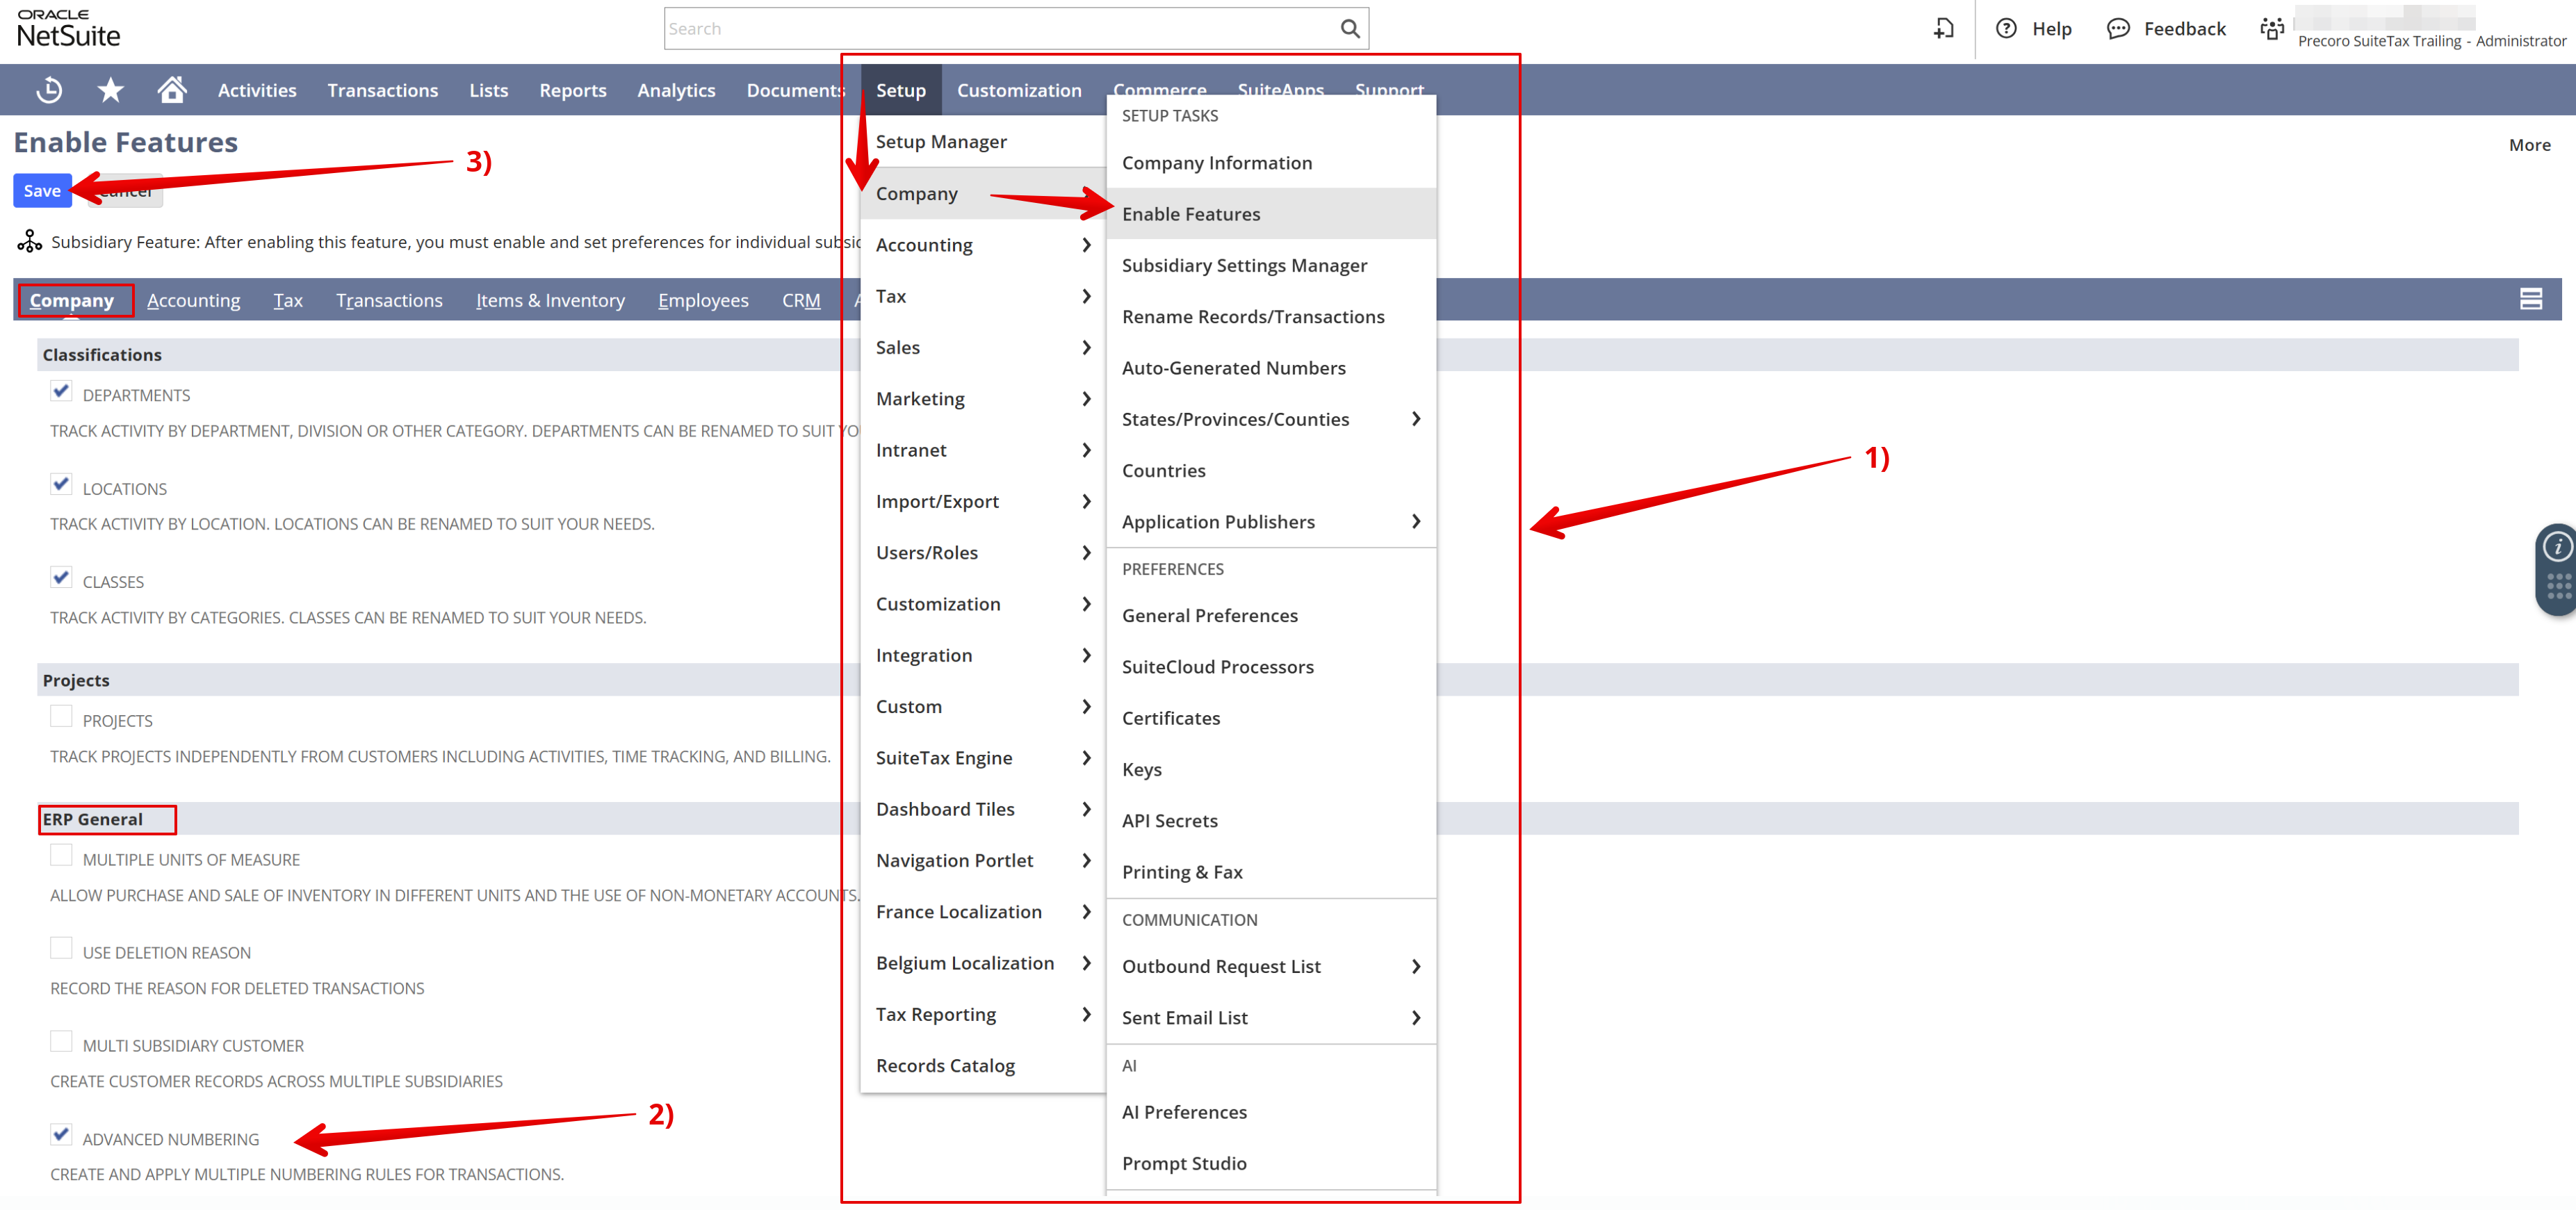
Step 1: Enable Advanced Numbering
- Navigate to Setup → Company → Enable Features.
- Open the Company tab → ERP General section.
- Enable the Advanced Numbering checkbox.
- Click Save to record the changes.

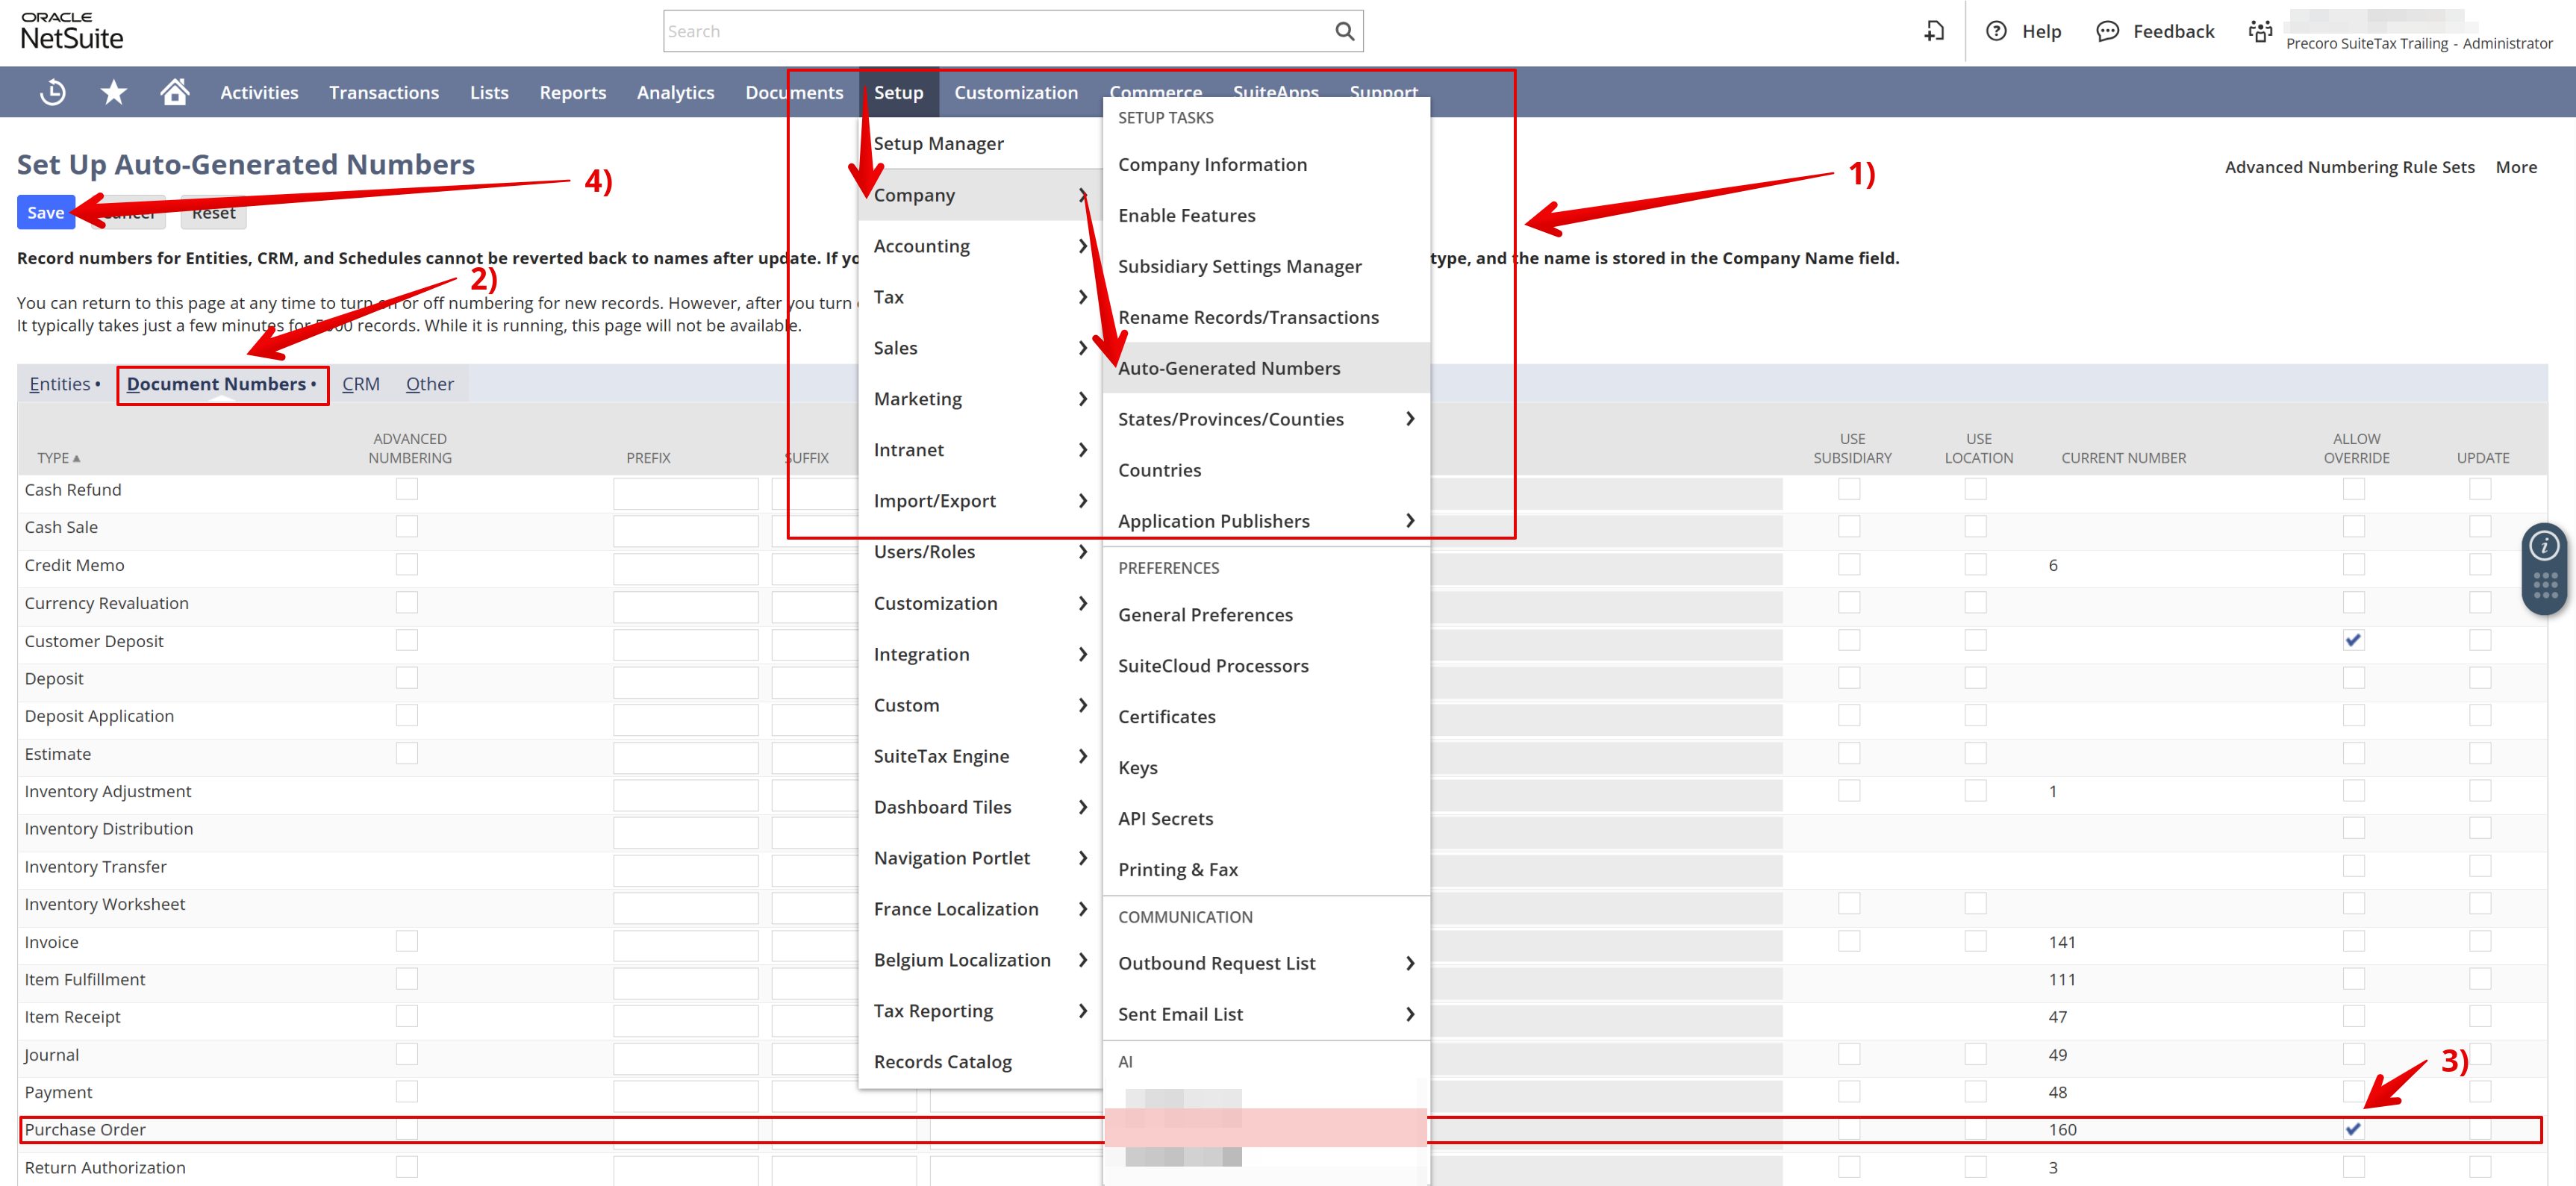
Step 2: Allow Number Overrides
- Navigate to Setup → Company → Auto-Generated Numbers.
- Open the Document Numbers tab.
- Locate the document type you’ll send from Precoro (e.g., Purchase Order or Invoice) → enable the Allow Override checkbox next to it.
- Click Save to record the changes.

Step 3: Adjust Transaction Forms
- Go to Customization → Forms → Transaction Forms.
- Locate the form used for Purchase Orders or Invoices (Bills) → click Customize or Edit button.
- Open the Screen Fields tab → set the Display Type for PO # to Normal.
- Click Save to record the changes.
Here’s how the integration works for POs and Invoices:
- If you use a custom PO number in Precoro, that number will be sent to NetSuite.
- If no custom number is set, the auto-generated PO number from Precoro will be used.
- If the Supplier Invoice Number is entered in Precoro, it will be sent to NetSuite.
- If there’s no Supplier Invoice #, but a custom Invoice # exists, the custom one will be sent.
- If neither is provided, NetSuite will receive the auto-generated Invoice # from Precoro.
How Can I Reconnect a Disconnected NetSuite Integration?
If your NetSuite integration is disconnected, follow these steps to restore the connection:
- Ensure the integration user is active in your NetSuite account.
- Confirm the user has the Precoro Integration Role assigned.
- Verify that both the Access Tokens and the Precoro Integration record are active in NetSuite.
- Check if all required NetSuite features for the integration are enabled.
- Update your NetSuite configuration settings in Precoro.
For step-by-step instructions, refer to our How to Set Up NetSuite SuiteApp Integration guide.
💡Please note: Documents and integrated lists don’t sync while the connection is inactive. Once you restore the connection, the data synchronization will be resumed.
How Do I Fix the “Transaction Date Outside Accounting/Posting Period” Error?
💡Please note: In NetSuite, no general ledger-impacting changes can be made to posting transactions within a closed period. To apply such changes, the period must first be reopened. Check the Reopening a Closed Period NetSuite guide.
The “Transaction date outside accounting/posting period” error typically occurs in the following cases:
- When a document is created with a Receipt Date or Issue Date that falls within a closed accounting or posting period.
- When AP transactions for that period have already been locked.
In such cases, NetSuite automatically assigns the transaction to an open period. As a result, the original document date no longer aligns with the posting period.
There are three ways to resolve the issue:
How Do I Troubleshoot Permission Errors in NetSuite Integration?
When importing any list, ensure that the Precoro Integration Role holder in NetSuite has the necessary permissions to access that specific list. Otherwise, an error may occur.
To fix the permission error:
- In NetSuite, navigate to Setup → Users/Roles → Manage Roles.
- Click Edit next to the Precoro Integration Role.
- In the Permissions → Lists section, locate the required list.
- Set the access level to Full → Click OK and Save to record the changes.
💡Please note: If you face an error when importing custom segments, please check that the role has permissions for both Custom Segments/Record Types and the specific custom segment. Find more information here.
How Do I Fix the “Insufficient Permission” Error When Sending Documents to NetSuite?
The “Insufficient Permission” error is typically caused by custom workflows in your NetSuite account.
When you add or update a document, it triggers a workflow that requires additional permissions not currently assigned to the Precoro Integration Role. As a result, the error occurs.
To resolve the issue:
- Review the error message to determine the custom record type that requires permission. For instance: “You need a higher permission for custom record type [Record Name] to access this page.”
- Then go to Setup → Users/Roles → Manage Roles.
- Click Edit next to the Precoro Integration Role.
- Navigate to Permissions → Custom Record.
- Add the required custom record type → set the access level to Full.
- Click Add and Save to record the changes.
How Do I Fix the Tax Details Tab Permission Error When Sending Documents to NetSuite?
You may encounter the following permission-related error when sending a document: "A User Error Has Occurred: Permission Violation: You need the 'Lists -> Tax Details Tab' permission to access this page."
This error indicates that the user or role used for sending documents lacks the necessary permissions to access the Tax Details Tab, which is required by NetSuite's tax calculation engine (SuiteTax).
To resolve this issue, follow these steps:
Step 1: Grant Role-Based Access
-
Go to Setup → Users/Roles → Manage Roles.
-
Select the Precoro Integration Role.
-
On the Permissions → Lists tab, find Tax Details Tab and set the access level to Full, then save the changes.
Step 2: Add Global User Access (if the problem persists)
-
Go to Setup → Users/Roles → Manage Users.
-
Select the user who encountered the error.
-
On the Global Permissions tab, add the Tax Details Tab with Full access.
Why Do I Receive the “Document Cannot Be Cancelled in NetSuite” Email?
If there is an issue while attempting to cancel a document in NetSuite, you’ll receive a call-to-action email from Precoro.
The email states that the document was successfully canceled in Precoro, but could not be removed from NetSuite due to one of the following reasons:
- The transaction is linked to other transactions in NetSuite.
- The transaction’s G/L impact falls within a closed accounting period and cannot be changed.
Please check the document log in Precoro for more details. You may need to review and resolve the issue directly in NetSuite to complete the cancellation.
What Will Be the Posting Period in NetSuite If the Document Is Sent Later than Its Issue Date?
The posting period in NetSuite is determined by the Issue Date in Precoro.
For example, if an invoice or a PO in Precoro has an Issue Date in April but is approved and sent to NetSuite in May, NetSuite will attempt to post the transaction in the April period.
However, if that period is closed, one of the following will happen:
- If the “Allow Transaction Date Outside of Posting Period” setting is not enabled in your NetSuite Accounting Preferences, Precoro will return an error, and the document won’t be exported.
- If enabled, NetSuite will follow your configuration under the “Default Posting Period When Transaction Date in Closed Period” setting:
- Current Period (set by default): Posts the transaction to the current open period.
- First Open Period: Posts the transaction to the first available open period after the closed one.
- Current Period (set by default): Posts the transaction to the current open period.
How Can I Find Available Permissions for the Precoro Integration Role?
Follow these steps to locate the available permissions:
- In NetSuite, go to Setup → Users/Roles → Manage Roles.
- Click Edit next to the Precoro Integration Role.
- Scroll down to the Permissions section and check what permissions are applied to this role.
How Do I Change the User Responsible for NetSuite SuiteApp Integration?
To change the admin for your NetSuite integration, please follow the steps explained below. Before you start, ensure you have the Administrator role assigned in NetSuite and Configuration access in Precoro.
💡Pro tip: We recommend assigning the Precoro Integration Role to a generic system user (a dedicated account created for integrations) rather than a specific employee's personal account. This ensures the connection remains active even if the employee leaves the company or switches roles.
Step 1: Assign the NetSuite role
The new admin needs the necessary role and permissions in your NetSuite account.
- Navigate to Lists → Employees → Employees.
- Click Edit on the active user profile you wish to use for the integration.
- Open the Access tab.
- In the Roles list, assign the Precoro Integration Role to this user.

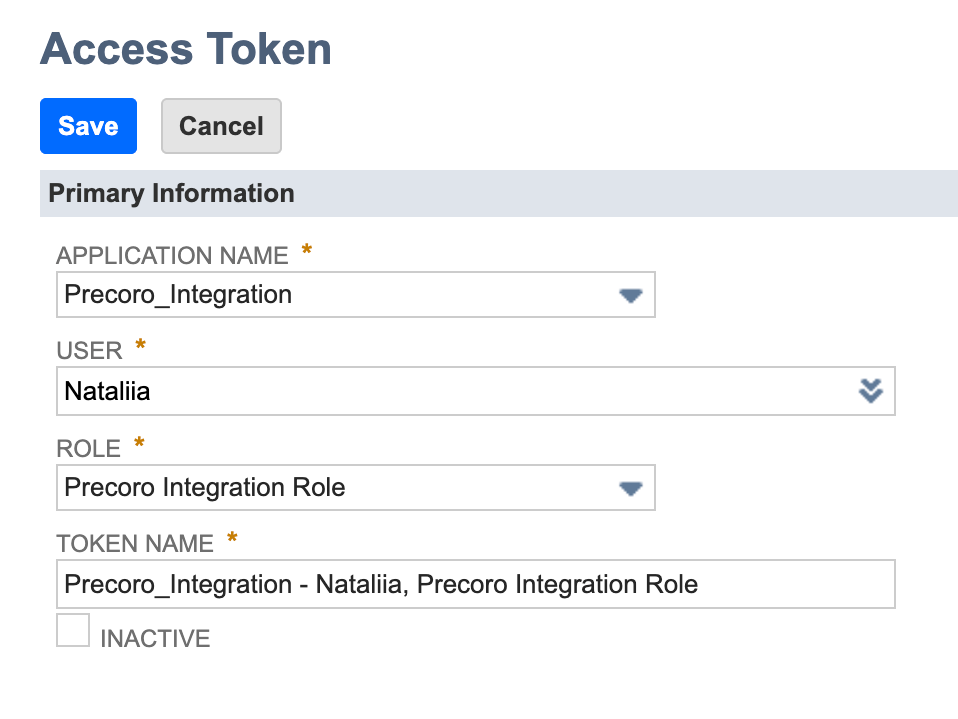
Step 2: Create a new Access Token
Generate new security keys for this user.
- Go to Setup → Users/Roles → Access Tokens → New.
- Select the Application Name (if you can't find it, check the correct name in Setup → Integration → Manage Integrations).
- Select the User you assigned the role to in Step 1.
- Select the Role (Precoro Integration).
- The Token Name field will populate automatically.
- Click “Save”.
❕Important: Once you click Save, look at the bottom of the screen. Make sure to copy the Token ID and Token Secret right away. You won't be able to view these credentials again after leaving the page.
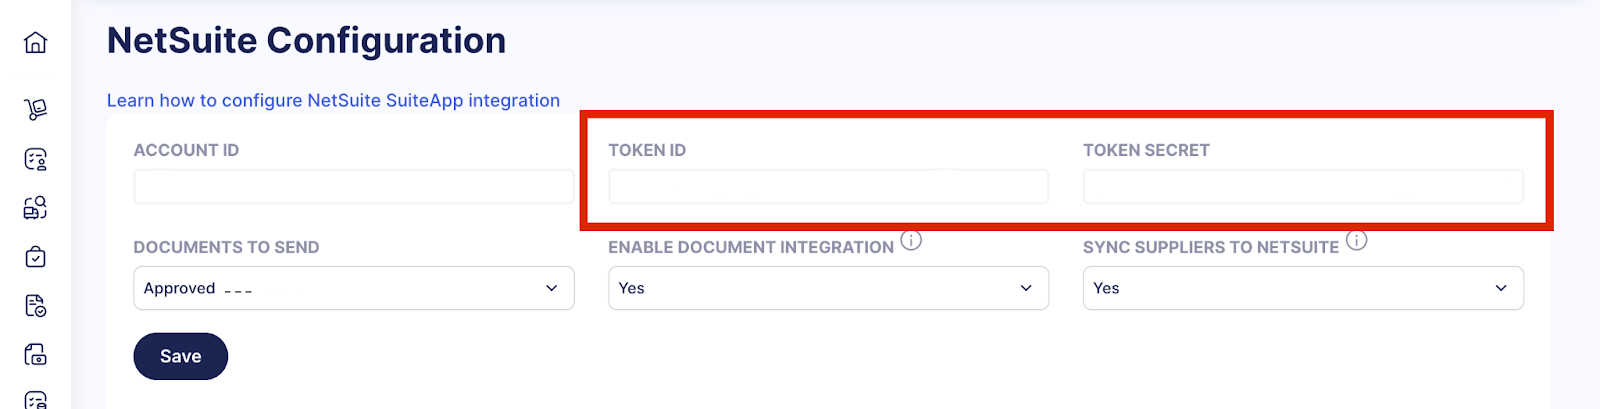
Step 3: Update the tokens in Precoro
Replace the old credentials in Precoro to restore the connection.
- Log in to Precoro and navigate to Configuration → Integrations → NetSuite Configuration.
- Enter the new Token ID and Token Secret into the corresponding fields.
- Click Save to confirm the changes.
Please note: If you have multiple legal entities connected, ensure you update the tokens for each entity separately.
Step 4: Get the SuiteApp Token
Since the SuiteApp token is linked to the specific Precoro user who generated it, the token needs to be regenerated to ensure stability under the new administrator.
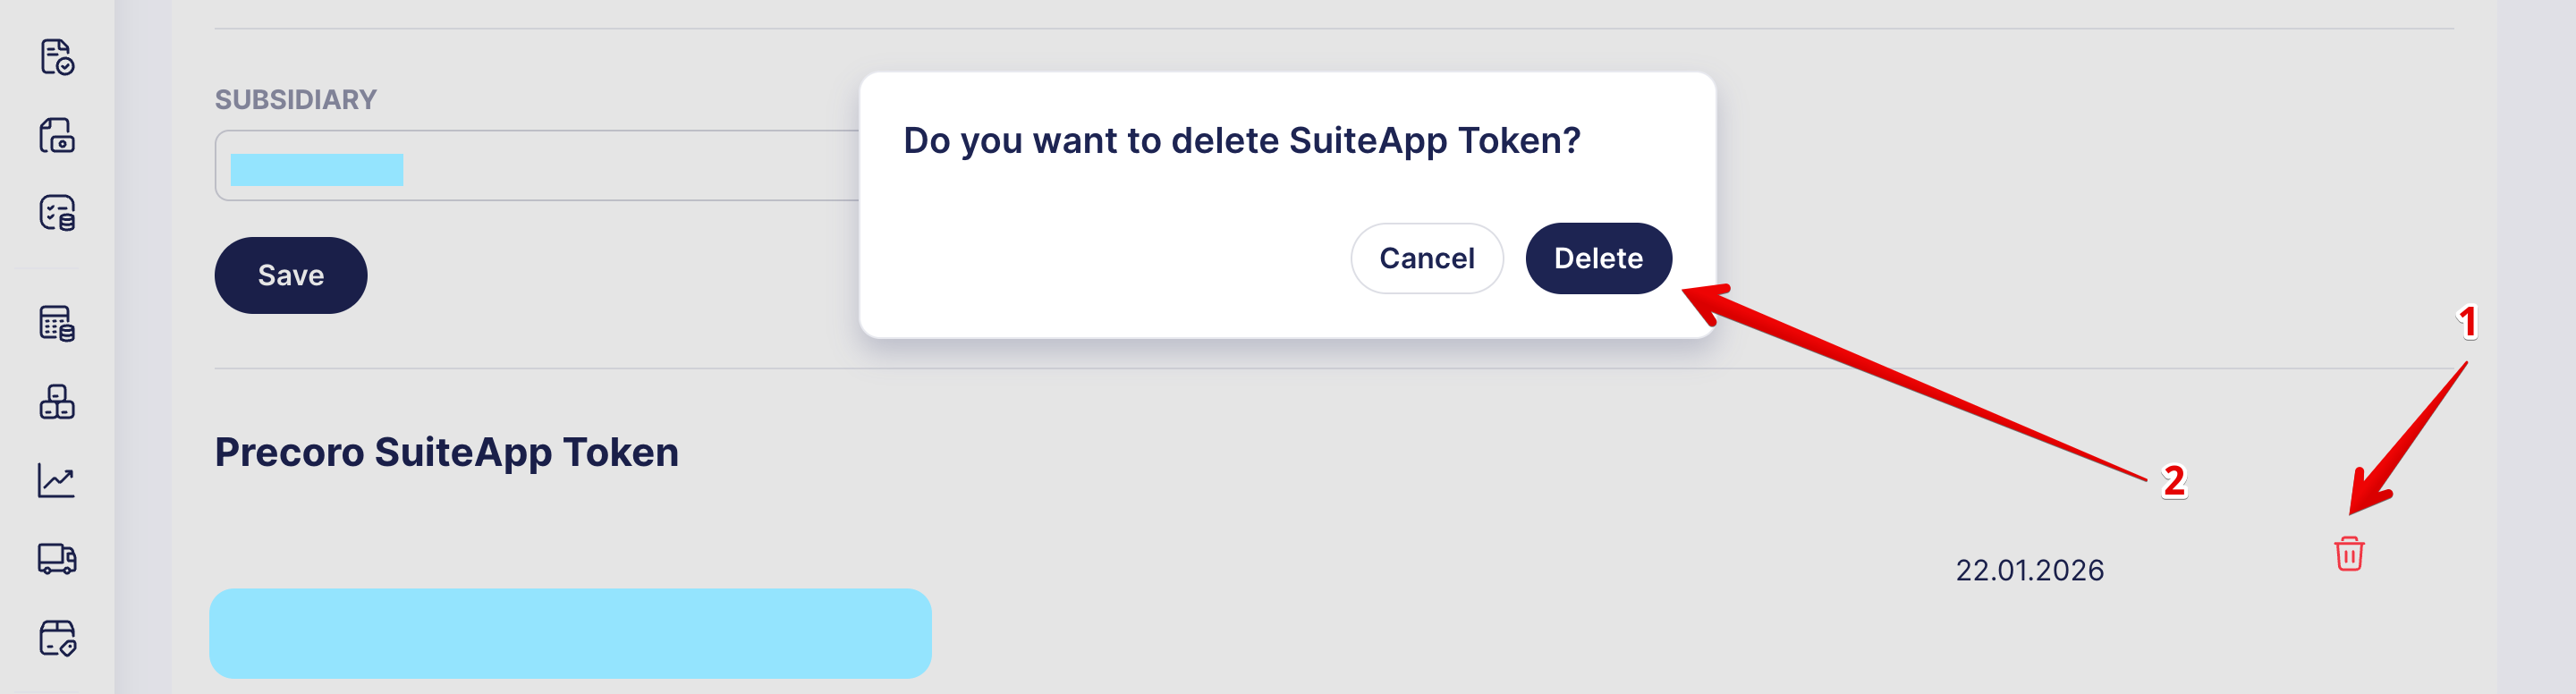
1. Delete the old SuiteApp token.
In Precoro, please navigate to Configuration → Integrations → NetSuite.
Locate the SuiteApp Token field. Click the Delete icon (trash bin) next to the current token to remove it.
2. Generate a new SuiteApp token.
Once the field is empty, the Create SuiteAppToken button will appear. Click it to generate a new token.
Copy the newly generated token, as you’ll need it on the NetSuite side.

Step 5: Apply Changes on the NetSuite Side
1. Log in to NetSuite and switch your role to Precoro Integration Role.
2. Navigate to Precoro → Configuration → Integrations.
You’ll be redirected to the Integration Management page.
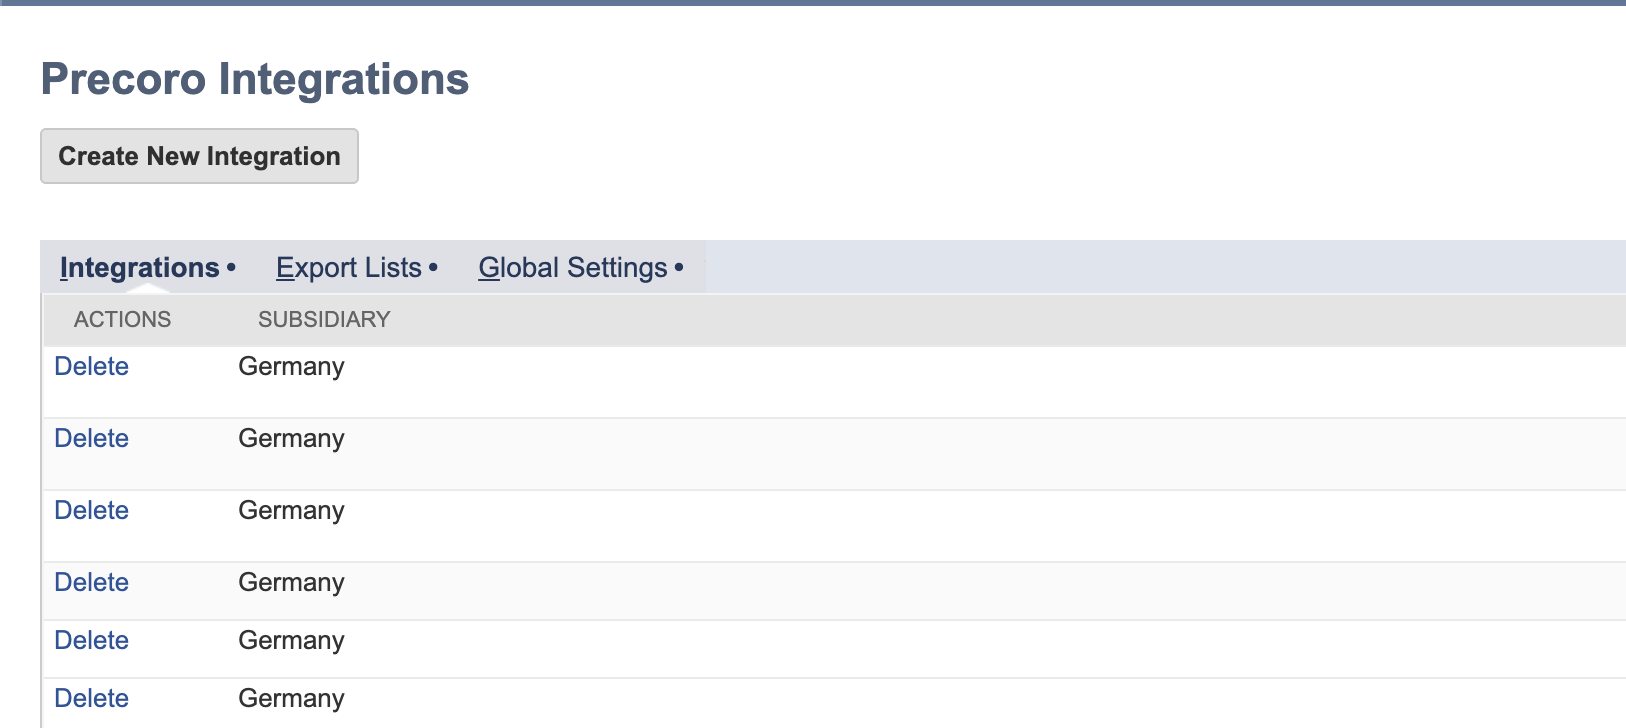 3. Remove old integrations:
-
Find the integrations created using the old SuiteApp token.
-
Click Delete for each of those integrations.
4. Create a new integration:
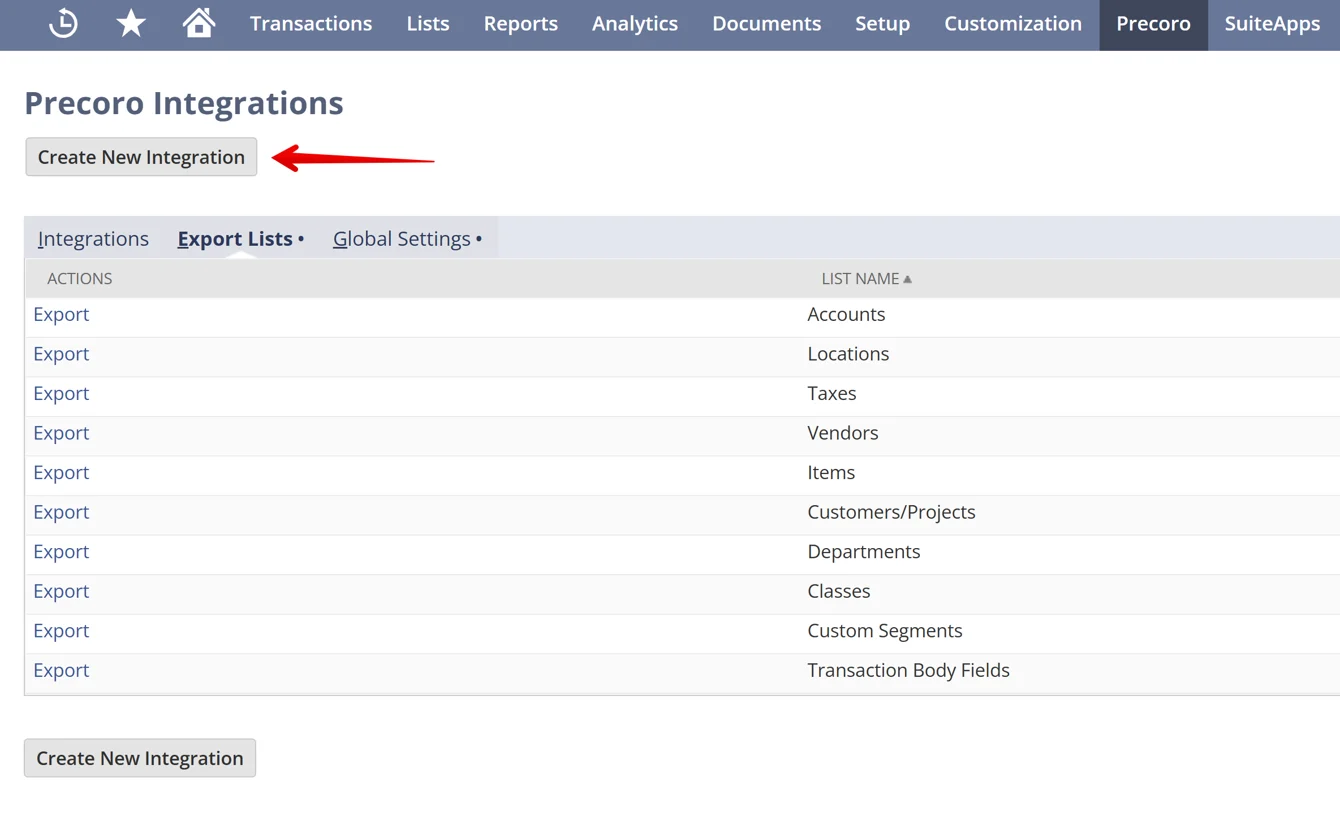
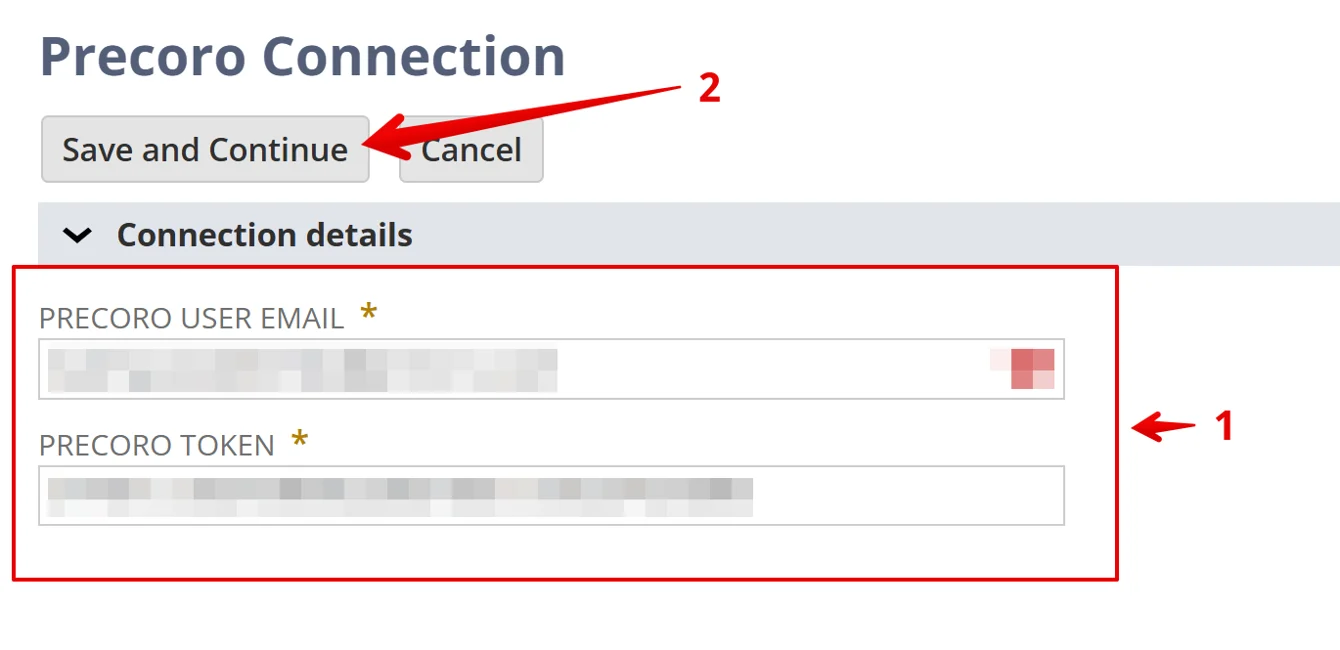
Fill in the following fields:
-
Precoro User Email — the email of the user who generated the new SuiteApp token
-
Precoro SuiteApp Token — paste the newly generated token.
Once done, click Save and Continue.
 5. Select the subsidiary:
-
Choose the same subsidiary that was previously selected in Precoro for the NetSuite configuration.
-
Click Save to complete the setup.
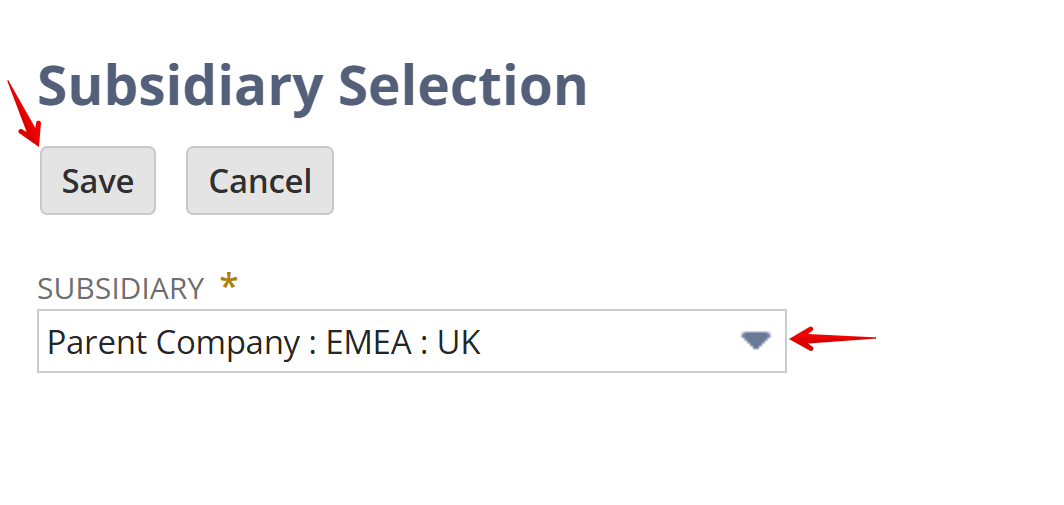
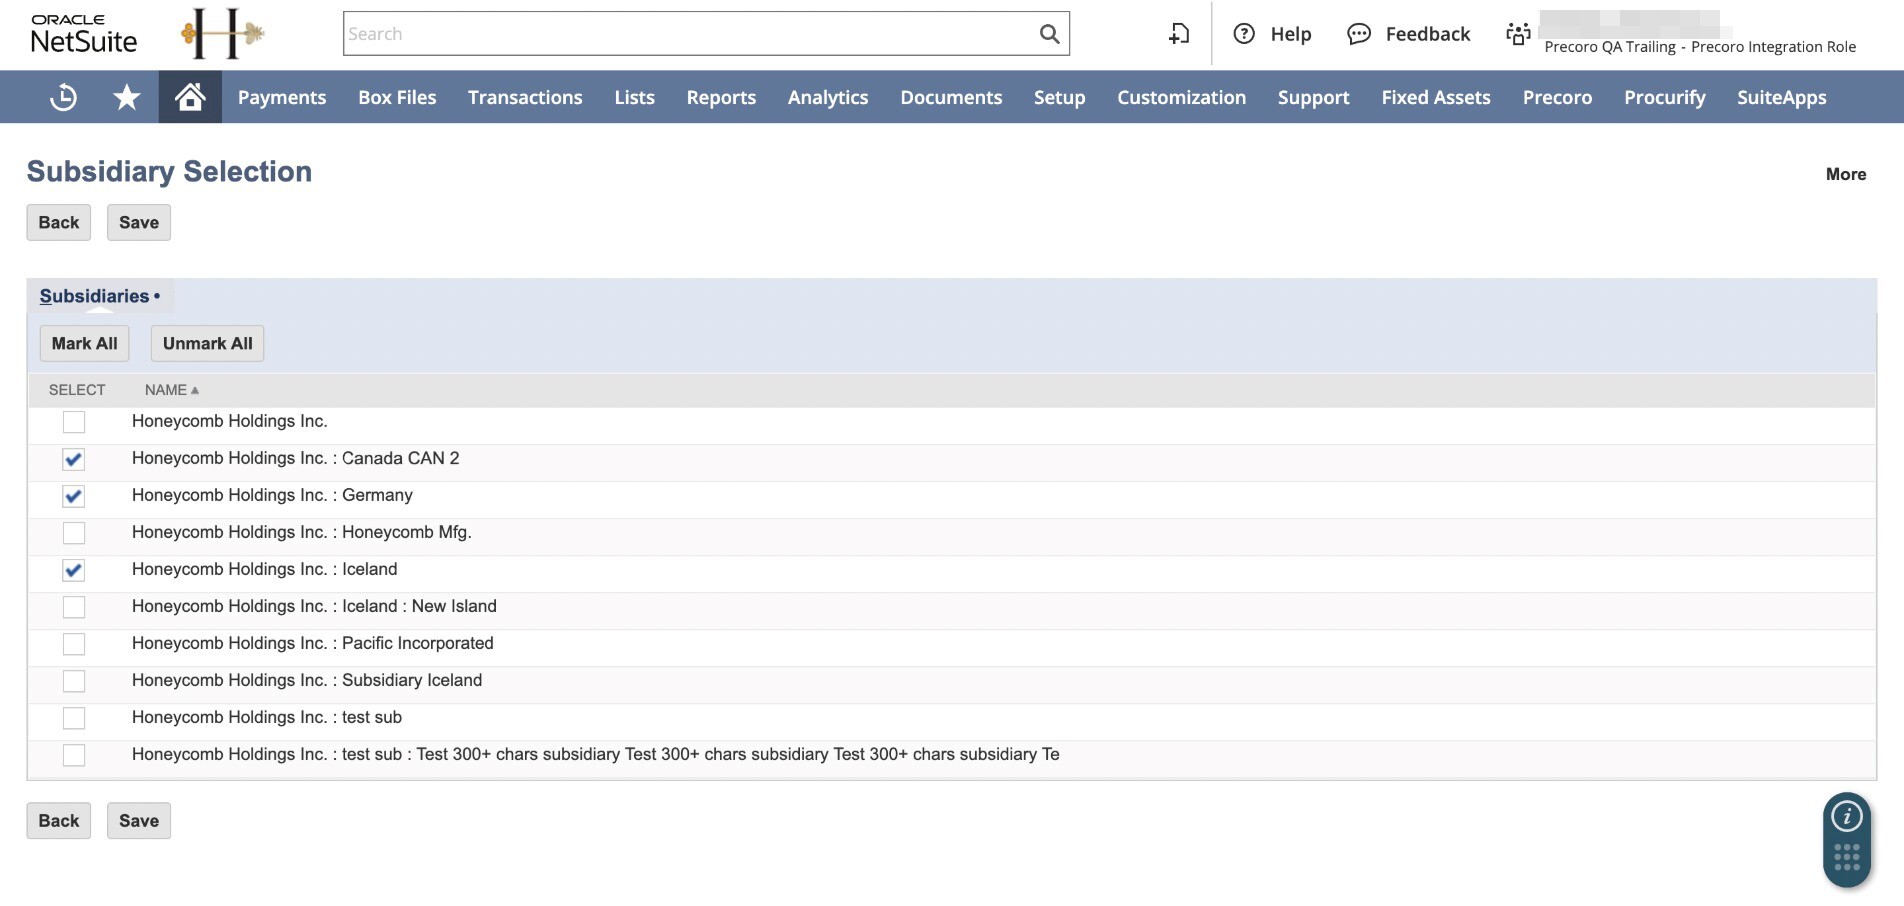
If you used several subsidiaries with legal entities (if you use Multi-Entity Management), you will see the Subsidiary Selection screen as in the screenshot below. Select the subsidiaries that you have previously integrated and click Save.
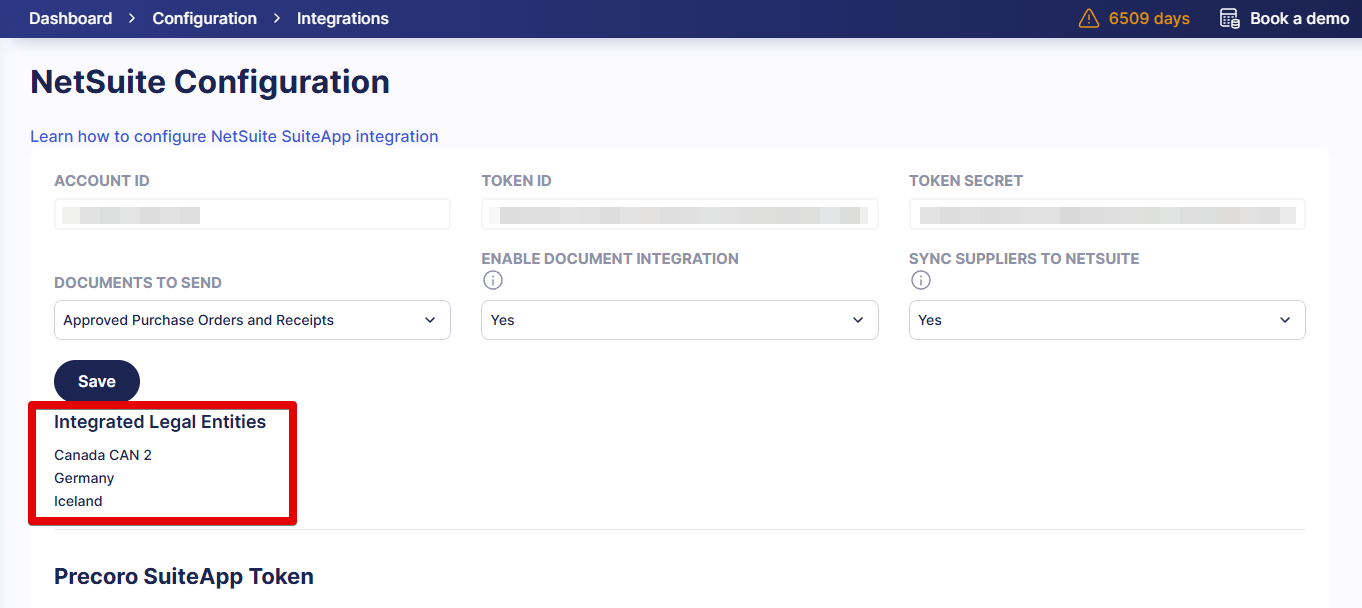
In Precoro, you will see the integrated subsidiaries as legal entities on the NetSuite Configuration page.
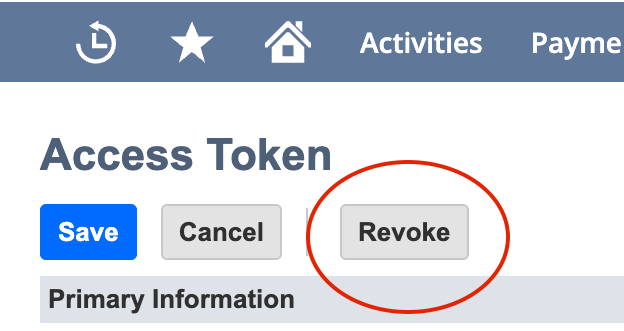
Step 6: Revoke the old Access Token
For security purposes, we recommend revoking the token that belonged to the previous user once the new connection is established.
- In NetSuite, go to Setup → Users/Roles → Access Tokens. Find the token used previously and press Edit.
- On the token editing page, click Revoke to permanently remove the old credentials.
How Can I Check the Available Classes, Locations, and Departments for a Subsidiary?
To check if there are any available options for the subsidiary in NetSuite, navigate to Setup → Company → click on the list in question (for instance, Departments):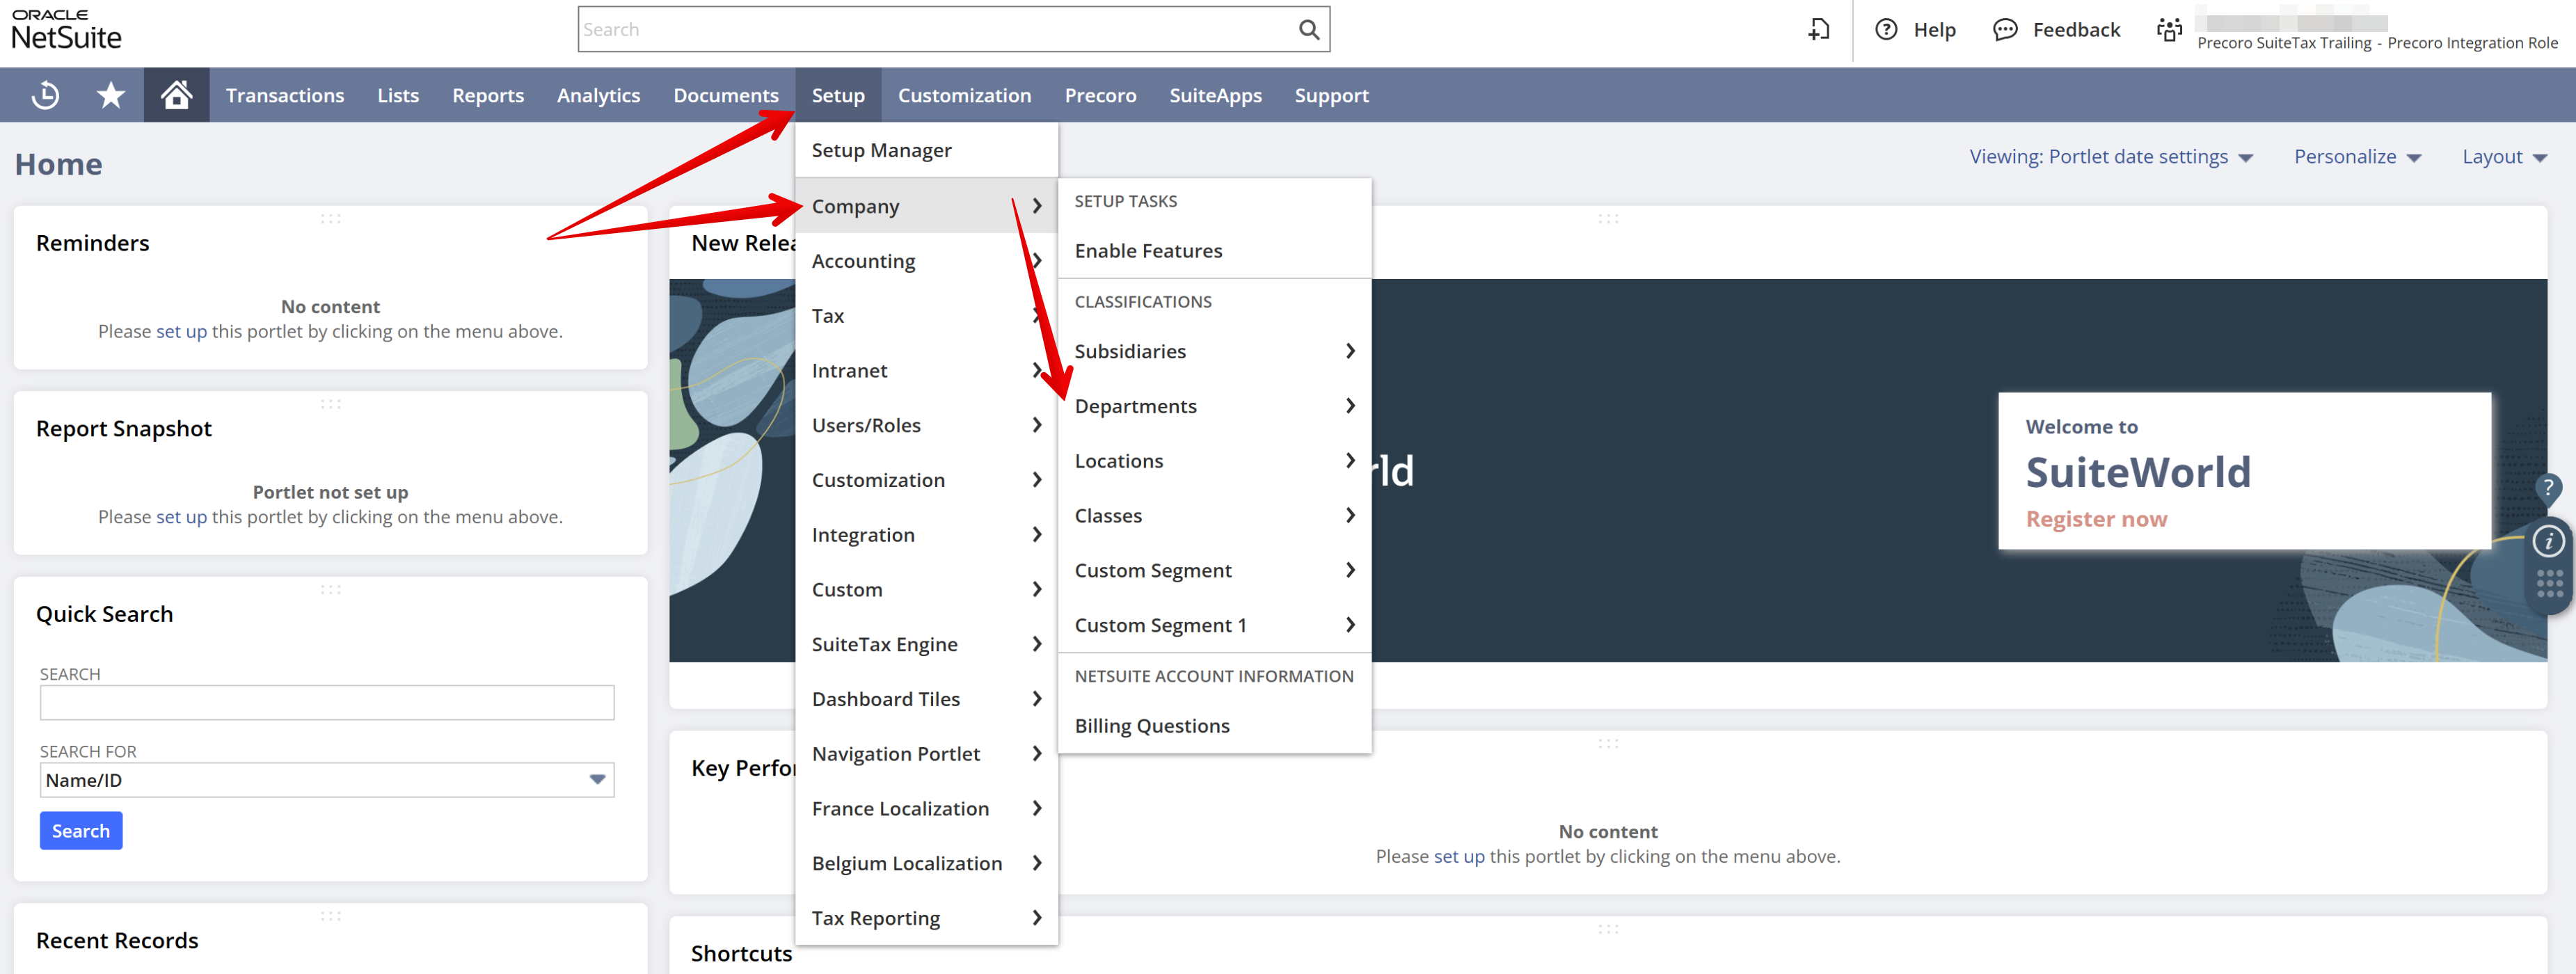
What Happens If I Edit Accounts or Add a New Account in NetSuite?
You can automatically sync newly added or edited accounts with Precoro in several ways:
- By enabling the “Sync New Records by Default” feature for accounts in NetSuite. Learn more here.
- By enabling the “Sync to Precoro” checkbox for a certain account. Learn more here.
- By exporting new accounts in bulk. Learn more here.
Сan I Delete the Integrated Options (Chart of Accounts/Classes/Projects)?
Yes,you can remove the integrated options you don’t need for your procurement process.
Follow the steps below:
- In Precoro, navigate to Configuration.
- Open the Custom Fields for Items or Custom Fields for Documents page.
- Open the directory in question.
- On the Edit Custom Item (or Document) Field page, locate the option in question → click the Delete icon.
- Click Update to record the changes.
Can I Add an Integrated Supplier to the Supplier Portal?
If your company is integrated with NetSuite, you can use the Supplier Portal to collaborate with suppliers.
Suppliers from NetSuite can be matched with those added via the Supplier Portal.
💡Please note: Supplier fields such as Company Name, Phone, Taxpayer Identification Number, Account Number, and Address cannot be edited in Precoro, as this information is synced directly from NetSuite.
Invoices created through the Supplier Portal will be sent to NetSuite after your confirmation in Precoro.
How Does the Time Zone in My Precoro and NetSuite Accounts Affect the Document?
If your Precoro and NetSuite accounts are set to different time zones, the document date in Precoro may not match the date in NetSuite.
This mismatch can lead to data update issues during synchronization.
To avoid discrepancies, make sure both accounts use the same time zone when setting up the integration.
How Do I Enable the “Allow Expenses on Purchases” Feature in NetSuite?
To enable the “Allow Expenses on Purchases” feature:
- In NetSuite, navigate to Setup → Accounting → Accounting Preferences.
- Open the Order Management tab → scroll down to the Purchasing section.
- Enable the Allow Expenses on Purchases checkbox.
- Click Save to record the changes.
What Happens If I Delete an Item from a Purchase Order in Precoro After It’s Been Received in NetSuite?
If you delete an item from a Purchase Order in Precoro that has already been received in NetSuite (i.e., a Receipt has been created for it), you won’t be able to send the updated PO to NetSuite.
To successfully send the update from Precoro, you first need to delete the corresponding item(s) from the related Receipt(s) in NetSuite.
How Do I Fix the “An nlobjSearchColumn contains an invalid column” Error During Synchronization?
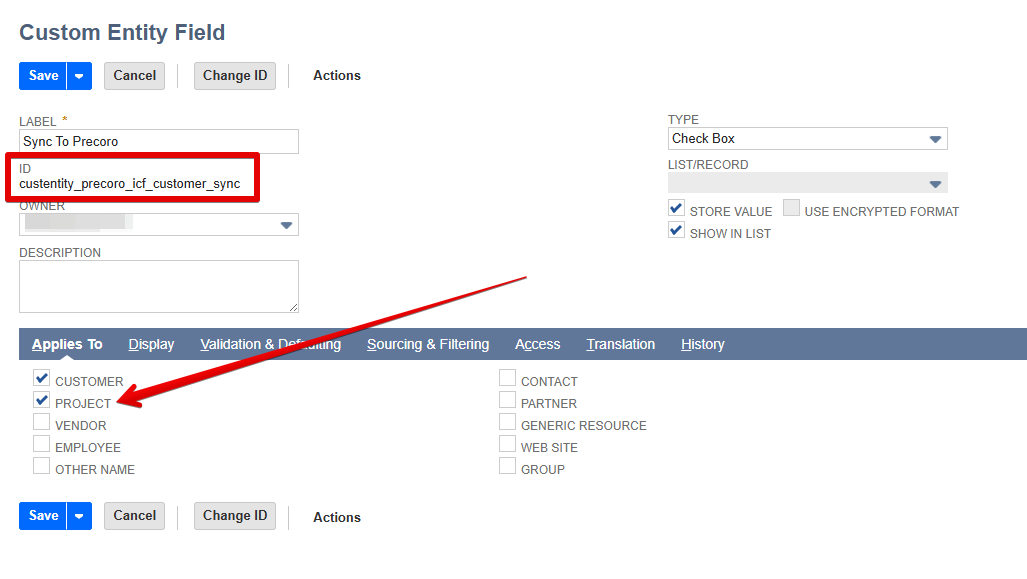
If the Projects module was activated after SuiteApp installation, you may encounter this error: "An nlobjSearchColumn contains an invalid column, or is not in proper syntax: custentity_precoro_icf_customer_sync." It occurs because the custentity_precoro_icf_customer_sync field isn't applied to Projects.
To resolve the issue:
- Navigate to Customization → Lists, Records & Fields → Entity Fields.
- Find a field with ID custentity_precoro_icf_customer_sync and open its configurations.
- In the Applies To tab, enable the Project checkbox and save the changes.
Can Number Formatting for Prices and Totals Differ Between Precoro and NetSuite?
In NetSuite, you can define number formatting on 3 levels:
-
Home → Set Preferences
This setting is selected by each user for their profile, and it always takes priority.
-
Setup → Company → General Preferences
This setting defines the default format for the entire company.
-
Preferences tab → Number Format in Subsidiary settings
The subsidiary-level setting.
Since the user's individual settings are prioritized, each user will see the number format selected for their profile regardless of the settings chosen in Precoro or on the subsidiary level in NetSuite.
Each user can select a needed numbering format for their profile. This setting will affect all of this user's roles.


Please note: the user's individual preferences are prioritized if the Number Format - Allow Override setting is enabled in Setup → Company → General Preferences → Overriding Preferences tab. Otherwise, the users will see the number format established in the company settings.

Why Do I See the “Precoro SuiteApp Installed in Your NetSuite Account Is Outdated. Please Contact Your Account Administrator To Update It.” Error?
The “Precoro SuiteApp installed in your NetSuite account is outdated. Please contact your account administrator to update it.” notification appears in Precoro when the version of the Precoro SuiteApp installed in your NetSuite Sandbox account is older than the current supported version.
Because NetSuite Sandbox accounts do not support automatic SuiteApp updates, each new version must be updated manually.
Until the update is completed, synchronization from Precoro to NetSuite is temporarily disabled to prevent integration issues. This means you won’t be able to create or update documents and suppliers in NetSuite from Precoro. However, imports from NetSuite to Precoro will continue to work normally.
To update the Precoro SuiteApp in NetSuite:
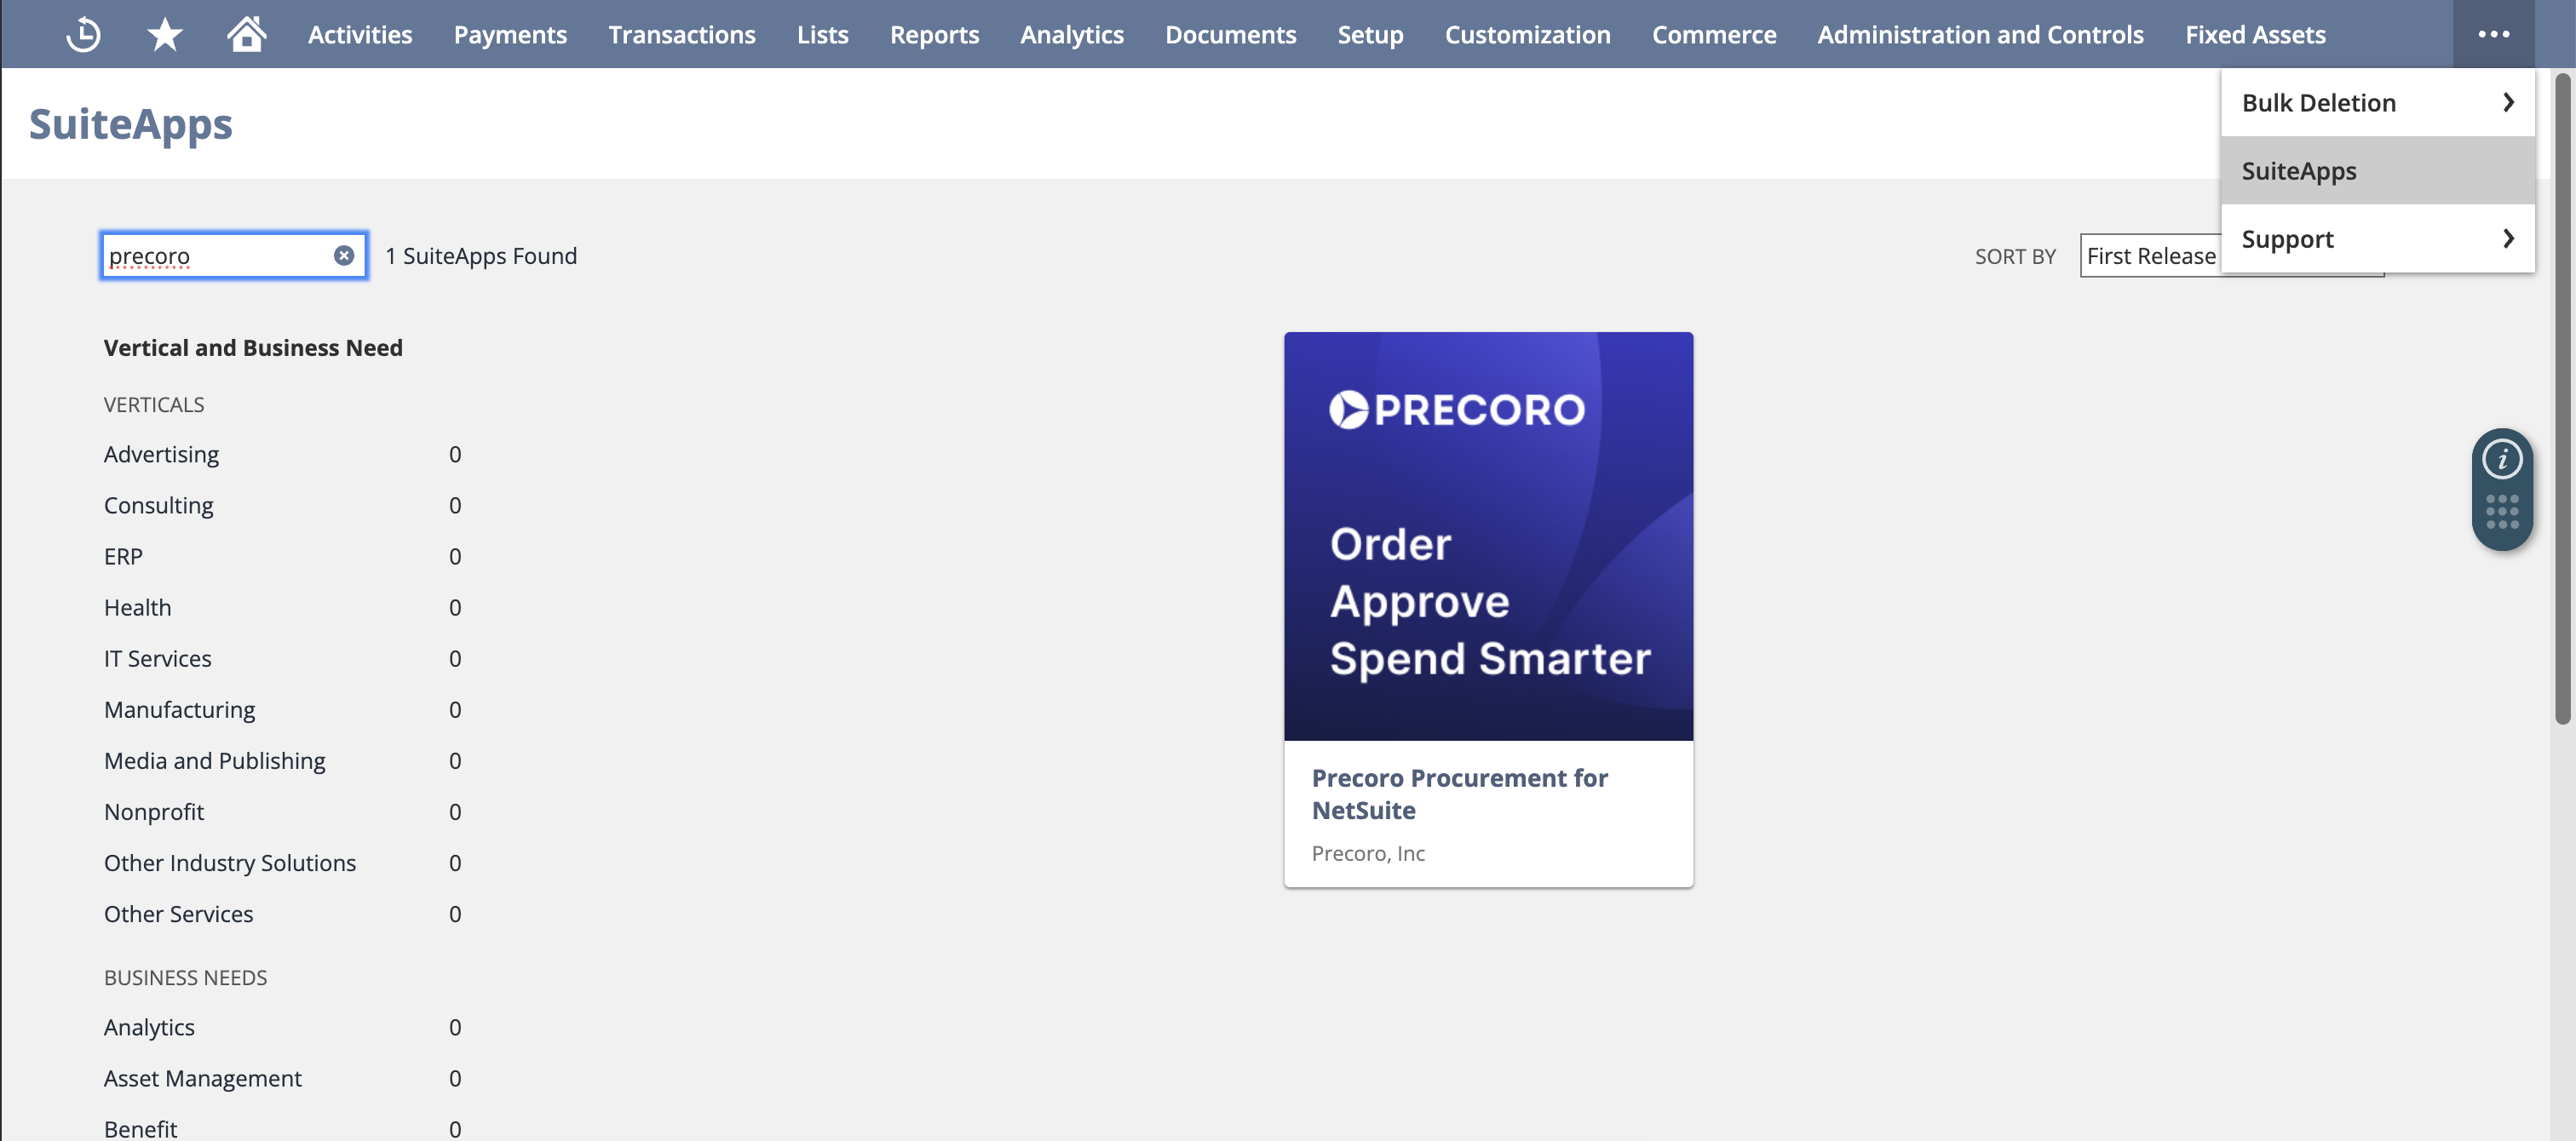
- Log in to NetSuite using the Administrator role.
- Navigate to SuiteApps → type Precoro Procurement for NetSuite in the search bar.

- Click Upgrade.


Once you complete the upgrade, synchronization from Precoro to NetSuite will resume.