TABLE OF CONTENTS
- How the Multi-Entity Management Feature Works
- What You Need to Set Up Multi-Entity Management
- Setting Up Multi-Entity Management
- Managing Access by Legal Entity
- Reports by Legal Entity
- Including Legal Entities in Budgets
- Multi-Entity Management for API Integrations
- FAQ
How the Multi-Entity Management Feature Works
The Multi-Entity Management feature is designed for organizations that operate across multiple entities but share common data.
Instead of setting up multiple companies, you can manage everything under a single company and organize data by Legal Entities (LEs).
For example, if your organization has entities in different countries but uses the same or similar Departments, GL Accounts, and supplier list, there’s no need to create separate companies.
With Multi-Entity Management, you can centralize your data, simplify maintenance, and apply changes instantly across all entities.
What You Need to Set Up Multi-Entity Management
To ensure a smooth setup, collect the following information in advance:
- Integrations: Check if your company uses any integrations.
- Legal Entities: Create a list of all entities you plan to configure.
- User Access: Decide which users should have access to each Legal Entity.
- Suppliers: Prepare your supplier list and specify which suppliers should be available for which Legal Entities.
- Departments and GL Accounts: Review your Departments and GL Accounts to see if they are the same across all entities or different.
💡 Please note: Multi-Entity Management is currently not available for QuickBooks Online, Xero, and integrations via connectors. However, API integrations are fully supported with Multi-Entity Management. It is also available for NetSuite and allows you to integrate multiple subsidiaries and map each of them with a legal entity.
Setting Up Multi-Entity Management
For New Accounts
- Create a company in Precoro.
- Contact your Customer Success Manager to activate the Legal Entity feature.
- Go to Configurations > Legal Entities, create the Legal Entities you need, and fill in the required details for each one.
Learn more about creating a Legal Entity in this article.
Moving from Multi-Company Setup
If you currently use multiple companies in Precoro, you can consolidate them into one:
- Decide whether to create a new company (recommended) or use one of your existing companies as the main one.
Please note: creating a new company is required if you use integrations. NetSuite integration with multi-entity management also supports multiple subsidiaries; learn more here. - In the chosen company, go to Configurations > Legal Entities, create the Legal Entities you need, and fill in the required details for each one.
- Contact your Customer Success Manager to activate the Legal Entity feature.
- Configure your data and user access by Legal Entity.
- When setup is complete, deactivate users in the old companies.
Managing Access by Legal Entity
Legal Entities can be used in Warehouse Requests, Purchase Requisitions, Requests for Proposal, Purchase Orders, Invoices, and Expenses. In Receipts, the Legal Entity is pulled automatically from the Purchase Order.
💡 Please note: Inventory documents (Stock Transfers and Inventory Consumption) are not supported yet. Support will be added in the future.
Here’s how to configure access for different types of data:
User Access
You can manage user access to Legal Entities in Configurations > User Management.
-
Open a user card by clicking the edit (pen) icon.
-
Go to the Legal Entities tab.
-
Assign a Main Legal Entity to the user (it will be auto-filled in documents).
-
If a user has Access to All, any new Legal Entities will be added automatically.
-
Make sure user access aligns with location access to prevent mismatches.
- Click Update to save the changes.
Supplier Access
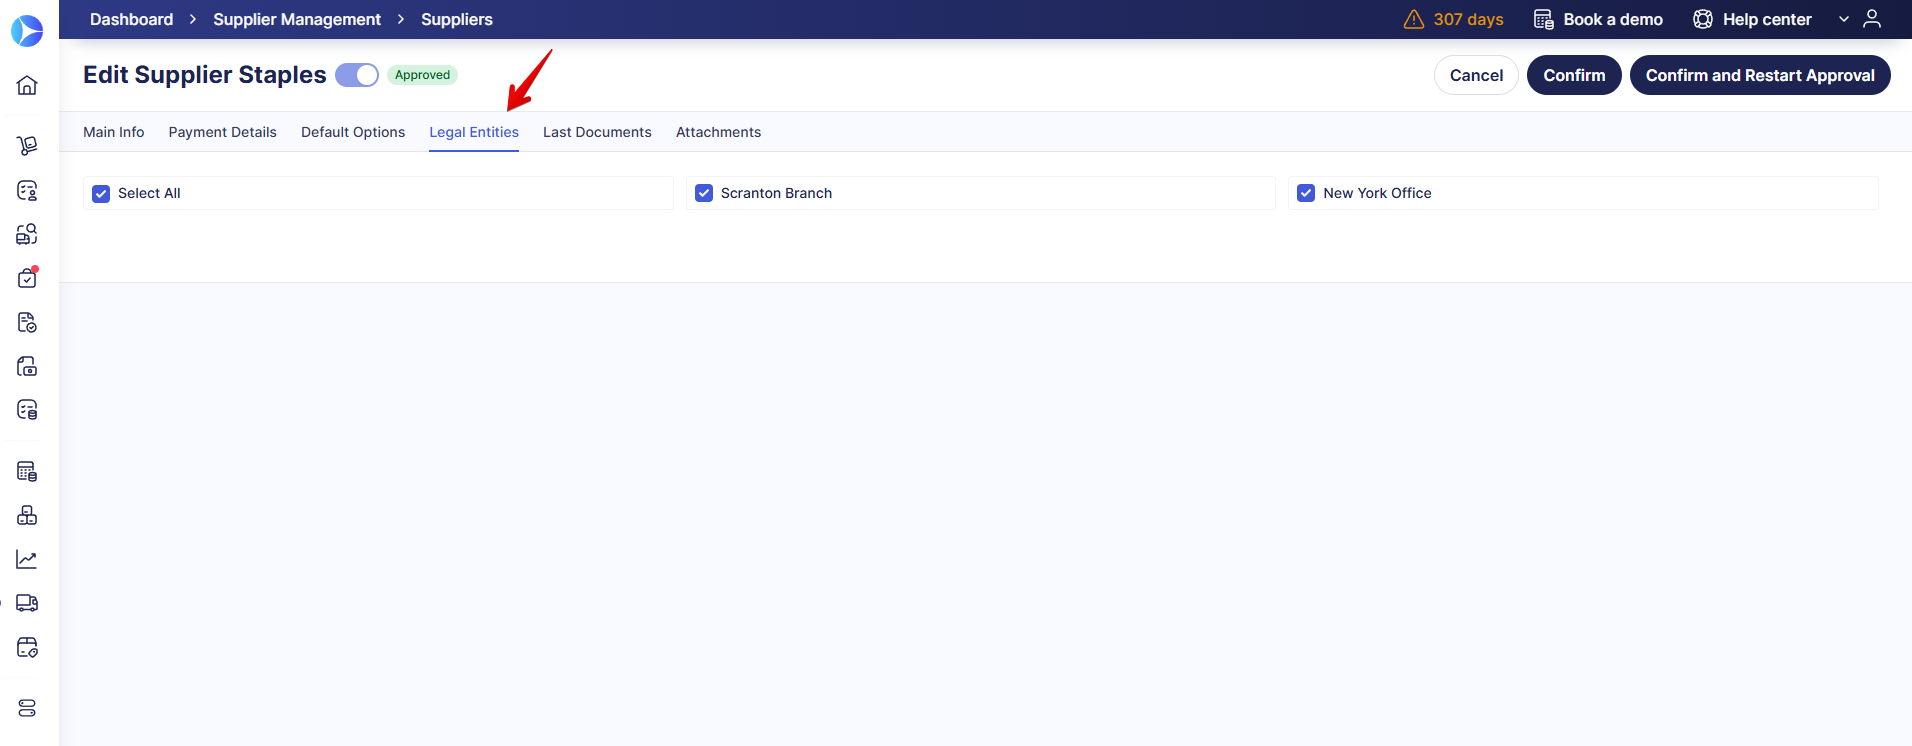
You can configure supplier access to Legal Entities in Supplier Management:
- Edit the supplier card by clicking the pen button and go to the Legal Entities tab.
- Assign the Legal Entities the supplier should be available for.
- Suppliers will only appear in documents for the assigned Legal Entities.
Custom Fields for Items and Documents
Each custom field option can be linked to one or more Legal Entities. Integrated options also support dependencies on Legal Entities.
To set up dependencies between custom fields and Legal Entities:
-
Go to Configurations and select Custom Fields for Items or Custom Fields for Documents, depending on which options you want to configure.
-
Create a new custom field or click Edit on an existing one.
-
In the Options section, click Edit.
-
Click the Add button next to Dependencies.
-
Check the Legal Entity box and select the Legal Entity you want the option to depend on.
-
Click Save.
Learn more about setting up dependencies in this article.
Taxes
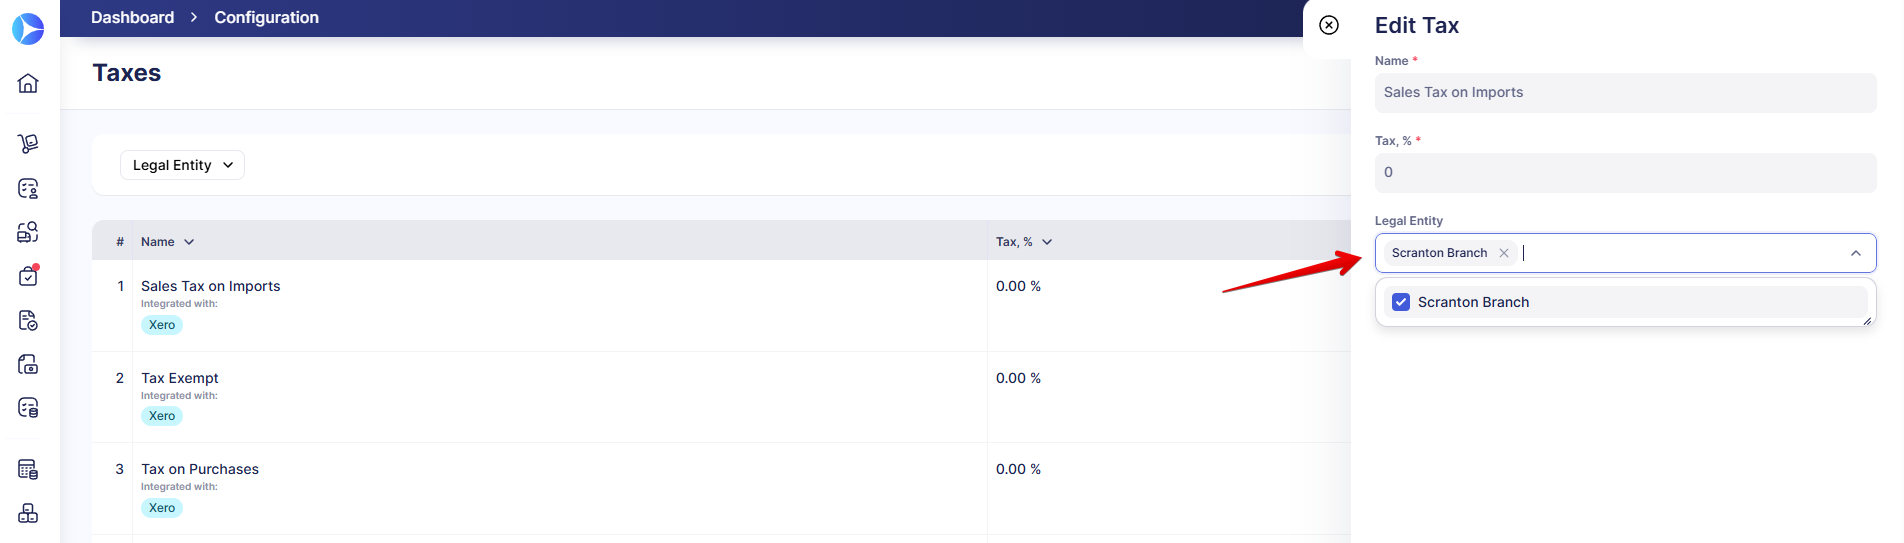
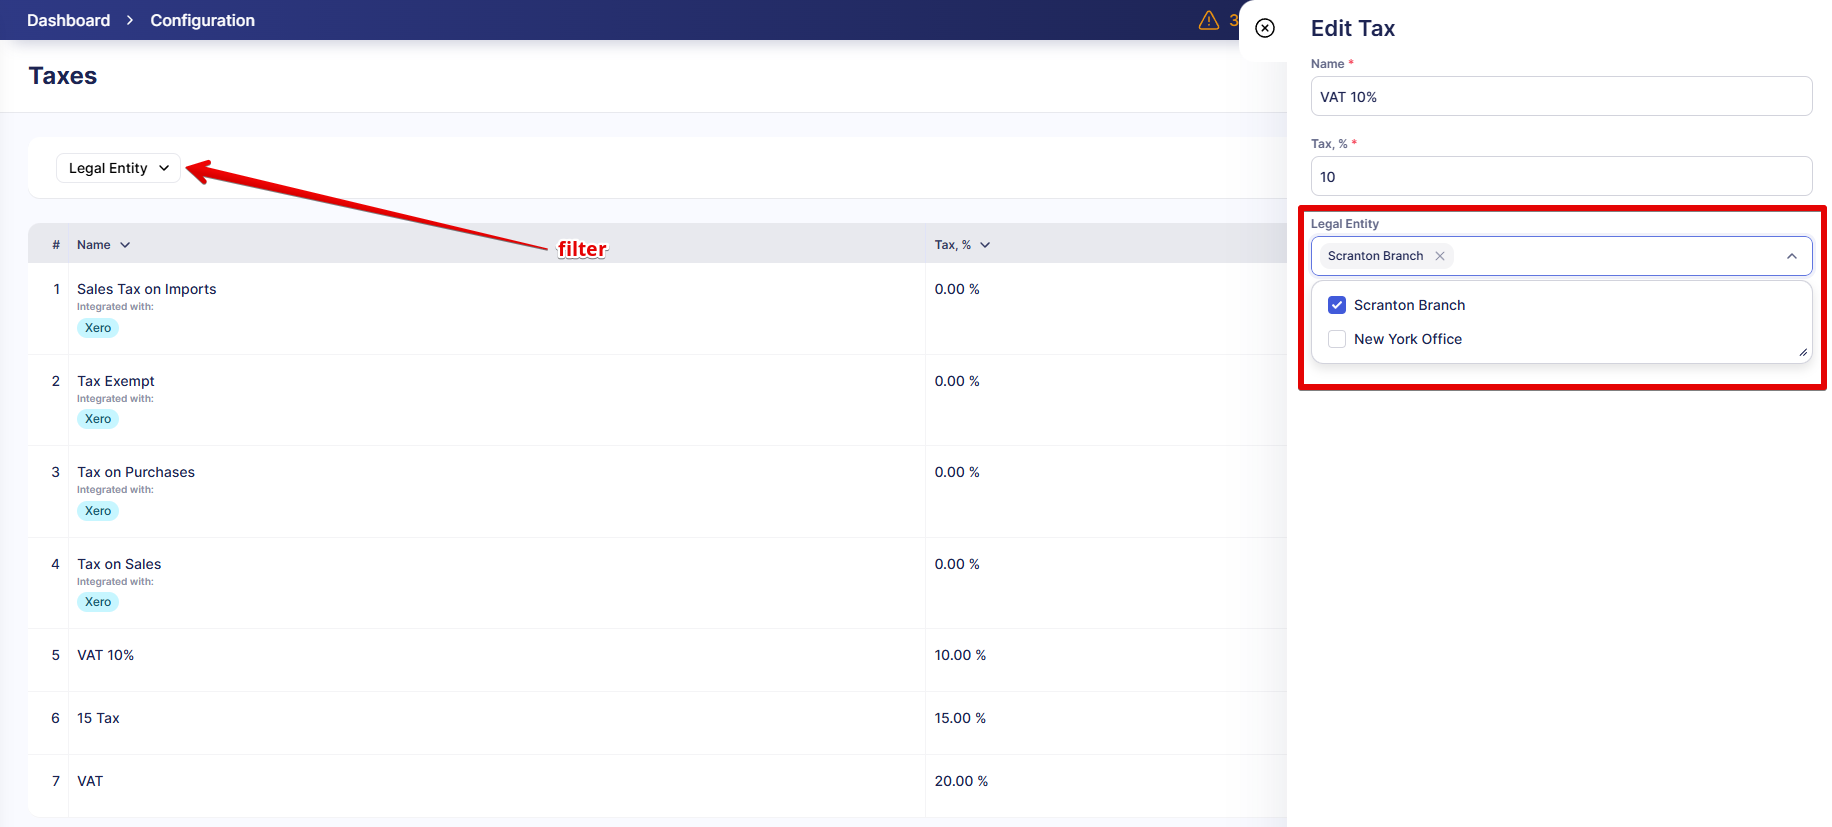
-
Go to Configurations > Taxes.
-
Click Add Tax or edit an existing tax.
-
In the sidebar, find the Legal Entity field.
-
Select one or more Legal Entities to which this tax should apply. If no Legal Entity is selected, the tax will apply to all Legal Entities.
-
Click Save.
Each Legal Entity can have its own tax list. Taxes are filtered automatically in documents depending on the chosen Legal Entity.
You can also filter taxes by legal entities on the Taxes page:
Reports by Legal Entity
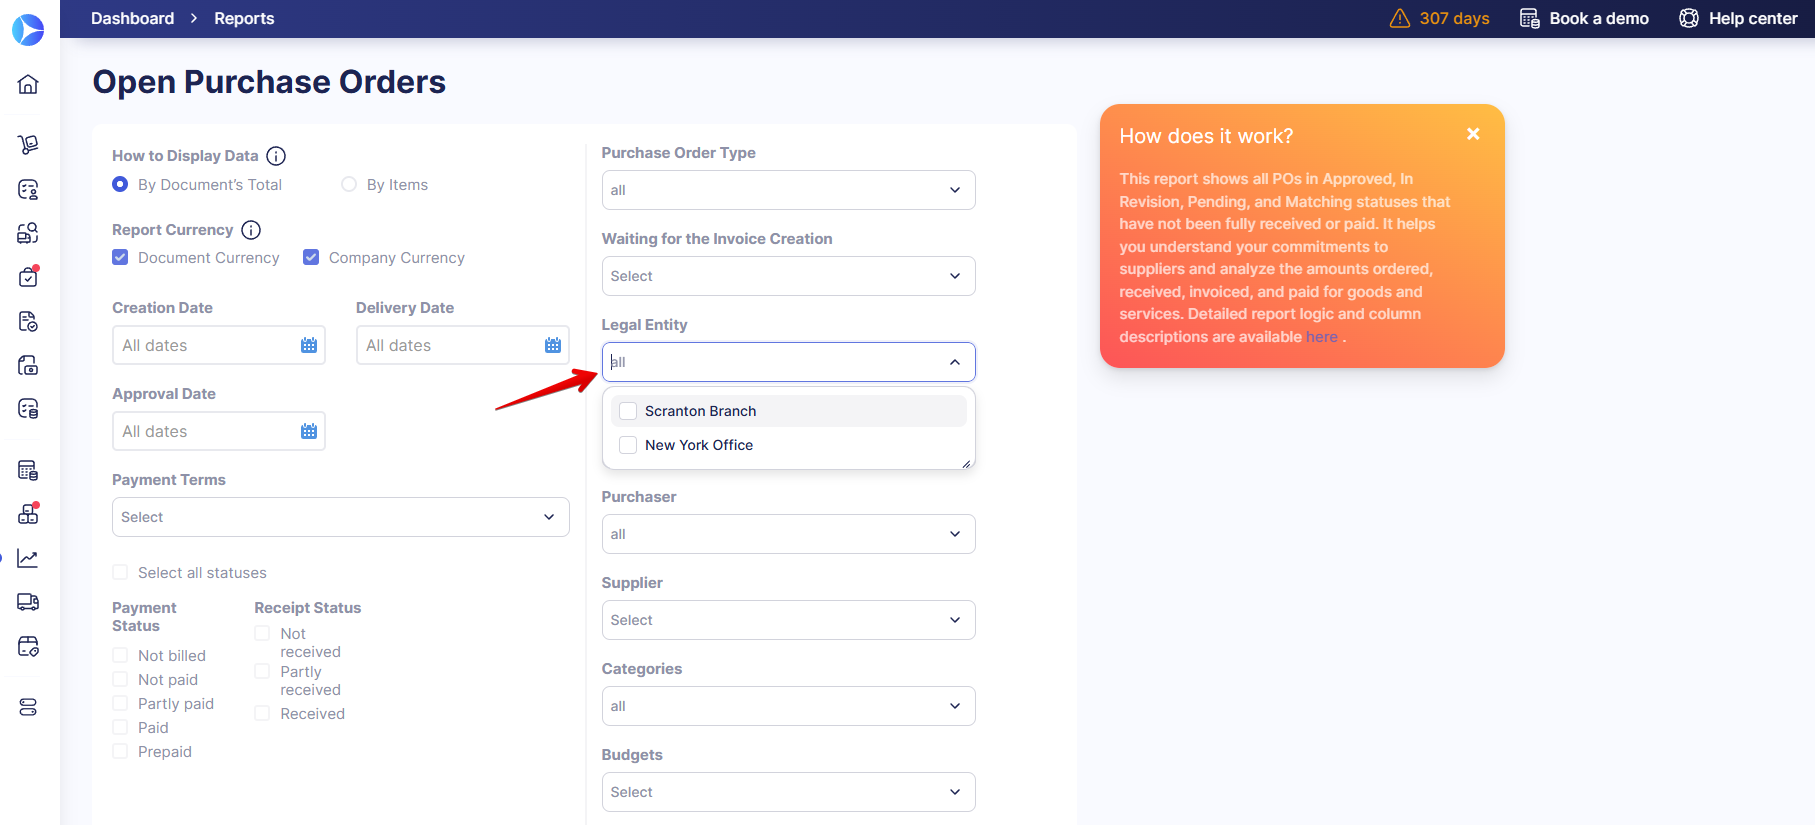
You can run reports for all Legal Entities or for a specific entity that interests you.
Predefined reports for Purchase Orders, Invoices, Credit Notes, Expenses, and Purchase Requisitions include a Legal Entity filter. The Legal Entity is also shown as a column in the reports.
Here’s how it works:
- Users can only see data for the Legal Entities they are allowed to access.
- Related information, like suppliers, budgets, and locations, is linked to Legal Entities to keep data accurate.
The Legal Entity column will stay visible in reports even if you turn off the “Set Up Access by Legal Entity” setting later, so your reports remain consistent. If the setting is off, reports work as they did before, without any Legal Entity filters.
In custom reports, you can add the following LE-currency fields:
- In General Data:
- Totals in LE Currency
- Legal Entity Currency
- In Item Data:
- Totals in LE Currency
Preconfigured budget reports also show which entities use each budget. In the Budget Usage and Budget vs. Actual reports, the Legal Entities Using this Budget column shows all LEs included in the corresponding budget.
Including Legal Entities in Budgets
💡Please note: This feature is currently in Beta. Contact your Customer Success Manager to enable it.
Creating or importing a budget
When creating a new budget, you'll see the Legal Entity option enabled by default on the Select what to include in your budget step. This allows you to select which legal entities will have access to any budget line.
When filling out budget lines, please select legal entities first to ensure only the available options of other fields are suggested.
When importing a budget via a template, you can list several LEs for any line separated by a semicolon (;) or enter All to grant universal access.
Editing a budget
You can edit legal entities in the budget later, even after including documents in this budget. When you save the budget, Precoro will check whether the selected location and custom field options are available for the LE and notify you if you need to make corrections.
Selecting budgets in documents
When legal entities are included in budgets, you'll also need to select them in documents before assigning a budget.
LEs in budget reports
You'll see Legal Entity as a new column and filter in the following budget reports:
- Budget Usage
- The Legal Entity column shows all LEs added to this budget. It's available on the report generation page.
- Budget vs. Actual Report
- The Legal Entity column shows all LEs added to this budget. It's available on the report generation page.
- In the exported document, the Legal Entity column will contain all LEs added to a corresponding budget line.
Multi-Entity Management for API Integrations
If you use an API integration, switching to Multi-Entity Management is simple. All you need to do is:
-
Map your Legal Entities in Precoro to the entities in your integration.
-
Include Legal Entity filters in your API requests.
Let’s say your integration has three entities: Chicago, Dallas, and New York. You want to sync invoices only for the Chicago entity. In Precoro, you can make an API request to export invoices where the Legal Entity = Chicago.
The request will look like this: https://api.precoro.com/invoices?legalEntity[]=12345
Here, 12345 is the ID of the Chicago Legal Entity. As a result, the integration will only contain invoices from Chicago.
In the API response, the Legal Entity information for a document will look like this:
"legalEntity": {
"id": 12345,
"createDate": "2024-06-11T14:23:08+00:00",
"updateDate": "2024-06-11T14:23:08+00:00",
"enable": true,
"name": "TEST Api Precoro",
"legalAddress": null,
"accountNumber": null,
"accountHolderName": null,
"bankName": null,
"bankAddress": null,
"sortCode": null,
"businessRegistrationNumber": null,
"taxPayerType": 2,
"taxPayerNumber": null,
"phone": null,
"keyExecutive": null,
"fullName": null,
"permanentAccountNumber": null,
"internationalBankAccountNumber": null,
"americanBankersAssociationNumber": null,
"swiftCode": null,
"indianFinancialSystemCode": null,
"externalId": null,
"uniqueCode": null
},
When retrieving documents through the API, the Legal Entity information is always included in the response so you can match and filter data accordingly.
Working with Suppliers and Custom Fields
-
In supplier API responses, you will find the collection "supplierLegalEntities", which shows which Legal Entities each supplier belongs to.
-
For DCF and ICF options, dependencies on Legal Entities are also included. Each option contains a "documentCustomFieldOptionDependOnLegalEntities" collection with "legalEntityId", so you can filter data correctly for each entity.