Latest Updates: app.precoro.com on August 1, app.precoro.us on August 15.
TABLE OF CONTENTS
-
Auto Calculation of Invoice Due Date Based on the Payment Terms
- Create Custom Orders from Requisitions
-
Unique Legal Entity Code Displayed as Part of Custom Numbering in Documents
- OCR Improvements
Auto Transfer Unspent Amount in Budgets
We have added the new convenient automation to the budget lines to help eliminate manual work, thus saving time and avoiding potential mistakes. This new functionality can be useful if you want to stop manually transferring the unspent amount left from the previous budget period to the new one.
To activate it, please follow the steps below:
1. Create a new or open the existing budget you wish to automate and press the Edit icon. The budget should have at least two periods to qualify for the auto-transfer function.
2. Activate the Auto transfer of unspent amount checkbox so the remaining amounts for all the budget lines will be transferred from the previous period to the next after the end of the current budget period in the number of days specified in the settings.
Subsequently, you will see the following field: The sum will be transferred after — where you need to enter the number of days, after which the remaining sum from the previous budget will be automatically transferred to the new one. The maximum number you can enter is 28.
You can only enter the number of days up to the End Date of the next budget period. If not, then the number of selected days will exceed the End Date of the existing budget periods, and there will be no transfer.
3. Check the entered information, save the changes, and enjoy the automated process!
The amounts for each budget line will be automatically transferred within the period you specified in the settings.
Auto Calculation of Invoice Due Date Based on the Payment Terms
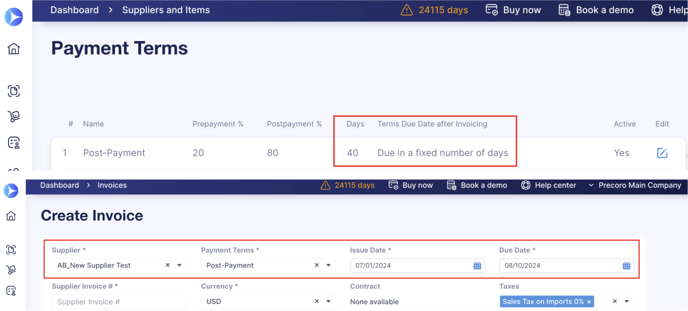
The Invoice Due Date field will be automatically calculated and filled out based on the Invoice Issue Date, Supplier, and settings you selected in Payment Terms. It applies in both cases when you create a single Invoice or one based on a Purchase Order.
To conveniently see all the settings, we have changed the field order, moving the Issue/Due Date (for Invoice) and Delivery Date (for Purchase Order) closer to the Payment Terms.
When creating new or editing existing Terms in Precoro, you will now see the following settings:
- Days — the negotiated number of days allowed to wait before paying an Invoice.
You cannot enter a number greater than 31 if you have selected the “Due by a certain date of this month” or “Due by a certain date of the next month” rules. For the “Due in a fixed number of days” rule you can enter any number greater than zero.
- Terms Due Date after Invoicing — set the Payment Due Date conditions after Invoicing:
- Due in a fixed number of days — payment must be made within the set days after invoicing. You can enter any needed number in the Days field.

-
- Due by a certain date of this month — payment must be made up to the set date of the current month after invoicing. You can enter any number between 0 and 31.

- Due by a certain date of the next month — payment must be made up to the set date of the following month after invoicing. You can enter any number between 0 and 31.

Please find a more detailed guide for the Payment Terms Management and Invoice Due Date recognition by OCR.
Create Custom Orders from Requisitions
We have expanded the functionality of Custom Forms, and you can conveniently create Custom Service Order and Custom Purchase Order documents from Requisitions.
You can create the new documents from both:
- Going to the PO management page and clicking the From Requisitions button, you will see the list of all the available options including your custom forms for Orders.

- The PR document directly, by clicking the Create Purchase Order button. You will be able to select the needed document type from the list.

Unique Legal Entity Code Displayed as Part of Custom Numbering in Documents
You can find a new Unique Code field in the Legal Entity section, where you can input digits and characters to create your code and further display it as part of the Custom Numbering in the selected document.
To set up the Unique Code from Legal Entity to be part of the document Custom Numbering, please contact our Support Team, who will set it up for you.
Also, you can use filters to search your entities by the Unique Code:

Integration Updates
Better Notification Process for the QuickBooks Integration Disconnect
We have added a new letter to the Email Preferences — Notification about disconnected QuickBooks integration. If activated, users with Configuration roles in Precoro will receive the email notifying them of the possible issues:
-
QuickBooks subscription has been transferred to another user.
-
QuickBooks subscription has been canceled.
-
QuickBooks subscription expired.
-
Your QuickBooks admin has been removed from the QuickBooks organization.
And prompting the administrators to take action and establish the integration. In the meantime, your company’s documents, suppliers, items, and tracking categories will not be created or updated until the integration has been established again.
OCR Improvements
We have prepared the following updates for you in regards to the OCR functionality:
Highlighting Potential Duplicate Documents
We have added the visual highlighting of documents that may potentially have duplicates on the AP Inbox page, as well as text prompts that will let you know what values seem to be duplicated.
The duplicate check occurs when the file obtains the Draft status. However, you can still create documents from attachments with duplicated highlights.
To see more information about the values, please click the Duplicated status in the document: