TABLE OF CONTENTS
How to Export Suppliers from NetSuite
Overview and Requirements
You can find the list of suppliers in NetSuite in the Lists → Relationships → Vendors section.
💡Please note: If multiple integrations are configured, records will be exported based on the subsidiary’s availability rule. A supplier will only be exported to the Precoro company if it is available to the subsidiary with which it is integrated.
You can integrate suppliers in several ways:
Option 1: Mass Export
To export suppliers in bulk:
- In NetSuite, go to Precoro → Configuration → Integrations.
- Open the Export Lists tab → click Export next to Vendors.
- Only suppliers available for integrated subsidiaries will appear on the Vendor Export page. Select the suppliers to export or use Mark All to select all on the current page. If you switch pages, selections will be reset, so each page must be exported separately.
- Click Export. The selected suppliers will appear in Precoro within 15 seconds. For large numbers of suppliers, the integration will occur in batches, and the data will appear in Precoro gradually.
- Repeat the process for other pages if necessary.
💡Please note: The "Sync to Precoro" checkbox will be automatically enabled for all exported records.
Option 2: Single Record Export
To export a specific supplier:
- In NetSuite, navigate to Lists → Relationships → Vendors.
- Click Edit next to the required supplier (or New Vendor to create one).
- Enable the Sync to Precoro checkbox.
- Click Save. The supplier will appear in Precoro within 15 seconds.
How to Sync New Suppliers by Default
To enable automatic syncing for all newly created suppliers:
- In NetSuite, go to Precoro → Configuration → Integrations.
- Open the Global Settings tab.
- In the Sync New Records by Default section, enable the Vendors checkbox.
- Click OK to confirm the synchronization. All new suppliers will now be synced automatically.
💡 Please note: You can manually uncheck the “Sync to Precoro” checkbox when creating a new supplier. In this case, the supplier will not be synced with Precoro.
How to Import Suppliers in Precoro
To import the suppliers in Precoro:
- Go to Precoro → Supplier Management page → Supplier Management.
- Click the Import from NetSuite button.
- Select the suppliers you want to import or click Select All (if you need to integrate all of them). You can also use the search bar to quickly find a particular supplier.
- Click Import to complete the process.
- The selected suppliers have been successfully imported into Precoro.
How to Select the Supplier Type When Importing from NetSuite
You can select the supplier type in NetSuite when editing the Vendor record: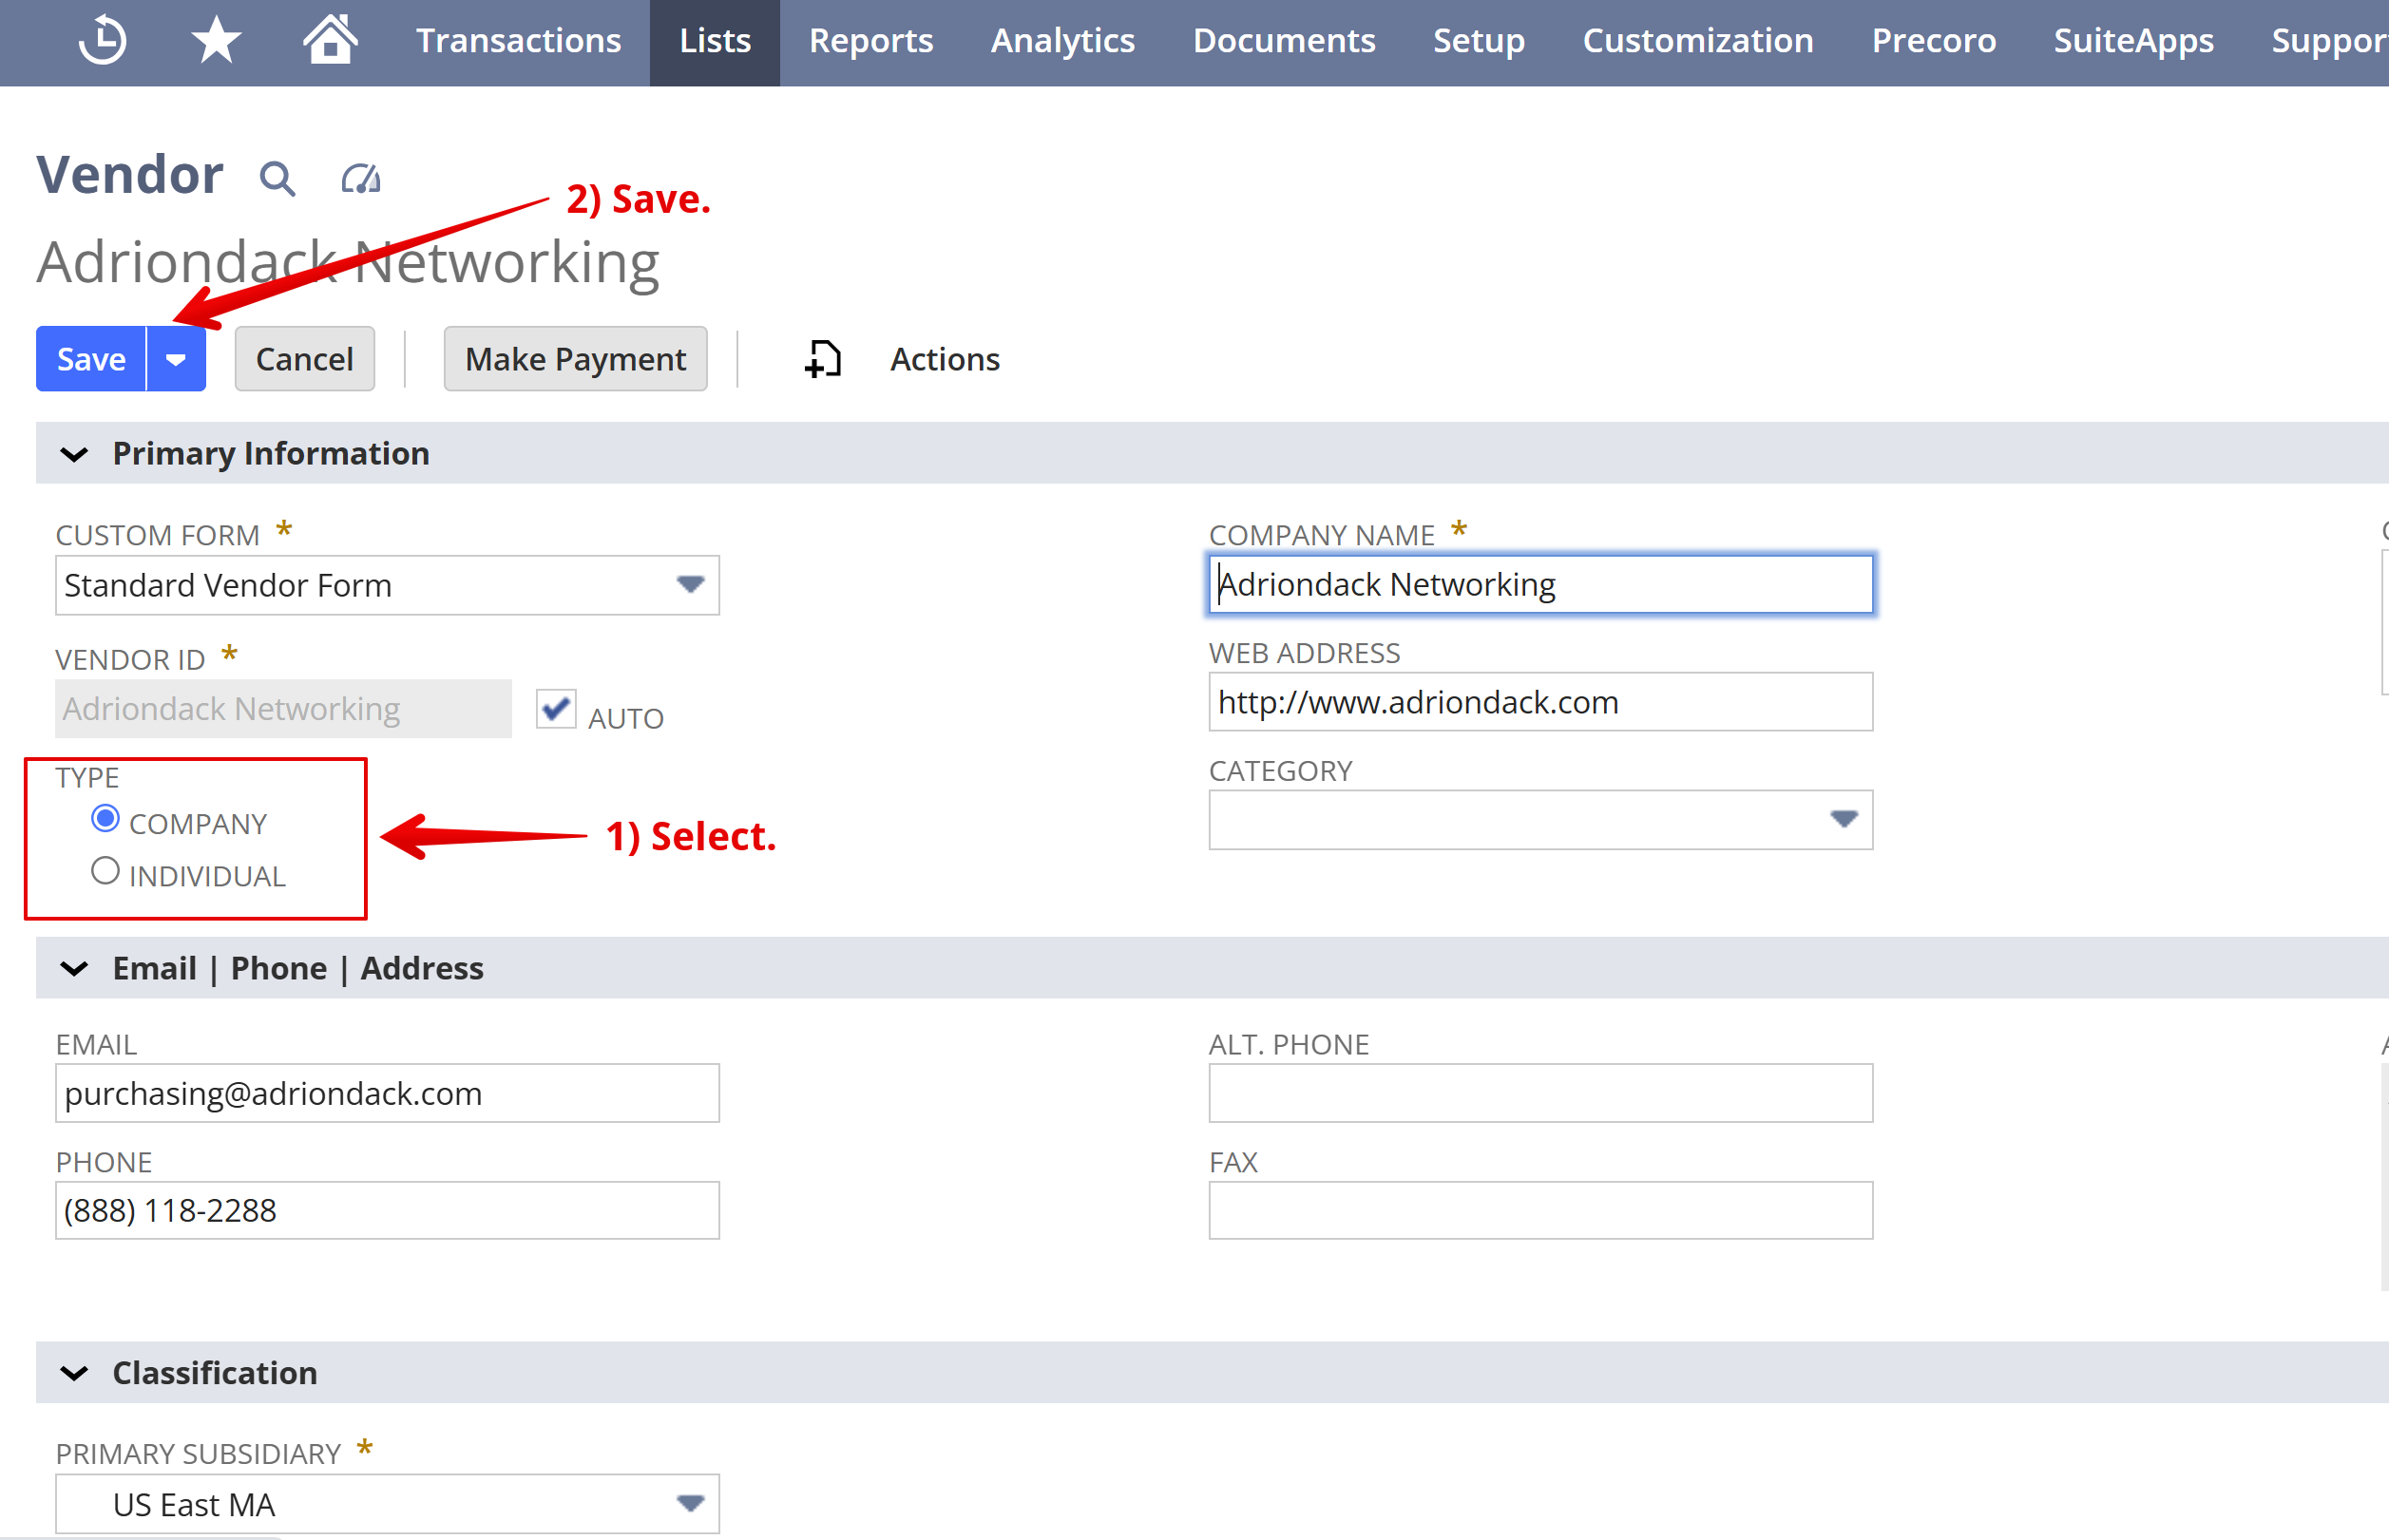
When importing suppliers from NetSuite to Precoro, you can choose between two vendor types:
- Company: Regular supplier type companies.
- Individual: This category may include private entrepreneurs and freelancers.
You can see the type assigned to each supplier and filter by this parameter as needed. For example, you can choose to import only the “Company” type suppliers.
To sort through the different types of suppliers in Precoro, go to the Import Suppliers from NetSuite page → click the Show Filters button.
Supplier Integration Logic: Precoro → NetSuite
When you create a supplier in Precoro, it is automatically integrated and created as a “Company” type supplier in NetSuite.
If needed, you can exclude a specific supplier from integration by using the Internal status.
Such suppliers remain in Precoro but are not mapped to NetSuite, and their documents are not sent to the integration.
To do this, open the supplier card in the Supplier Management page and disable the Sync with Integration option.
If you use Multi-Entity Management and have several integrated subsidiaries, you can create a supplier with several legal entities, and it will be integrated with the corresponding subsidiaries.
How the Updates Work
Updates to integrated Suppliers from NetSuite to Precoro occur in real time as soon as changes are saved in NetSuite. For the update to occur, the “Sync to Precoro” checkbox must be enabled for the corresponding supplier.
Updates to integrated suppliers from Precoro to NetSuite occur in real time as soon as changes are saved in Precoro.
Syncing Suppliers' Active / Inactive Status
-
If a supplier is deactivated in Precoro, it will not be deactivated in NetSuite.
-
If a supplier is deactivated in NetSuite, it will be automatically deactivated in Precoro and remain inactive in NetSuite.
💡 Please note: The supplier’s active/inactive status is synced only from NetSuite to Precoro. It's not a two-way synchronization, unlike some other supplier fields.
How to Disable Suppliers Sync from Precoro to NetSuite
You can disable or enable the synchronization of new suppliers and updates for already integrated suppliers from Precoro to NetSuite on the NetSuite Configuration page using the “Sync Suppliers to NetSuite” setting:
- In Precoro, go to Configuration → Integrations.
- Locate the NetSuite integration → click the Update Settings button.
- On the NetSuite Configuration page, update the “Sync Suppliers to NetSuite” setting according to your needs:
- When set to “Yes”, suppliers will be synced between Precoro and NetSuite. This option is enabled by default.
- When set to “No”, new suppliers and updates to existing suppliers will not sync from Precoro to NetSuite, including any updates made through file imports.
- Click Save to record the changes.
💡Please note: Disabling/enabling the “Sync Suppliers to NetSuite” setting will not affect the integration of new suppliers or updates from NetSuite to Precoro, which will remain active in both cases.

Supplier Mapping: How It Works
Suppliers Auto-Mapping
When integrating suppliers from NetSuite to Precoro—whether via SuiteApp or the “Import from NetSuite” option on the Supplier Management page—Precoro will automatically map suppliers if there is an exact match between the supplier's Name in Precoro and either the Company Name, Vendor ID, or First and Last Name for an individual supplier in NetSuite.
Additionally, if you create a new supplier in Precoro that already exists in NetSuite, it will also be mapped automatically by matching the Name.
The recording shows an example of the automatic mapping:
- Ensure the Name in Precoro exactly matches the one in NetSuite.
- On the Supplier Management page, click Import from NetSuite.
- Check the suppliers you want to import → click Import.
- The system will automatically map the matching supplier data.
Manual Supplier Mapping and Unmapping
You can manually map or unmap previously integrated suppliers with NetSuite on the Supplier Management page:
- To unmap a supplier, click the delete icon. You will receive a system notification once the process is successfully completed.
- To map a supplier, click the mapping icon. The system will automatically match the corresponding entries.
💡Please note: For a supplier to be successfully integrated with NetSuite, the Name in Precoro must match the Company Name, Vendor ID, or the First and Last Name (for individual suppliers) in NetSuite.
Mapping for “Individual” Supplier Type in NetSuite
The individual suppliers type in NetSuite uses the Company Name field (typically for a company code) and adds separate First Name and Last Name fields specifically for individual suppliers.
When integrating an individual supplier from NetSuite into Precoro:
- Precoro will take the First Name and Last Name from NetSuite and combine them into the Company Name field in Precoro.
- The original Company Name field in NetSuite (usually containing a code) will not be used for the supplier’s display name in Precoro.
- Precoro will first attempt to map the supplier using the First Name and Last Name from NetSuite, together with the supplier’s Company Name in Precoro.
- If no match is found based on First Name and Last Name, the system will fall back to mapping based on Company Name and Vendor ID.
- In cases where fallback mapping occurs, the First Name and Last Name from NetSuite will overwrite the previous Company Name in Precoro.
💡 Please note: Suppliers with Pending or Rejected statuses cannot be mapped. If you attempt to import a supplier with these statuses, either approve or modify their name in NetSuite to avoid automatic mapping issues.
Contact Mapping Option in NetSuite
You can control whether accounting contacts from NetSuite and purchasing contacts from Precoro are mapped together.
💡 Please note: The setting applies to all supplier interactions, including manual mapping, import, export, updates, auto-updates, and creating new suppliers.
To configure this setting:
- Go to NetSuite.
- Navigate to Precoro → Configuration → Integrations.
- Open the Global Settings tab → Other Settings section.
- Enable/Disable the “Enable Vendor Contact Mapping” option.
- Click OK to confirm changes.
💡 Please note: Disabling contact mapping keeps contacts separated between NetSuite and Precoro. Changes made to contacts in one system will not sync to the other. Existing contacts will remain in their respective systems without being transferred.
Integrated Fields and Their Synchronization Method
When integrated with NetSuite, Precoro syncs key supplier information in one of the following ways:
- One-way synchronization: Updates made in NetSuite are pulled into Precoro during the next sync. Changes made in Precoro are not sent back to NetSuite.
- Two-way synchronization: Changes made in either system are reflected in the other after the data sync. Please note that if a field is cleared in Precoro, the data will remain intact in NetSuite; to delete the data, you'll need to clear the field in NetSuite manually.
| Supplier fields in Precoro | Related fields in the supplier's NetSuite profile | Synchronization type |
| Supplier’s Name | Company Name (Primary Information) | Two-way synchronization |
| Currency | Primary Currency (Financial → Account Information) | One-way synchronization |
| Email Address | Email (Email | Phone | Address) | One-way synchronization |
| Legal Address | Address (Email | Phone | Address) | Two-way synchronization |
| Taxpayer Identification Number | Tax ID (Financial → Account Information) | Two-way synchronization |
| Phone Number (Company Contact) | Phone (Email | Phone | Address) | Two-way synchronization |
| Account Number | Account (Financial → Account Information) | Two-way synchronization |
Currency integration works as follows:
- When updates in NetSuite are pulled to Precoro, all currencies available to the supplier in NetSuite are added to this supplier in Precoro.
- When a supplier is created in Precoro is pushed to NetSuite, only the first currency is transferred and set as the Primary Currency. Changes to suppliers' currencies made in Precoro are not automatically reflected in NetSuite.
How to Prevent Supplier Sync Errors
If you add a Legal Address in the supplier’s profile in Precoro, make sure the required address fields in NetSuite don't block the synchronization.
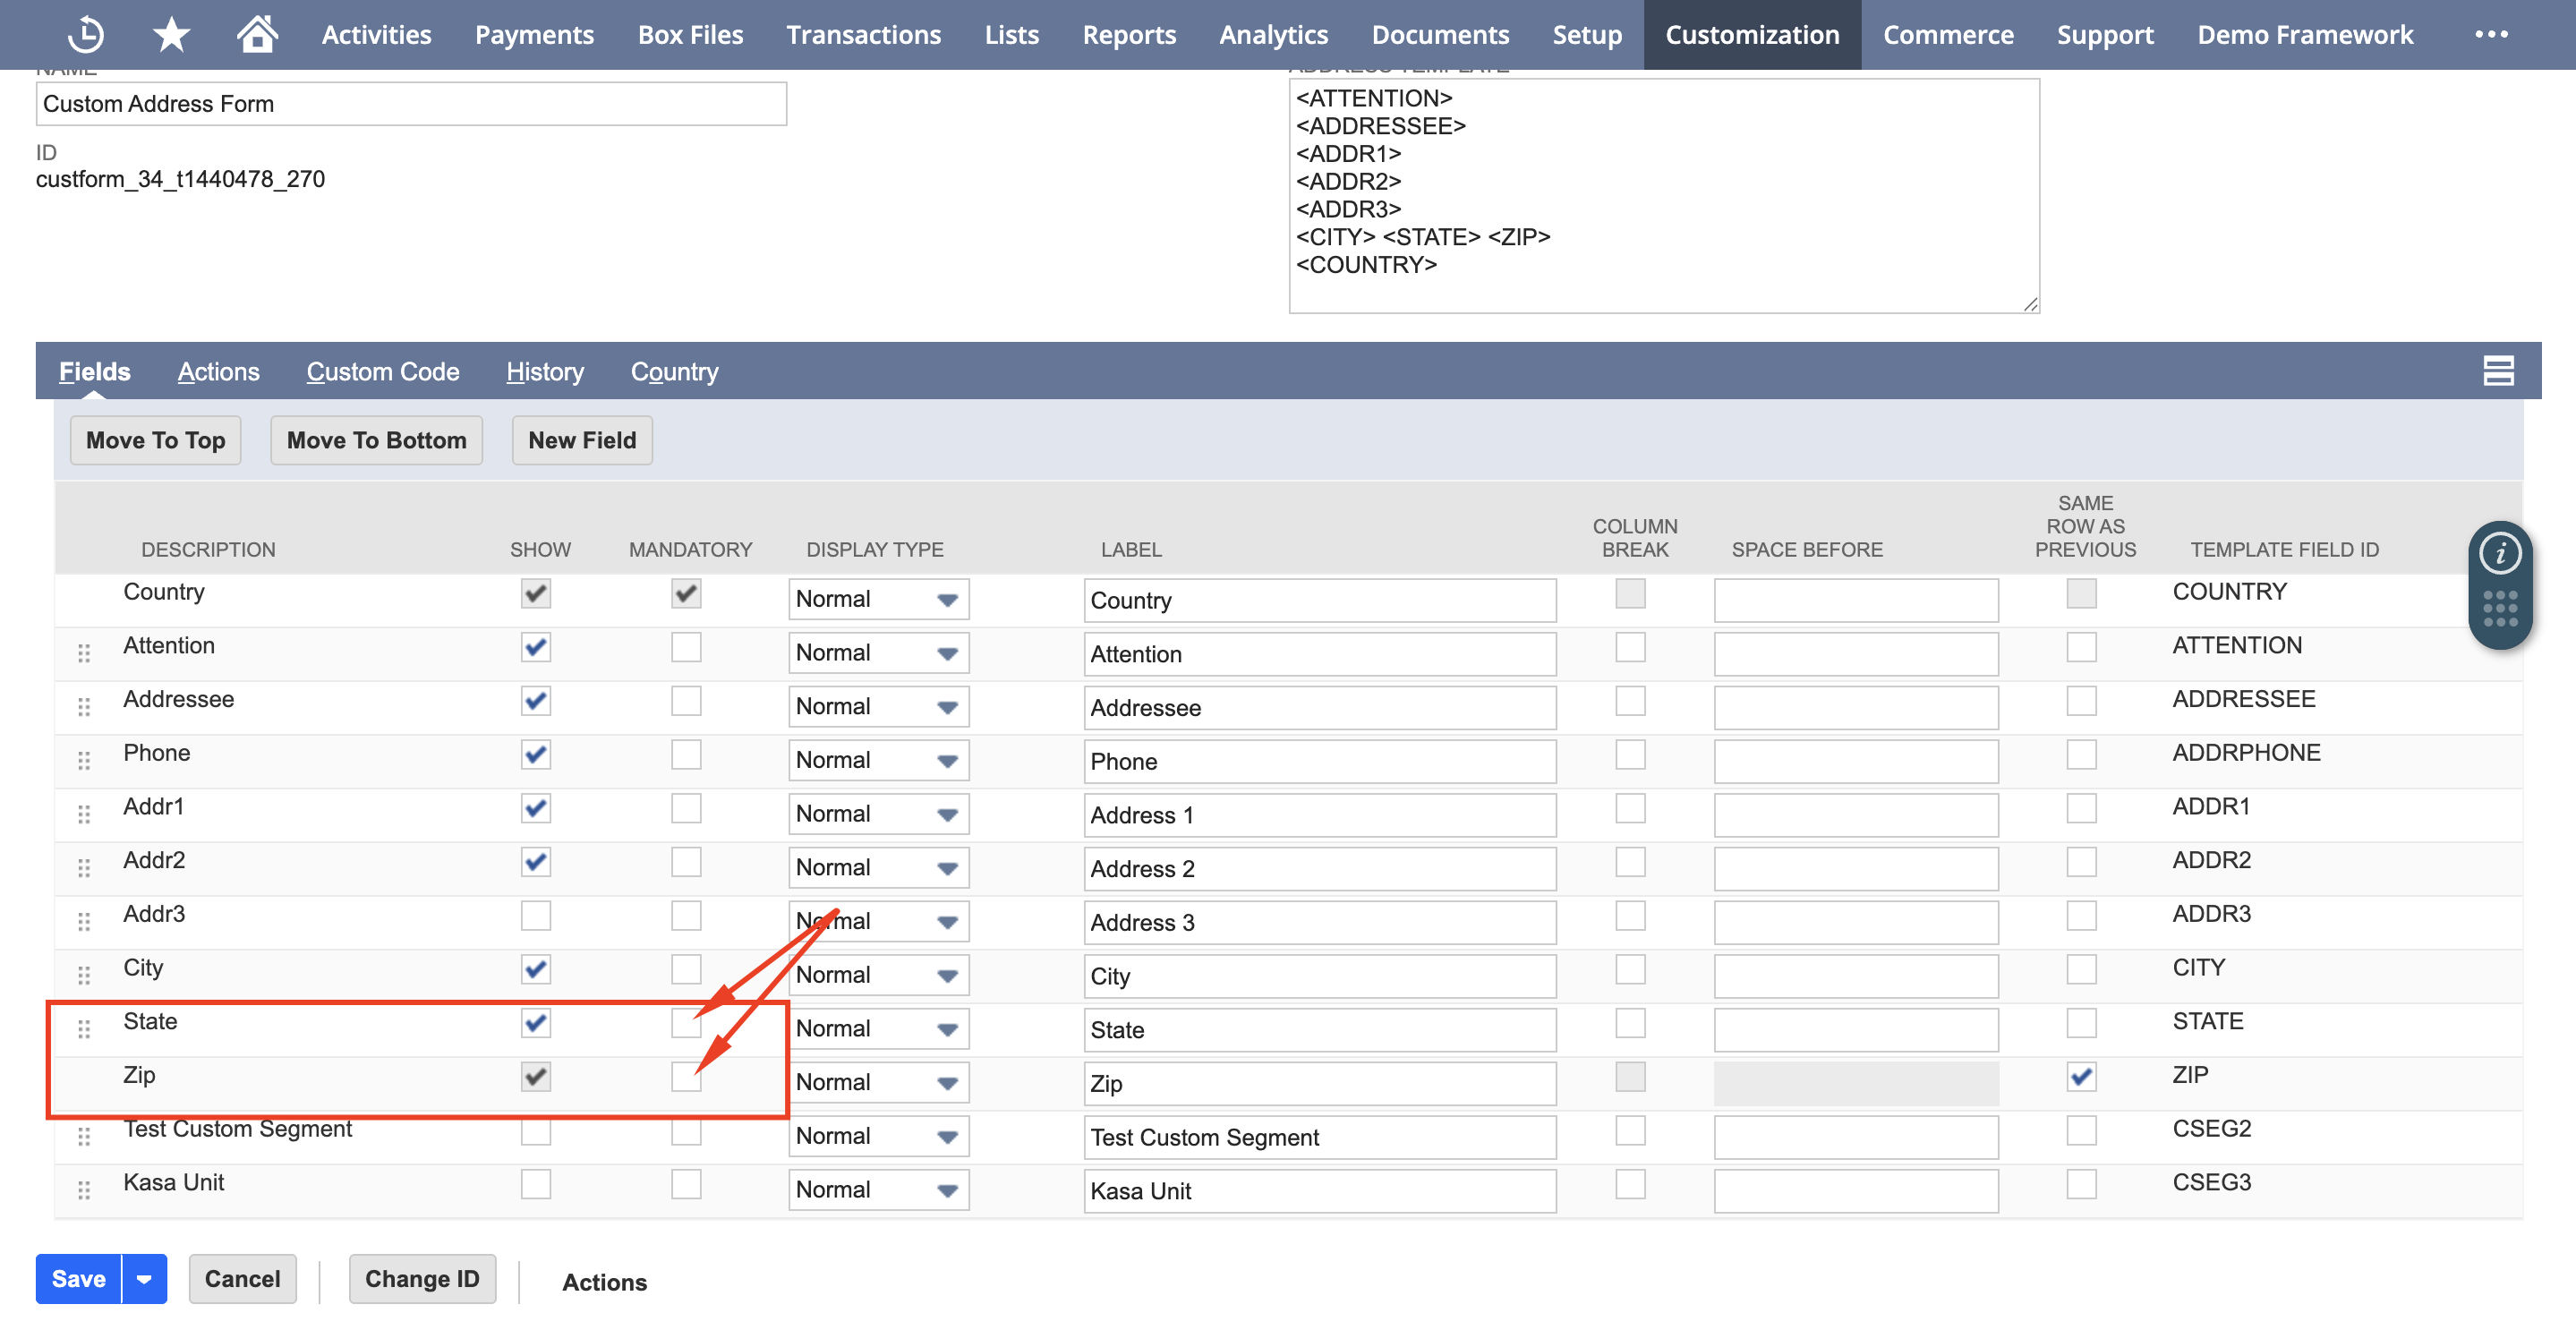
To prevent the issues, adjust the supplier’s address form in NetSuite:
- Log in to NetSuite with the Administrator role.
- Navigate to Customization → Forms → Address Forms.

- Open the address form assigned to the relevant country and subsidiary.
- Uncheck the mandatory setting for State and ZIP fields.
- Click Save to apply the changes.


Character Limits for Supplier Fields in NetSuite
NetSuite enforces the following character limits:
- Company name: 83 characters
- Email address: 254 characters
- Phone number: 32 characters
- Account number: 99 characters
- Legal name: 83 characters
- Tax ID: 25 characters
NetSuite Integration Logs in Supplier Cards
To check the integration logs for a specific supplier:
- Go to Precoro → Supplier Management → Supplier Management.
- Open the supplier in question → navigate to the Integration Logs tab. The tab is only displayed if the integration logs are available.
The following log types are added to the Integration Logs tab:
- Supplier imported or updated from NetSuite;
- Supplier created or updated in NetSuite;
- Supplier mapping and unmapping;
- Handled and unhandled errors.
If the last added log is an error, you will see an Error tag by the tab’s name.
FAQs