TABLE OF CONTENTS
- Use Cases
- How to Set Up Amazon Punch-In
- Step 1: Create a Group Within Your Amazon Business Account
- Step 2: Turn On the Procurement System Integration for the Created Group
- Step 3: Add the Credentials to Precoro
- Step 4: Add the Payment Method to the Group
- Step 5: Add an Address to the Created Group on Amazon
- Step 6: Add or Update Your Locations in Precoro
- Step 7: Add Users to Your Group
- Step 8: Place Your Test Purchase Order
- Step 9: Switch to Active Mode
- How to Create Amazon Orders Outside the Precoro Punch-In
Use Cases
💡Please note: When using Amazon Punch-In, the process will always start with creating a purchase order. Purchase requisitions are not created when you use this integration.
- Most popular: For more flexibility in your purchasing process, you can choose whether Amazon purchases in Precoro require approval.
To set this up, create two groups in your Amazon Business account:
- Group 1: for direct purchases on Amazon without approval.
- Group 2: for Punch-in integration with Precoro, which will require approval.
When placing a PO, you will be able to select one of these groups. Ensure you complete all the setup steps outlined in this guide to properly configure your Amazon account for this use case.
- Most compliant: If you need all Amazon purchases to be approved through Precoro:
Create a single Amazon Punch-In group by completing the steps outlined in How to Set Up Amazon Punch-In section.
How to Set Up Amazon Punch-In
💡Please note: You should have an Amazon Business Account to start the setup process.
Step 1: Create a Group within your Amazon Business Account
To set up a new group:
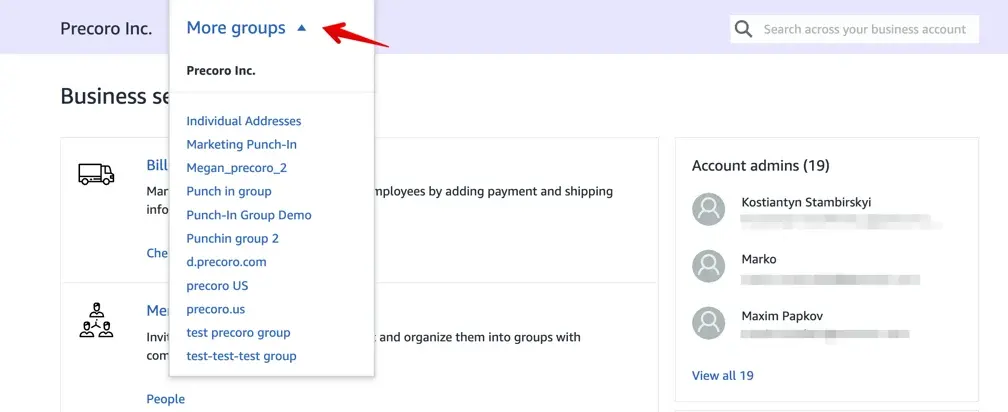
- Open your Amazon Business Account → Account Details → Business Settings.
- Under the Members section, select Groups.
- Give your group a recognizable name (e.g., Punch-In Purchasing) → select the Shared Payment Methods and Shared Addresses in the settings → click the Add Group button.
Here's a how-to video:
Step 2: Turn On the Procurement System Integration for the Created Group
💡Please note: Before applying the settings, make sure you are implementing the changes in the right group. You can switch groups by clicking the group’s name on the top panel:
To set up the purchasing system:
- Open the group you have created.
- Scroll down to the System Integrations section → select Purchasing System.
- On the Set up your purchasing system page, choose Precoro (for app.precoro.com users) or Precoro-US (for app.precoro.us) → click Save.

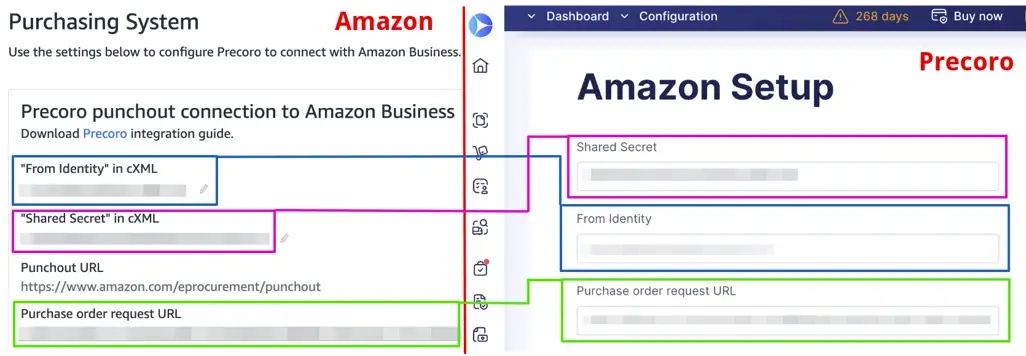
- You will be provided with automatically generated data: "From Identity" in cXML, "Shared Secret" in cXML, Punchout URL, and Purchase Order Request URL. Press the Save button below.

💡Please note: Your integration begins in Test mode, meaning purchases won't be fulfilled or charged during this period. Once the setup is completed, you can switch to Active mode.
Here's a how-to video:
Step 3: Add the Credentials to Precoro
Once the purchasing system is configured on Amazon, you can proceed with further setup:
- In Precoro, navigate to Configuration → Marketplace Configuration → click Setup under Amazon Punch-in.
If you cannot open the Amazon Configuration page, please contact your admin for a Configuration Role. - Copy and paste the generated data (“From identity” in cXML, “Shared Secret” in cXML, Purchase order Request URL) from Amazon into the corresponding fields in Precoro:

Make sure to copy and paste the Purchase Order Request URL, which is unique to your group (as shown in the image above). The Punchout URL is generic and will not work. - Fill out all the required fields in Precoro and click Update to finish the setup:

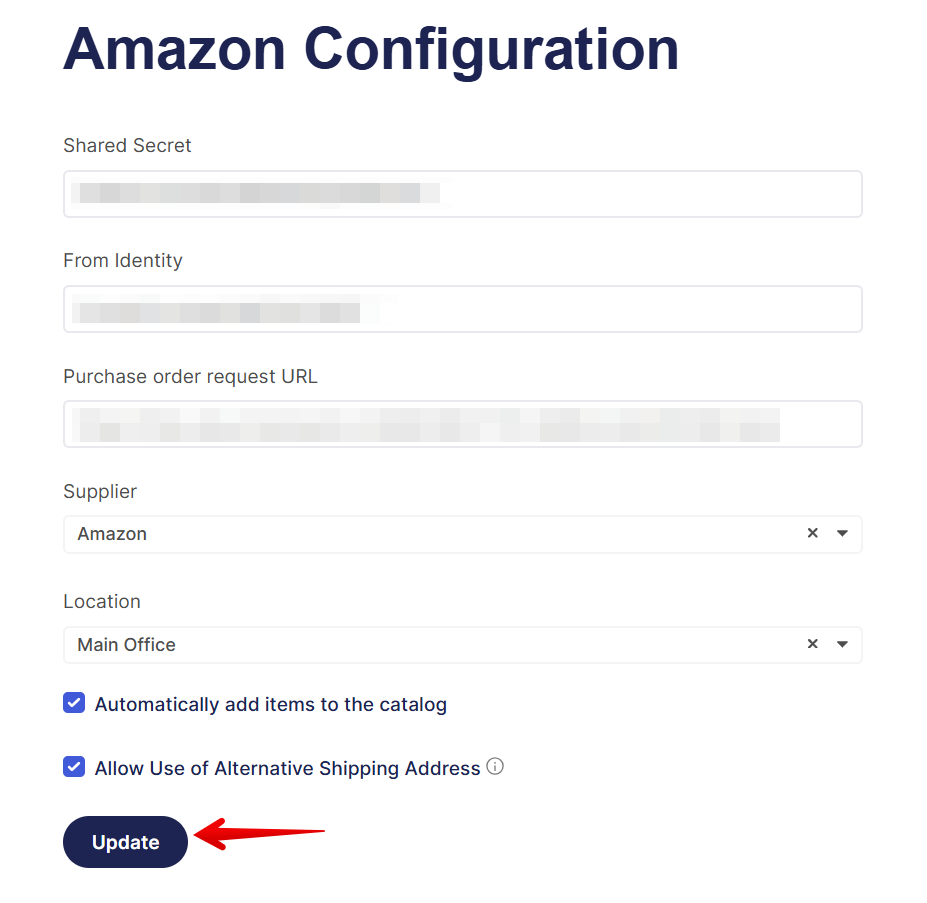
- Supplier — select Amazon Business as the supplier. If Amazon is not on your Supplier list yet, you can create an Amazon Business Supplier using the Add New Supplier button.
- Location — the selected location will be applied in case there is a system error while matching the addresses from Amazon Business to Precoro.
📖Learn how to create Locations in Precoro here.
- Legal Entity
📖You can find more information on creating and working with Legal Entity in Precoro here.
- Automatically Add Items to the Catalog (optional) — if activated, new items added to the Purchase Orders will be automatically added to the Catalog. This function helps save time on routine tasks and eliminate potential manual errors.
- Allow use of Alternative Shipping address (optional)
Enabling this feature means that:
- The Location in documents will be entered based on your configuration settings.
- The Shipping Address will be filled out in the Precoro document based on the address you entered during the order checkout (even if your default Location has a different address).
- The address you see in the Amazon Shipping Address field in the document will be the one sent to Amazon.
- In the printed document, you will see the address from the Amazon Shipping Address field.
- In Reports, you can also select this field for display — Amazon Shipping Address.
Here's a how-to video:
By default, when the Purchase Orders are created, the selected Supplier, Location, and Legal Entity will be displayed in the documents:

Step 4: Add the Payment Method to the Group
💡Please note: Before applying the settings, make sure you are implementing the changes in the right group. You can switch groups by clicking the group’s name on the top panel.
- Go to Billing & Shipping → Shared Payment Methods.
- Select the preferred payment methods for your company:
If you are using the Invoice line, it will be automatically added to your group.
If you are using a credit card, click Add a credit or debit card and follow the instructions to enter your card details. - Click Save to record the changes.
Here's a how-to video:
Step 5: Add an Address to the Created Group on Amazon
💡Please note: Before applying the settings, make sure you are implementing the changes in the right group. You can switch groups by clicking the group’s name on the top panel.
To add an address to the created group in Amazon Business:
- Go to Business Settings → locate Billing&Shipping section → press Addresses and delivery preferences → Shared address book.
- Navigate to Actions on the right → click the Add an address button and fill out the required fields.You can also adjust your delivery preferences in the Delivery instructions (optional) section.
- Once the address information is filled out, click the Add an address button to save changes.
- Repeat for all necessary locations or use the bulk upload option.
Here's a how-to video:
Bulk upload option:
If you need to add multiple locations, you can upload your addresses in bulk:
- Select the Upload addresses for the current group option.
- You will be prompted to download a templated Excel file.
Fill out the required fields in the file, following the instructions provided, and then upload it back to the platform.
Step 6: Add or Update Your Locations in Precoro
To add or update a Location in Precoro, follow these steps:
-
Open the Location Management page → click Add Location to create a new one, or select an existing one and press the Edit button.
-
Fill out the required general fields if you are creating a new location.
-
Click the Marketplace Shipping address button. Please note: Country *, State/Province *, City *, Postal Code * and Address * fields are not editable at this step.
-
Copy the address information from the address added to your punch-in group in Amazon → paste it into the Search on Google Maps.
-
Select the needed option from the drop-down list. Once selected, the data is automatically entered into the corresponding fields. You can now edit the automatically entered information in all the address fields.
💡Please note: For the settings to work correctly, the shipping address details should be identical in Precoro and Amazon.
6. Press the Create or Update button below to record the changes and repeat the process to add all needed addresses.
Here's a how-to video:
Step 7: Add Users to Your Group
💡Please note: Before applying the settings, make sure you are implementing the changes in the right group. You can switch groups by clicking the group’s name on the top panel.
- Go to Business Settings → Members → People → click the Add People button.
- Choose a method to add users:
- Upload a spreadsheet: use a bulk upload for multiple users.
- Share an invite link: provide the link to users for self-registration.
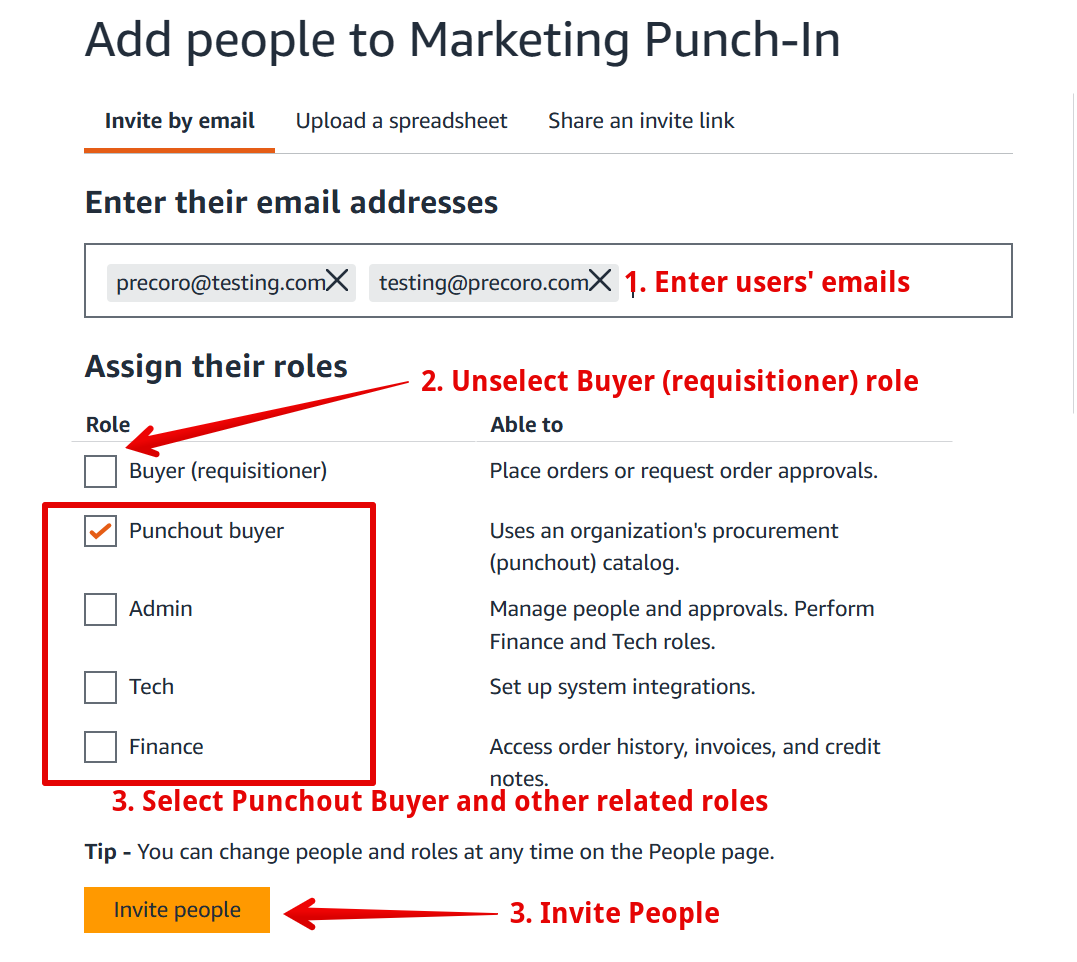
- Invite by email: Enter users’ email addresses (press Enter after each email address to separate them) → assign roles → click Invite People.
- Assign Roles:
Assign the Punchout buyer role for all users to access the integration. You can also enable additional roles based on user responsibilities.
💡Please note: Do not assign the Buyer (requisitioner) role, as it bypasses the Punch-in process. If the Punchout buyer role is unavailable, check if you selected the correct Punch-in group.
4. Remove the Buyer (requisitioner) role if it is assigned at the general level:
💡Please note: Having both the Buyer (requisitioner) role on the general level and the Punchout buyer role on the group level does not work together.
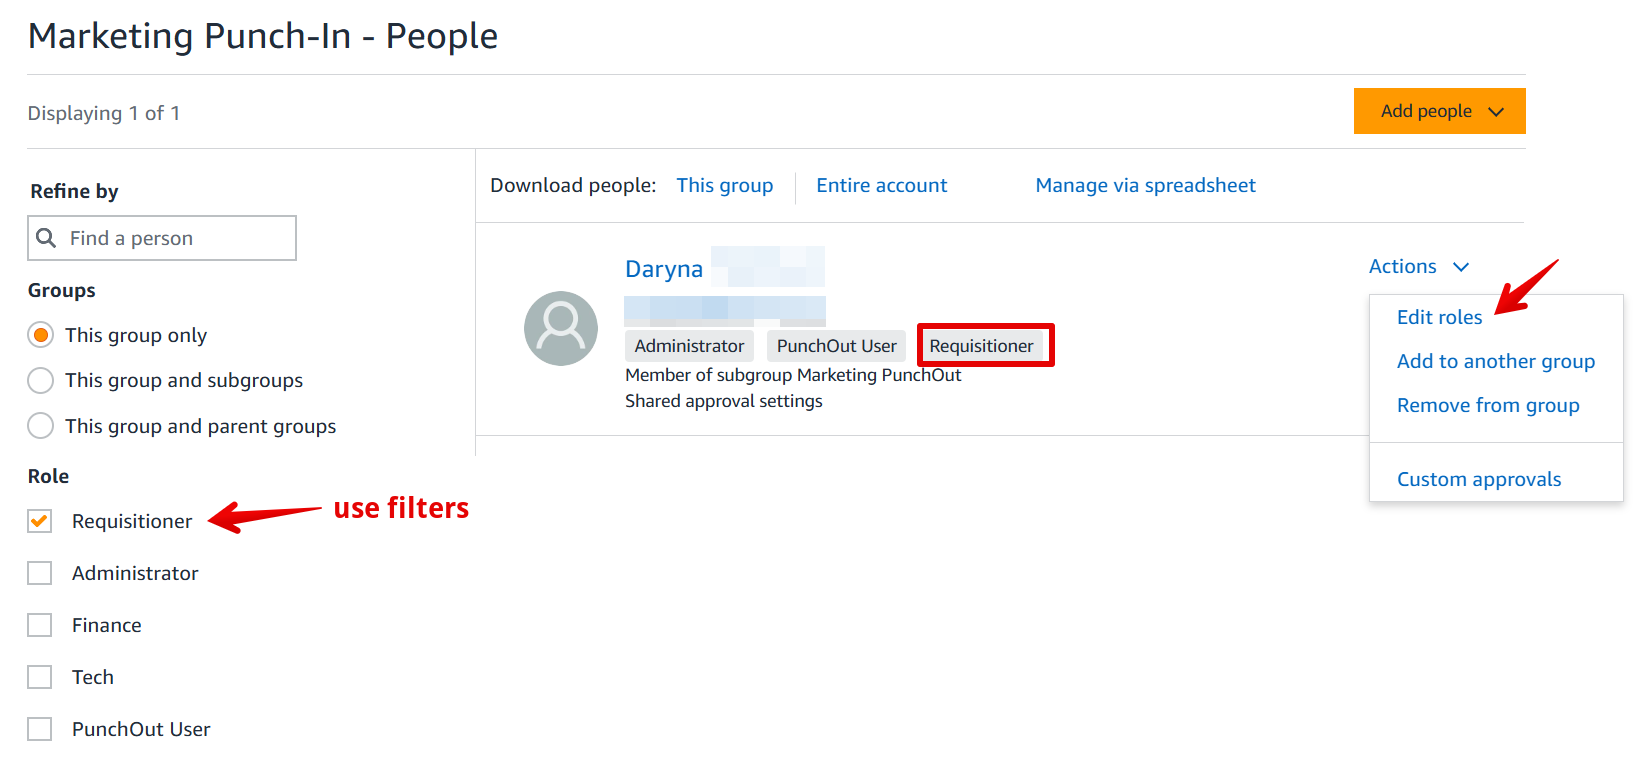
- Navigate to your company account Business Settings by clicking on your company name on the left → Members → People.
- Locate users with the Requisitioner role → Click Actions → Select Edit roles.
- Uncheck the Requisitioner role → Click Update roles.
Here's a how-to guide:
Important to Note:
- Users with an Amazon Business account are added to the group automatically without receiving email notifications.
- Users without an Amazon Business Account will receive an email invitation to join. They will have to accept the invitation and register on the platform to appear as members of the group.
- Users must have the same email address in both their Amazon Business and Precoro accounts for proper access.
Step 8: Place Your Test Purchase Order
Congratulations! You’re almost done. Now, it’s time to test whether the integration is set up correctly.
💡Please note: While the integration is in the Test Mode, your orders will not be fulfilled or charged.
To test the integration:
1. Add an item to your cart and click Proceed to Checkout.
If you have access to other groups in your Amazon Business account, you may need to select your Punch-In Group. Otherwise, it will be selected automatically.
2. Fill out all the necessary fields to complete the order.
Once done, you will see a warning message stating that this order requires approval. This indicates the integration is working correctly.
3. Click Submit Order for Approval to continue with the testing process. This will send your Purchase Order (PO) for approval in Precoro.
🤝 If you don’t see this option, please review the previous steps or contact our Amazon Integration Specialist at precoro@precoro.com.
4. You’ll be redirected to Precoro, where your order should have a Draft status.
💡Please note: Once the PO is sent to Precoro, you cannot edit item prices, add new items, or delete existing ones. You can only Approve the order or Reject it, without modifying the original item information from the Amazon order.
5. In Precoro, click the Edit Purchase Order button in the right action panel and fill out the required fields: Department, Budget, Location, Chart of Accounts, etc.
💡Please note: You can select any Location in Precoro if it has a correctly added Marketplace Shipping address. However, only the Amazon Shipping Address will be sent back to Amazon if the Allow use of Alternative Shipping address option is enabled.
6. Once done, click Confirm.
Here's a how-to video:
Once approved in Precoro, your order will be automatically sent to Amazon and canceled in a few hours due to testing. Amazon would start processing your order if the integration was live at this stage.
You can cancel your PO in Precoro once it is canceled on Amazon.
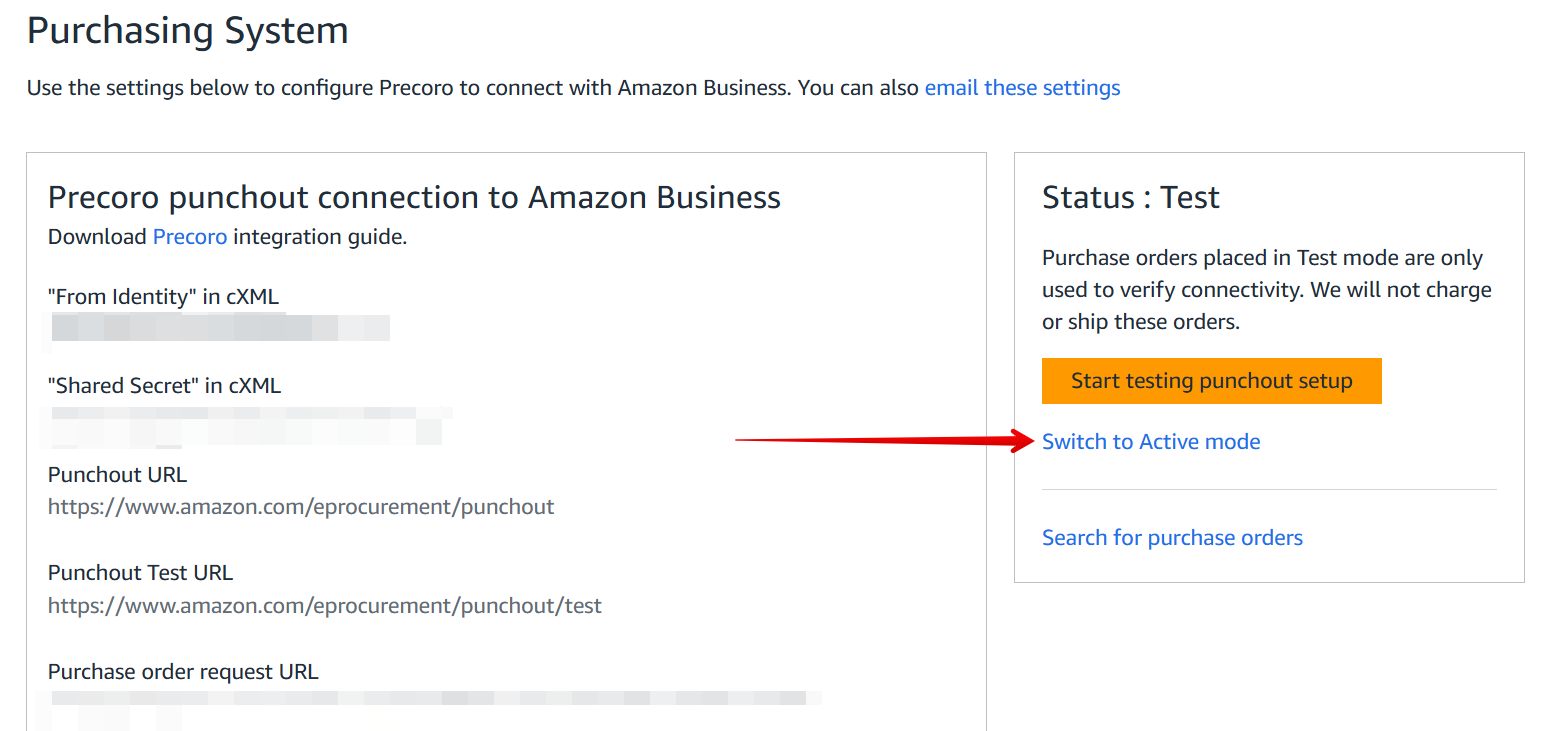
Step 9: Switch to Active Mode
Once you have verified that everything is working correctly, you can switch to the active mode:
💡Please note: In Active mode, all subsequent orders will be processed and charged to your account.
- Go to Business Settings → System Integrations → Purchasing System.
- Click the Switch to Active Mode button, which will put the integration into live mode.

How to Create Amazon Orders Outside the Precoro Punch-In
If you want to make Amazon purchases without Precoro integration (not recommended), you can сreate a separate group for non-integrated orders:
- Set up an additional group in your Amazon Business Account.
- Assign the Buyer (requisitioner) role to all users in this group (not the Punchout buyer role).
- If the same users are present in your main company group, confirm that they have the Buyer (requisitioner) role there as well.
🤝If you need help setting this up, please contact our Amazon Business Integration Specialist at support@precoro.com
Check Frequently Asked Questions Regarding Amazon Integration article if any questions arise.