TABLE OF CONTENTS
What is Single Sign-On
Single Sign-On (SSO) allows your system administrator to manage all logins across all applications from one secure platform. It also allows users to use only one set of credentials to log in to different platforms, while the identity provider (IdP) ensures secure access.
If you use SSO, you can:
- Improve data security.
- Ensure easier access for users and increase productivity.
- Centralize control over user profiles for administrators.
Supported SSO Providers
You can integrate Precoro with any identity provider that supports the SAML 2.0 protocol. To do it easily, follow the Precoro SSO setup guide provided in this article.
Additionally, we have a list of supported providers and setup guides for integrating with them:
How to set up SSO
Here’s a general guide you can follow if your SSO tool is not on the list of supported providers.
Step 1: Ensure Necessary Access
Before connecting Precoro to your SSO provider, ensure you have the required access level on both platforms.
- You need the Admin role in Precoro to access the SSO Settings page in Configuration.
- You also need admin access in your SSO tool.
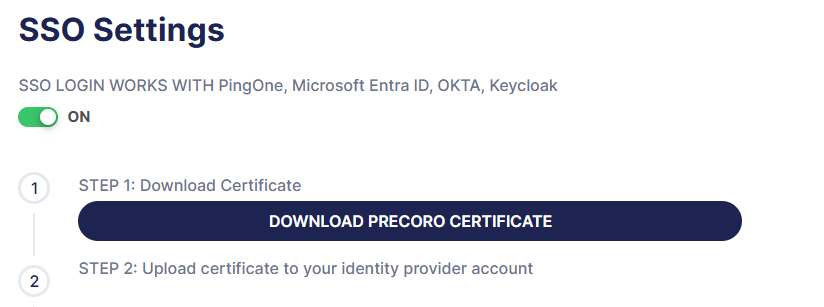
Step 2: Upload Precoro Certificate
To set up SSO, navigate to Configuration → SSO Settings.
Press the Download Precoro Certificate button and upload it to your IdP account.
Step 3: Adjust the Settings in the IdP Admin Panel
1. Navigate to the admin panel in your SSO tool and add a new SAML app.
2. Fill out these fields:| Field |
Value |
What it is used for |
|
SSO URL |
EU Server: https://app.precoro.com/ US Server: https://app.precoro.us/ |
Precoro URL to initiate SSO |
|
Entity ID |
EU Server: https://app.precoro.com/backoffice US Server: https://app.precoro.us/backoffice |
Precoro company identifier |
|
Assertion Consumer Service (ACS) URL |
EU Server: https://app.precoro.com/backoffice/saml/login_check US Server: https://app.precoro.us/backoffice/saml/login_check |
Precoro URL for SAML responses |
|
X.509 Certificate |
The certificate you downloaded from Precoro in Step 2. |
A certificate to verify SAML requests |
|
(Optionally) Single Logout Response Endpoint (SLO URL) |
EU Server: https://app.precoro.com/logout US Server: https://app.precoro.us/logout |
An optional parameter for session logout |
3. Download metadata from your IdP.
4. Save the changes after you’ve provided the necessary information.
5. Find the Issuer (alternative names: Identifier, Entity ID) parameter in your identity provider profile. Depending on the tool you use, it may be in:
- The SAML Settings section,
- The Identifiers / Entity ID / Issuer section.
Save this value to enter it in Precoro on the next step.
6. Add the users or groups to the created Precoro SAML app.
Step 4: Adjust the Settings in Precoro
Return to the SSO Settings page in Precoro. Enter the Issuer (Identifier, Entity ID) unique identifier you copied in the previous step.

Then upload the metadata you saved in the previous step.

Press Update to save the changes.
Step 5: Test the Integration
Once the integration is established, test it out by following the usual login process:
- When you log in to Precoro, press the Sign In with SSO button.
- Enter your corporate email address.
- You’ll be redirected to your IdP page. Enter your credentials there.
- After successful authorisation, you’ll be redirected to Precoro.