How to Set Up and Use Webhooks
Learn how to use webhooks to receive updates about events in Precoro in real time.
TABLE OF CONTENTS
- What are Webhooks?
- How to Configure Webhooks?
- Structure of a Webhook Message
- Example of a Webhook Message
- How to Process Webhook Notifications
- Rules and Restrictions
What are Webhooks?
Webhooks allow us to track events that occur in Precoro. Unlike API, you do not need to manually send requests to see if there were any changes in Precoro (e.g., whether there have been changes in Suppliers or if Invoices have been paid), because you will be able to receive notifications about these events in real-time.
All you need to do is enter your endpoint URL and choose the events to track.
You can add up to 5 unique Webhook Endpoints in Precoro.
How to Configure Webhooks?
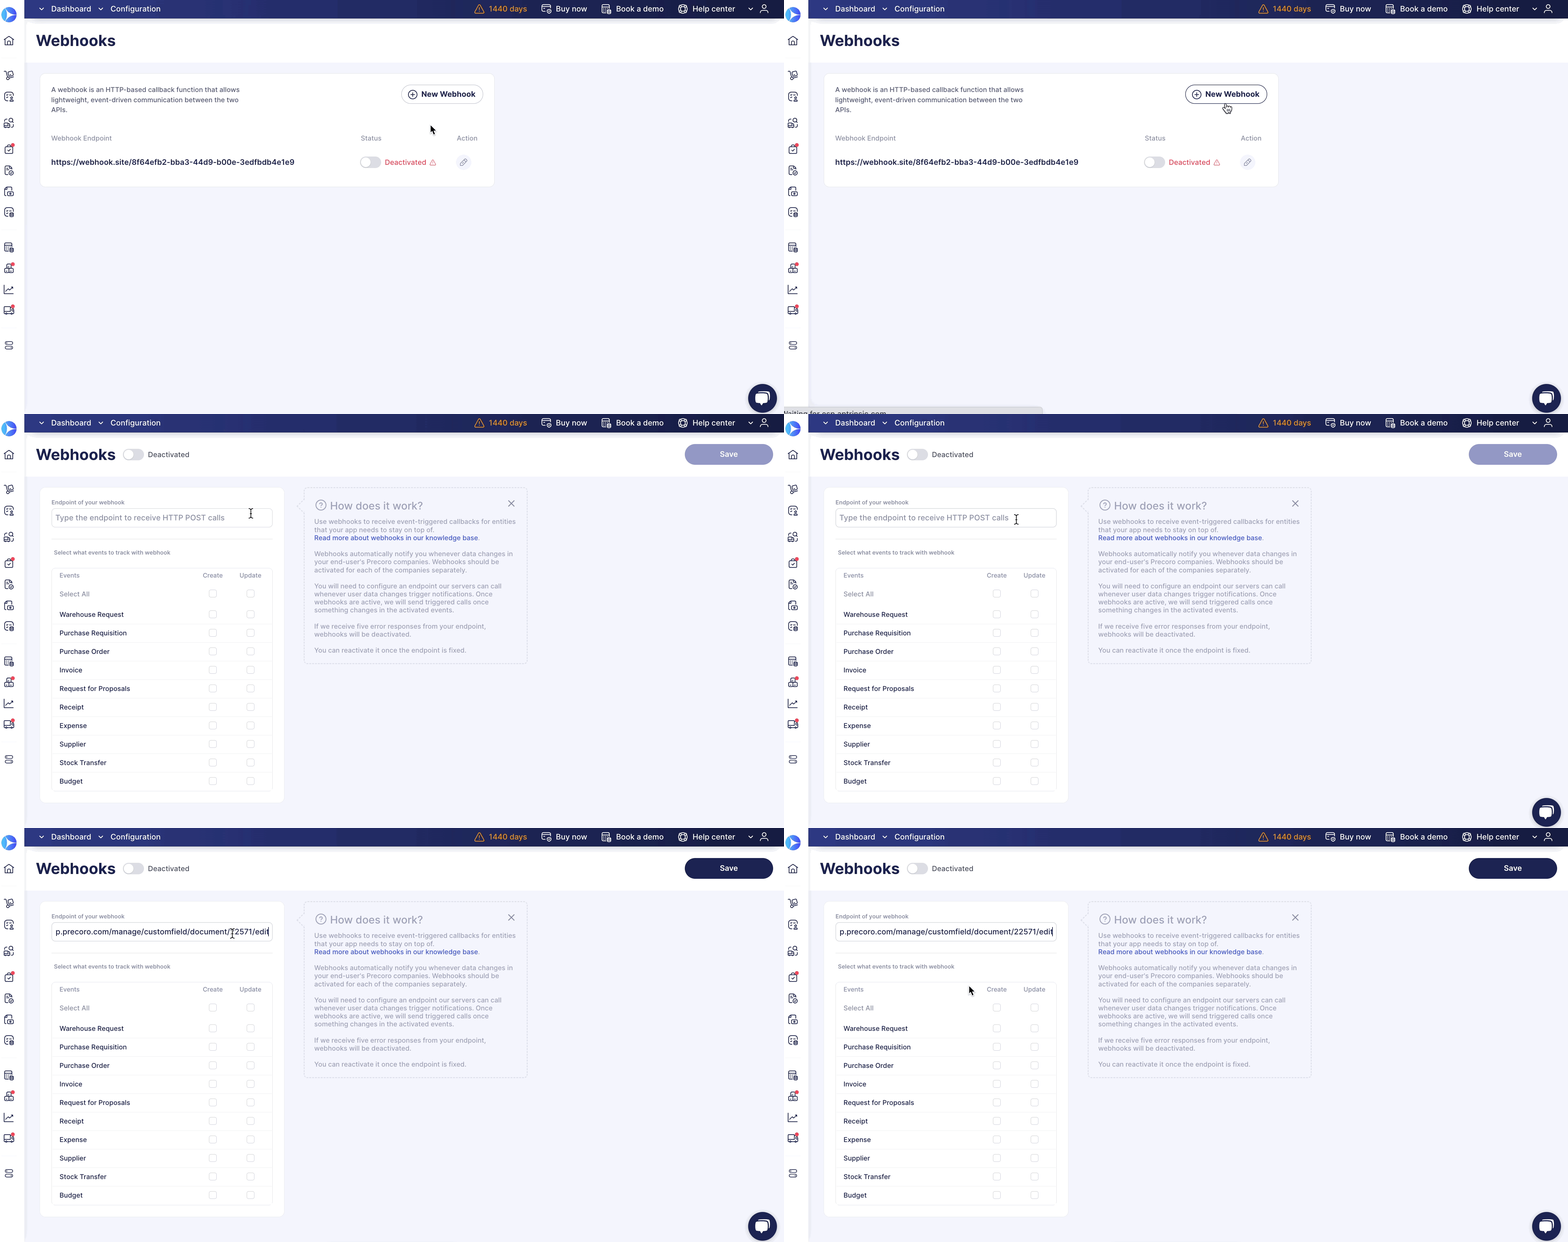
In Precoro, you can set up and manage webhooks on the Configuration page: Link to the US server | Link to the EU server. From there, you can view your current webhooks, check their activation status, and edit them by clicking the pencil icon.
Follow these simple steps to configure a webhook:
1. Enter the endpoint URL
Creating a webhook endpoint is no different from creating any other page on your website. It is an HTTP or HTTPS endpoint on your server with a URL. This URL is the link to which requests will be sent. Make sure it is correct and accepts POST requests.
Press the New Webhook button and type in the endpoint:

2. Select the events you want to track
There are nine entities you could track for the moment, and two types of events: create and update.
3. Make sure users creating webhooks have all the necessary Roles
Please note that user access affects the information a user receives from the webhook.
For example, if a user has created a webhook with only a PO Creator role, they will receive webhooks only for their POs.
Therefore, users who set up webhooks should have maximum access—that way, they will be able to get webhooks for all modules without restrictions.
Structure of a Webhook Message
There are three required fields in a webhook message:
1. Id—ID of the entity that was created or modified.2. Type—the type of entity that was created or modified.
3. Action—the event that happened.
4. Idn—the IDN of entity, if available.
Below you will find a table of values for type and action.
|
Entity |
Type |
|
Warehouse Request |
0 |
|
Purchase Requisition |
1 |
|
Purchase Order |
2 |
|
Invoice |
3 |
|
Request for Proposal |
4 |
|
Receipt |
5 |
|
Expense |
6 |
|
Supplier |
7 |
|
Stock Transfer |
8 |
|
Budget |
9 |
|
Custom Fields for Documents |
10 |
|
Custom Fields for Items |
11 |
|
Event |
Action |
|
Create |
0 |
|
Update |
1 |
Example of a Webhook Message
Let’s take a look at an example below:
{
"id":123456,
"type":2,
"action":0,
"idn":5,
}
This means a new Purchase Order with id 123456 and idn 5 was created.
How to Process Webhook Notifications
After receiving the message, you can get all the necessary data on it by making a request to the API, following our documentation.
The message contains all the required information (according to the example above, to get full information, you would need to make a request—GET https://api.precoro.com/purchaseorders/{idn}).
Rules and Restrictions
- To avoid spam requests, if the same action with the same entity occurs several times in Precoro within 30 seconds, it will be sent once.
- While the document has a Draft or In Revision status, the changes are not sent to the webhook. These statuses indicate that the document has not yet been finalized in Precoro and the changes may continue.
- Check if the response code is 200 or 201. If there is an error when sending a message, your webhook will be deactivated after five attempts. You can check this on the webhook settings page.
Usage Scenarios
Relating Custom Fields for Items with Invoice Items
Usage Case: Syncing new invoices with related Custom Fields for Items.
Steps to Set Up:
Retrieve Invoices Created or Updated After a Specific Date:
Make a GET request to retrieve invoices created or updated after the specified date using the endpoint, for example, /invoices?modifiedSince=2023-10-10T00:00:00, or use the Approval Date filter that shows the final approval date. This ensures you have the most recent invoice data to work with.
Fetch Custom Fields for Items Information and Set Up Webhooks:
Obtain Custom Fields for Items information by making a GET request to /itemcustomfields. It's advisable to store this information on your side, as these data don't change frequently. Additionally, consider setting up webhooks to receive real-time updates whenever Custom Fields for Items and Documents are modified. This will keep your data constantly up-to-date without the need for constant polling.
Query Each Qualifying Invoice:
For each qualifying invoice, make a GET request to /invoices/{id} to access specific details, including line items. This data retrieval provides an opportunity to relate Custom Fields for Items with the stored Custom Fields for Items data.
Relate Custom Fields for Items with Invoice Items:
Compare the Custom Fields for Items data obtained from /itemcustomfields with the line items in the invoice retrieved in the previous step. By matching relevant Custom Fields for Items to the line items, you establish a connection that adds specificity to your data.