TABLE OF CONTENTS
How to Send a Registration Form
To Invite a New Supplier
Precoro offers multiple ways to add and manage suppliers. If you have the suppliers’ contacts, terms, payment details, and necessary documents, you can add them yourself, as described in this article.
You can also send registration forms to suppliers you want to work with. These forms will help you receive accurate information and decide on your collaboration.
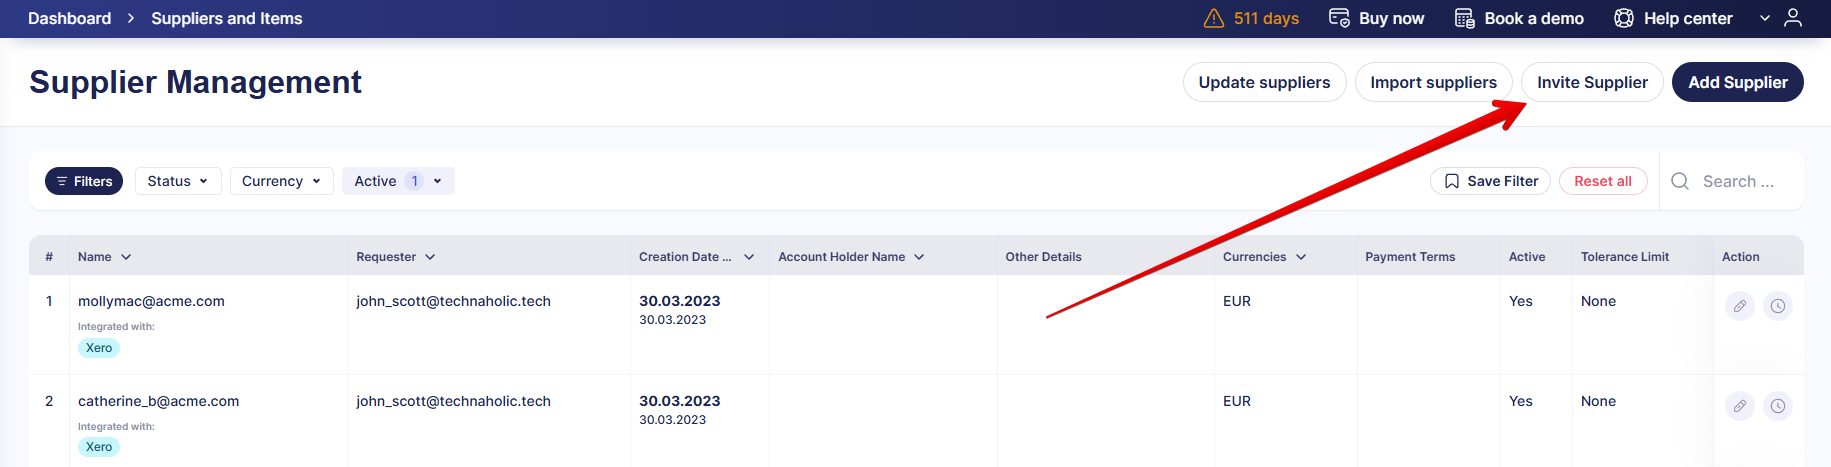
- Open the Supplier Management module in the left-side menu, go to the Supplier Management tab (Supplier Management for precoro.us), and press Invite Supplier.
If you also use the Supplier Portal but do not want to invite this supplier to it, select the Send a Registration Form option.
- Press New Invitation in the top right.
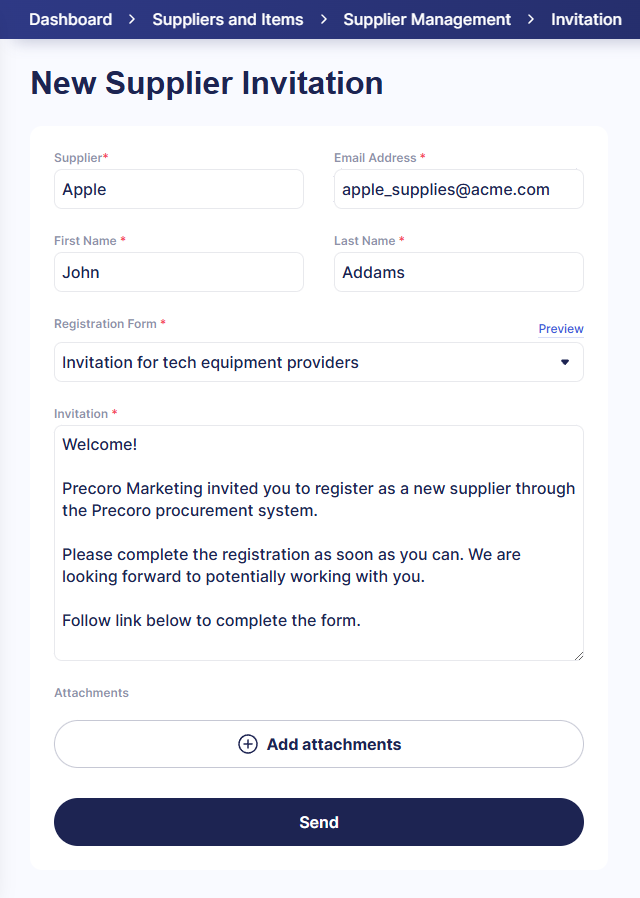
- Fill out the necessary fields. Ensure you enter the correct supplier name, as it will appear in the form, and the supplier will not be able to edit it.
- Select the registration form. If needed, press Add Registration Form at the top of the drop-down list and create a new template by following this guide.
You can also edit the invitation email.
-
Press Send.
To Send a Questionnaire to an Existing Supplier
You can also use registration forms to prompt the existing suppliers to update necessary information.
-
Open the Supplier Management module in the left-side menu, go to the Supplier Management tab, and click on the supplier you want to request information from to open the Supplier Card.
-
Press Send Questionnaire in the top right corner.
If the supplier has a Pending status, the button is available to the current Approver.
If the supplier is Approved, the button is available to all users with the Supplier Management Roles.
-
You will be directed to the new invitation screen. The information from the supplier card will fill in the supplier's name and contact information.
-
The supplier will receive the form with the data from the supplier card automatically filled in. They can leave it as is or make edits.
When the supplier submits the form, data is transferred to the supplier card. If the supplier had the Pending status, the changes only affect further approval steps. However, if the data of the Approved supplier changes, the re-approval process is triggered.
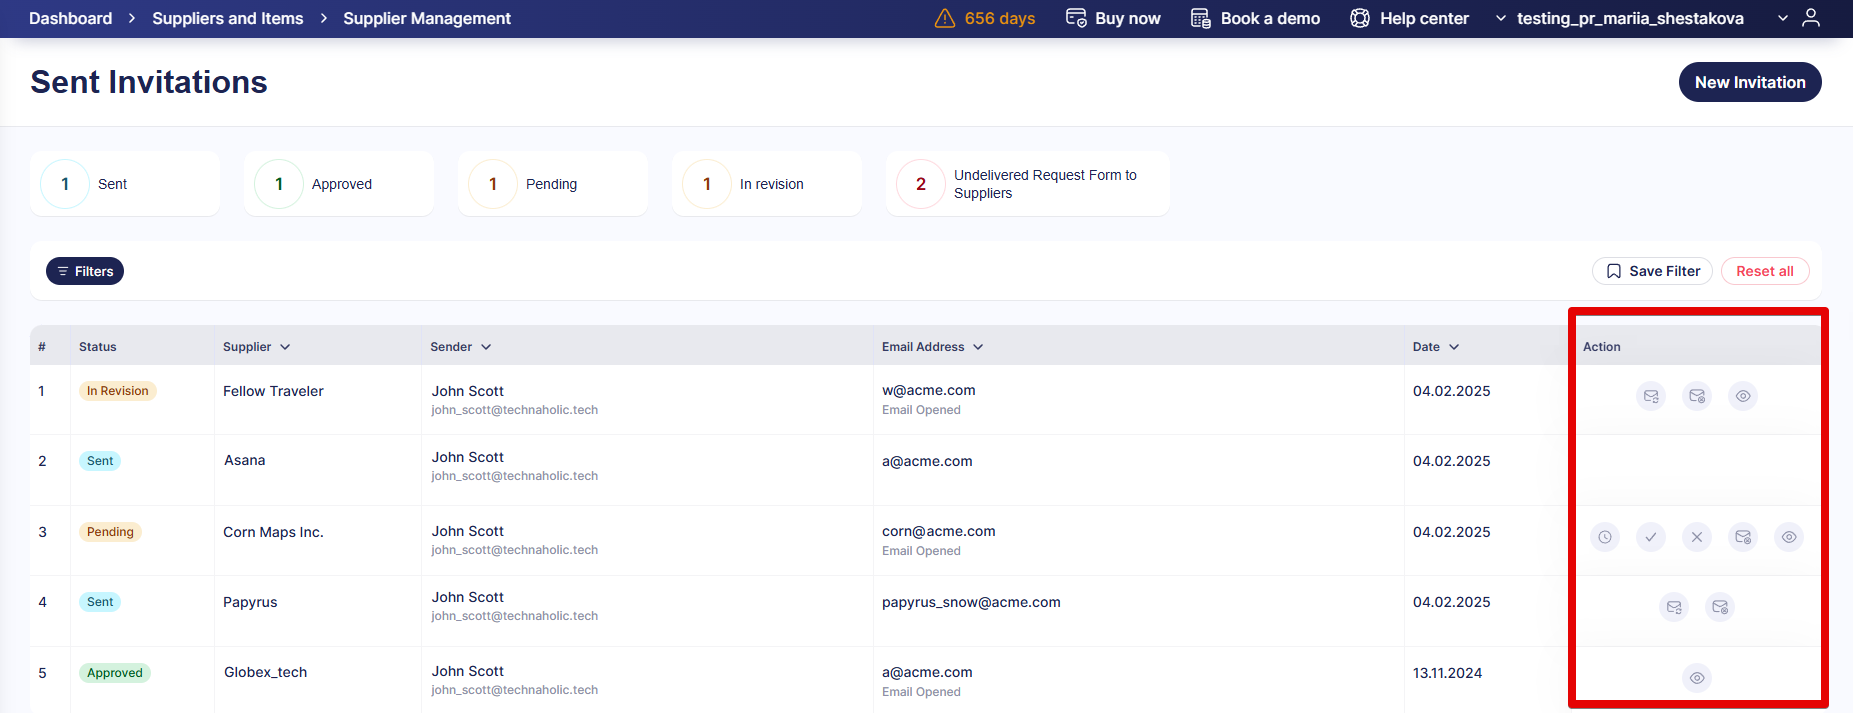
Managing Sent Invitations
Go to the Supplier Management page and press Invite Supplier to see the Sent Invitations page. This is a hub that allows you to view and manage existing invitations. There are several actions available for invitations depending on their status. Their icons are displayed in the Action column, and you can hover over them to see the names.
Here’s what you can do from this page:
- Resend invitations
When the invitation is sent, but the supplier has not responded yet, you can resend it. This allows you to edit the details, including the email address (to send it to an alternative contact).
- Revoke invitations
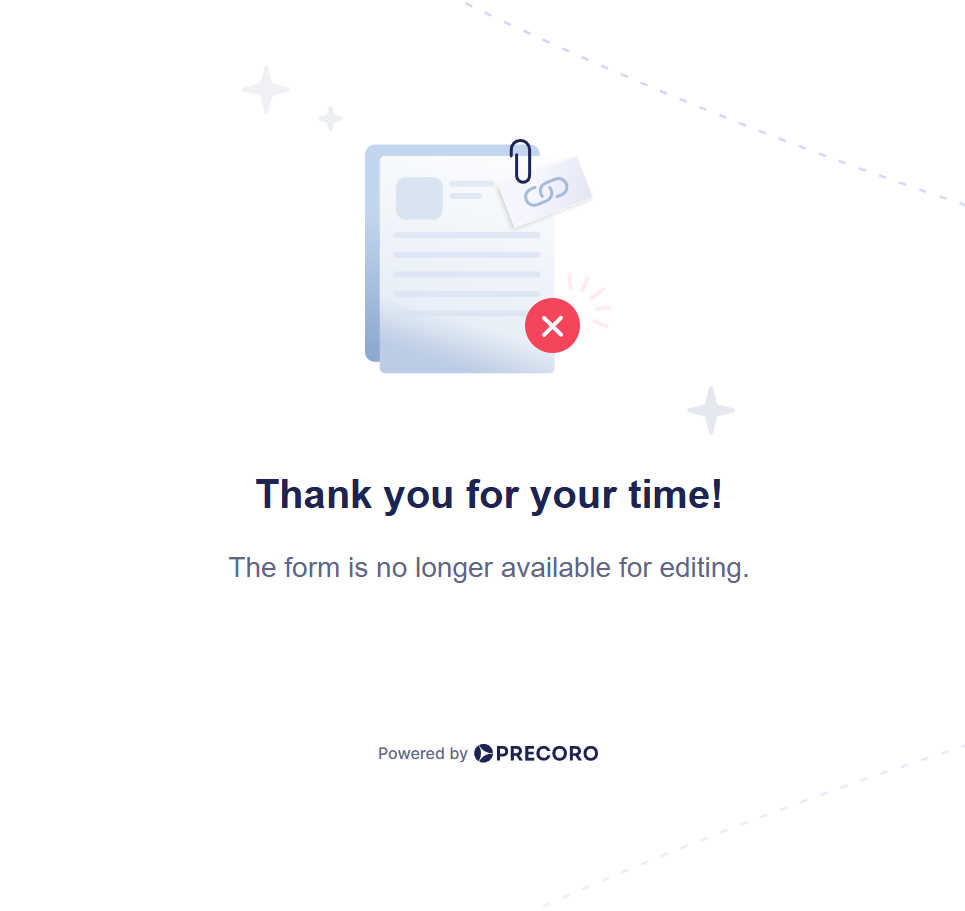
If you no longer need the invited supplier and the invitation is in Sent, Pending, or In Revision status, you can revoke it. This invitation will gain the Canceled status.
If the supplier tries to open the form, they will see the following message:
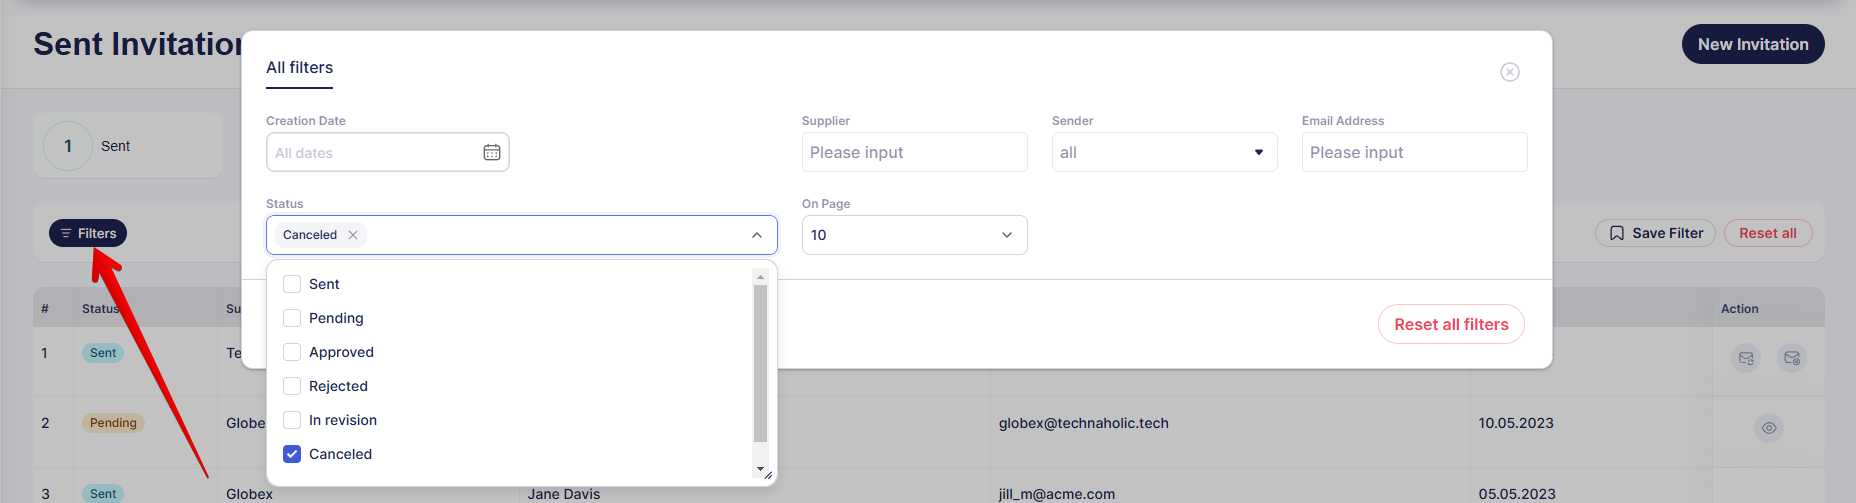
Canceled invitations are removed from the list on the Sent Invitations page. To view them, open Filters and select Canceled in the Status field.
- Preview suppliers’ responses
If the invitation has a Pending, In Revision, or Approved status, meaning at least one form has been submitted, you can use the preview button to access the submitted information. -
Approve submitted forms
If the submitted information corresponds with your expectations, approve the form. The supplier will receive the Approval email and proceed to the supplier approval workflow set up in your company.
-
Reject submitted forms
If the submitted information does not meet your expectations, reject the form. The supplier will receive the Rejection email.
-
Send submitted forms for revision
If you want to request clarifications from the supplier, send the forms for revision. You will be prompted to add a comment explaining the changes the supplier has to make. They will receive the Revision email with your message.
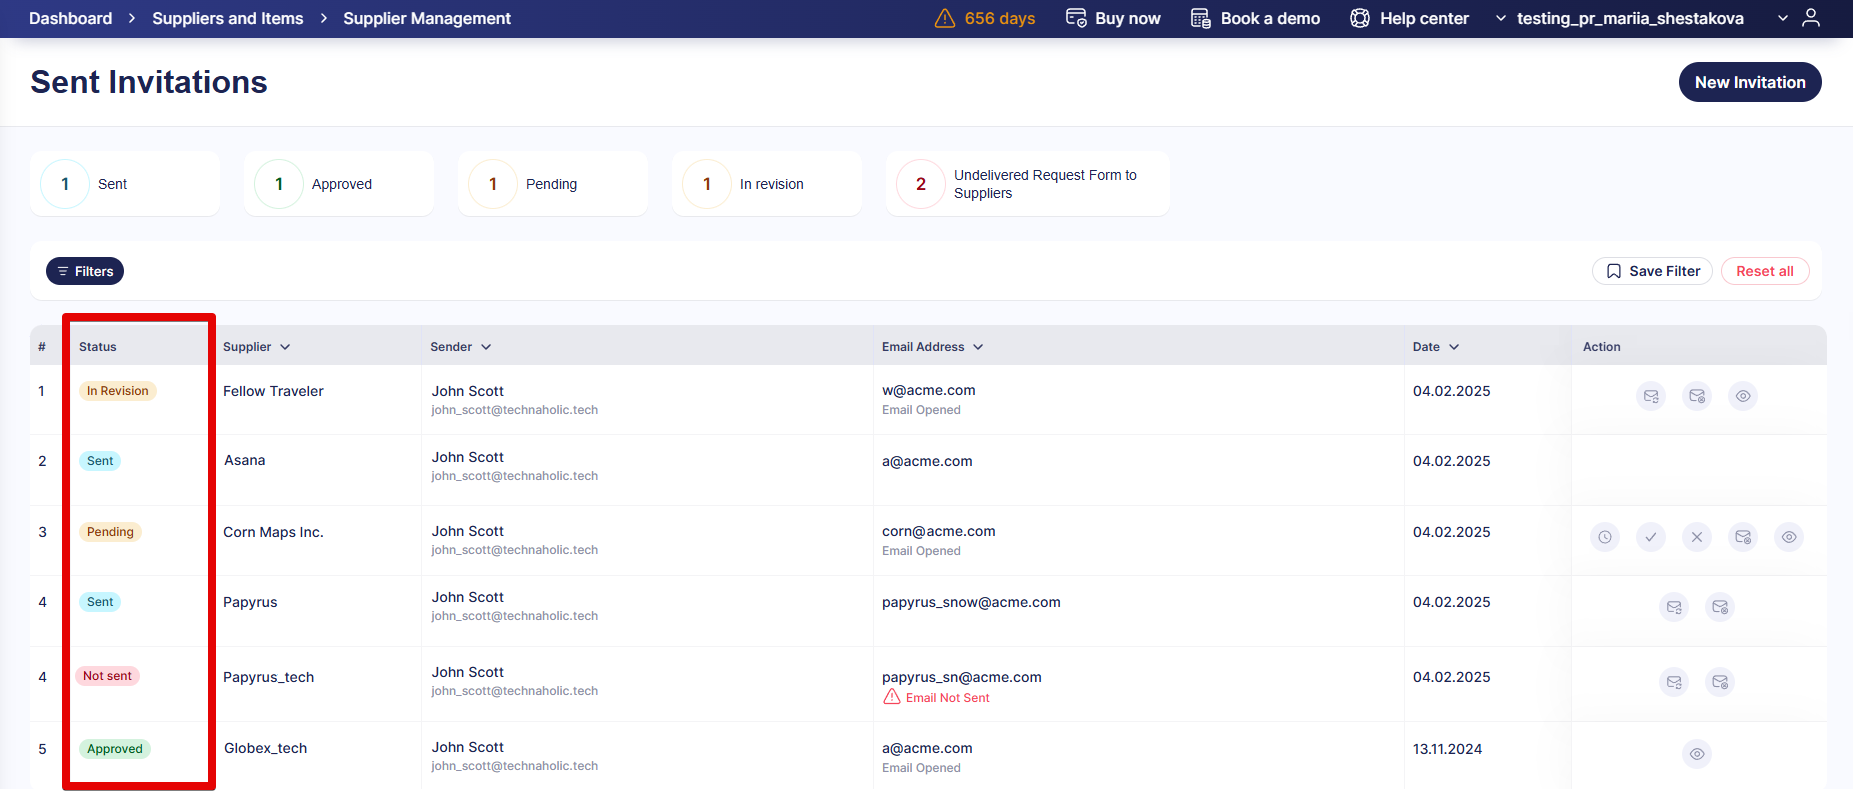
Tracking Invitations
Invitation Statuses
In the Status column, you may see the following statuses:
|
Sent |
The supplier has not yet processed and submitted the registration form. |
|
Not Sent |
An error occurred when sending the invitation email. |
|
Pending |
The supplier has already submitted the registration form and awaits further action from the sender. When a supplier submits a form and the invitation gains Pending status, the sender is notified via email and can proceed to approve, reject, or send the form for revision. |
|
In Revision |
The sender used the Send for Revision option. This invitation was sent back to the supplier with the request to make changes stated in the sender’s comment. |
|
Approved |
The sender approved the submitted form. |
|
Rejected |
The sender rejected the submitted form. |
|
Canceled |
The sender revoked the form. To see invitations with this status, use Filters. |
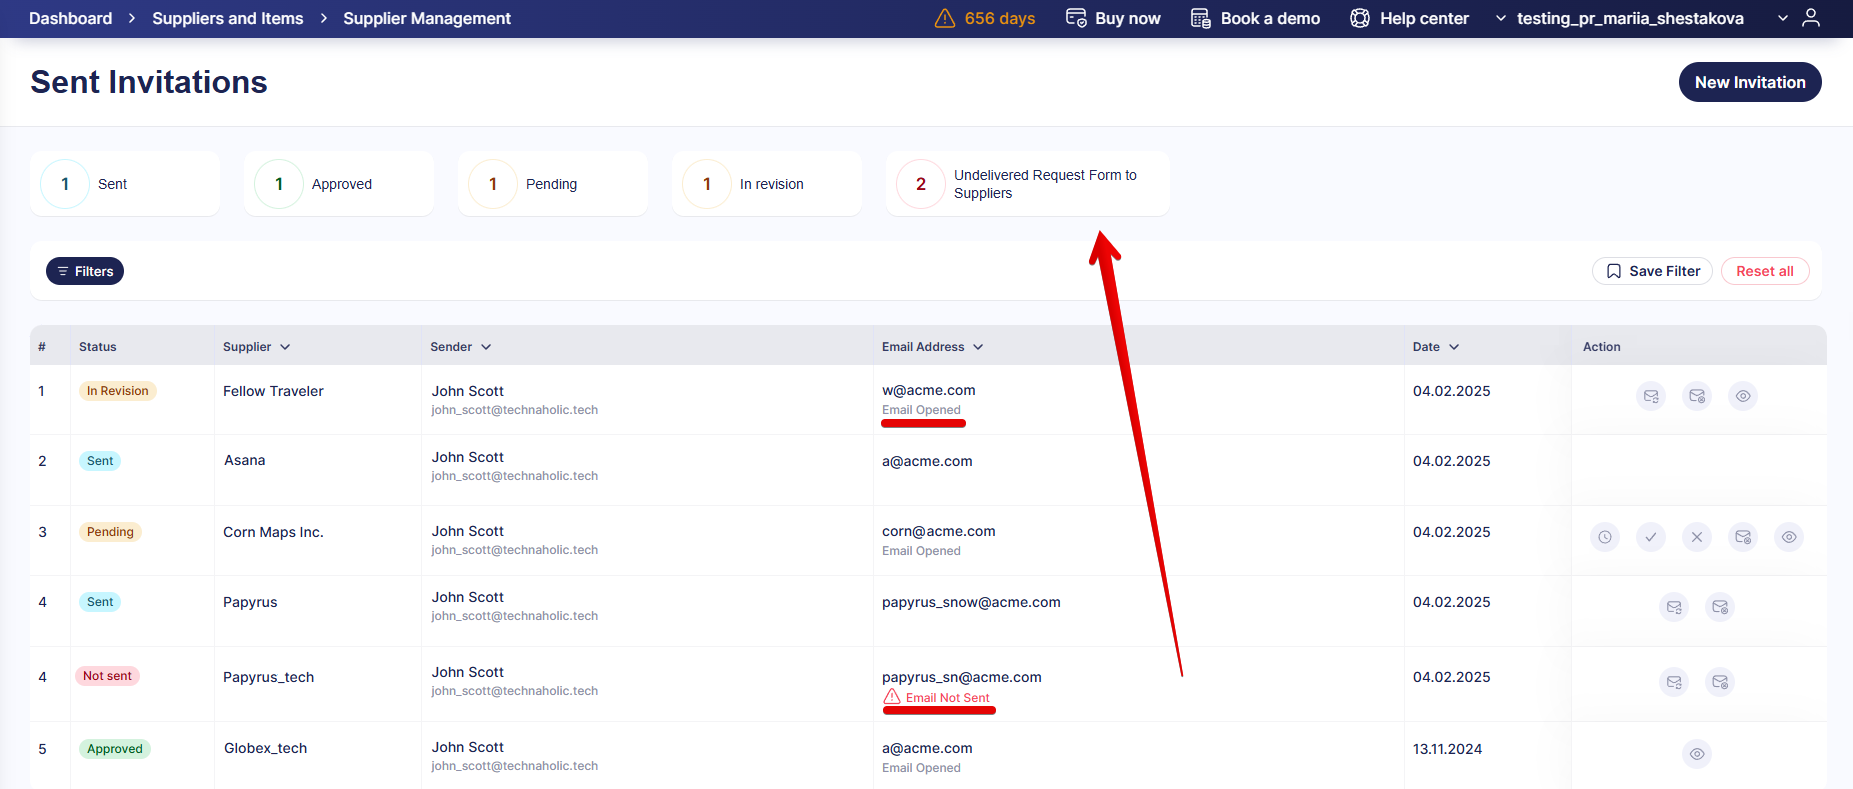
Email Statuses
Depending on whether the invitation was delivered and opened, you may see the following email statuses:
-
Email Not Sent
-
Email Sent
-
Email Opened
To view all invitations that haven’t been sent, use the Undelivered Request Form to Suppliers infocard.
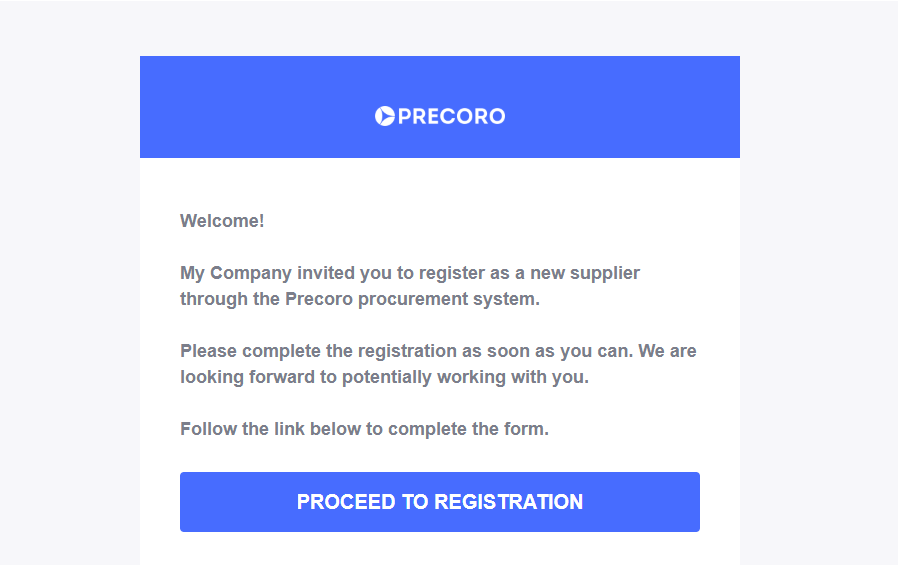
Invitation From the Supplier’s Perspective
Here is how the supplier sees and uses the forms you set up and send:
- When you send an invitation, the supplier receives the invitation email.

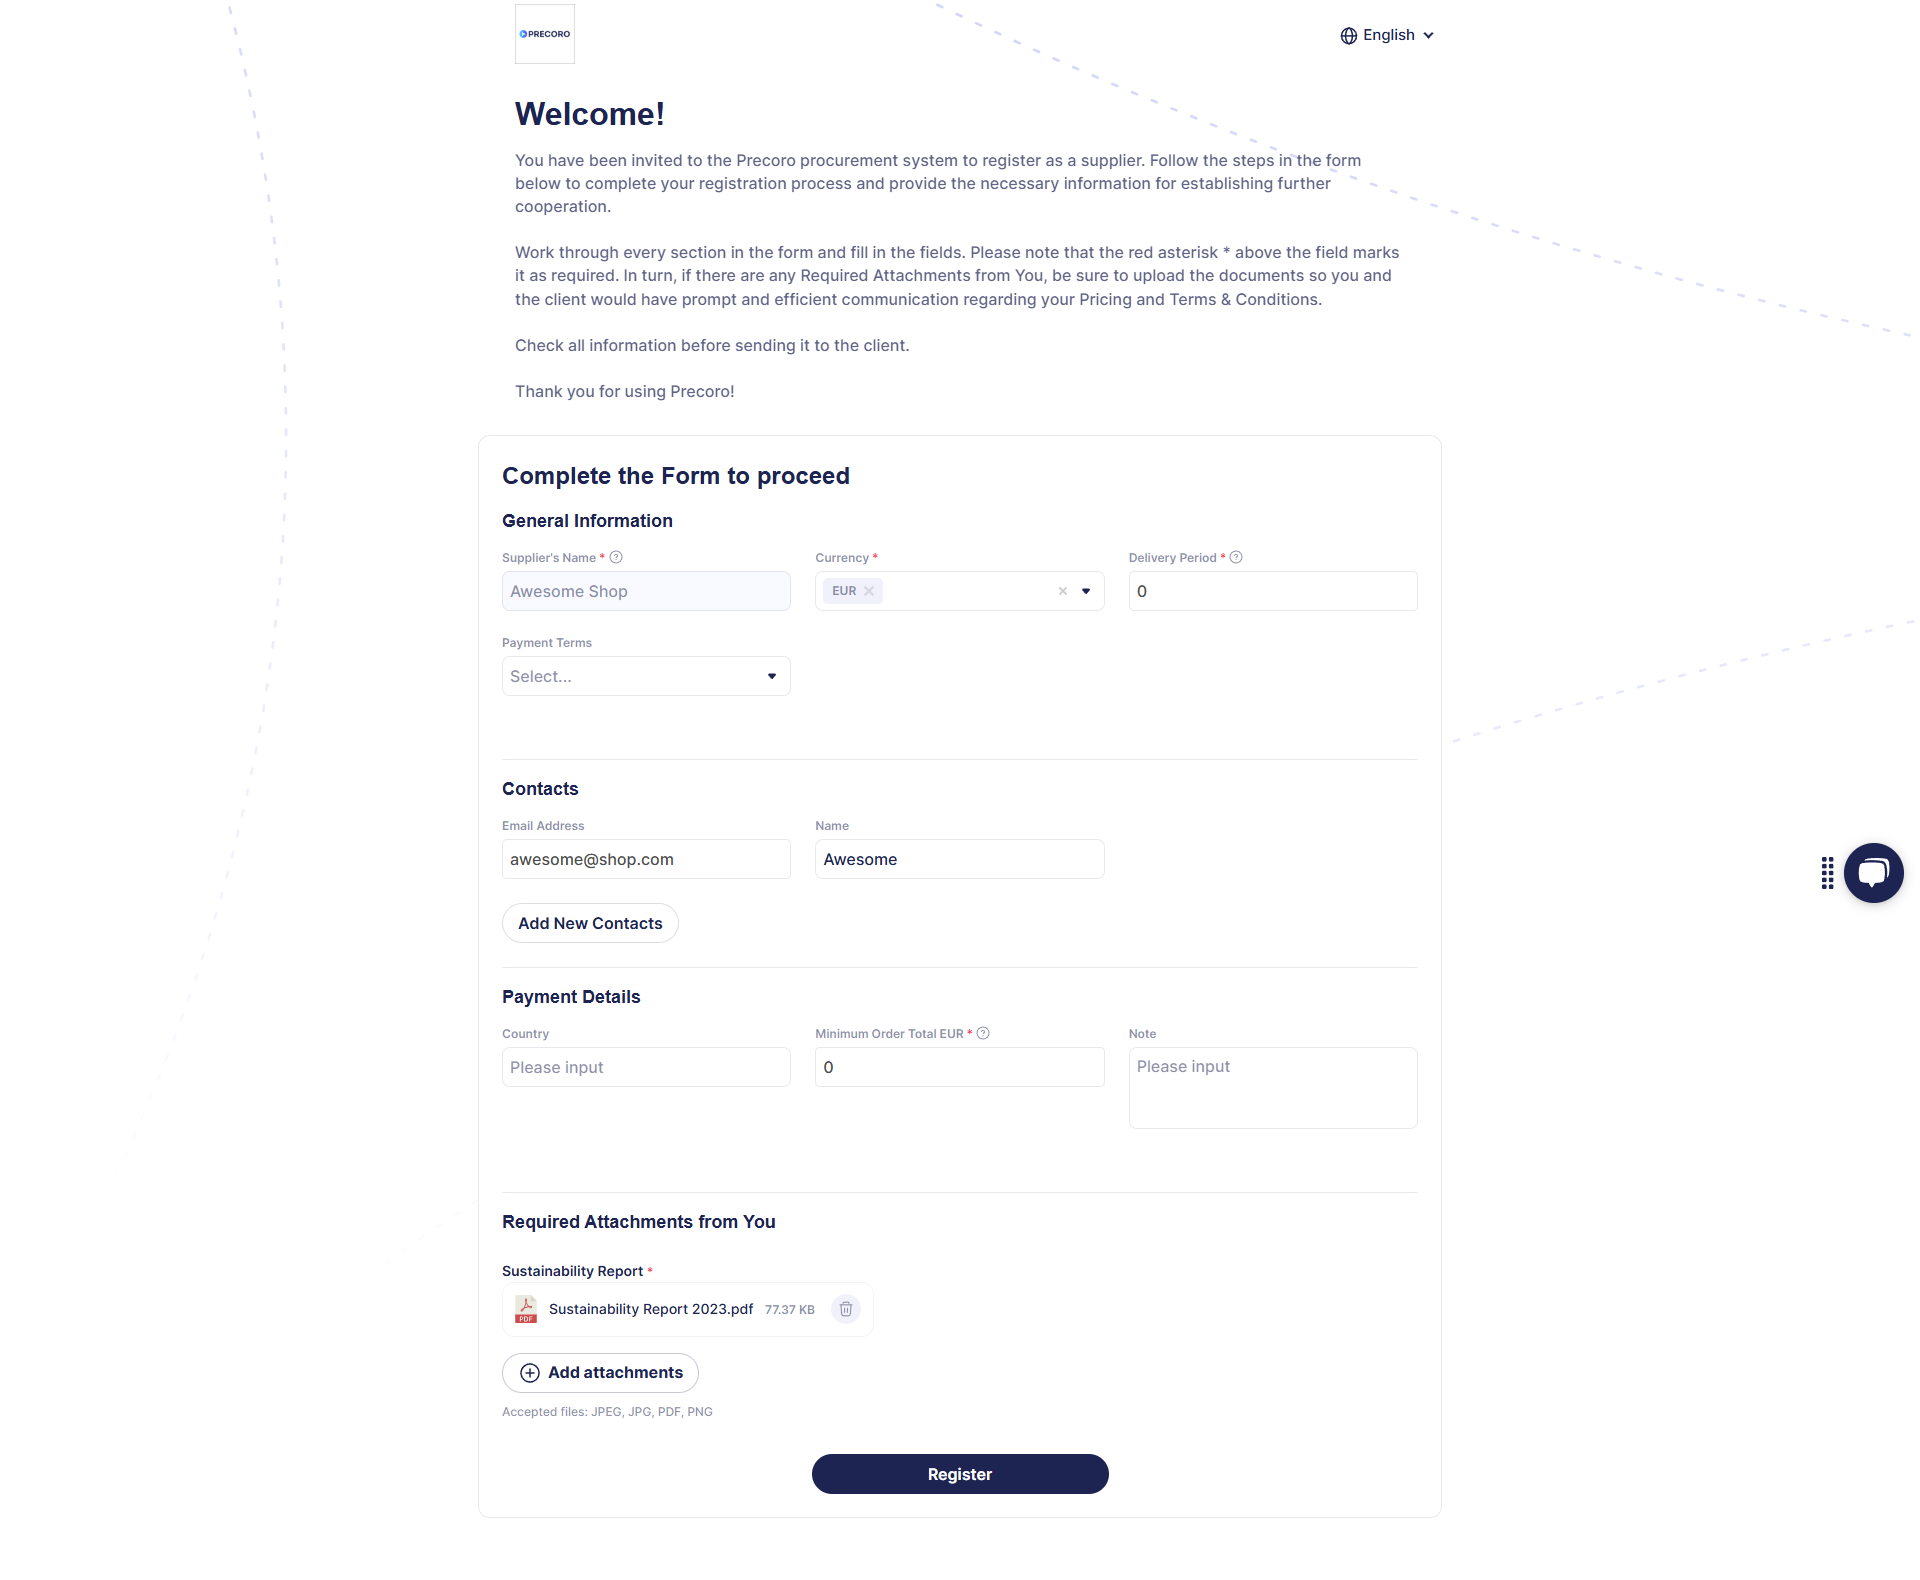
- After clicking Proceed to Registration, they are directed to the registration form. They can fill out the fields you requested, add attachments, and share additional contacts there.
- Once everything looks good, the supplier can click Register at the bottom of the page.

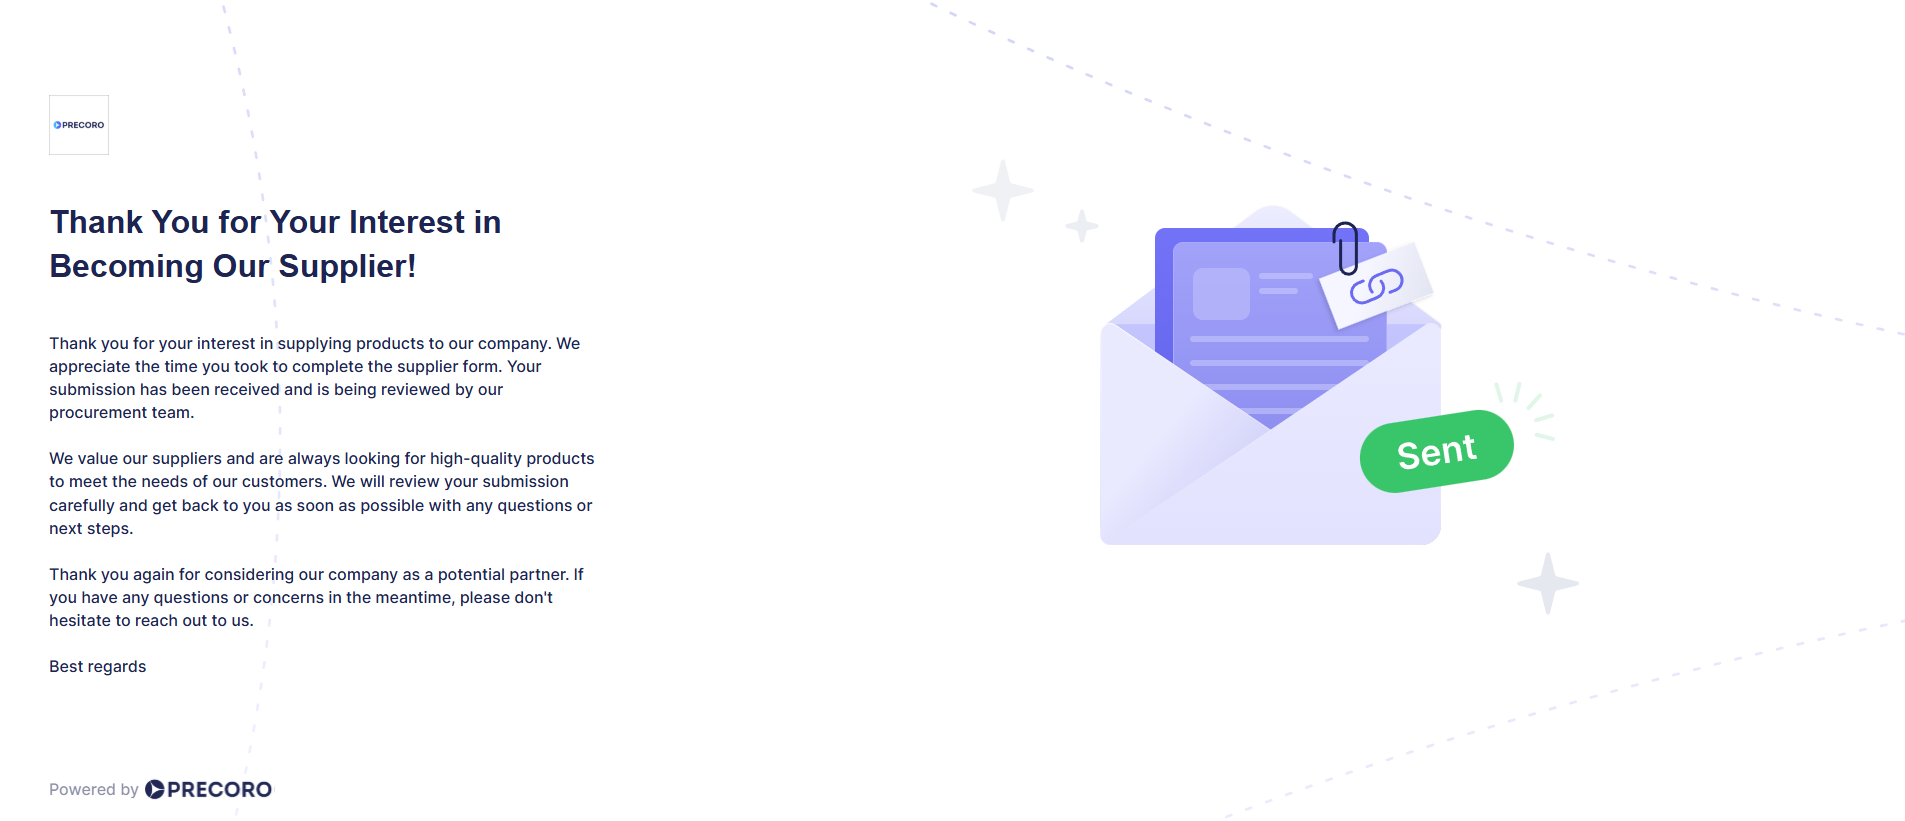
- The supplier then sees your Thank you Page.

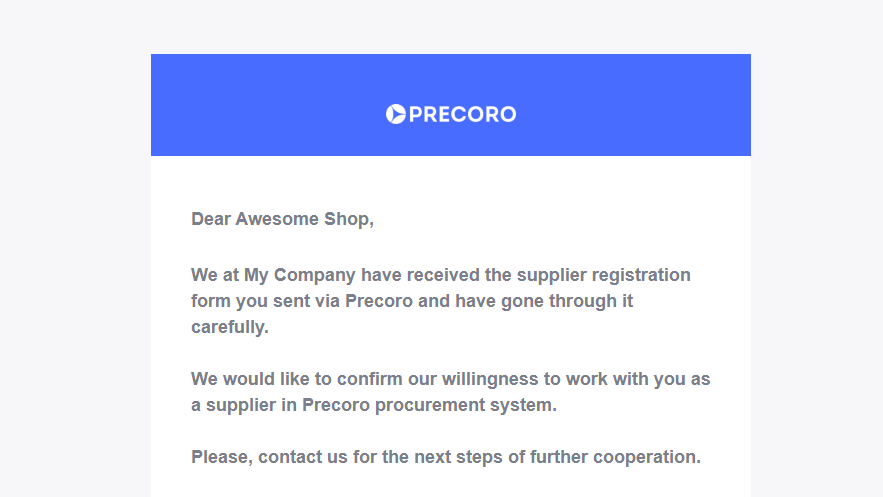
- Once the submitted form is approved, rejected, or sent for revision, the supplier receives the corresponding email notifying them of further action. You can customize these emails when editing the registration form.
FAQs