How to Integrate Precoro with QuickBooks Desktop
Discover how to connect Precoro to QuickBooks Desktop to free your AP team from manual entry and maintain consistent data in both systems.
TABLE OF CONTENTS
How Does Precoro and QuickBooks Desktop Integration Work?
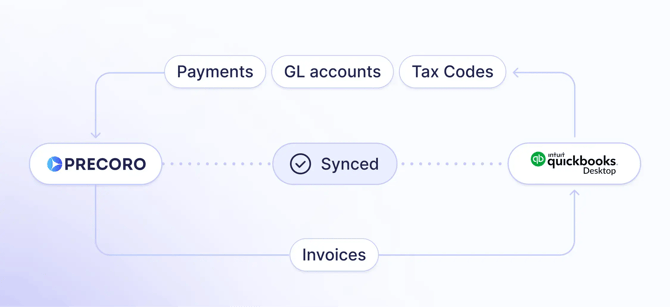
QuickBooks Desktop and Precoro integration helps teams keep their purchasing and accounting data perfectly in sync. With the connection, you get to enjoy a quick and easy purchasing process in Precoro while having all your approved invoices sent to QuickBooks Desktop automatically. Once payments are made in QuickBooks, the invoice status in Precoro updates to "Paid" without you moving a finger.
GL Accounts and Tax Codes also sync from QuickBooks Desktop to Precoro automatically, so your data stays accurate and up-to-date across both systems.
What You’ll Need to Get Started
💡Please note: This integration is a paid add-on, available for purchase if you have the Automation or Enterprise package. For pricing details, please contact your Customer Success Manager.
To set up this integration, you’ll also need to download the .exe connector. Before proceeding, please verify:
- Company policies on .exe installations.
- If virtual servers are in use, and whether they allow external app installations.
If the .exe installation is not allowed, consider using the QuickBooks Desktop integration via SFTP as an alternative.
Additionally, for the Quickbooks Integration to work, you’ll need the following:
- Both the QuickBooks Desktop application and SDK.
- Admin rights on a Windows machine.
- User role in Precoro that has maximum access with no restrictions.
If you have multiple companies that you would like to integrate with, you will need to obtain the path for each company file.
How to Set Up the Precoro and QuickBooks Desktop Integration
Step 1: Decide on the Data You Want to Sync
Determine which data you want to sync between Precoro and QuickBooks Desktop. You can choose to synchronize the following:
-
From Precoro to QuickBooks: Invoices
-
From QuickBooks to Precoro: Payments, GL Accounts, and Tax Codes
Step 2: Get the API Key
Create an API token:
-
Navigate to the Configurations > Integrations page in Precoro.
-
Click on the API section.
-
Select the Generate API Key button.
-
Save the generated token for future use.
Learn more details on creating the API token in our Knowledge Base.
Step 3: Contact the Precoro Support Team
Reach out to the Precoro team for assistance. They will provide you with the link to download the .exe connector and the connector password for authorization.
Step 4: Install the .exe Connector
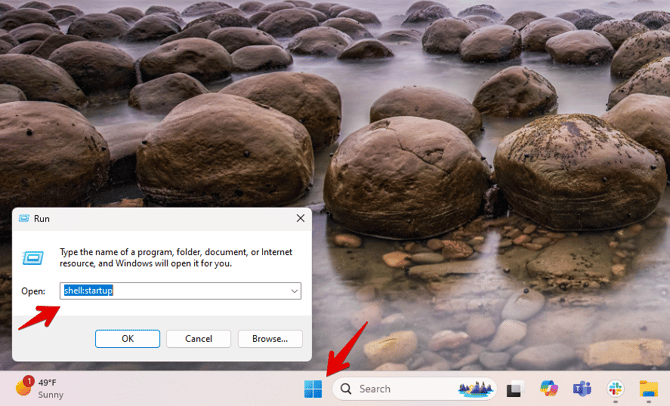
Download the .exe connector file from the link provided by the Customer Success team. To have it start automatically when your computer turns on:
-
Right-click the Windows icon in the bottom left and select Run.
-
Type "shell:startup" in the pop-up window and press OK.
-
Drag the connector file into the startup folder.
Step 5: Run the Connector
-
Right-click the connector launcher and select “Run as administrator”.
-
Enter the password and click OK.
-
If the pop-up closes without any error messages, the password is accepted, and the connector is successfully running.
And that’s it! You can enjoy the automated sync of the data you have chosen.
Frequently Asked Questions
What types of documents can I sync with the QuickBooks Desktop integration?
You can synchronize invoices from Precoro to QuickBooks Desktop and update payments, GL accounts, and tax codes from QuickBooks Desktop to Precoro.
How often can the data sync occur?
Choose a sync frequency that fits your workflow, from every 30 minutes to daily or weekly.
What if my company's policies don't allow .exe installations?
If .exe files cannot be installed due to company policy, you may want to consider using the QuickBooks Desktop integration via SFTP as an alternative.
How is data protected during the integration process?
The .exe connector file is signed with an Extended Validation Code Signing Certificate to ensure its security. Additionally, Precoro and QuickBooks follow industry-standard security practices for data handling.
What should I do if data is not syncing between Precoro and QuickBooks?
First, ensure that the connector is running as an administrator and has access to both Precoro and QuickBooks. If the issue persists, reach out to your Customer Success manager for troubleshooting.
How do I see if my documents have been sent to integration?
Please refer to this article to learn more about the integration process and associated statuses.

