TABLE OF CONTENTS
- How Different Custom Records Are Integrated with Precoro
- How to Create and Sync Custom Segments
- How to Create and Sync Transaction Body and Line Fields
How Different Custom Records Are Integrated with Precoro
There are several types of custom records you can integrate with Precoro. They will help you store and process any information about items and transactions beyond what standard fields offer, such as memos, project details, and so on.
| In NetSuite | In Precoro |
| Transaction Body Fields | Custom Fields for Documents |
| Transaction Line Fields | Custom Fields for Items |
| Custom Segments | Custom Fields for Documents and/or Items, depending on the choice you make during export |
In the following sections, we'll explain how to correctly configure each type of custom record to ensure data sync between NetSuite and Precoro.
How to Create and Sync Custom Segments
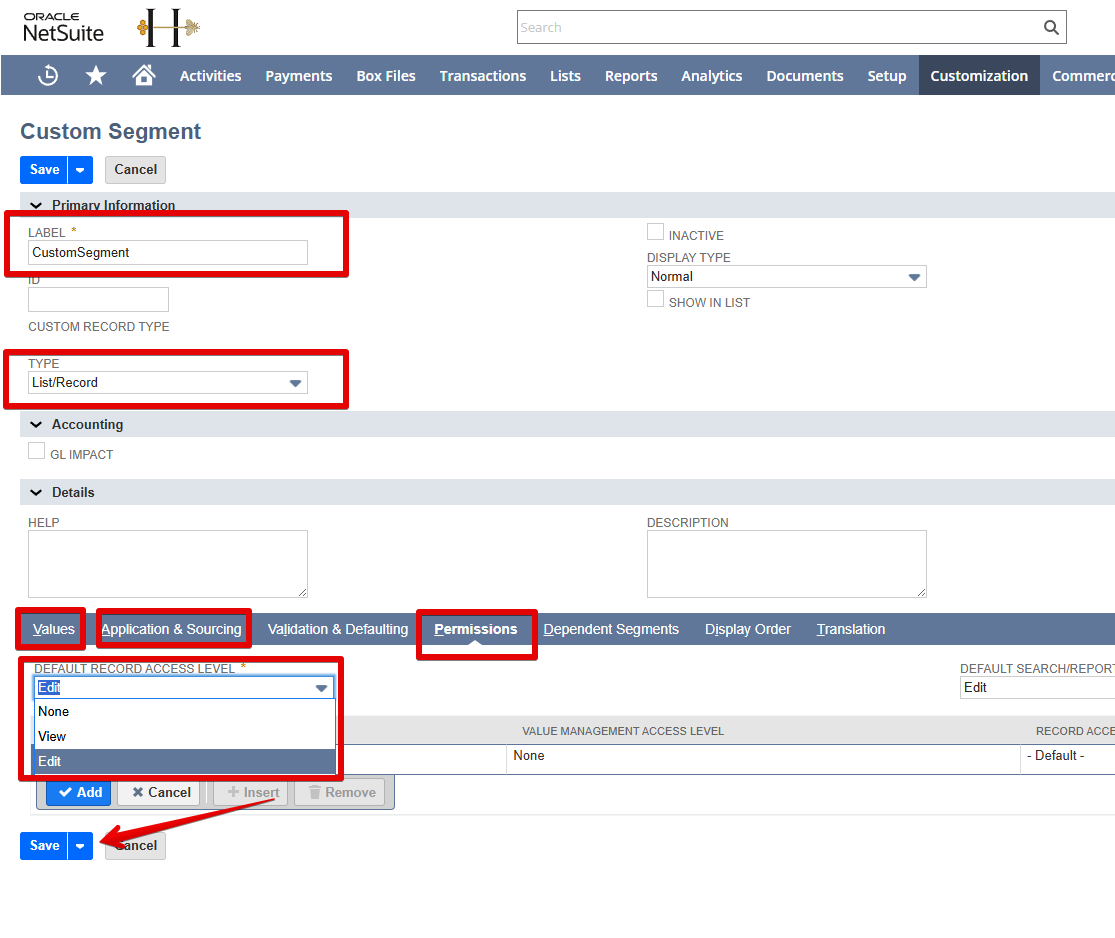
To create a custom segment in NetSuite:
-
Navigate to Customization → Lists, Records, & Fields → Custom Segments → New.
-
Fill in the Label for the segment.
-
Under Type, select one of the following:
-
List/Record
-
Multiple Select
Learn about available types here.
-
-
Open the Values tab and add values for the custom segment.
-
Go to the Application & Sourcing tab:
-
Under the Transactions subtab, mark Purchase Transactions in the Application section (for PO, Invoice, Credit Note) and Item Receipt in the Applied section (for Receipt).

-
Under Transaction Columns subtab → mark where the segment applies (e.g., Sale Item, Purchase Item, Expense).
-
-
Scroll to the Permissions section:
-
Expand Default Record Access Level.
-
Select Edit.
-
-
Click Save.
 To export and use the created segment in Precoro, please follow the steps outlined in this article.
How to Create and Sync Transaction Body and Line Fields
To create a Transaction Body Field, navigate to: Customization → Lists, Records, & Fields → Transaction Body Fields → New
For Transaction Line Field, go to: Customization → Lists, Records, & Fields → Transaction Line Fields → New
In both cases complete the following steps:
- Enter a Label for the field.
- Under Type, select one of the supported types:
- Date — displays as a calendar input in Precoro
- Free-Form Text — displays as a text field
- List/Record — displays as a dropdown with options
- In the Applies To section, select where the field should appear:
- Purchase → PO, Invoice, Credit Note
- Item Receipt → Receipt
- Configure any additional options as needed.
- Click Save.
How a Transaction Body Field looks in NetSuite

How a Transaction Line Field looks in NetSuite

To export and use the created field in Precoro:
- For Transaction Body Fields, follow the steps in this article.
- For Transaction Line Fields, study this article.