TABLE OF CONTENTS
What Is a Receipt?
A Receipt is a document confirming delivery and listing items and their quantities. Assigned people can make receipts after inspecting delivered goods. The information from receipts appears in related purchase orders and allows them to be completed.
Here’s what receipts can help you do:
- Enter and access information about what was delivered.
- Ensure all items from the purchase orders are received in sufficient quantities.
- Monitor the delivery of prepaid orders.
- Confirm deliveries that are required before passing invoices for payment.
- Add items to warehouses and keep the stock balance up to date.
The following chapters show how to create receipts and track what items were delivered.
How to Create a Receipt
There are several ways to start creating purchase order receipts followed by the same process. Let’s review these options and the needed actions.
Step 1. Create a Document
1. From a Purchase Order (PO)
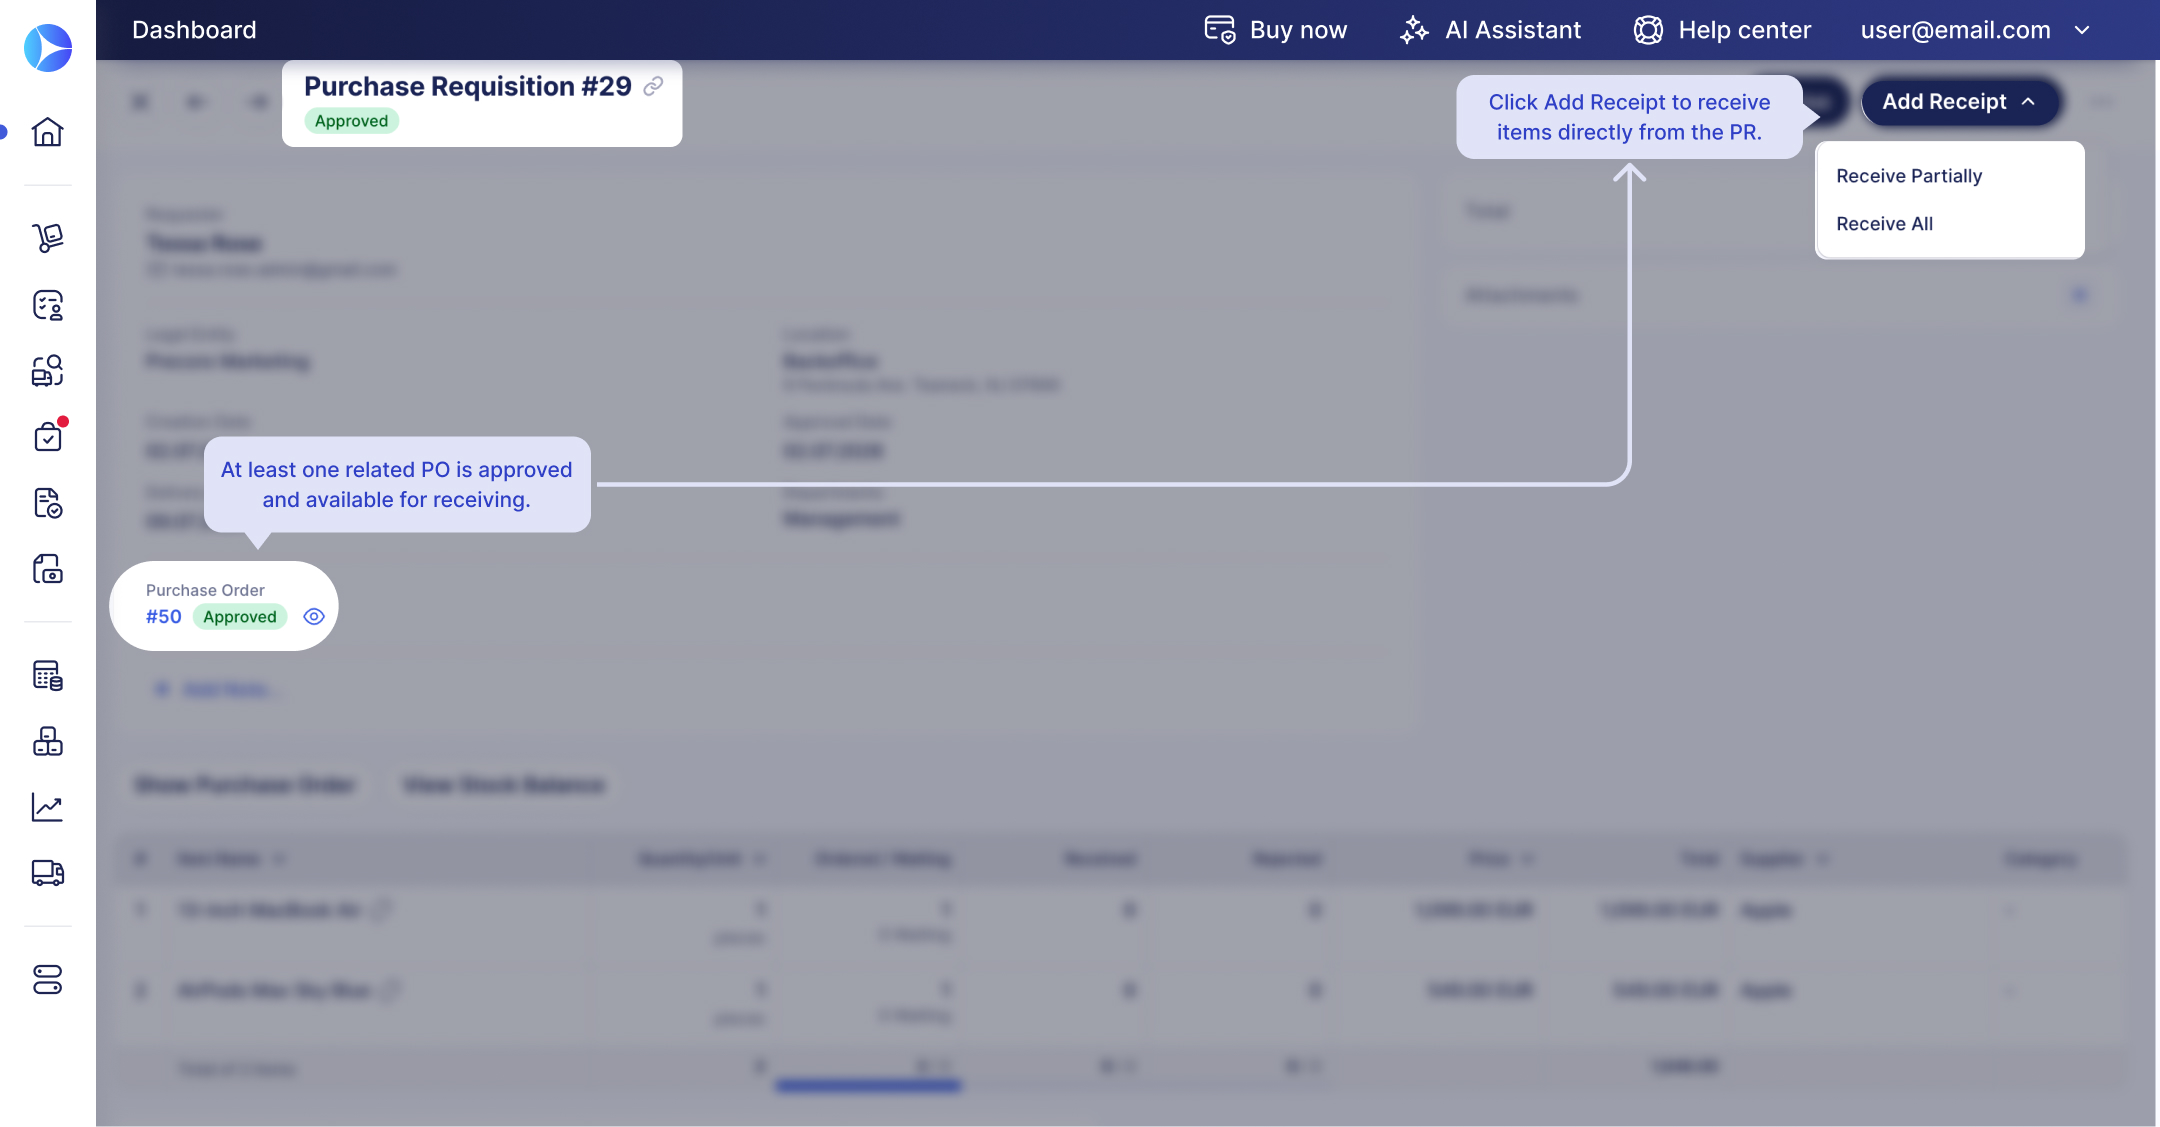
Open a PO for the items you want to receive and click the Add Receipt button on the action panel on the right.
You can choose one of the following options:
- Receive All — creates a receipt for all items in the PO. If the PO is already partly received, the new receipt will include all remaining items. The receipt opens automatically, so you can review and adjust the details before submitting it.
- Receive Partially — lets you review the PO items and select only the items that were delivered.
2. From a Purchase Requisition (PR)
The Add Receipt button appears in the PR header when both conditions are met:
- The user has permission to create receipts, such as access to the Receipt module with the Create role.
- The PR has at least one item available for receiving. This means that the item is included in a related PO, and that PO is in the Approved status.
To create a receipt from a PR:
- Open the PR with the items you want to receive.
- Click Add Receipt in the PR header.
- Use Receive Partially for partial delivery or Receive All for full delivery.
If you receive items from several POs related to the PR, Precoro will create a separate receipt for each PO.
3. From a Document Preview
The Add Receipt button is also available from the document preview sidebar for PRs and orders. Simply open the required module, click Preview (eye icon) next to the required document, and click Add Receipt to create a receipt quickly.
3. From the Receipts Page
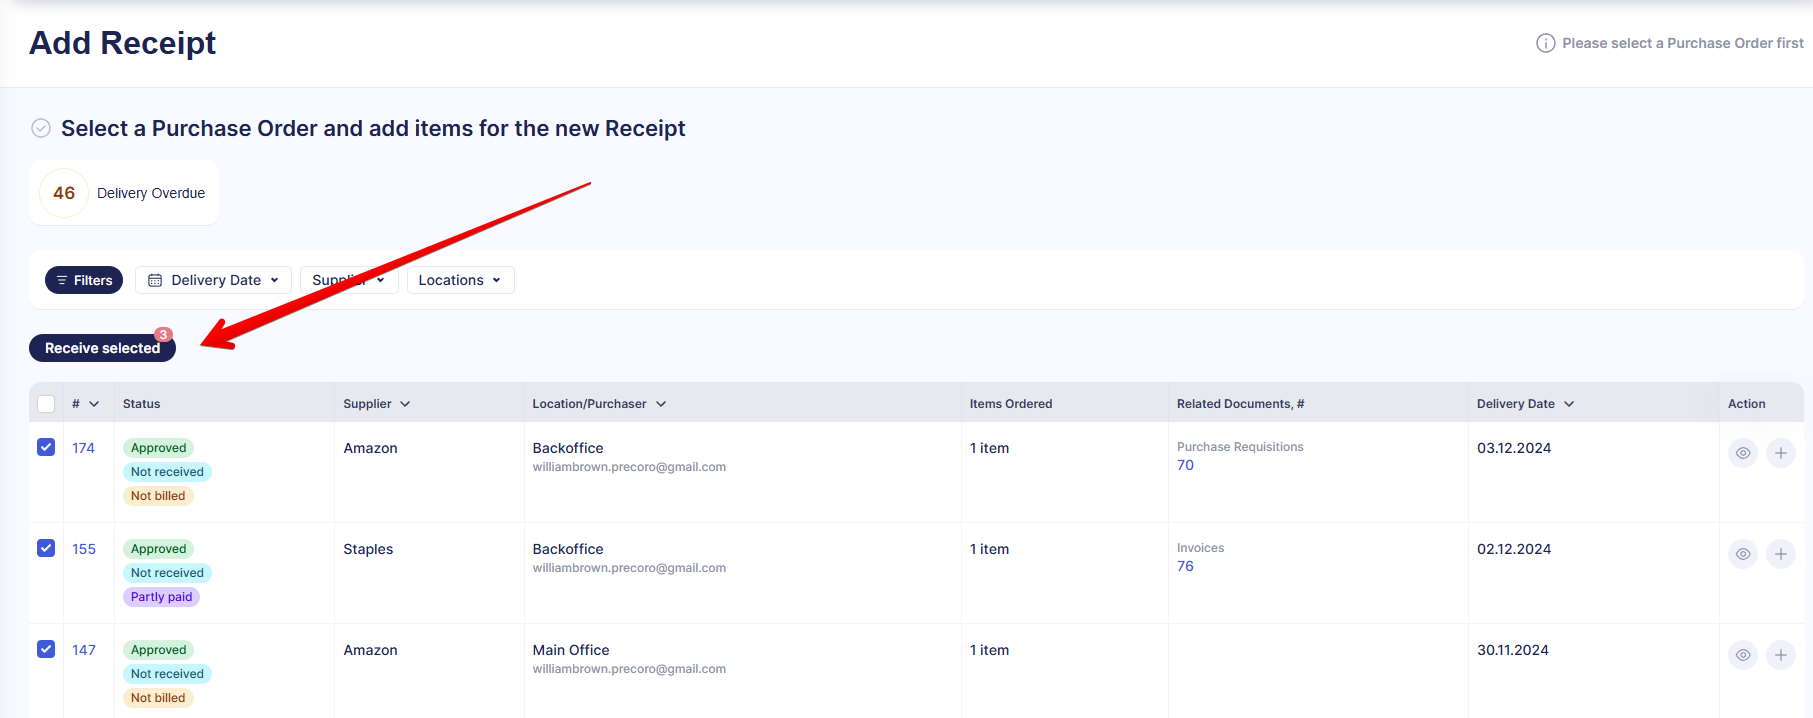
Navigate to the Receipts page and click Add. Find a PO with the items you are receiving and click + in the Action column.
4. Let AI Handle Receipt Creation
You can automatically create receipts using AI-powered scanning directly from the Receipts module. Learn more about the process here.
AI receipt scanning is also available on mobile devices. Read how to use it here.
💡 Please note: If you have a Creator role and access to the Receipt and Purchase Order modules, you can also create receipts in bulk at this stage. After you click Add on the Receipts page, you can select multiple POs and then click Receive selected. Automatically created receipts will follow the approval workflow set up in your company.
Step 2. Select the Items You Are Receiving
This step applies when you choose Receive Partially or Add from the Receipts page.
-
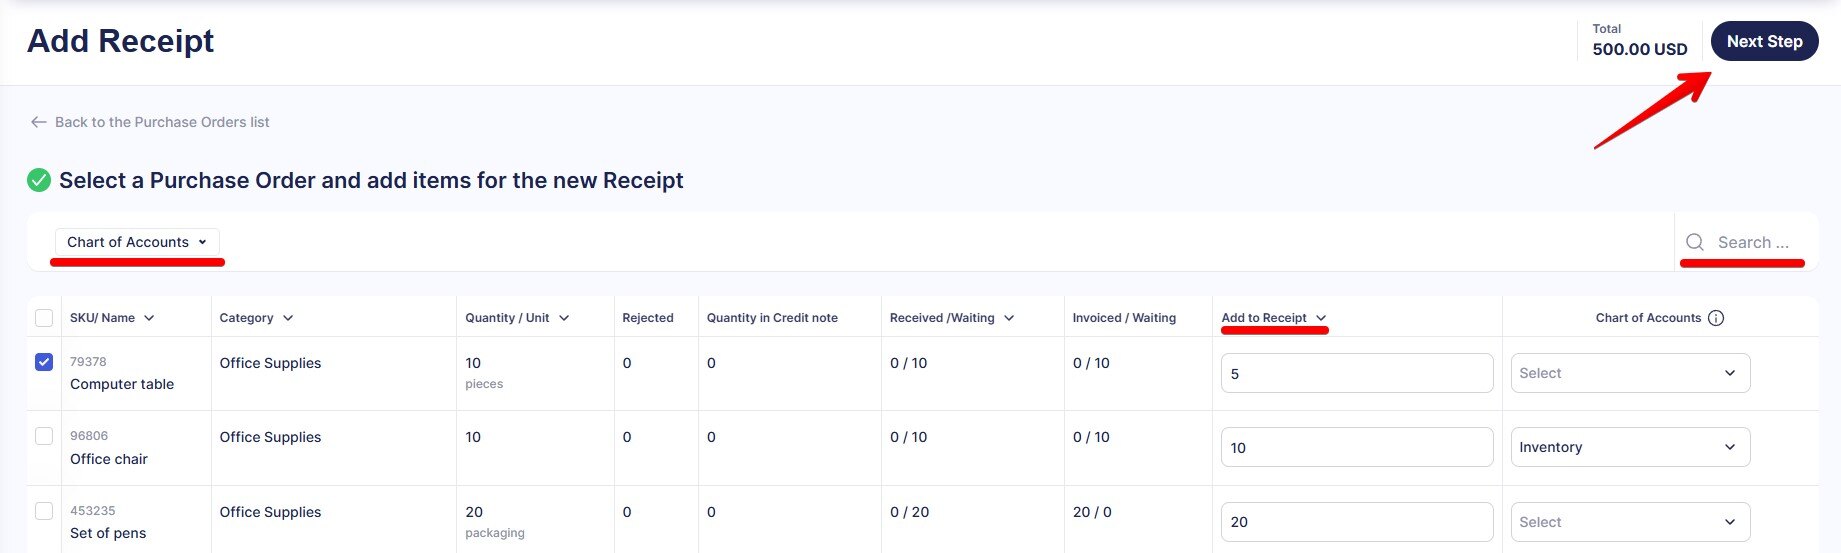
You will see the list of items from the PO. You can navigate it manually, use search (by SKU or name), or filter the items by their custom fields activated in the receipts. Learn more about using Custom Fields in this article.
- Select the items to receive. All items from the PO are selected automatically, but you can uncheck the ones you don’t need in this document. If not everything is delivered in one shipment, you can create more receipts from the same PO.
- Specify the received quantity (in the Add to Receipt column) and any required fields.
- Click Next Step.
💡 Please note: If you choose Receive All, Precoro creates a receipt for all available items automatically and opens it for review. You can adjust the receipt details before submitting it.
Step 3. Enter Receipt Details
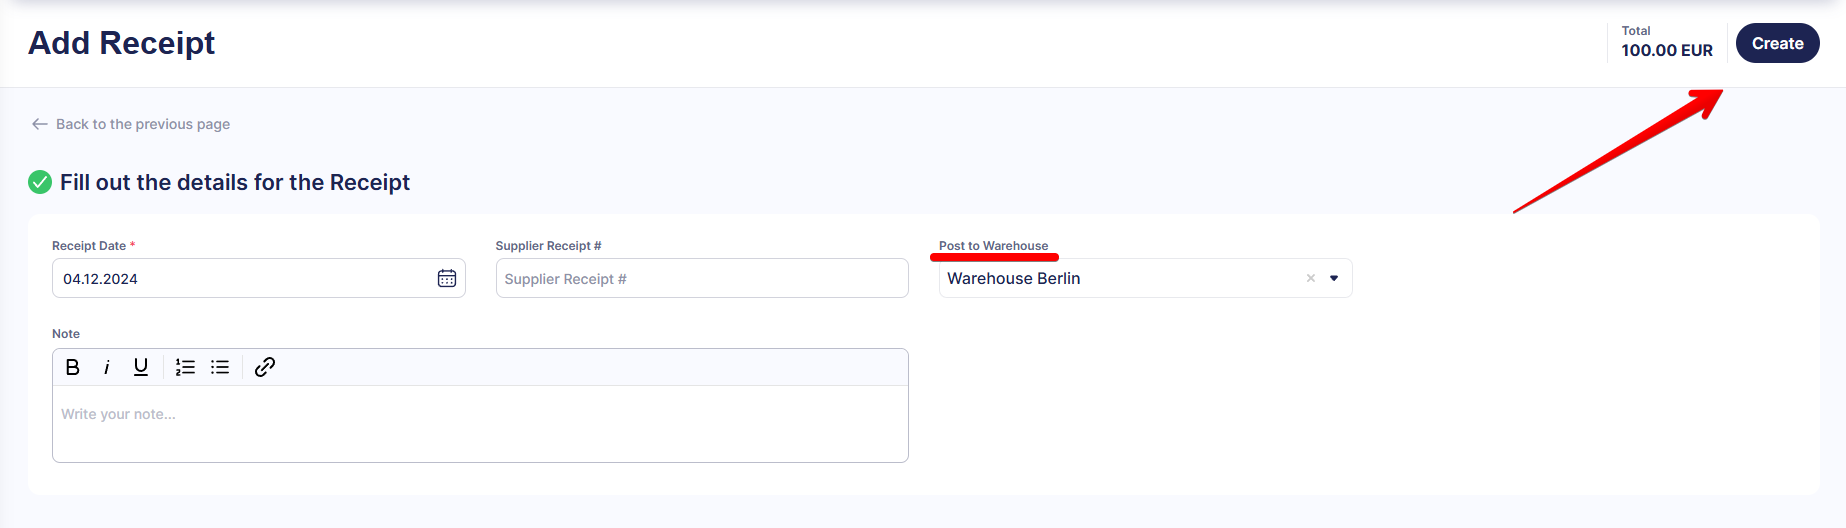
-
Fill out the receipt date and other necessary details. If the items are delivered to a warehouse, you can choose the correct one from the list in Post to Warehouse, and the stock balance will be updated accordingly.
-
Click Create.
Step 4. Review the Document
Now you can review the created receipt. This page allows you to:
- View the total of received and invoiced items.
-
Add attachments, notes, and comments.
-
See related documents or stock balance after clicking the corresponding buttons.
-
Download the receipt as a .pdf or .xlsx file once it reaches the Received status.
Step 5. Approval and Matching
- Once you have created a receipt, it will gain Pending status and follow the Approval Workflow set up in your company. When it is approved, the status will change to Received.
- If the Match with Purchase Order option in the Receipts section of Basic Settings is active and there are discrepancies between the receipt and related PO, the matching process is triggered. You can learn more about matching here.
How to Track Item Delivery
Precoro offers several ways to monitor if the ordered items were received and understand which receipts you should prioritize.
Viewing Related Documents
1. From any Receipt or Purchase Order document
When viewing a particular receipt for purchase, you can see the related PO, Quantity (as ordered), and Received quantity.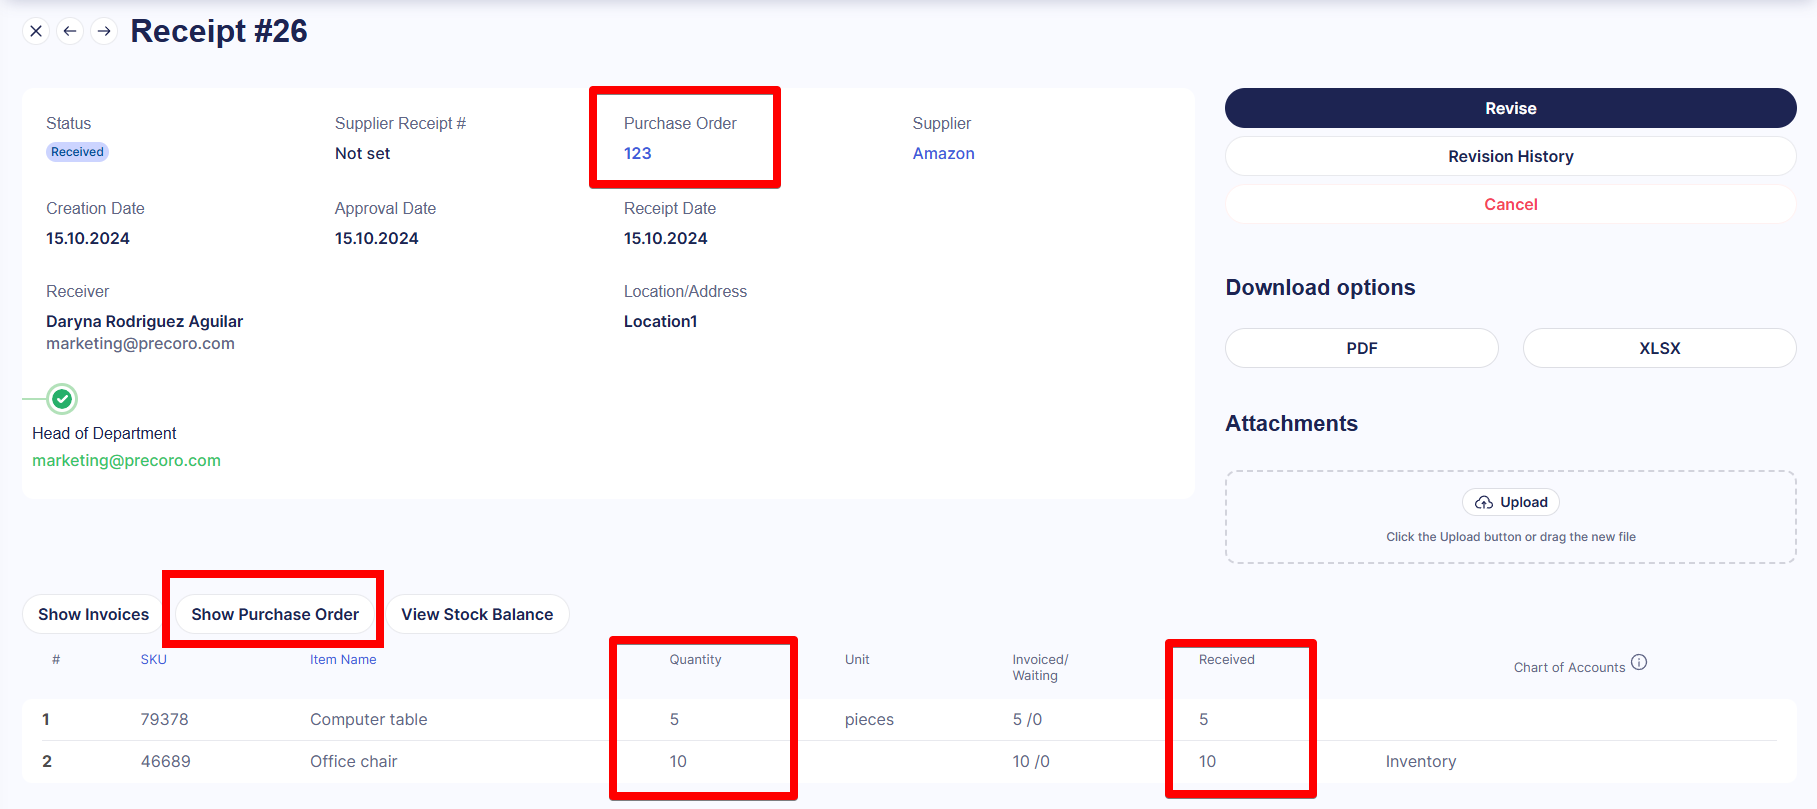
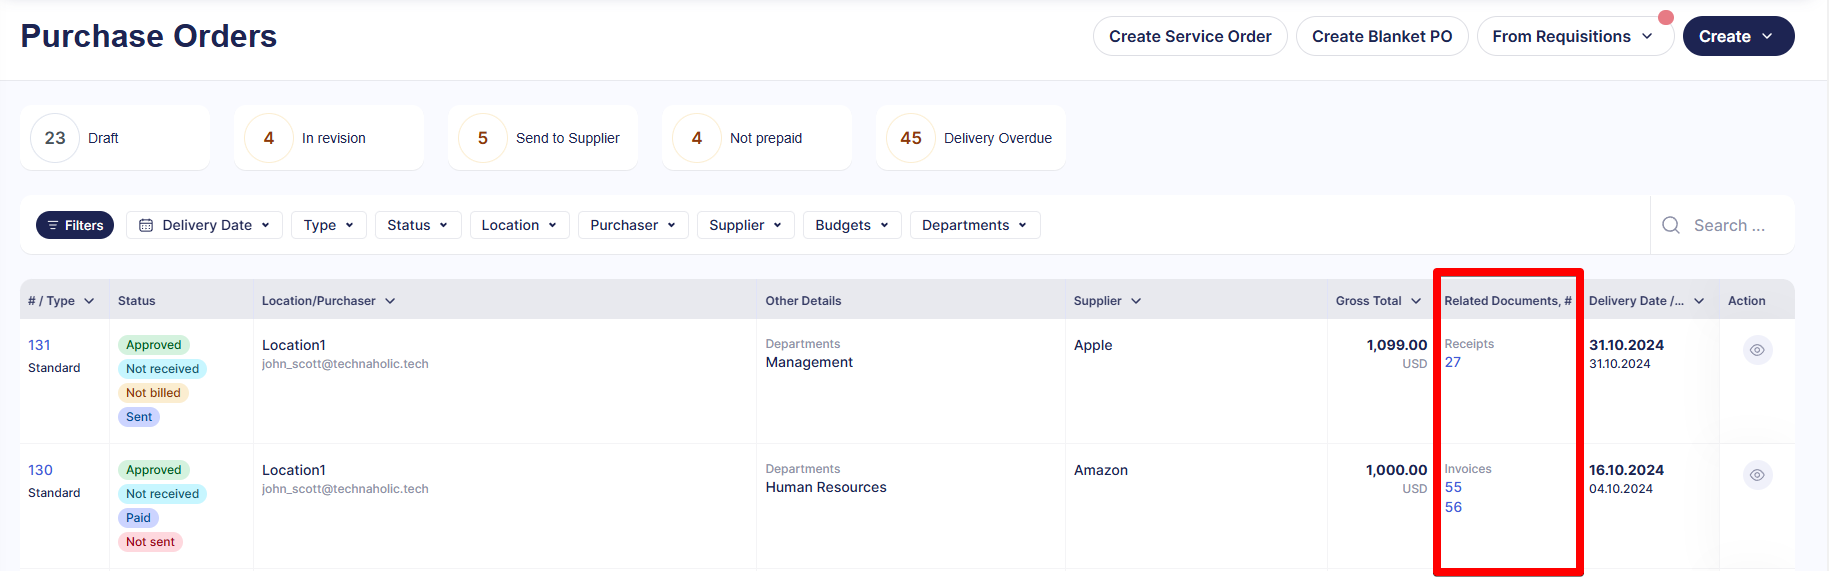
When viewing a particular PO that has a related receipt, you can see a list of order receipts or click Show Receipts. Item lines display the Received/Waiting column that shows how many items have already been added to receipts and how many still have to be received.
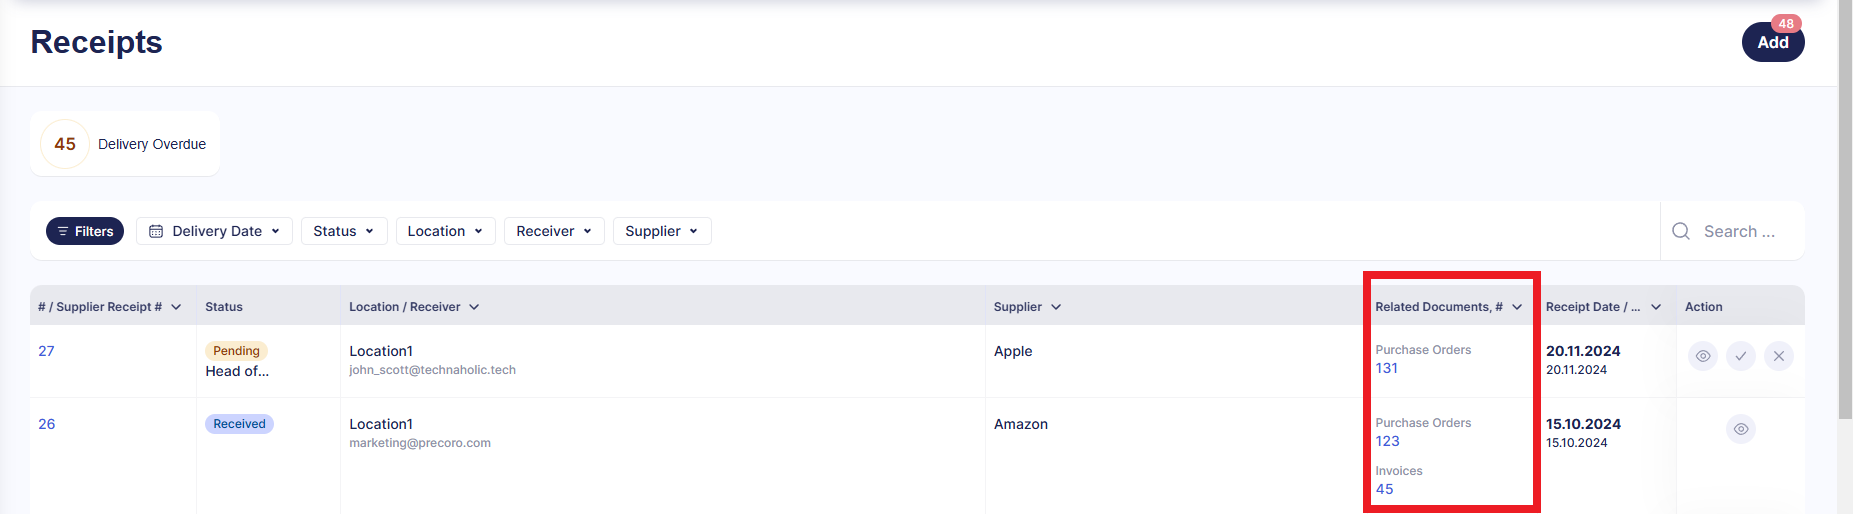
2. From the Receipts and Purchase Orders pages
On the Receipts and Purchase Orders pages related documents are displayed in the Related Documents, # column.
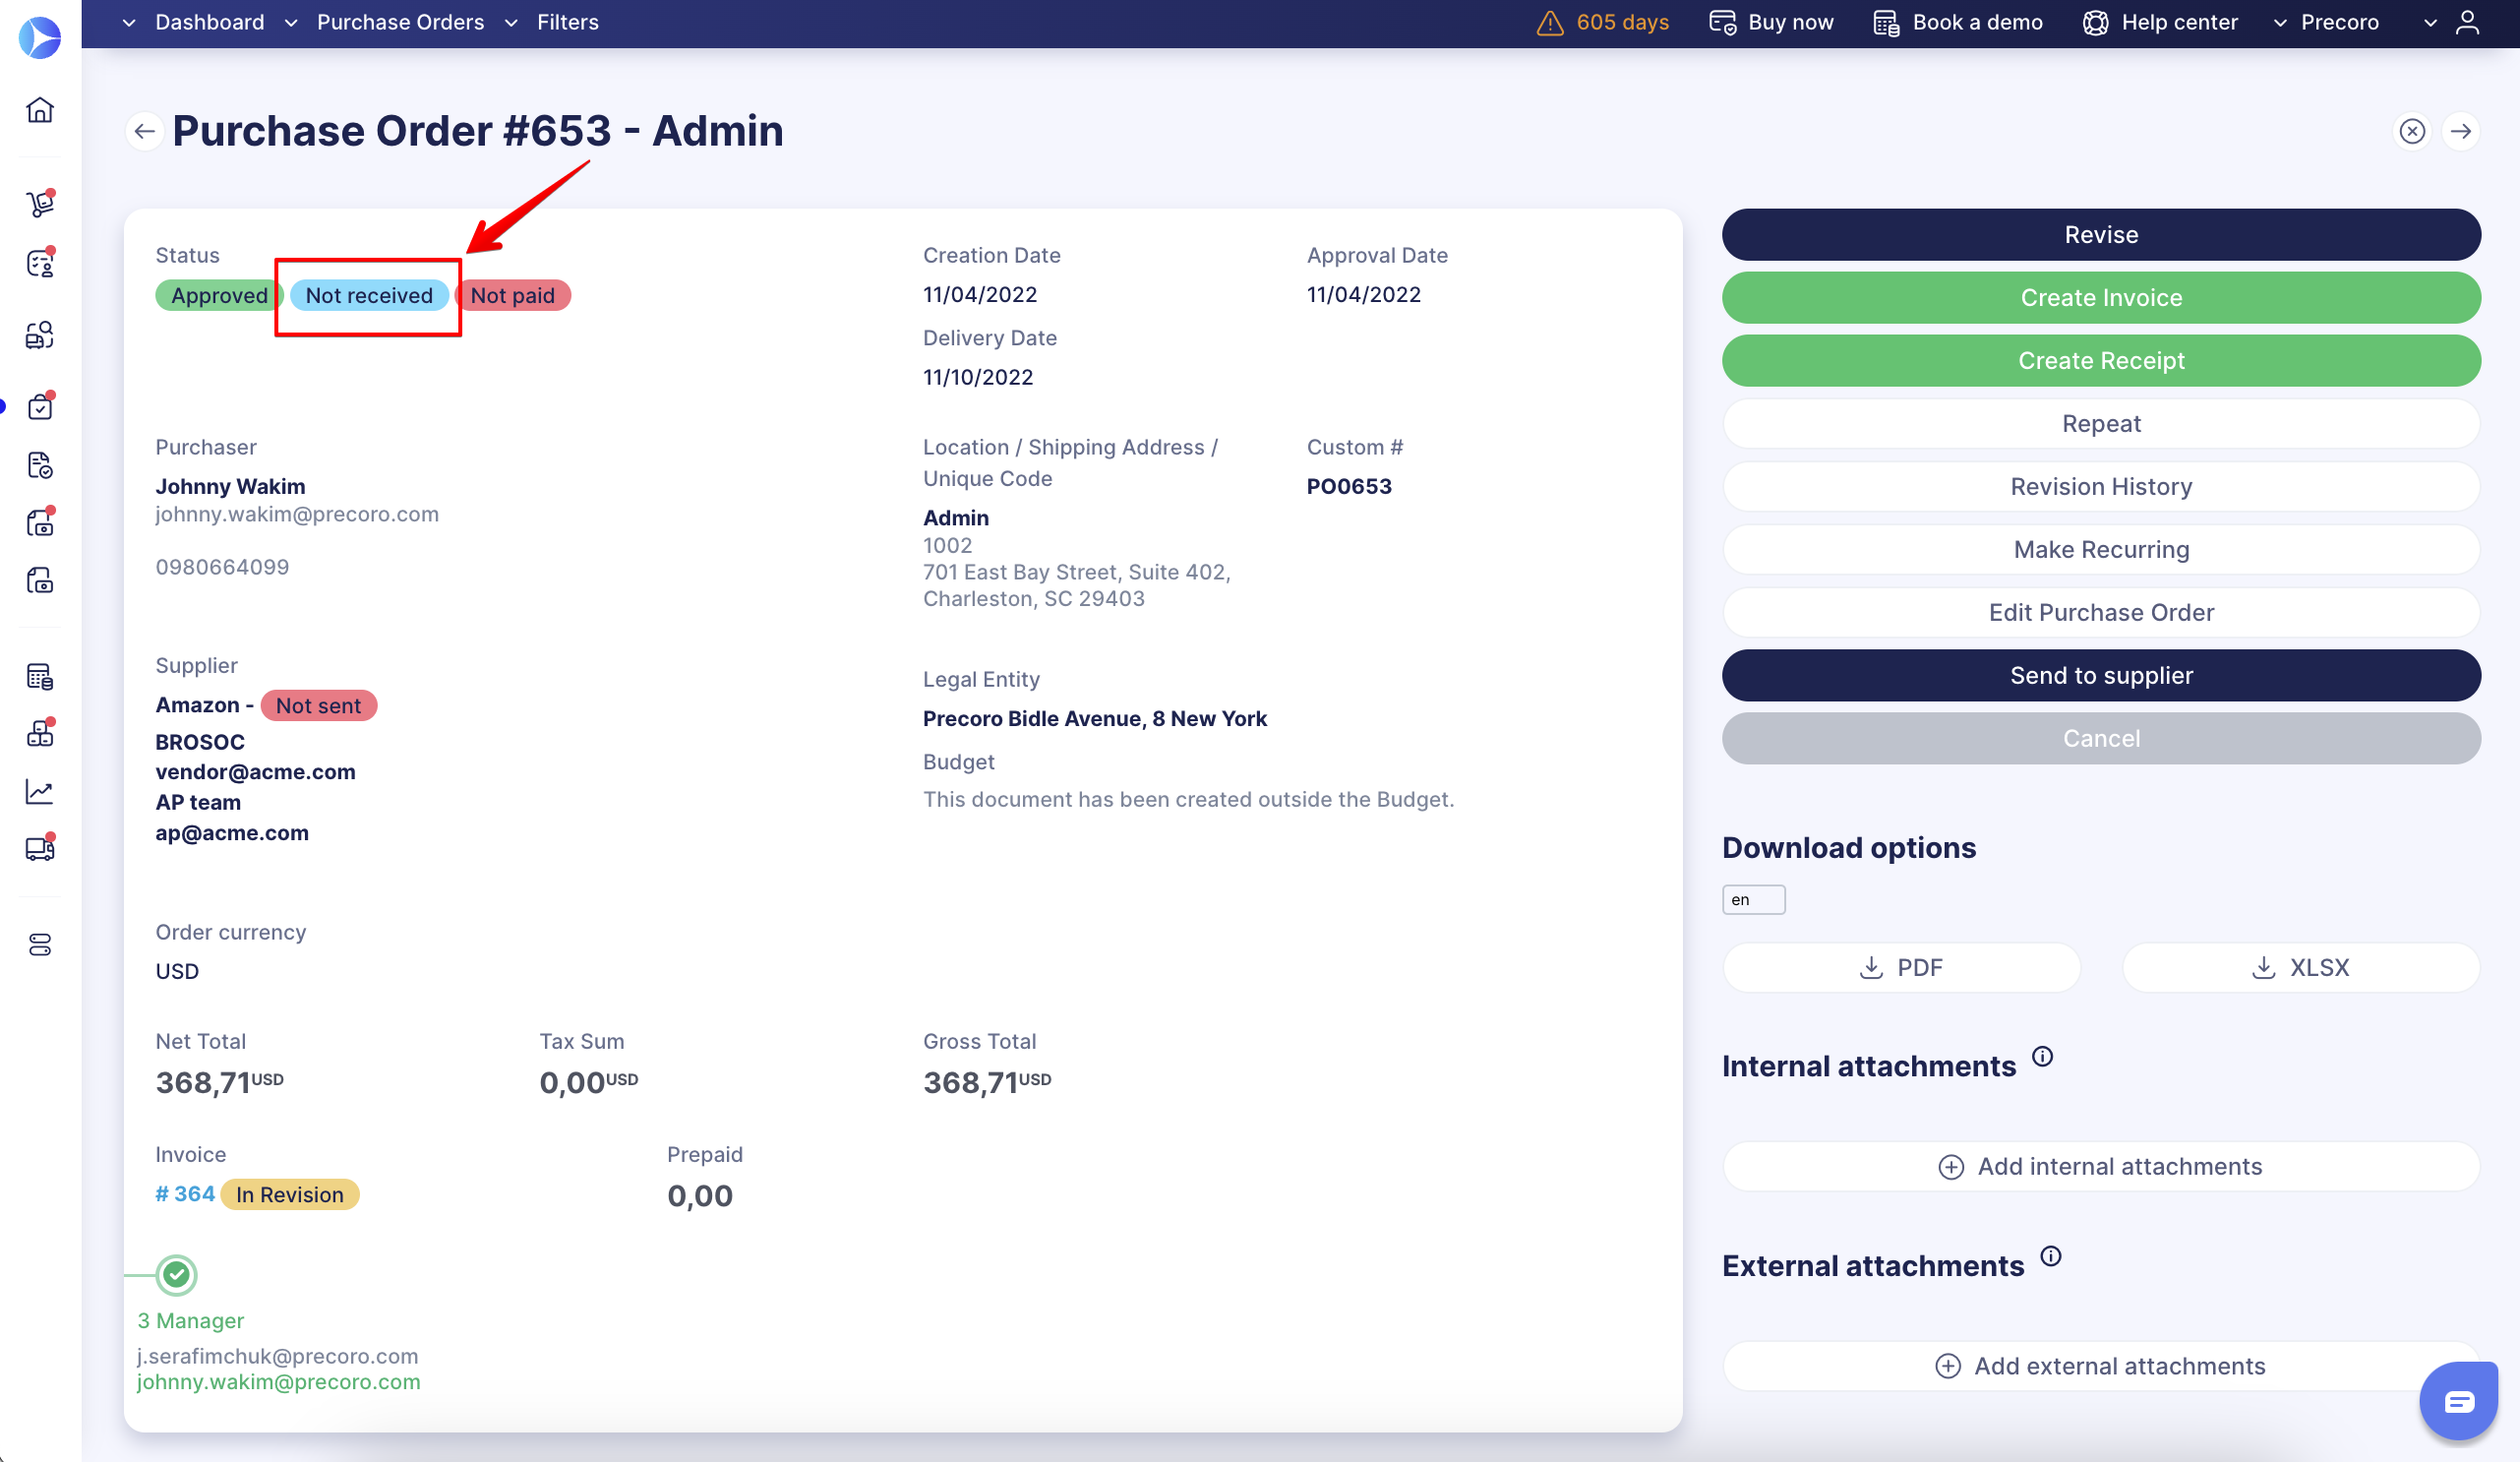
Understanding PO Statuses
Each PO will have one of the following statuses, indicating if the ordered items have been received.
- Not Received
This status is assigned to a PO upon creation and stays until the first related receipt is added.
- Partly Received.
If only a part of the order was received (not all items or insufficient quantity of any items), the document will gain this status. - Received
This status is assigned when all items are received.
Using Infocards on the Receipts Page
Infocards help you navigate the list of purchase orders when creating receipts. When you click an infocard on the Receipts page, you are directed to the Receipt creation screen with filtered purchase orders. Add receipts for any order separately (click + in the Action column) or in bulk.
- Pending Receipt
If 3-Way Match Functionality is activated in your company, receiving purchase orders filtered here may be your priority. This infocard shows a list of purchase orders with related invoices that have Pending Receipt status, and a receipt is needed to continue processing them. - Delivery Overdue Infocard
This infocard filters purchase orders with Approved and Not Received statuses for which the established delivery date has passed.