TABLE OF CONTENTS
Precoro provides even greater value when your colleagues are involved.
The process of adding new users to your company depends on the type of your Account:
Single Company Account
To invite a colleague, follow the steps below on the Configuration → User Management page:
1. Click on the Invite User button.
2. Enter the email address.
3. Click the Next Step.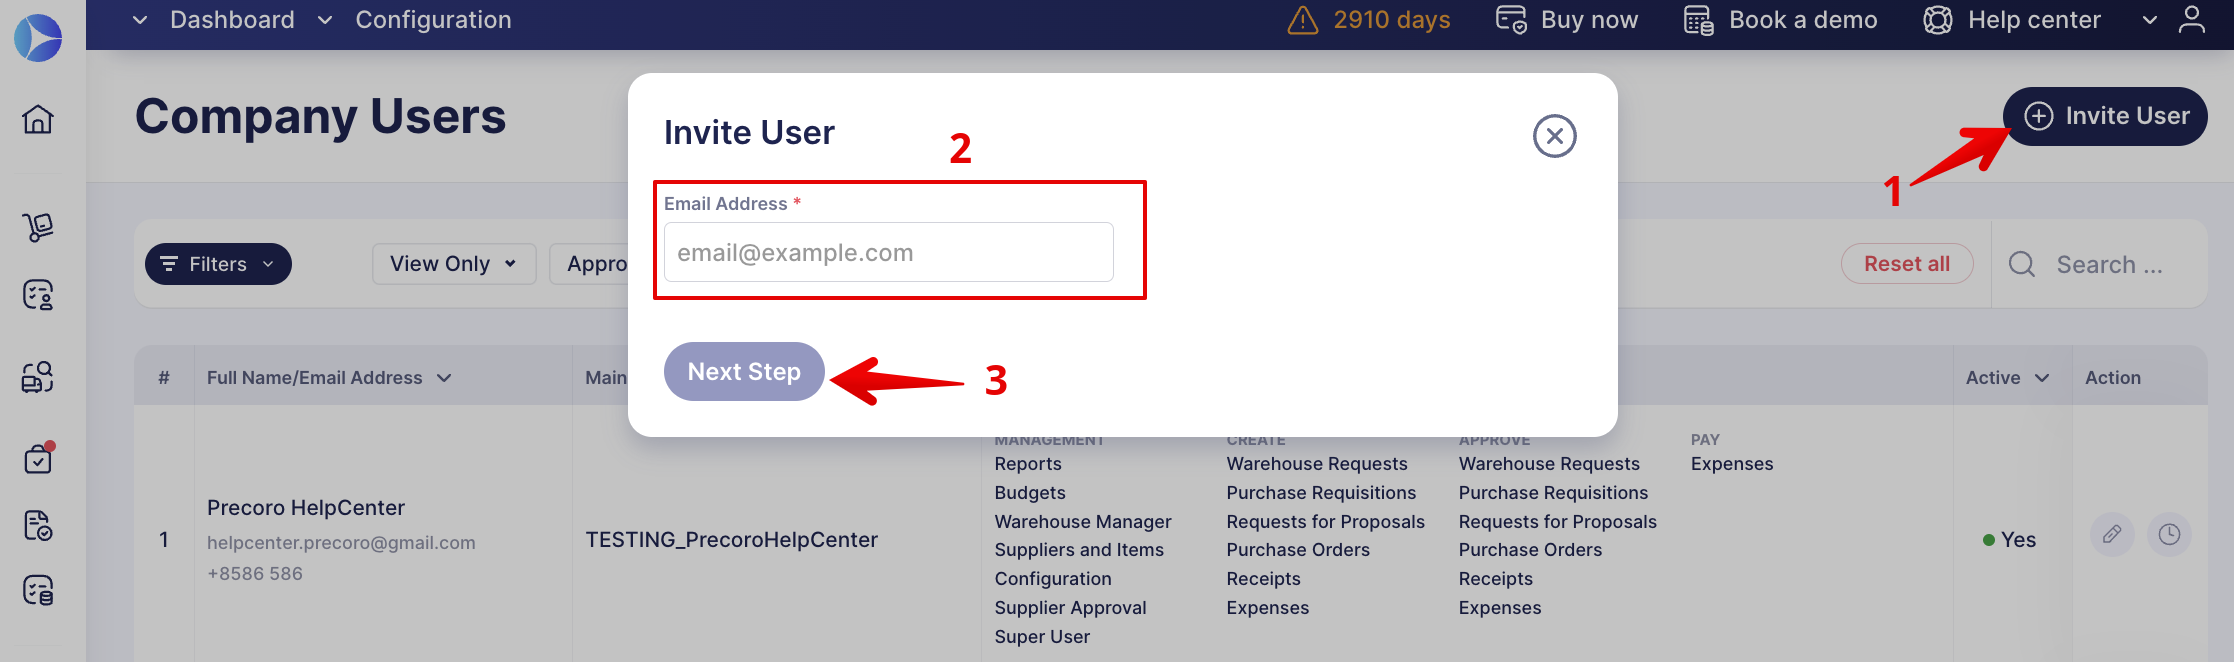
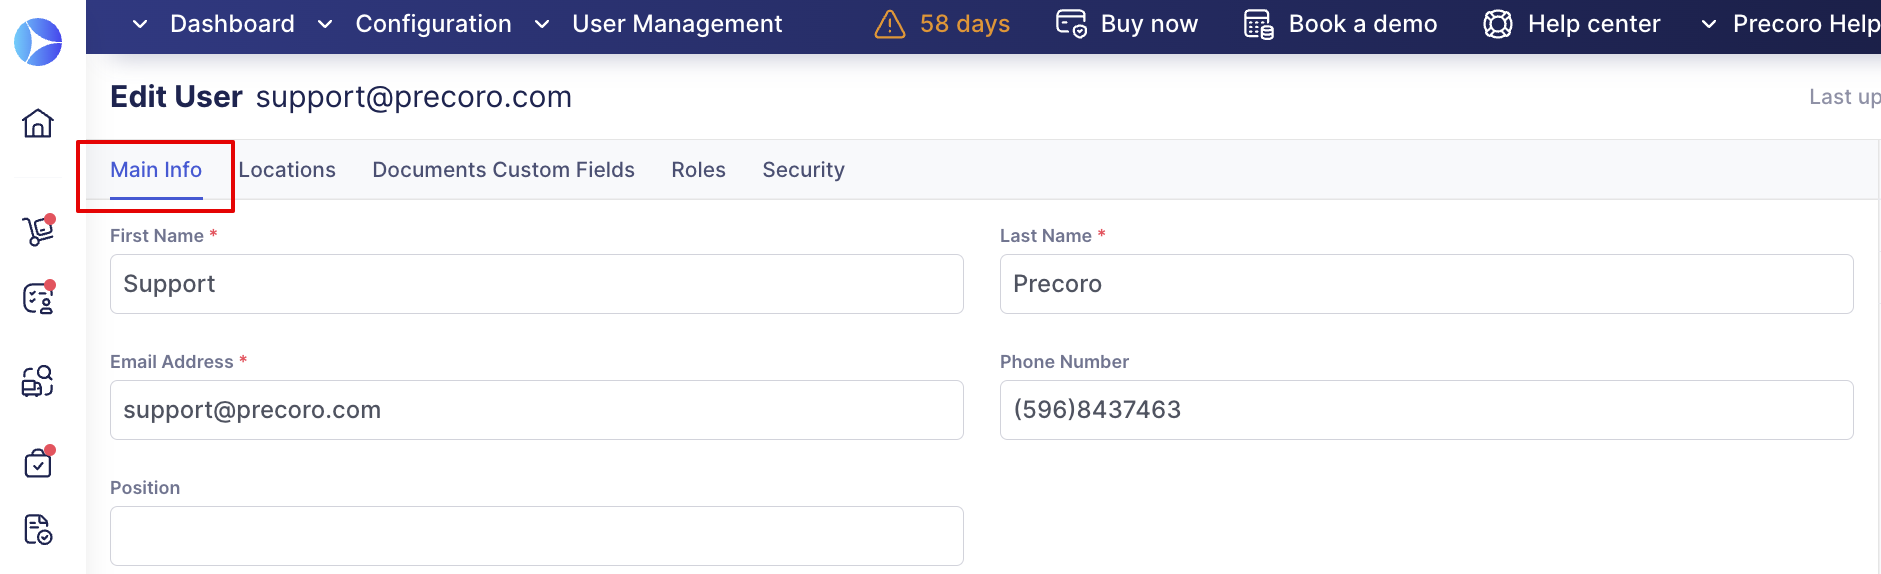
5. The following steps will help you set up the user’s permission to operate within the process:
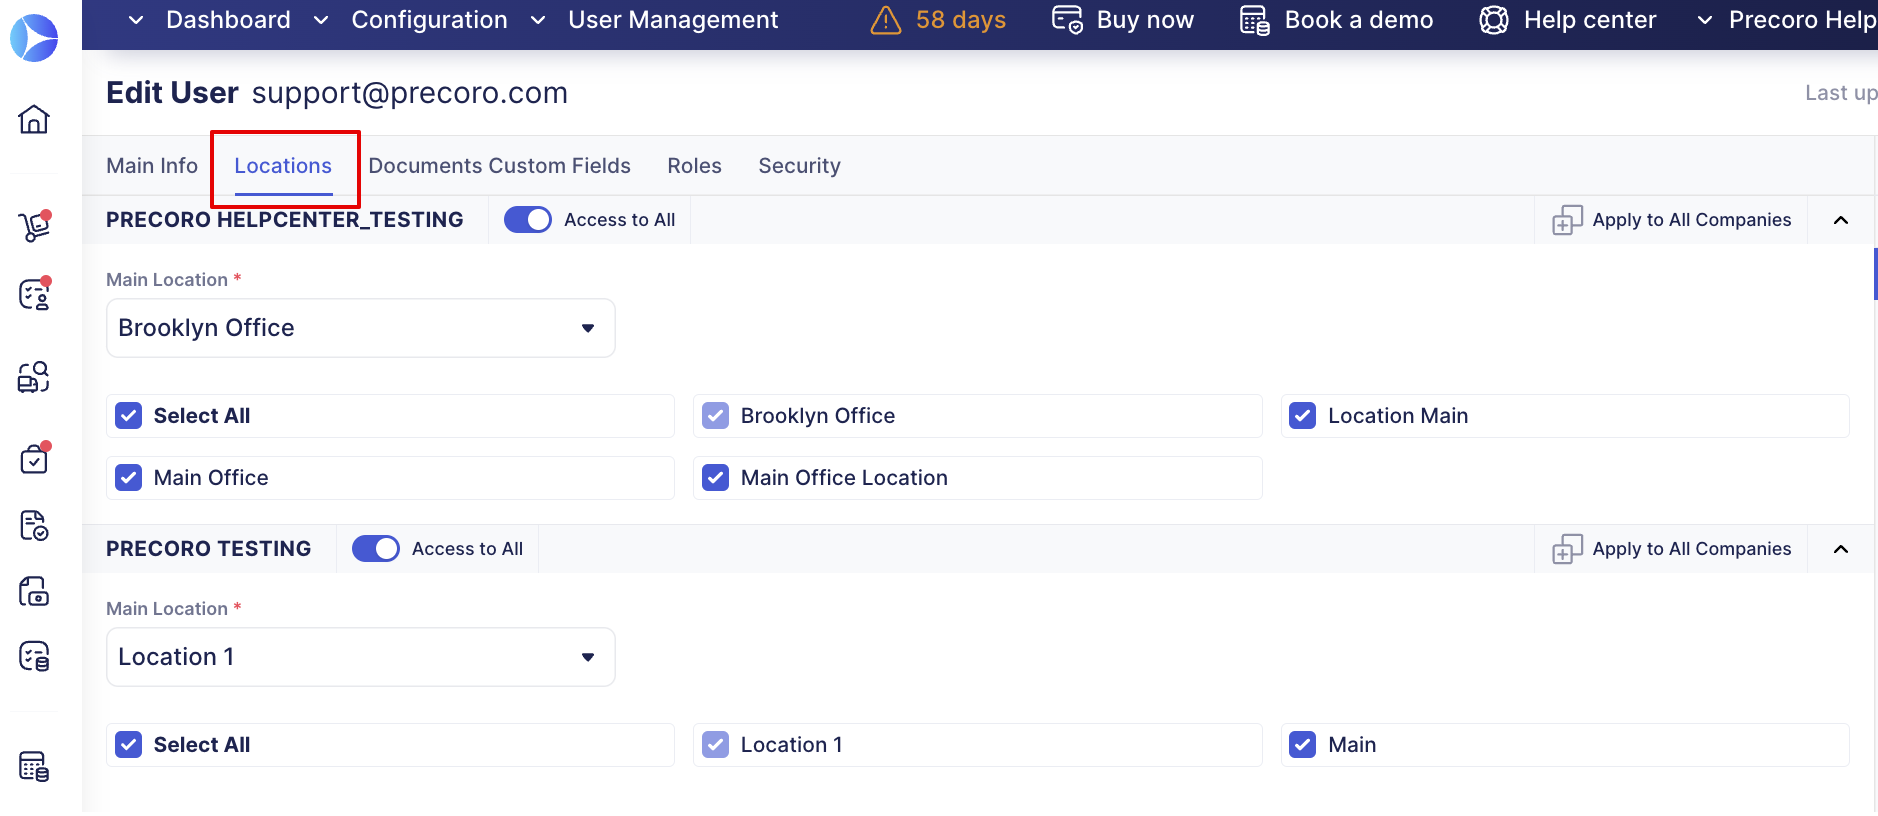
- Choose a Location(s) available to the user. You can use the mass actions to help you speed up the process.
More information about the Mass Actions in User Management can be found in this article below.
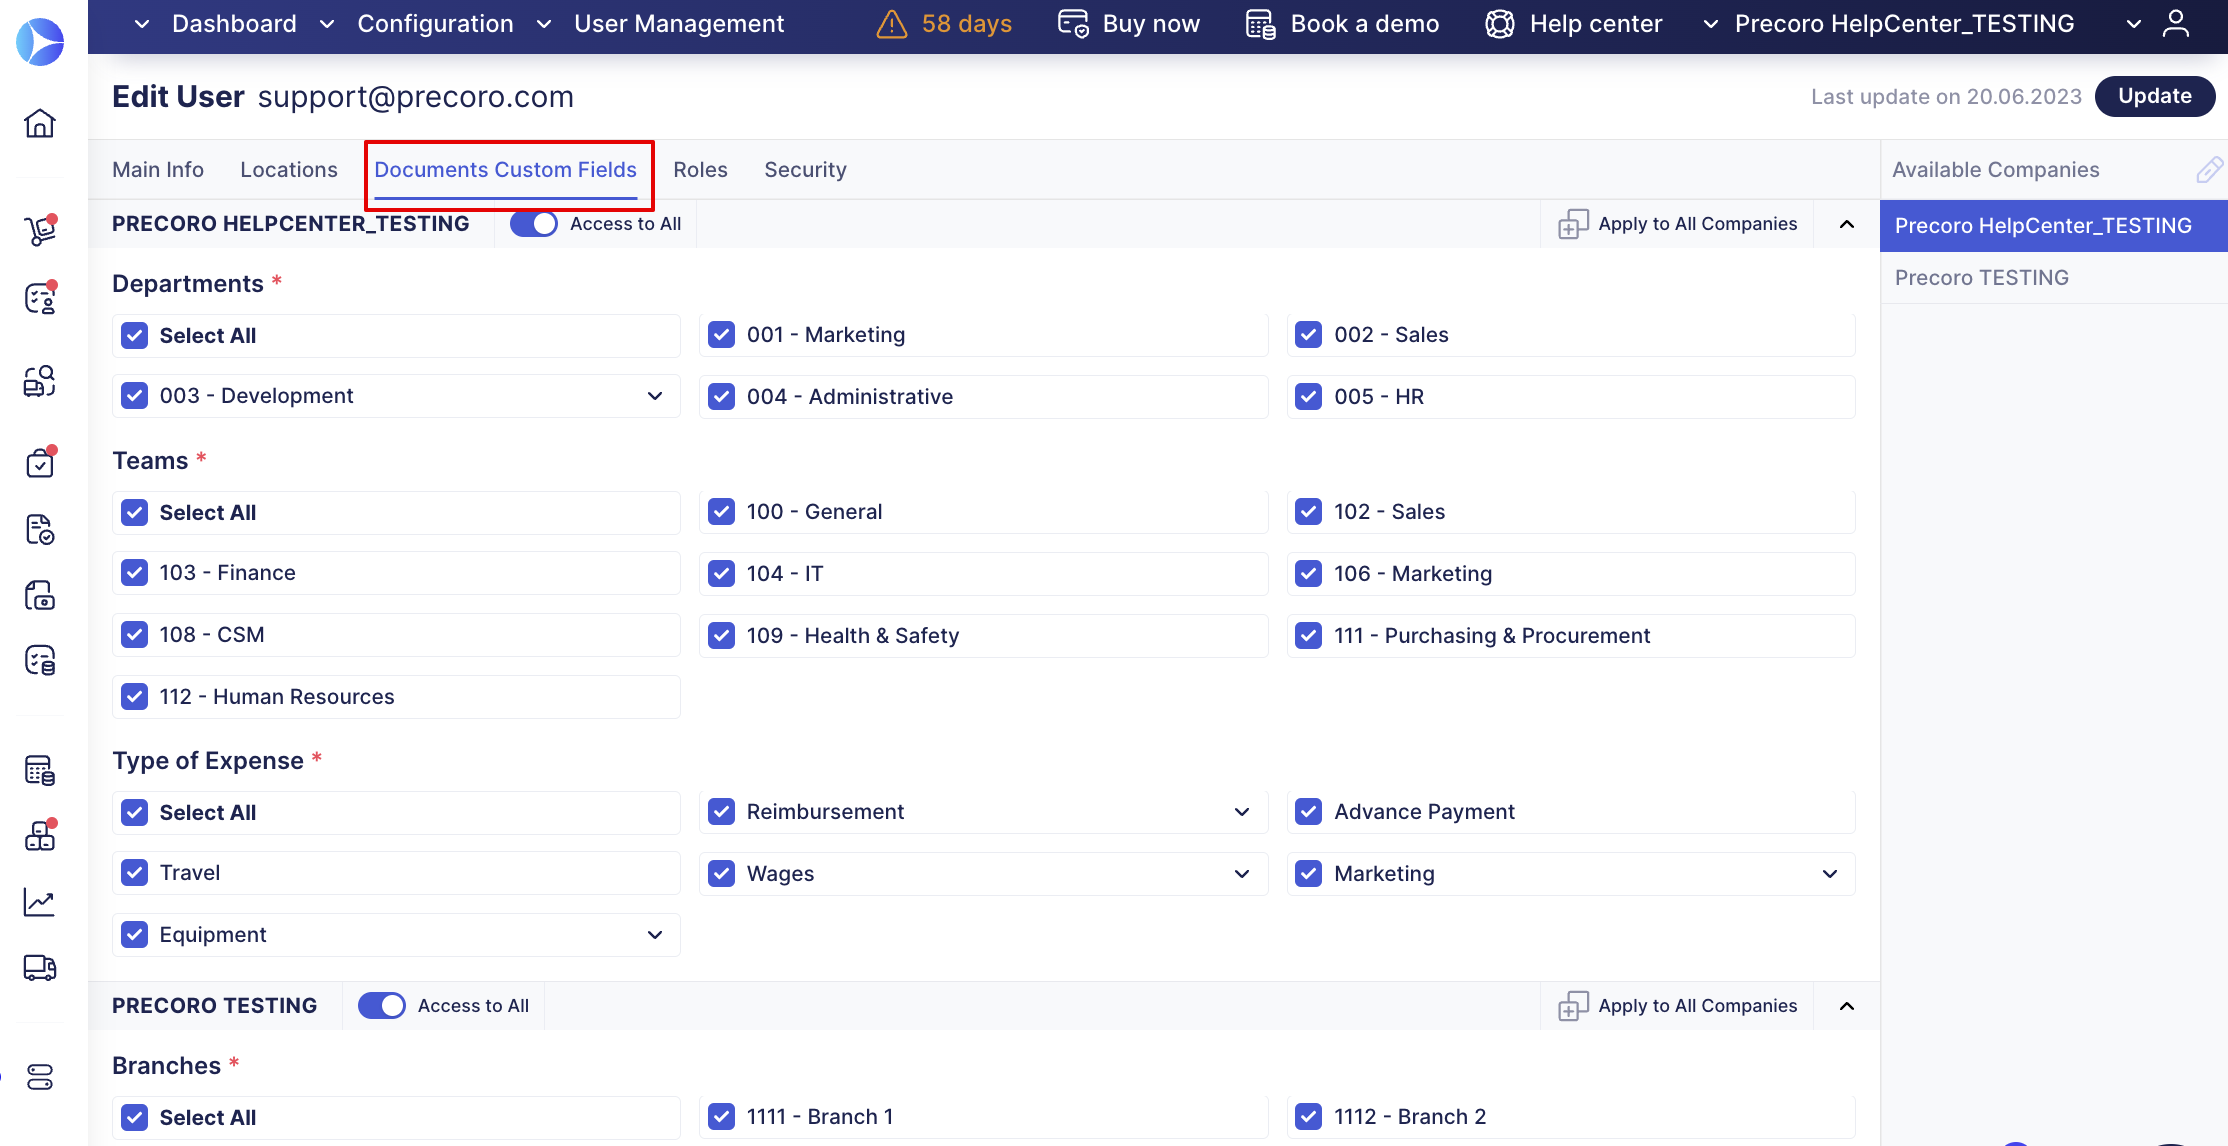
- Choose Custom Fields for Documents (Departments, Projects, etc.) you wish to make available to your colleague.
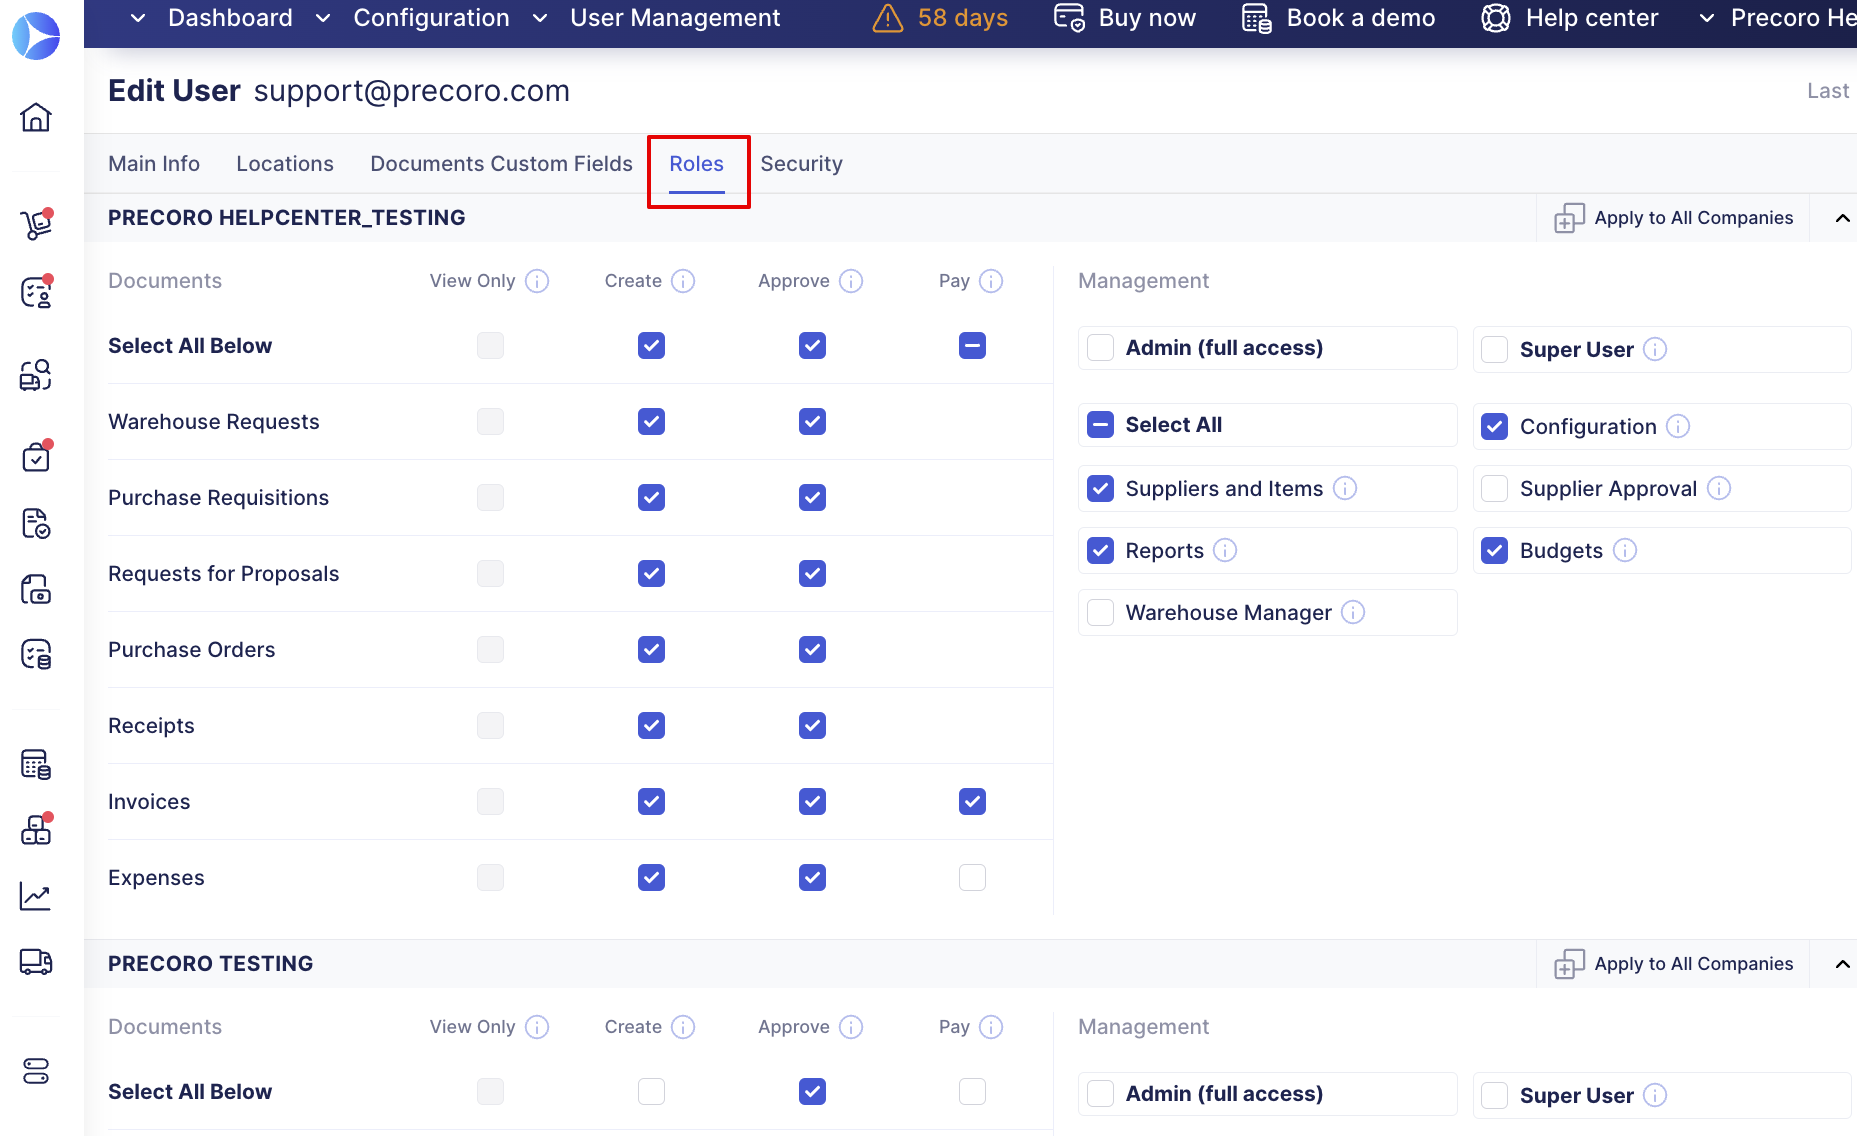
- Define the Roles by marking those roles and the functions associated with your colleagues concerning their functional responsibilities.
More information about Roles in Precoro can be found in this article.
You can also use the Search functionality when creating new or editing the existing User Profile on the Locations and Custom Fields for Documents tabs. To start the search press the icon and enter the needed information.
The search will be performed by the option Name or Code throughout all the available companies.

6. Click Invite. The invited user will receive an email asking them to create a Precoro password. After setting up the password, the user will be redirected to their Precoro account.
You can also manage invitations:
-
Resend the invitations if needed.
-
Edit the email if there are typos.
-
See who has not accepted your invitation yet.

Please note that the single-company accounts do not have a sidebar display on the right with a list of available companies. There are the following toggles on the page:
- User is Inactive — shows the user is not active in the company with the red light.
- User is Active — shows the user is active in the company with the green light.

Multi-Company Account
To invite a colleague to one of your companies in a multi-company account, follow the steps below on the Configuration → User Management page:
1. Click on the Invite User button.
2. Enter the email address.
3. Select the needed companies by checking them or use the Select All mass action.
4. Click the Next Step button.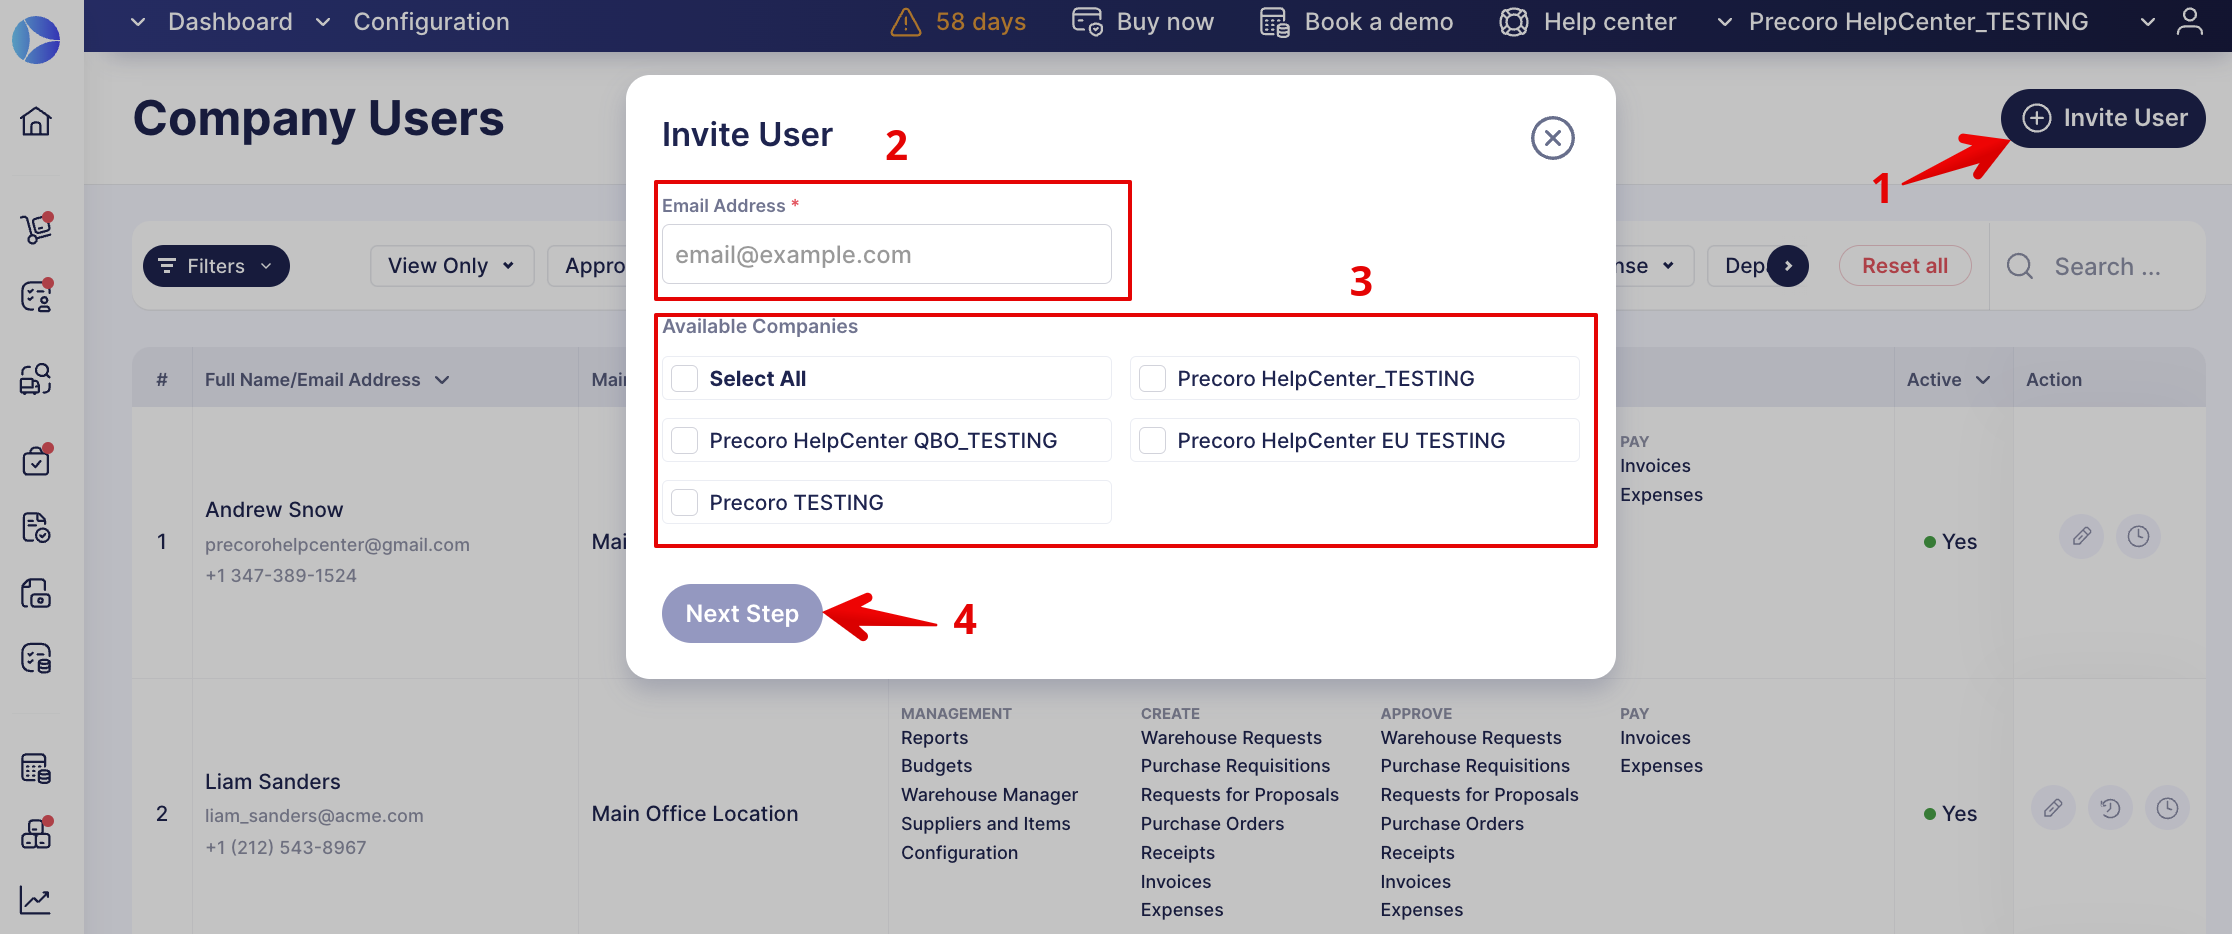
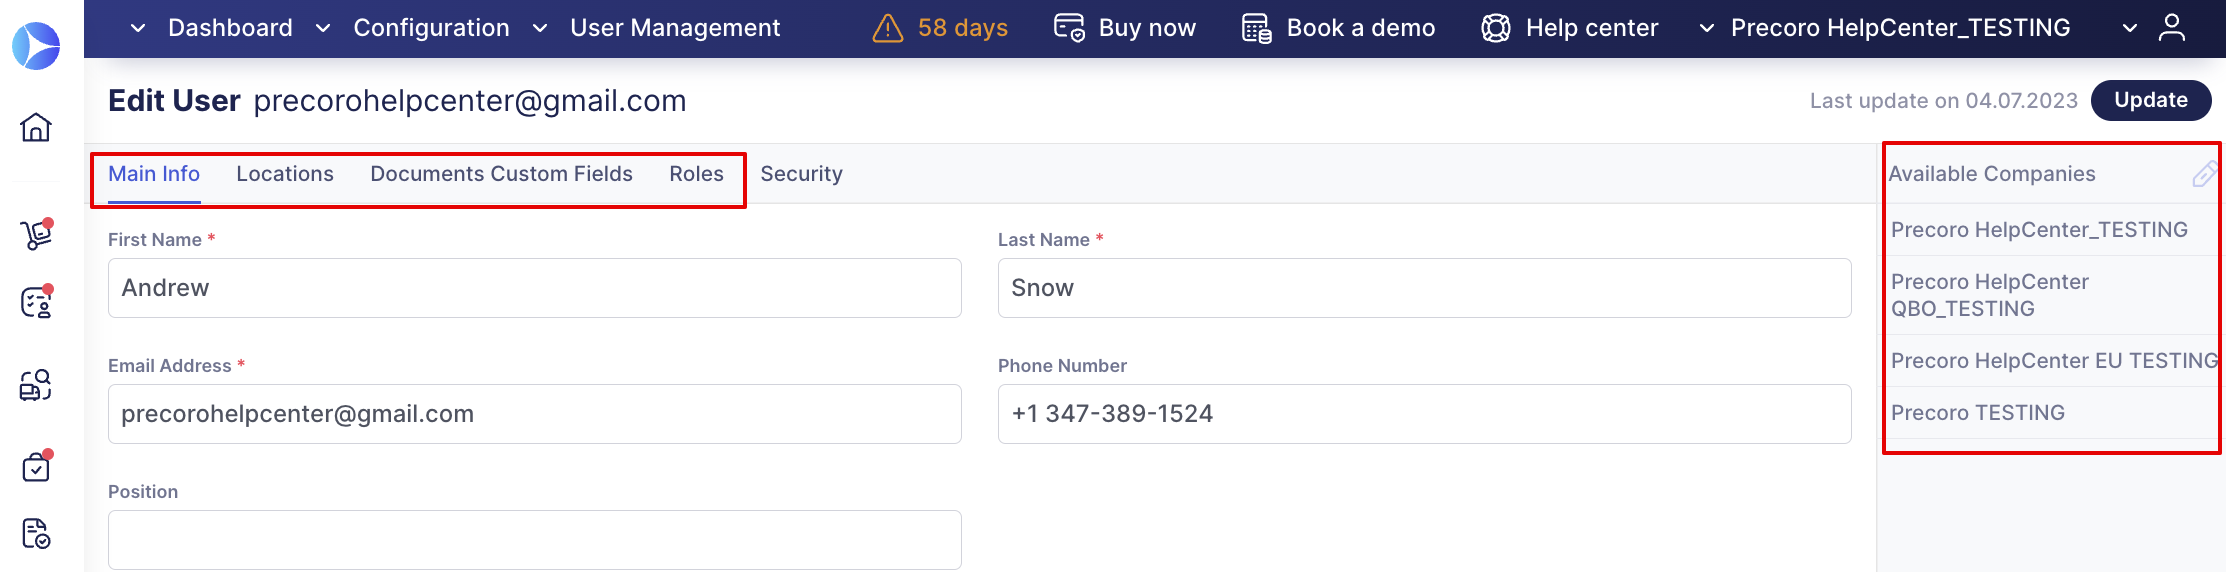
In a multi-company account, you will see the Available Companies for the user listed on the right. The user’s main info would be already predefined, as it is shared between all the companies.
You can assign the appropriate Locations, Custom Fields for Documents, and Roles to this user in all the listed companies (see steps 4-6 for the Single Company Account).
💡 Pro tip: Use the Mass Actions in User Management to help you speed up the process.
5. Press Invite User from Other Company / Invite. The invited user will receive an email with further instructions.
Mass Actions in User Management
- For multi-companies, you can add, edit, and deactivate user access in all companies at once. As well as select and appoint a Substitute User for all available companies at once for the deactivated user:
-
Access to All — can at once grant and revoke access to all Locations and Custom Fields for Documents options in a specific company.
💡 Please note: This function works even when the user has partial access to the options without having Access to All.
-
Select All — can at once grant and revoke access to specific Locations and Custom Fields for Documents options.
- Apply to All Companies — this can help you automatically duplicate the specific set of User Roles, Locations, and Custom Fields for Documents and apply them to all available companies.
You can also use a filter that will help you quickly manage user access to the options, sorting them by the necessary parameter.
You can find the filter in the User’s profiles in tabs for Custom Fields for Documents, Locations, and Product Groups (if your company uses this functionality). The filter is, by default, set to Show All Options. Click on the filter to see other available choices: Checked and Unchecked Only.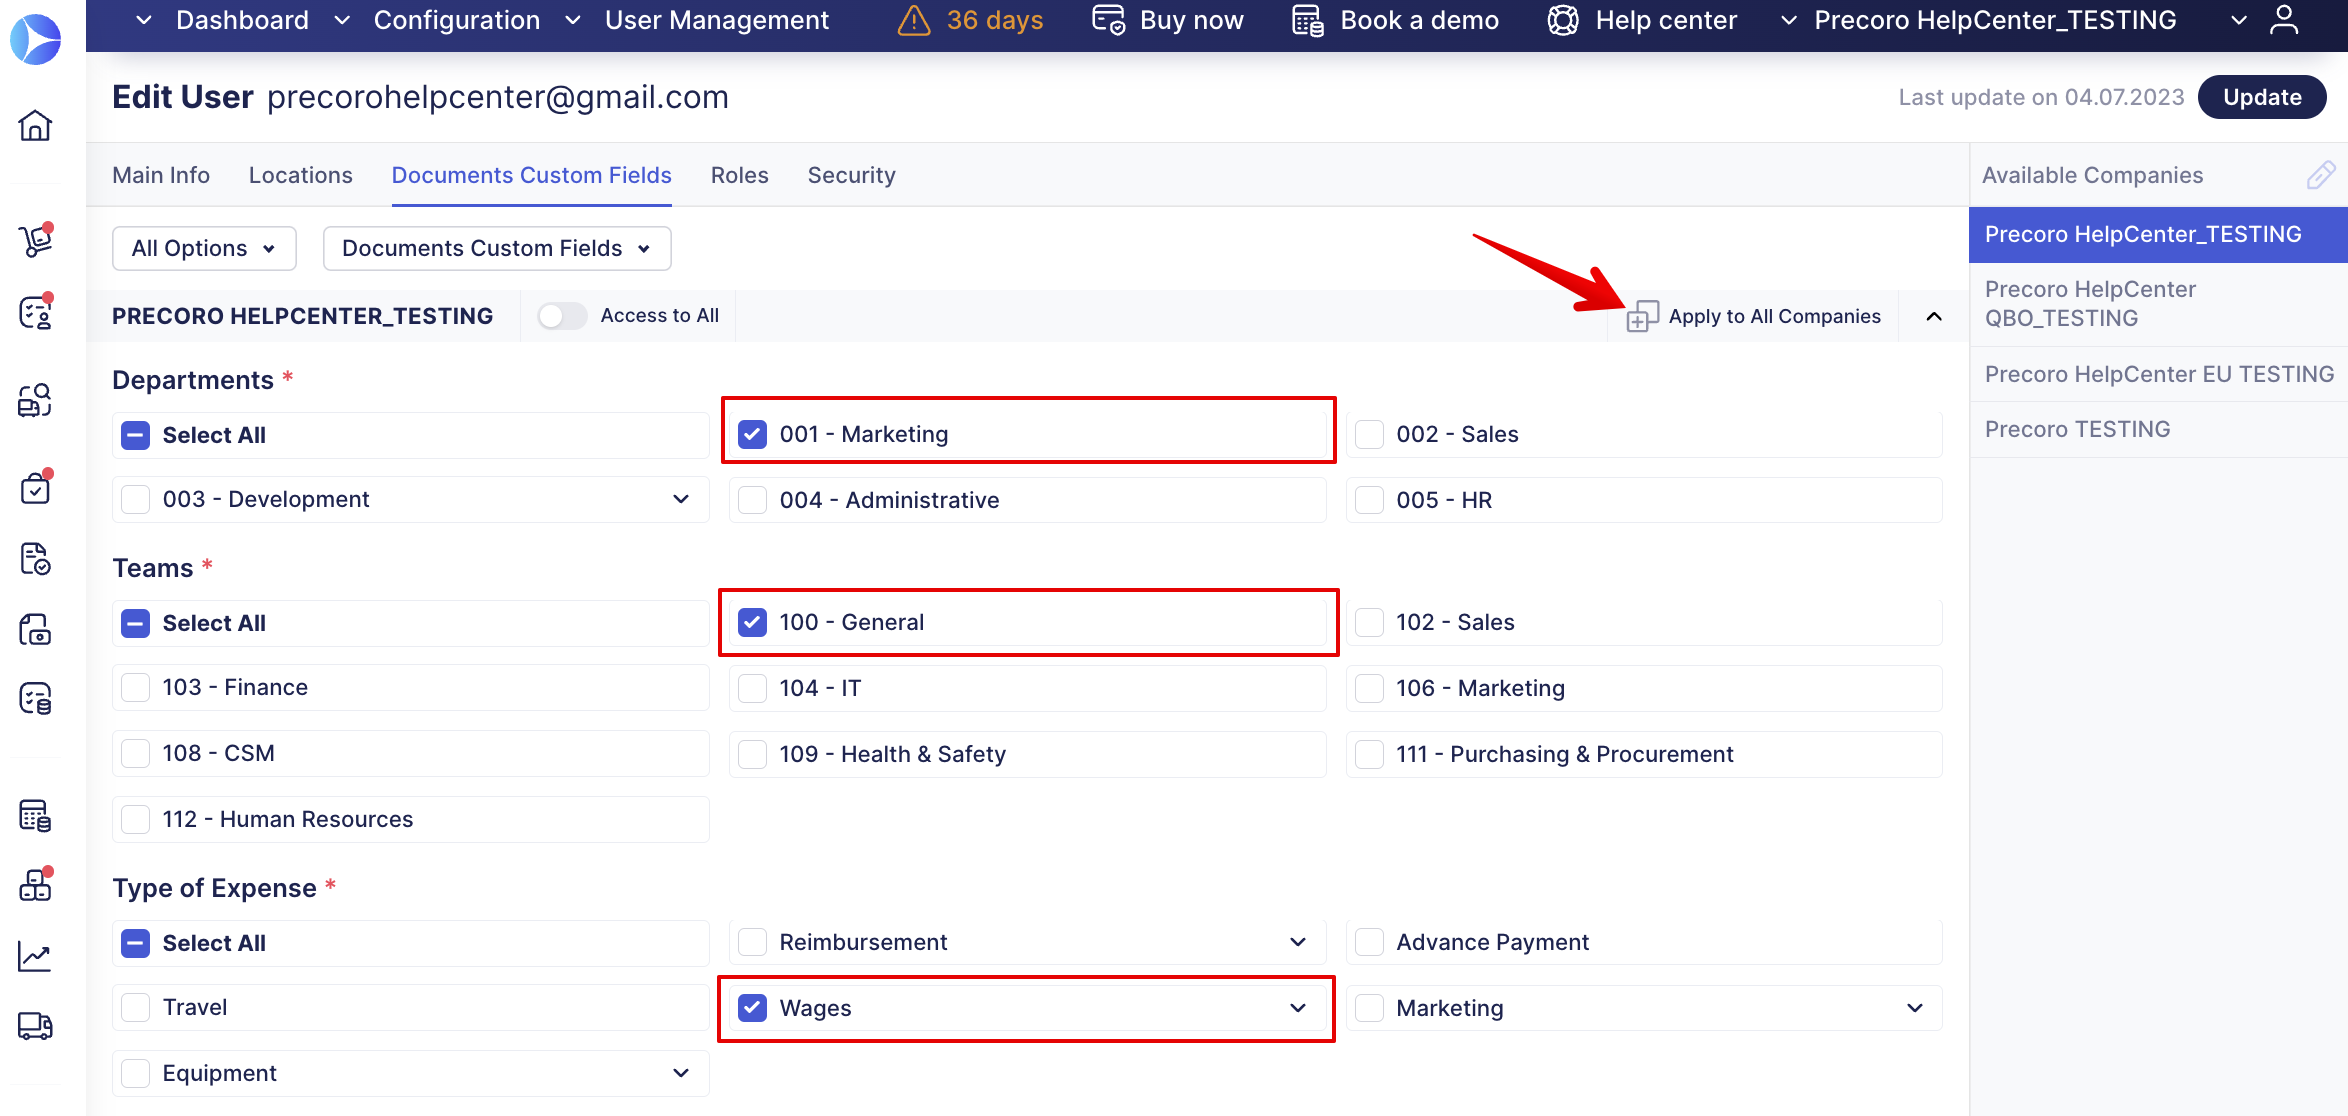
Automated CFD Access Assignments For Users
To avoid the situation when Custom Fields for Documents is added and users do not have access to any options, we automatically add access for all company users to the first created CFD option and the subsequent ones. The administrator can easily edit accesses and remove unnecessary options from users if they do not need to have access to those.
The process works as follows:
1. New Custom Fields for Documents is created, and all users in the company will get access to the added options.
2. You add the subsequent options. Since users already have access to one option of this CFD (Select All at the CFD level is activated), all those options will automatically be available to them.
3. The administrator can edit the access in User Management and remove the unnecessary options from users, thereby turning off the Select All setting; thus, all the following added options will no longer be automatically assigned to the edited user.
More information on the Custom Fields for Documents in Precoro can be found in the corresponding article.
Additional Ability to Grant Access to View Only Self-Created Documents When Creating New Related Ones
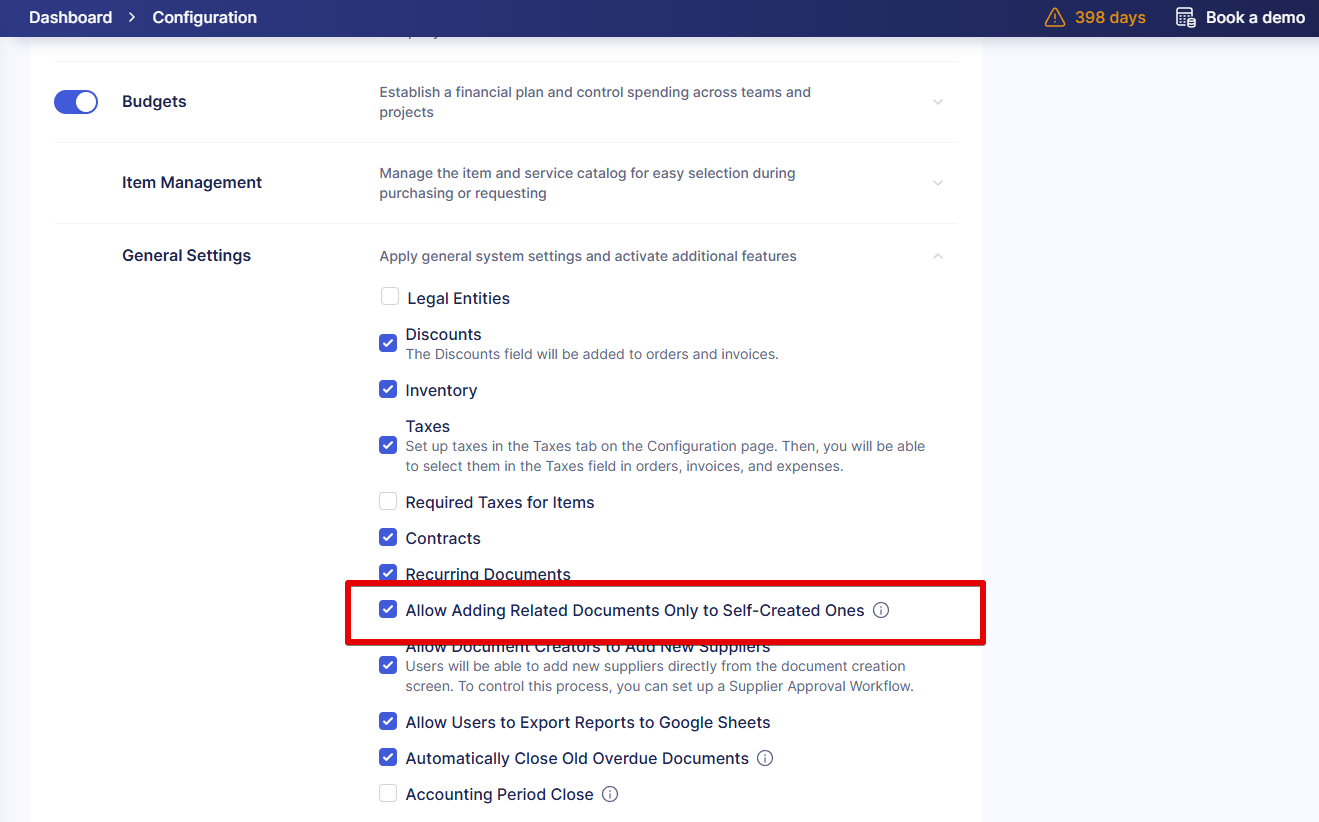
You can additionally grant access to view only self-created documents when creating new related ones, find the needed settings in the Configurations → Basic Settings → Document Setup → General Settings → Allow Adding Related Documents Only to Self-Created Ones.
By default, this checkbox is turned off. If the checkbox is activated, users will be able to View and Create related documents only from the documents they have initiated. This only works if users only have the Create role for the documents.
💡 Please note: If users have the Approve roles, they will see all the documents available to them by custom document fields and locations.
Also, if users have Create and View Only roles for the documents, they will still see all the documents in your organization available to them.
User Actions When Registering
After you have configured the access and roles, the user will receive an email with an invitation and instructions to:
- Follow the invitation to the Precoro system.
- Create a secure password.
- Agree to our Privacy Policy, Terms and Conditions, and Processing of Personal Data.
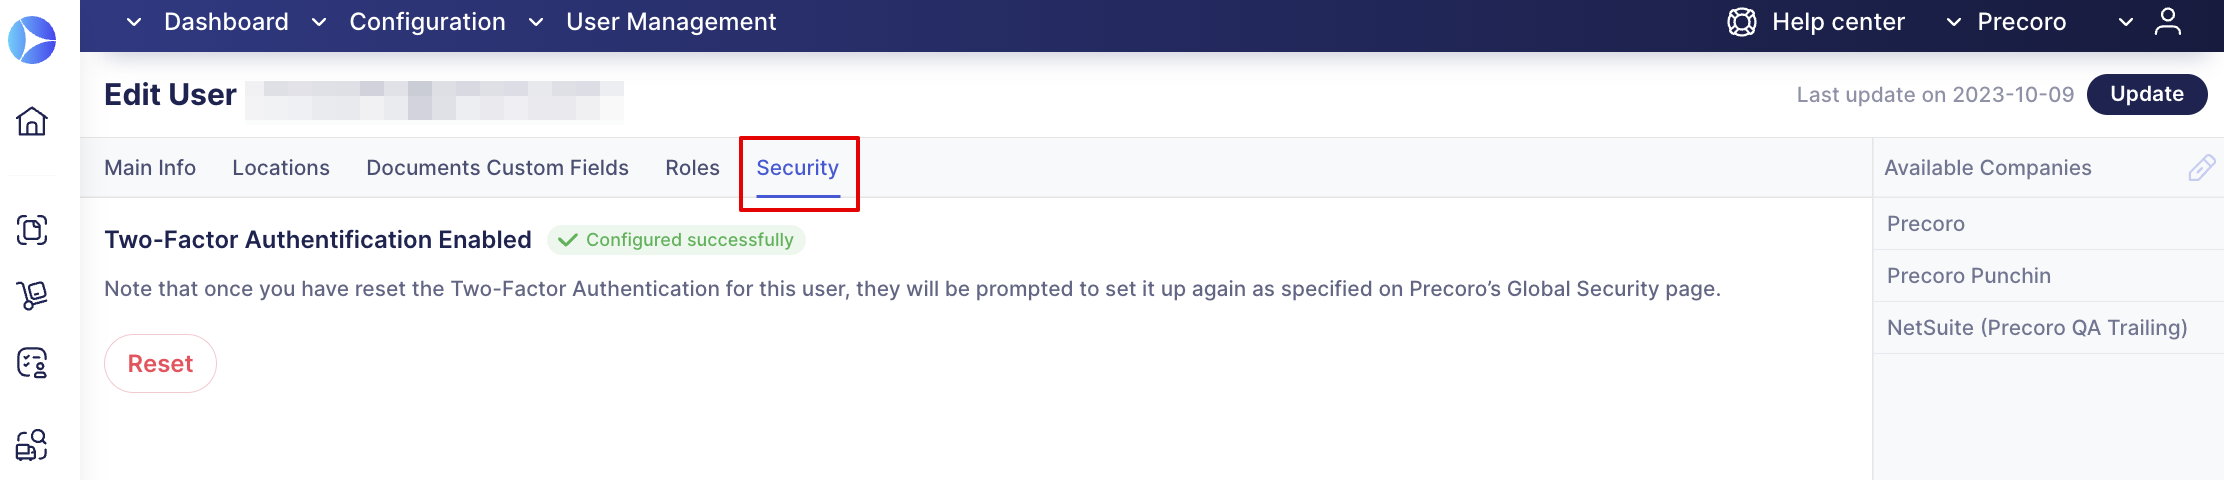
Two-Factor Authentification Security
When adding new or editing the existing users you can configure the two-factor authentication which will help protect Precoro accounts from hackers and identity theft.
Configure the Two-Factor Authentication in Precoro following the instructions in the article.
Tracking User Information
You can use the Advanced and Fast Filters as well as the Search function on the User Management page to quickly sort out and find the information you are looking for.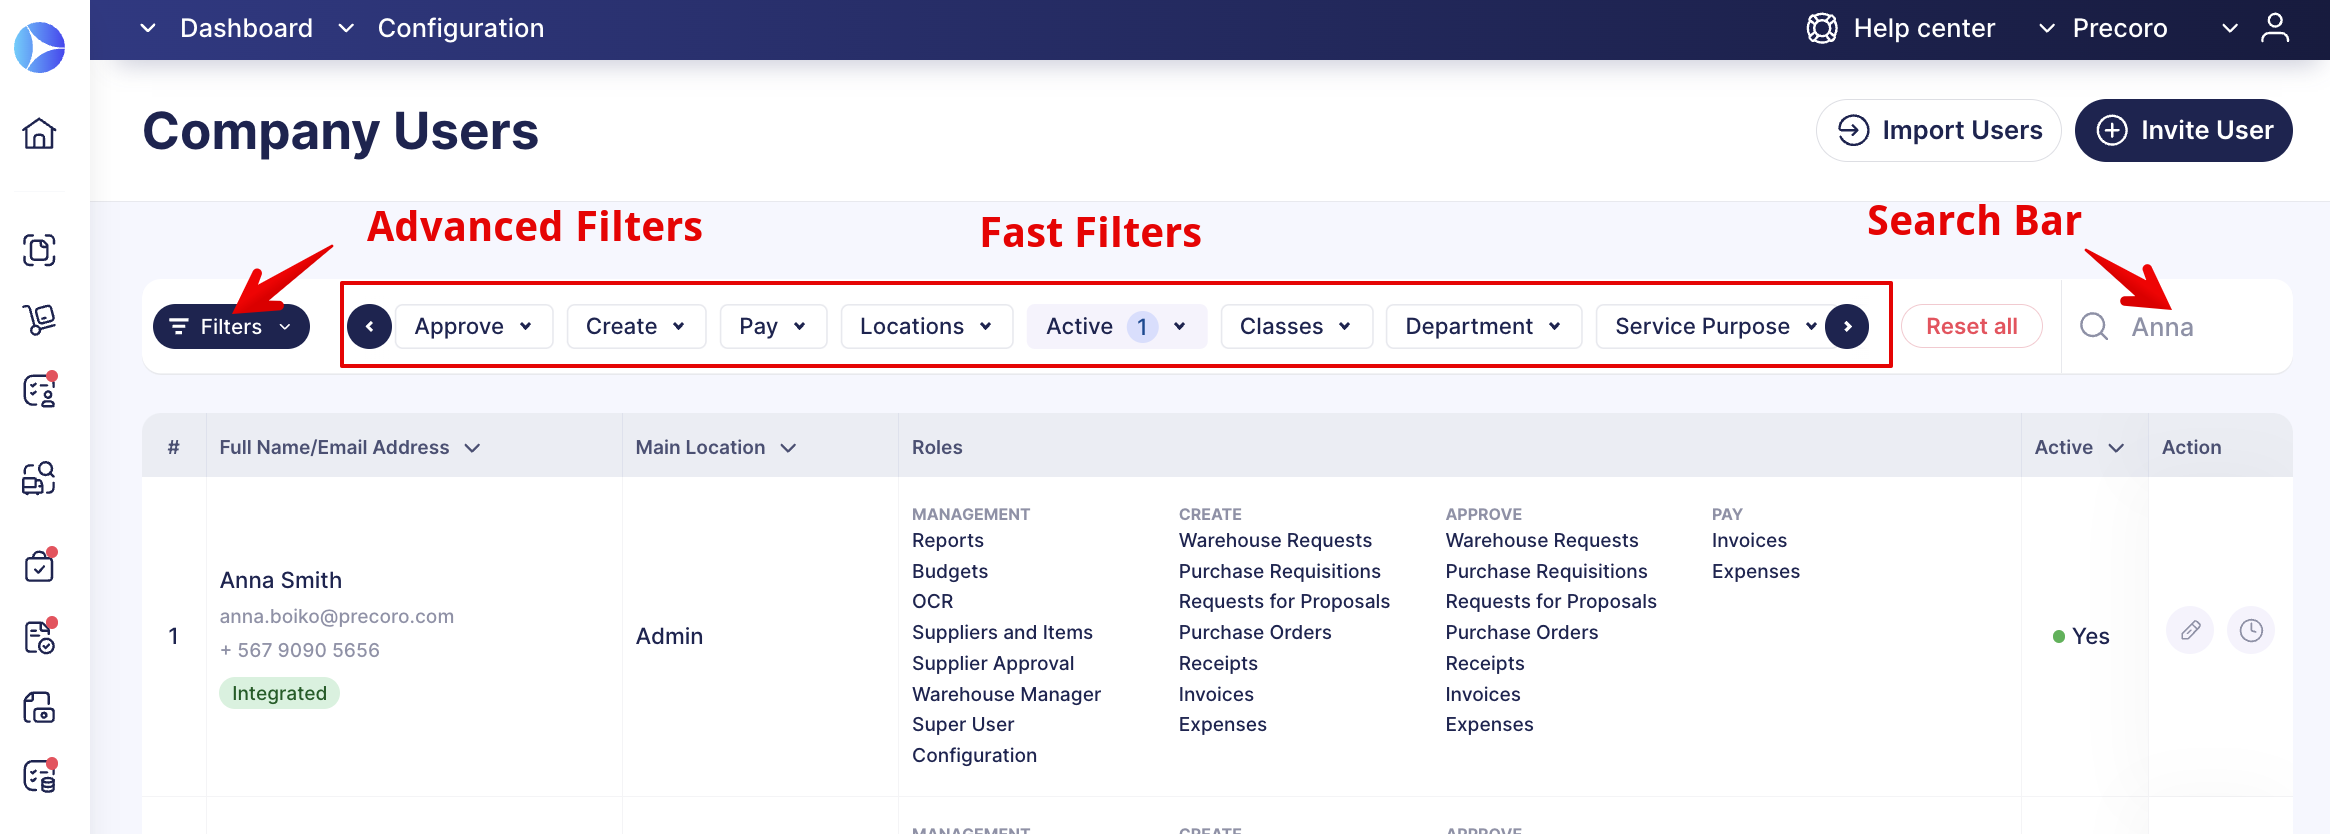
Track and Re-Send the Undelivered Letters to the Company Users
You can conveniently track the undelivered letters to the company users and quickly re-send the invitation if needed:
The Bounced Letters Status — Failed
You will see the Failed status for the undelivered invitations to new users.

The Infocard
- Undelivered Invitations — will help you filter out users with Failed invitation sending status.
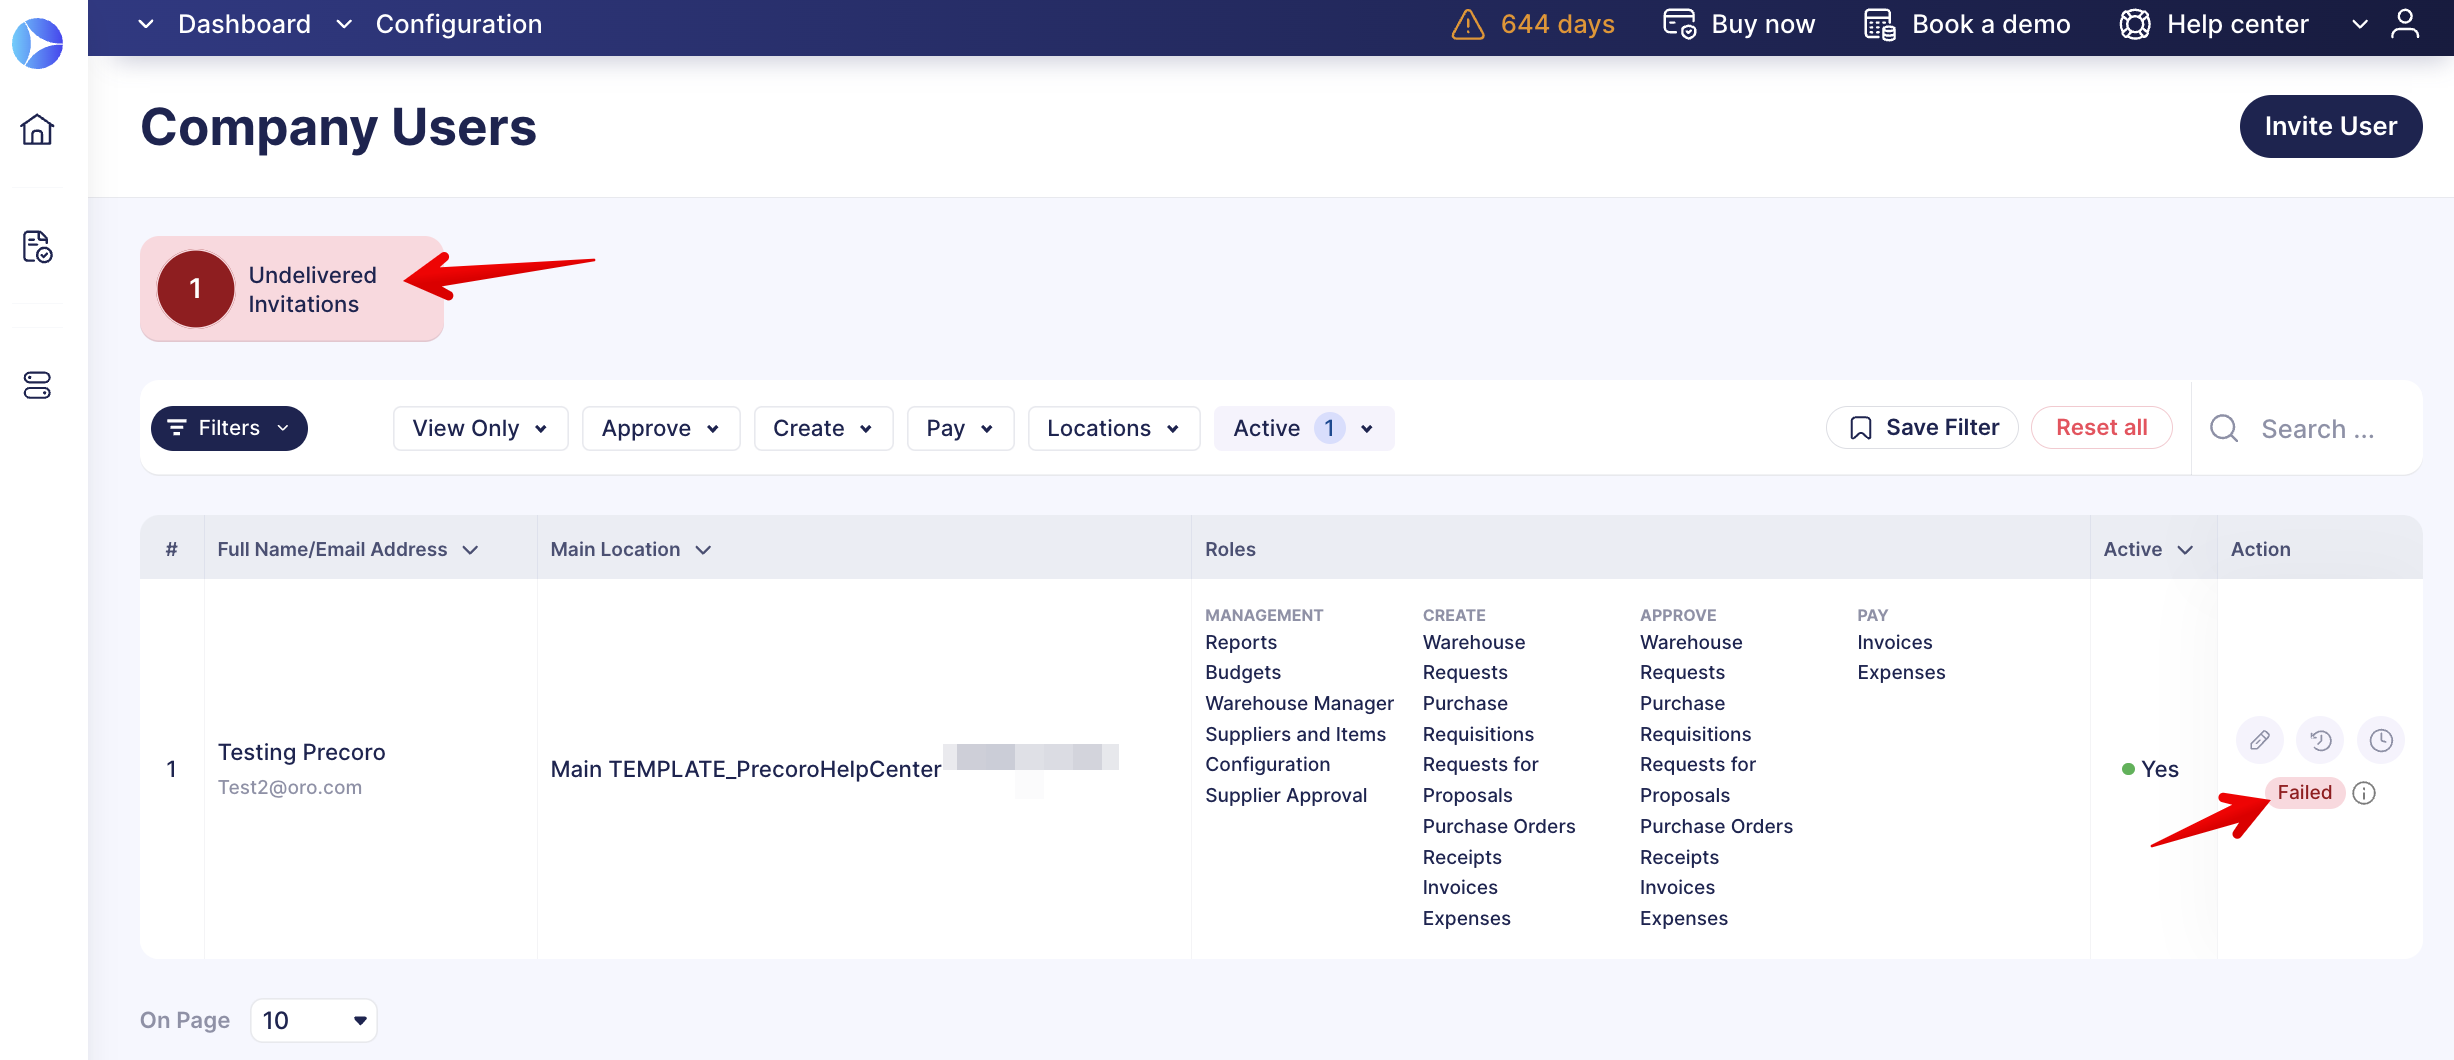
By using the infocard and status, you can quickly identify those who did not receive the letter and make another attempt by clicking the Resend button on the Action panel.
Save and Set as Default Filters on the User Management Page
You can save and set your custom filtering parameters as default. This functionality will save you time and eliminate manual routine work.
How to save filters on the advanced filters page
1. Open the advanced filters page.
2. Select the necessary filtering parameters.
3. Click the Save current filter button below.
4. Enter the filter Name, and if needed, check the Use as a default setting.
Having set the default filter will allow you to refresh the page or work on other pages, and when you return, the set default filter will still be running.
💡 Please note: You cannot have more than one default filter set on a page.
You can click Apply filter for another filter, and it will be applied, but after refreshing the page or switching to other pages, the default filter will be re-applied until you click the Reset All Filters button.
How to save filters on the fast filters panel
1. Select the needed parameters on the fast filters panel.
2. Click the Save filter button on the right.
💡 Pro tip: You can see and manage all your saved filters in the Saved Filters tab on the advanced filters page.
3. Enter the filter Name, and if needed, check the Use as a default setting.
Utilize Infocard Filters
There are also Infocard filters you can see and utilize on this page, for example:
- No User Access To Required CFD, with the help of which you will be able to quickly identify users who do not have access to any options in one or all of the required Custom Fields for Documents in your company.
To promptly fix those issues:
1. Open the User Management page and click on the No User Access To Required CFD Infocard.
💡 Please note: If you do not see the No User Access To Required CFD Infocard, then all your users have access to the required CFDs, and there is no need to correct their rights.
2. You will see the list of users who need access modifications. Open their profiles in the editing mode and provide them with the necessary Custom Fields for Documents options.
3. Save the changes made, and those users will have all the needed accesses for continuing the working process with documents.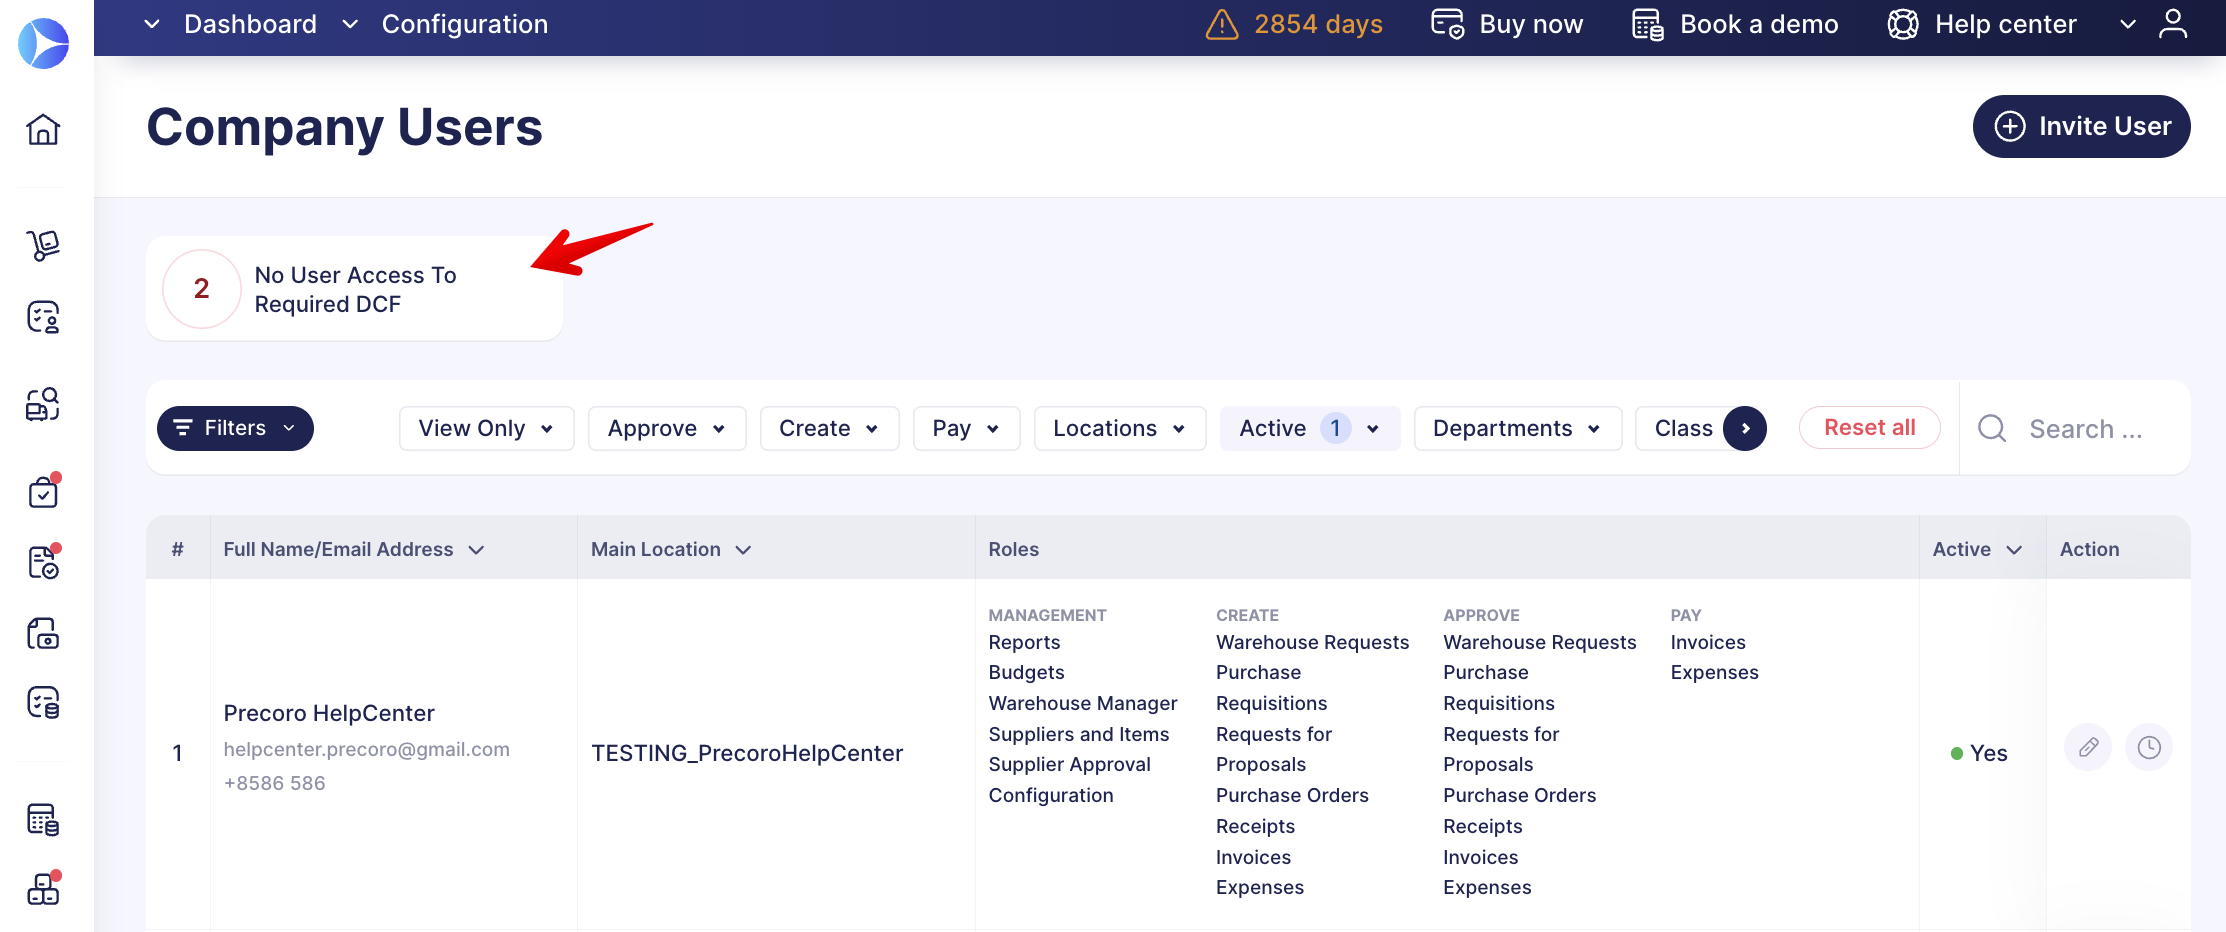
Additionally to the Infocard filter, to help you keep all these issues in check, all the Configurators will receive the letter every Monday. The letter will only be sent in case there are problematic users in your company who lack the needed CFD access.
-png.png?hsLang=en)
Also, if your company has an active integration with our partners and you have Integrated Company Users. In that case, there will be a corresponding display that will quickly allow you to assess which user is part of the integration: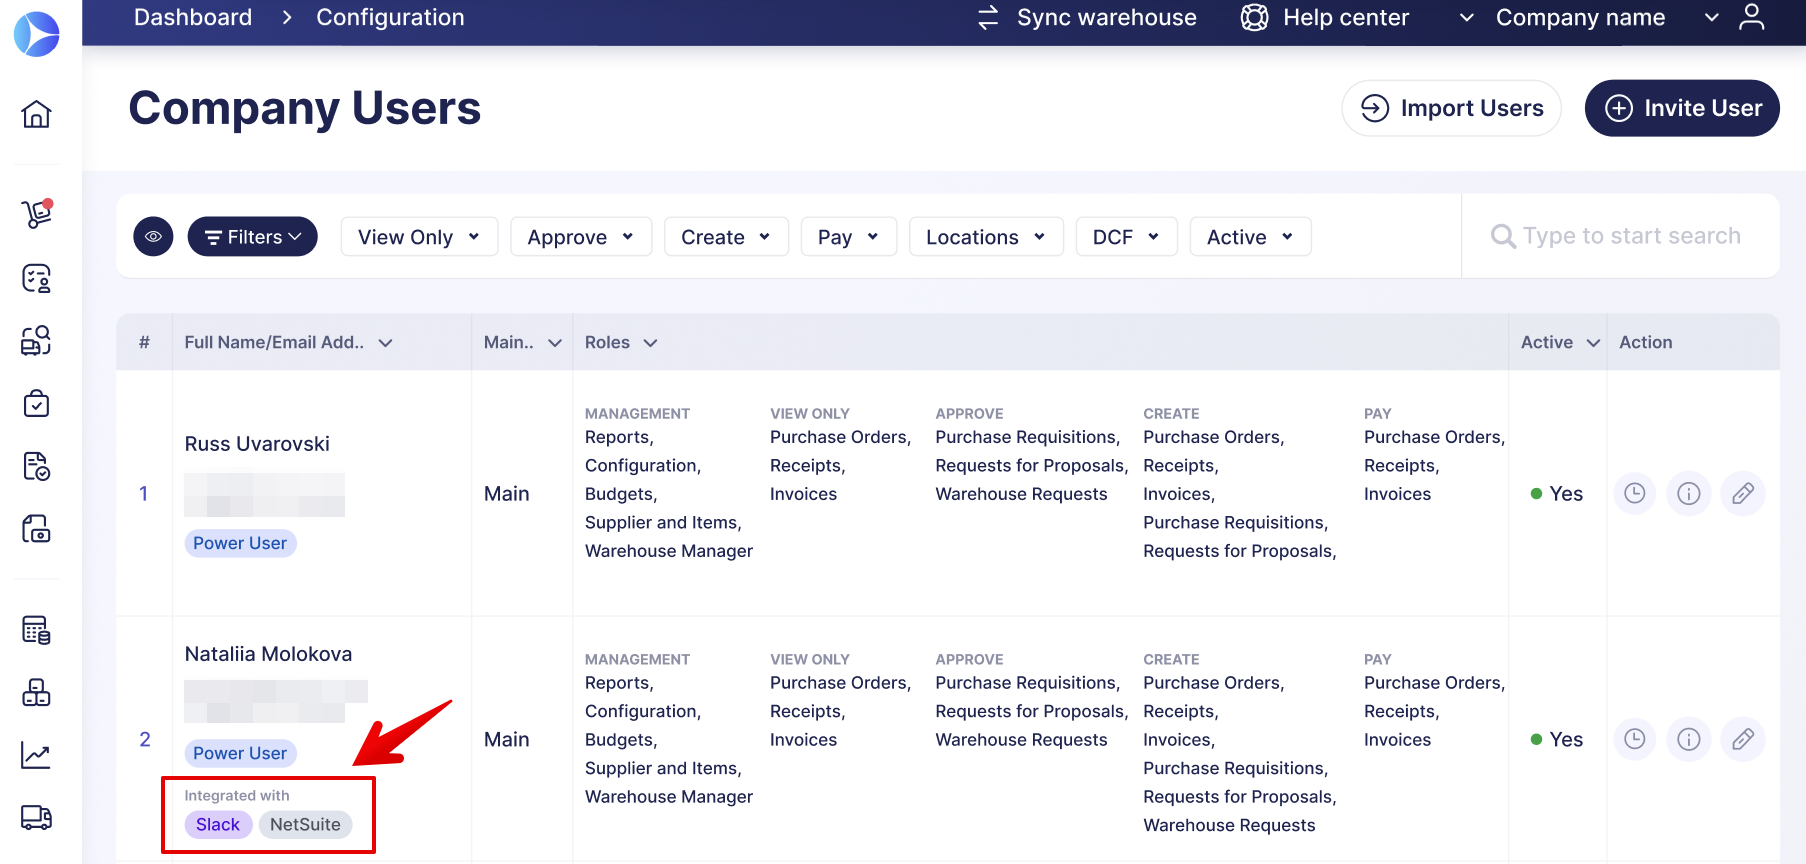
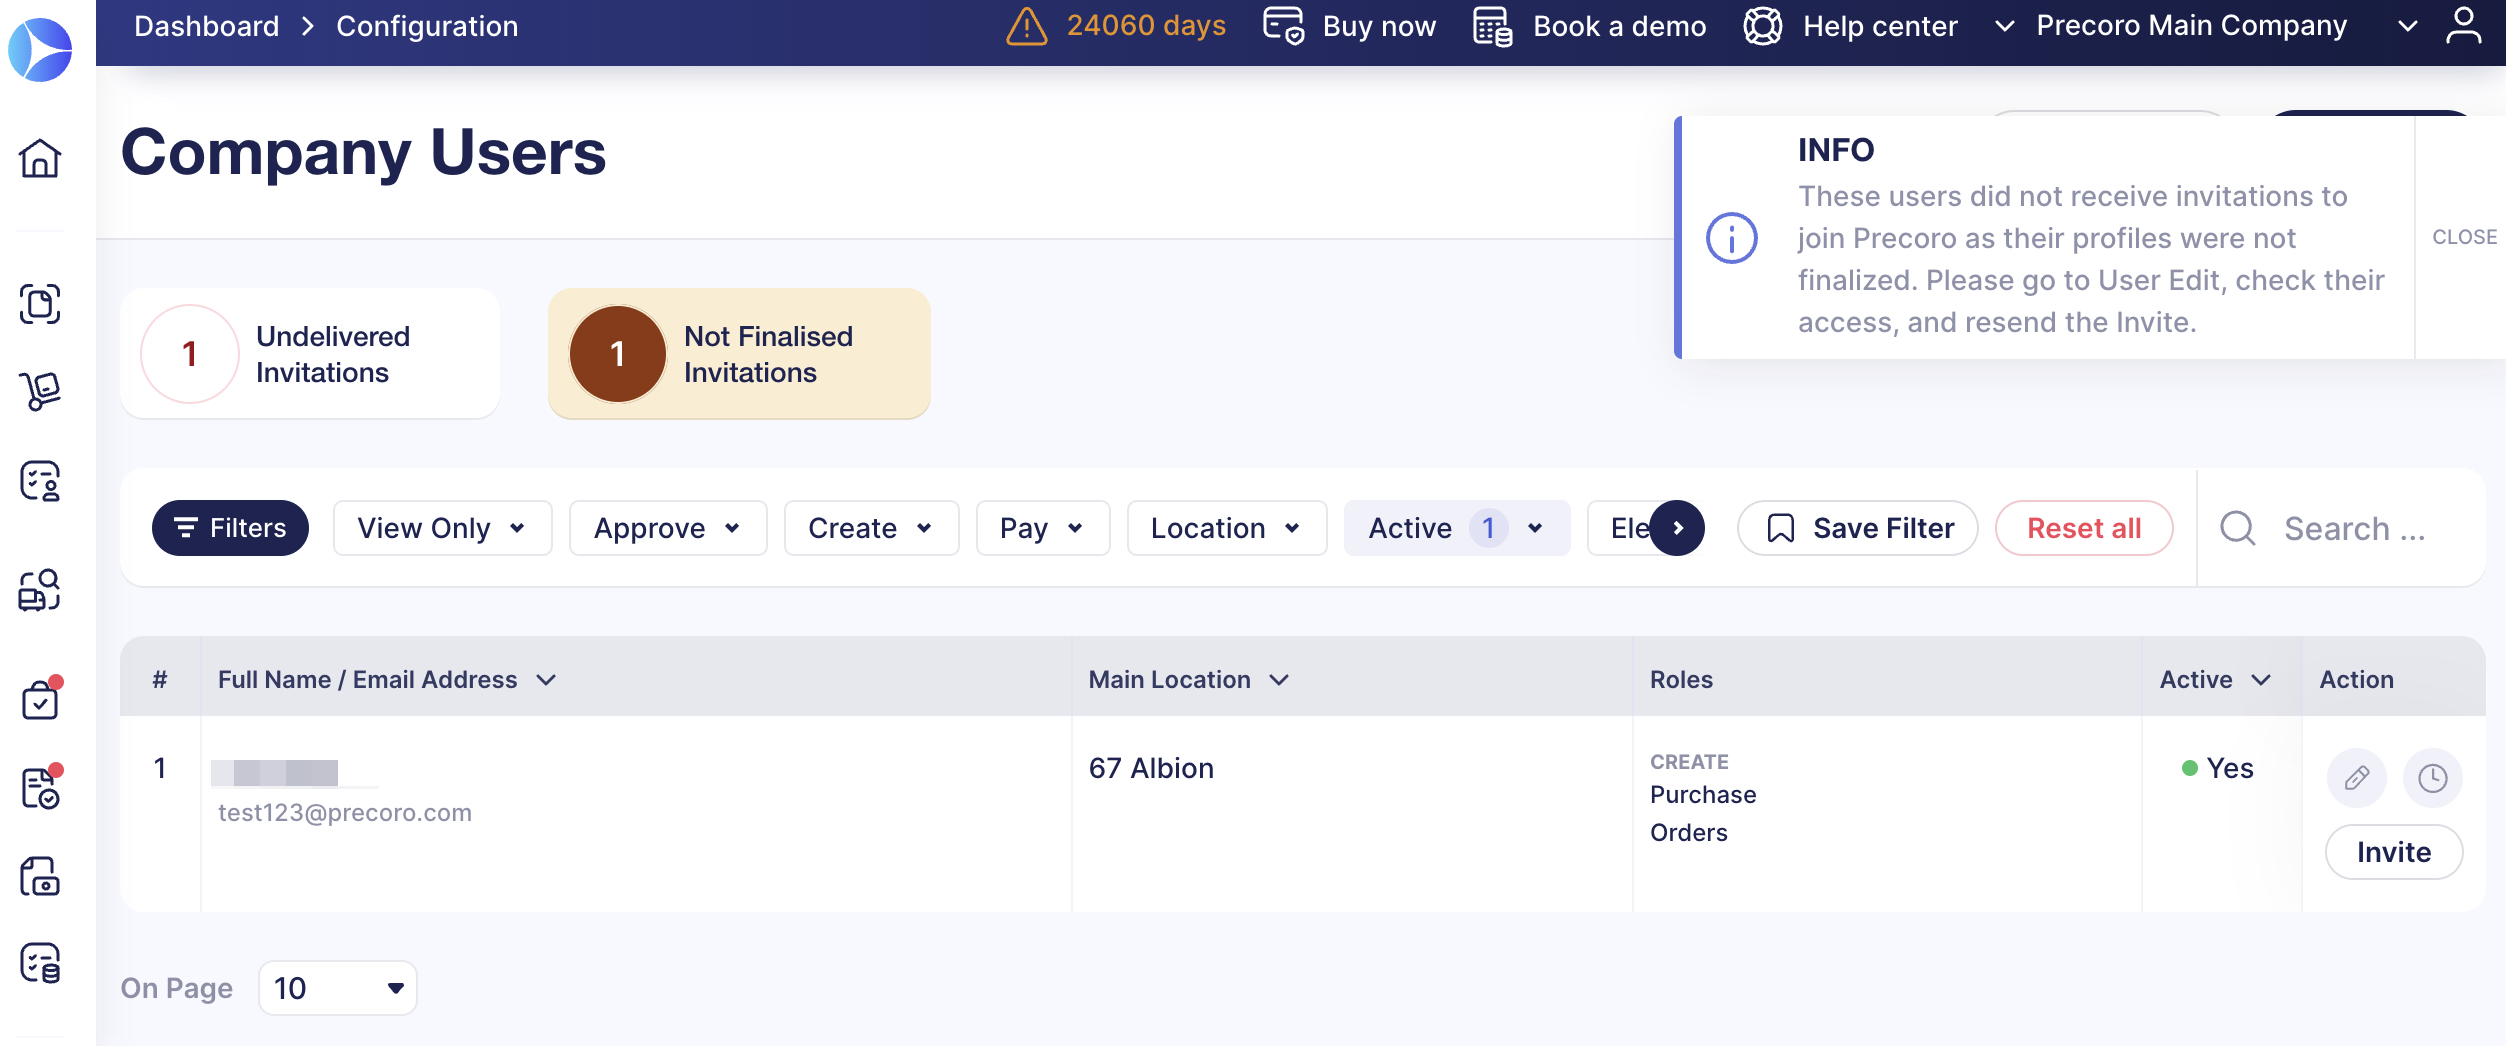
- The Not Finalised Invitations infocard is intended to make the admin’s life easier and let them know that there are users with incomplete settings and unsent invites to join Precoro.
When clicking the infocard, you will see the list of users who did not receive invitations to join Precoro as their profiles were not finalized. You can fix that by checking their access and resending the Invite.
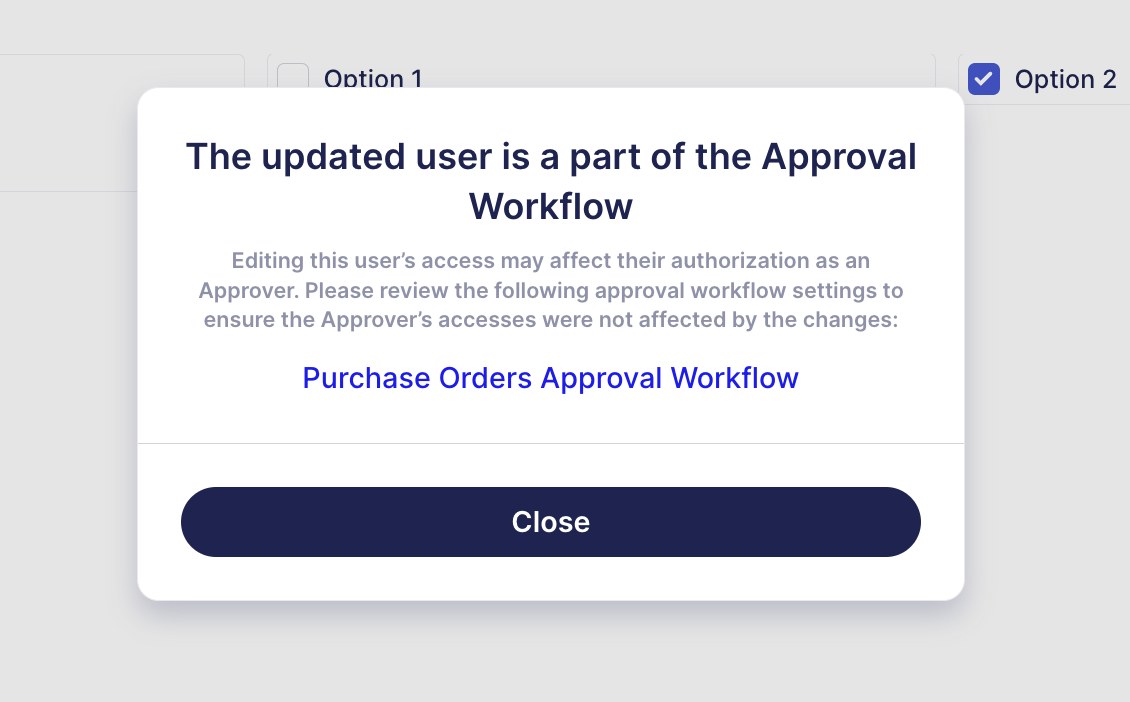
Admin Notification Regarding User Editing Who Are Part of the Approval
Every time the company administrator tries to change the user rights and roles, we will let them know if the updated user is part of the Approval Workflow, and editing the user’s access may affect their authorization as an Approver. We will prompt the administrators to review the current approval workflow settings to make sure the Approver’s accesses were not affected by the changes.

Preventing Taking User Access If It Is the Last Approver Option
You will see the notice below when trying to edit user rights. Subsequently, this action would remove the last available option for the approver.
You should first review the current settings and provide the approver with new accesses that will not be affected by the changes. After editing the approver, you can return to complete this user update.