TABLE OF CONTENTS
How to Import Suppliers from NetSuite
You can find the list of your Suppliers in Lists → Relationships → Suppliers:
%202023-07-04%2008-05-45-png.png)
To import Suppliers from your NetSuite account to your company in Precoro, follow these steps:
1. Make sure that Suppliers are associated with the integrated Subsidiary.
Please note: Only Suppliers associated with the integrated Subsidiary will be imported to Precoro.
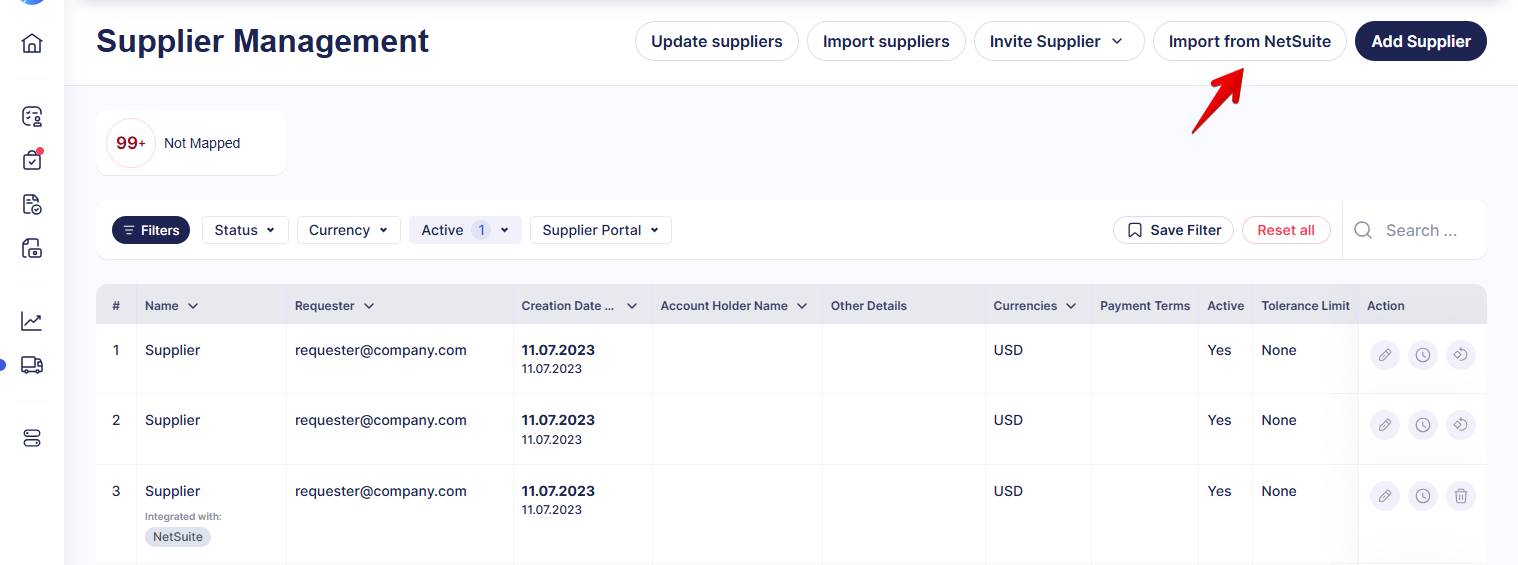
2. Go to your NetSuite integration page and click the Import Suppliers button. Alternatively, go to the Supplier Management page and select Import from NetSuite.
3. Select the Suppliers you want to import or click Select All (if you need to integrate all of them).
4. Use Search if you need to find and integrate particular Suppliers. You can also see the Currency imported from the main Supplier Currency.
Please note: When you clean the search, all selected suppliers become unmarked. This prevents importing the suppliers that you do not see while searching.
5. Click the Import button.
Congratulations, Suppliers have been imported.
How to Update Suppliers
Manual Update
Go to your NetSuite integration page and click the Update Suppliers button.
After the update, you will receive a system notification regarding the success status.
Auto-Update
You can also, turn on or off NetSuite Suppliers auto-updating from the Integration page. This functionality can help you eliminate manual and routine tasks of constant data updates.
Updates occur weekly on Mondays.
To Update Changes Automatically, toggle the corresponding switch to turn it blue. The deactivated toggle is gray, which means that information will only be updated manually.

Manual Supplier Mapping and Unmapping
You can manually map and unmap previously integrated Suppliers with NetSuite through the Suppliers Management page.
- To remove the integration, press the cross icon. Afterward, you will receive a system notification about the success progress.
- To map a Supplier, press the mapping icon, and the system will automatically map the corresponding entries.
For the Supplier to be integrated with NetSuite, there must be an exact match for the Name in Precoro and Company Name or Vendor Id in NetSuite.
Mapping for the NetSuite Individual Suppliers Type
The Individual Suppliers Type in NetSuite has a Company Name field where a company code is usually written, and First and Last Names fields appear only for the Individual Suppliers.
When importing the NetSuite Individual Supplier, Precoro will get the First and Last Names values from NetSuite instead of the Company Name field and insert them into Precoro’s Company Name field.
For the mapping process, initiated after the Supplier is created in Precoro on the Supplier Management page, we will still take values from the Company Name field in NetSuite and insert them in the corresponding Precoro’s Company Name field without recognizing the First and Last Names from NetSuite fields.
Suppliers with Pending and Rejected statuses cannot be mapped. Thus, if you are trying to import a Supplier that is Rejected or Pending, try changing their Name so the system will not automatically map them with the imported ones.
Contact Mapping Option in NetSuite
When a user reconnects or establishes a new connection, you can turn on or off the mapping of accounting contacts from NetSuite and purchasing contacts from Precoro.
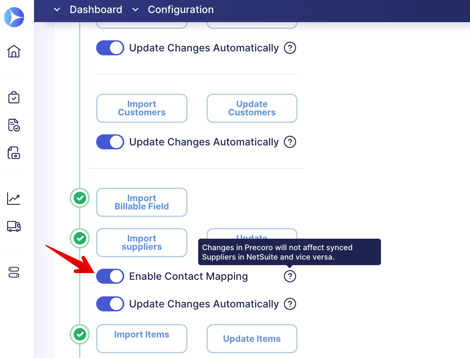
You can set the needed Contact Mapping for your users by enabling the corresponding checkbox on the Integrations page.
Changes in Precoro will not affect synced Suppliers in NetSuite and vice versa.
With Disable Contacts Mapping checked, NetSuite and Precoro contacts will be disconnected from each other. This will affect the contact integration in the following ways:
- If you already have contacts in Precoro, they will remain in Precoro and will not be transferred to NetSuite.
- If you already have contacts in NetSuite, they will remain in NetSuite and will not be transferred to Precoro.
- If you have contacts in both systems, then contacts from Precoro will remain in Precoro, and contacts from NetSuite will remain in NetSuite without being transferred.
This function applies to all mapping types: manual, import, update, auto-update, and creating a new Supplier in Precoro.
Integrated Fields and Their Synchronization
Supplier information from NetSuite which Precoro currently syncs:
| # |
Supplier Fields in Precoro |
Related Fields in Supplier NetSuite Profile |
Notes |
|---|---|---|---|
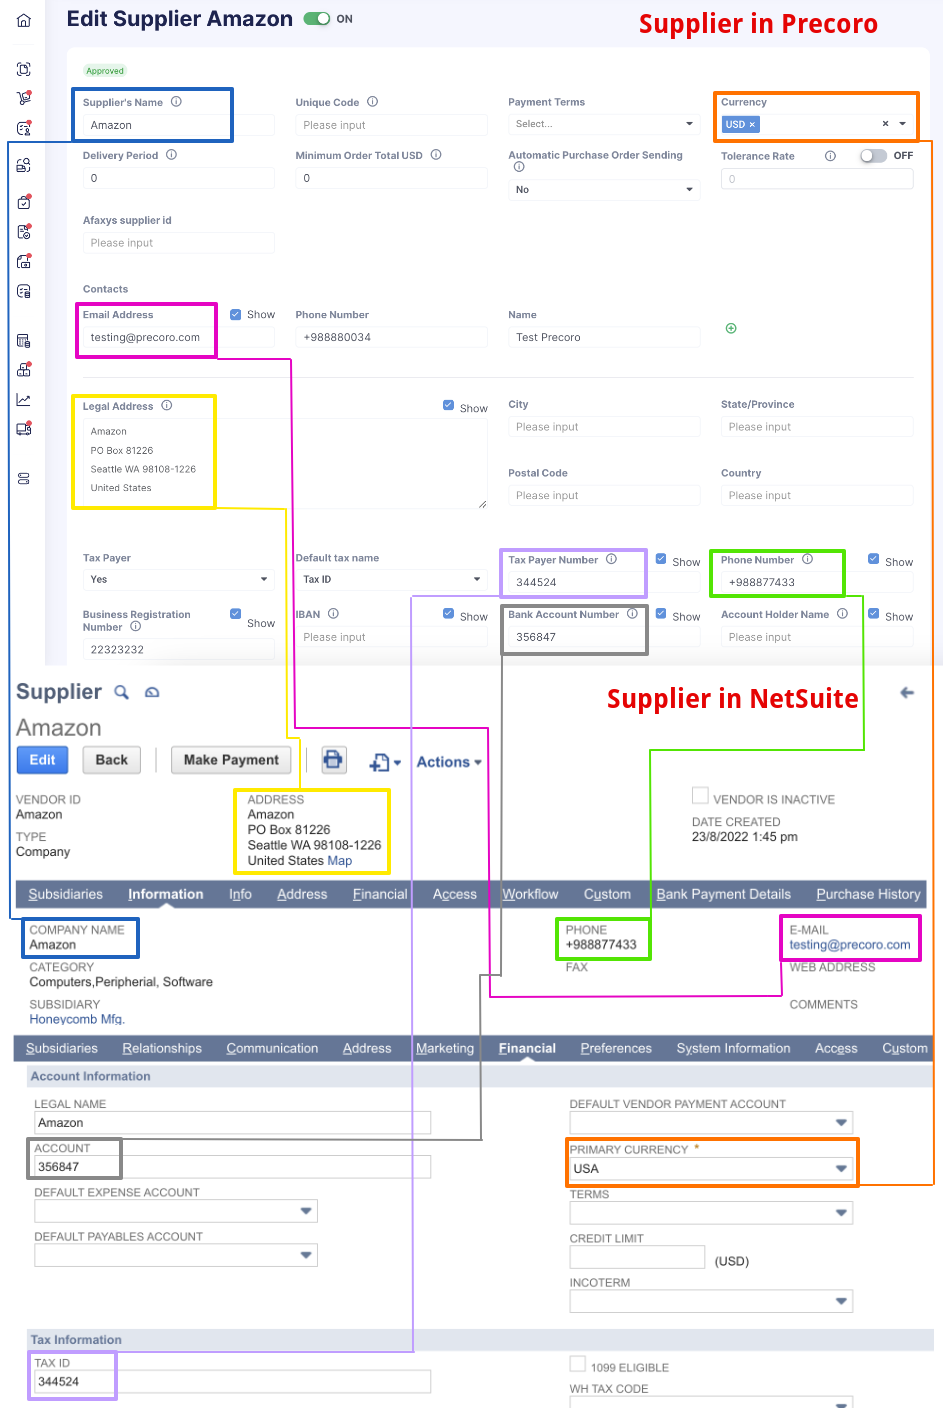
| 1 | Supplier’s Name | Company Name (Primary Information) | *two-way synchronization |
| 2 | Currency | Primary Currency (Financial → Account Information) | *one-way synchronization All currencies will be integrated. |
| 3 | Email Address | Email (Email | Phone | Address) | *one-way synchronization |
| 4 | Legal Address | Address (Email | Phone | Address) | *two-way synchronization |
| 5 | Taxpayer Identification Number | Tax ID (Financial → Account Information) | *two-way synchronization |
| 6 | Phone Number (Company contact) | Phone (Email | Phone | Address) | *two-way synchronization |
| 7 | Account Number | Account (Financial → Account Information) | *two-way synchronization |
*one-way synchronization — changes made in Precoro will not be displayed in NetSuite. Changes made in NetSuite will be displayed in Precoro after the data update.
*two-way synchronization — changes made in Precoro affect the integrated data in NetSuite. Changes made in NetSuite will be displayed in Precoro after the data update.
For the Supplier to be automatically integrated with NetSuite, there must be an exact match for the Name in Precoro and Company Name or Vendor Id in NetSuite.
When you create a new Supplier in Precoro that already exists in NetSuite, they will be automatically mapped by Name as well.
The recording shows an example of the NetSuite automatic mapping:
1. Make sure the Name in Precoro is an exact match for the one in NetSuite.
2. On the Integration page click the Import suppliers button, check the needed ones, and press Import.
3. The data will be automatically mapped.
Select the Supplier Type in NetSuite Integration
When importing Suppliers from NetSuite to Precoro, you can see the two categories:
- Company — regular Supplier type companies.
- Individual — this category may include private entrepreneurs and freelancers.
You will be able to see which Supplier belongs to which category and, if necessary, filter them by this parameter. For example, you can import only the Individual type suppliers.
In NetSuite in the Supplier List, you can select the needed Type:
On importing suppliers from the NetSuite page, click the Show Filters button to quickly sort through the Individual and Company types of Suppliers.
Character Limits for Supplier Fields in NetSuite
In NetSuite, you cannot enter more symbols than allowed by the system. Here are the character limits:
- Company name = 83 symbols
- Email Address = 254 symbols
- Phone number = 32 symbols
- Account number = 99 symbols
- Legal name = 83 symbols
- Tax ID = 25 symbols.
NetSuite Integration Logs in Supplier Cards
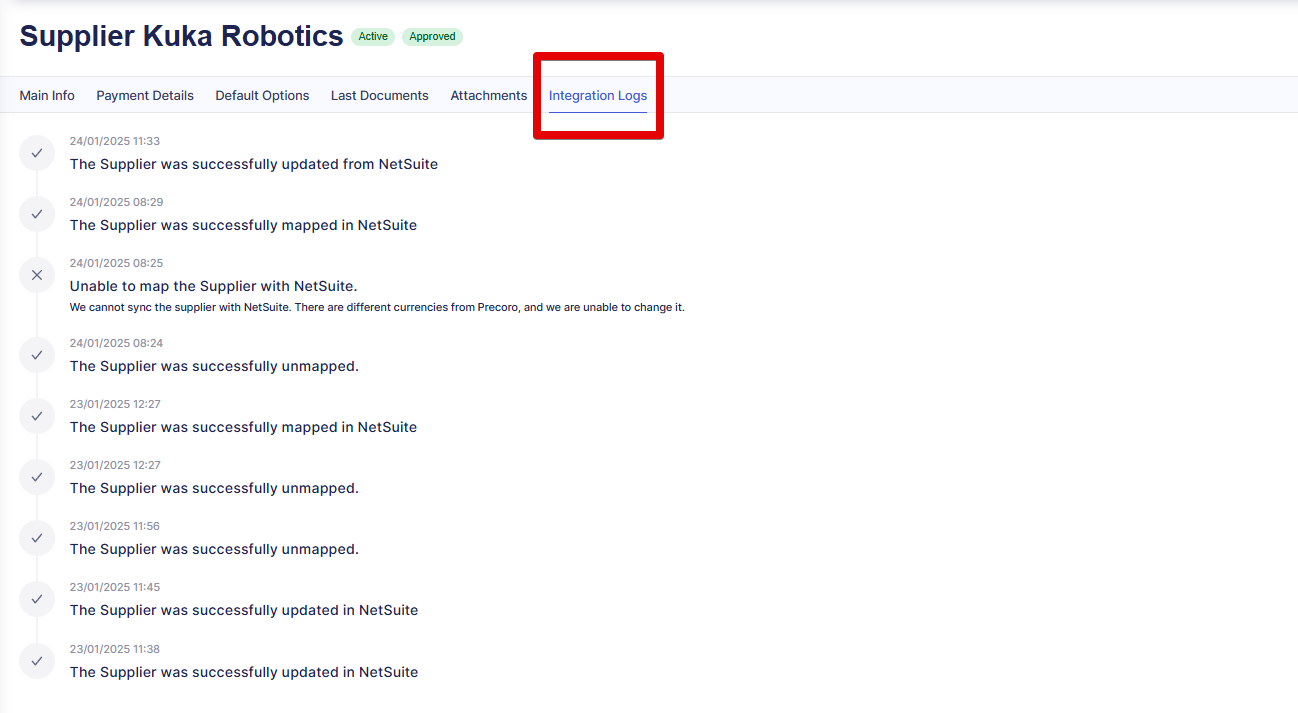
The Integration Logs tab in supplier pages in Supplier Management shows integration logs.
The following types of logs are added to this tab:
-
Supplier imported or updated from NetSuite;
-
Supplier created or updated in NetSuite;
-
Supplier mapping and unmapping;
-
Handled errors;
-
Unhandled errors with Sentry events.
The tab is only displayed if there are integration logs. If the last added log is an error, you can see an Error tag by the tab’s name.
Other Supplier Integration Features
1. What if the Supplier has several subsidiaries?
If one of those subsidiaries is integrated with Precoro, the Supplier can be integrated.
2. The Supplier has two or more currencies. How does the integration work?
All Supplier currencies will be integrated.
3. Can I integrate the Supplier that uses a Supplier Portal?
The Supplier with Supplier Portal can be integrated and use Portal as well.
4. Updating one of the synced fields for a Vendor
- In Precoro — a related field in NetSuite updates automatically.
- In NetSuite — click on Update Suppliers on the Integration page in Precoro to sync changes.
5. Adding a new Vendor
- In Precoro — the Vendor will be automatically added to NetSuite*.
- In NetSuite — click on Import Suppliers on the Integration page in Precoro to sync the new Vendor.
*Note: Email Address and Legal Address will not be synced.
6. Removing a Vendor
- In Precoro — the Vendor will remain active in NetSuite. If you want to deactivate the Vendor in NetSuite, do this manually by clicking the Edit button.
-
In NetSuite — click on Update Suppliers on the Integration page in Precoro to sync the inactive status of the Vendor.
7. Updating a Vendor after merging the duplicates in Netsuite
Make sure that a Master Vendor in NetSuite has the same name as the integrated Vendor in Precoro.
Click on Update Suppliers on the Integration page in Precoro to sync the Vendors again.
8. Adding/updating Vendors in Precoro in bulk (with further syncing with NetSuite)
If you want to import new Vendors/update current Vendors in bulk via Import Suppliers on the Configurations → Suppliers Management page and then sync the changes with NetSuite, it should be done through the additional mapping procedure. In such a case, please contact your Client Success Manager, and we will help you manage this process.
9. Auto-updating Integrated Vendors in Precoro
Integrated vendors in Precoro can be automatically updated weekly on Mondays. Thanks to this feature, all Vendors you import from NetSuite to Precoro are automatically updated based on the changes you make in NetSuite.
Please contact your Client Success Manager so we can assist you in this matter.
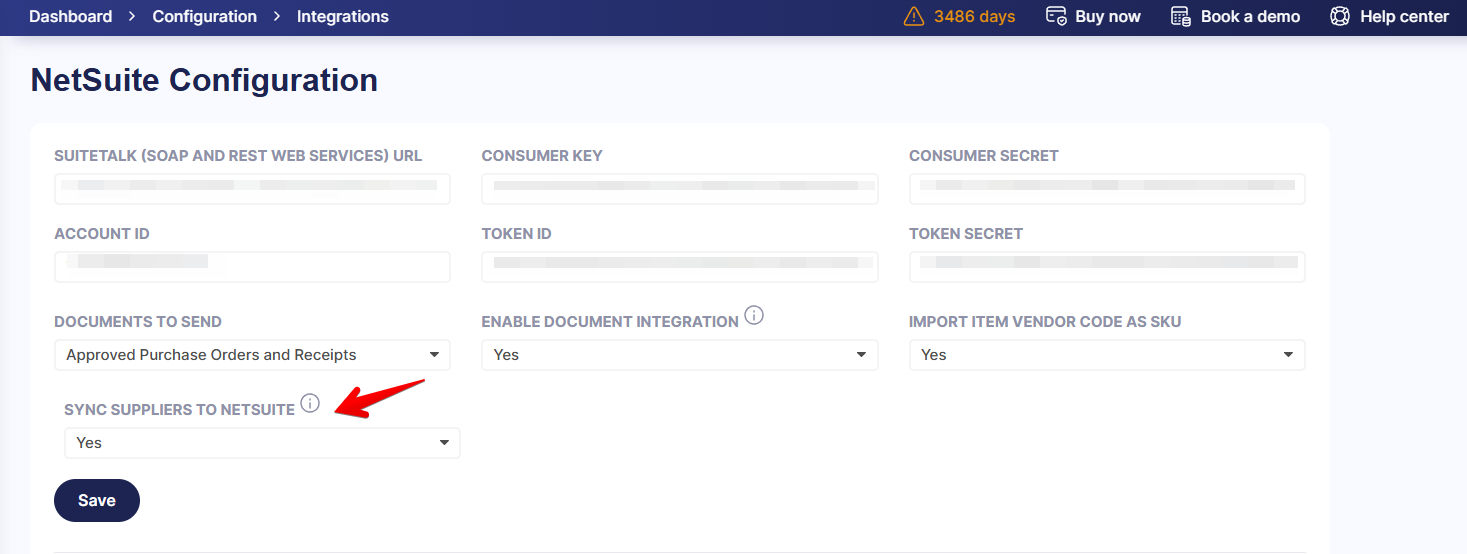
10. How to enable or disable supplier integration with NetSuite?
Navigate to the NetSuite Configuration page and use the dropdown menu to enable or disable the synchronization of suppliers to NetSuite. Here is how it works:
- When set to Yes: Suppliers will be synced between Precoro and NetSuite. This option is enabled by default.
- When set to No: New suppliers and updates to existing suppliers will not sync from Precoro to NetSuite, including any updates made through file imports/updates.