TABLE OF CONTENTS
How to Set Up the Invoices Integration
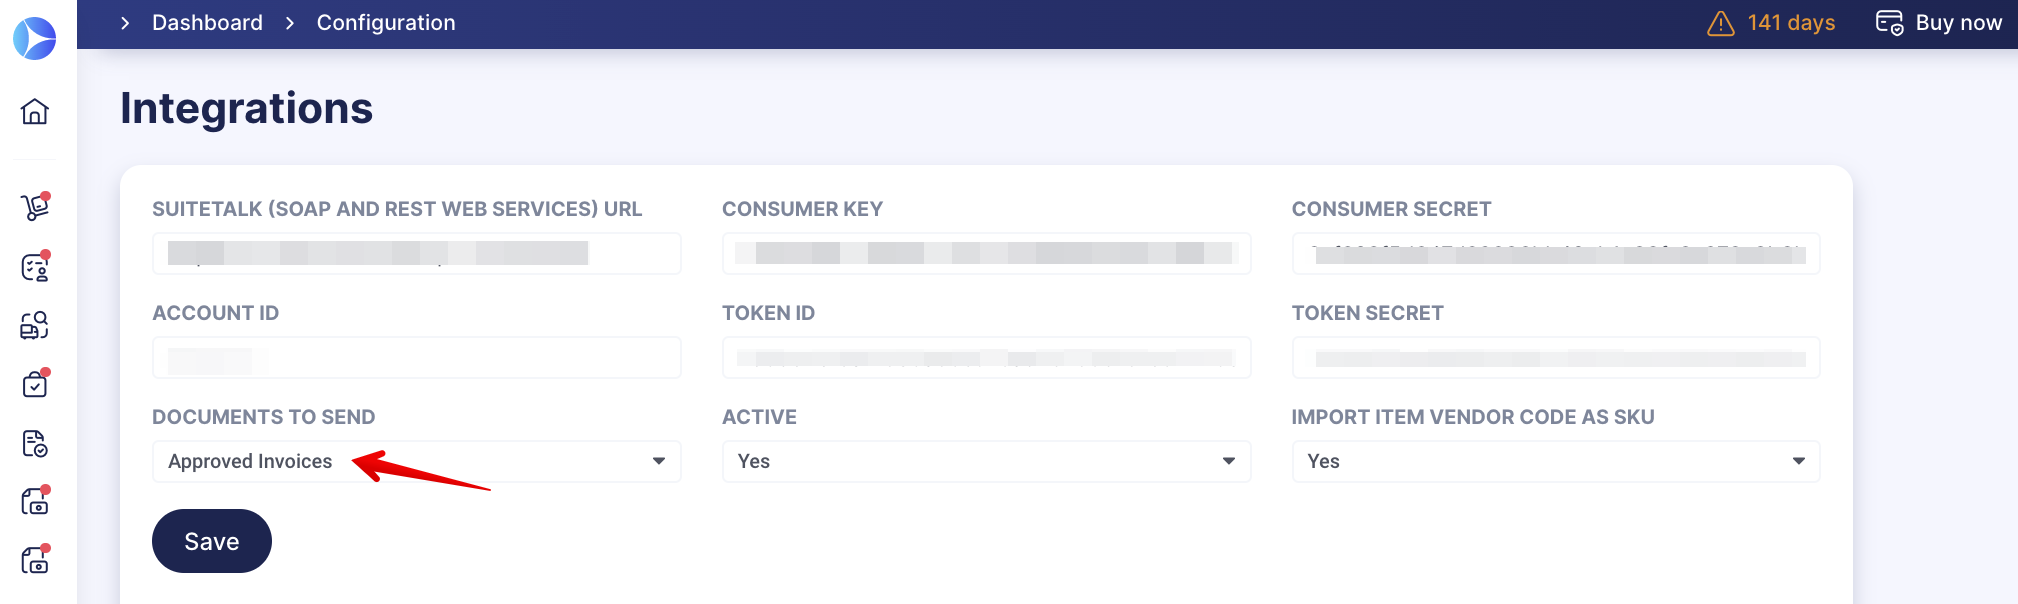
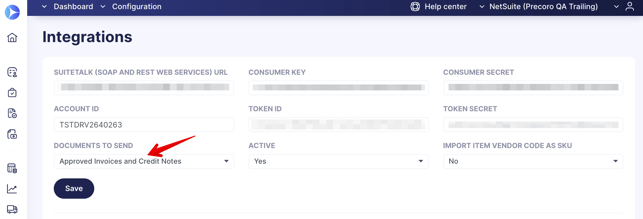
To set up the Invoices integration:
- Open the NetSuite integration page.
- Select the Approved Invoices in the Documents to Send field.
- Press the Save button to confirm changes.
Follow the link for more general information on how to set up the integration with NetSuite.
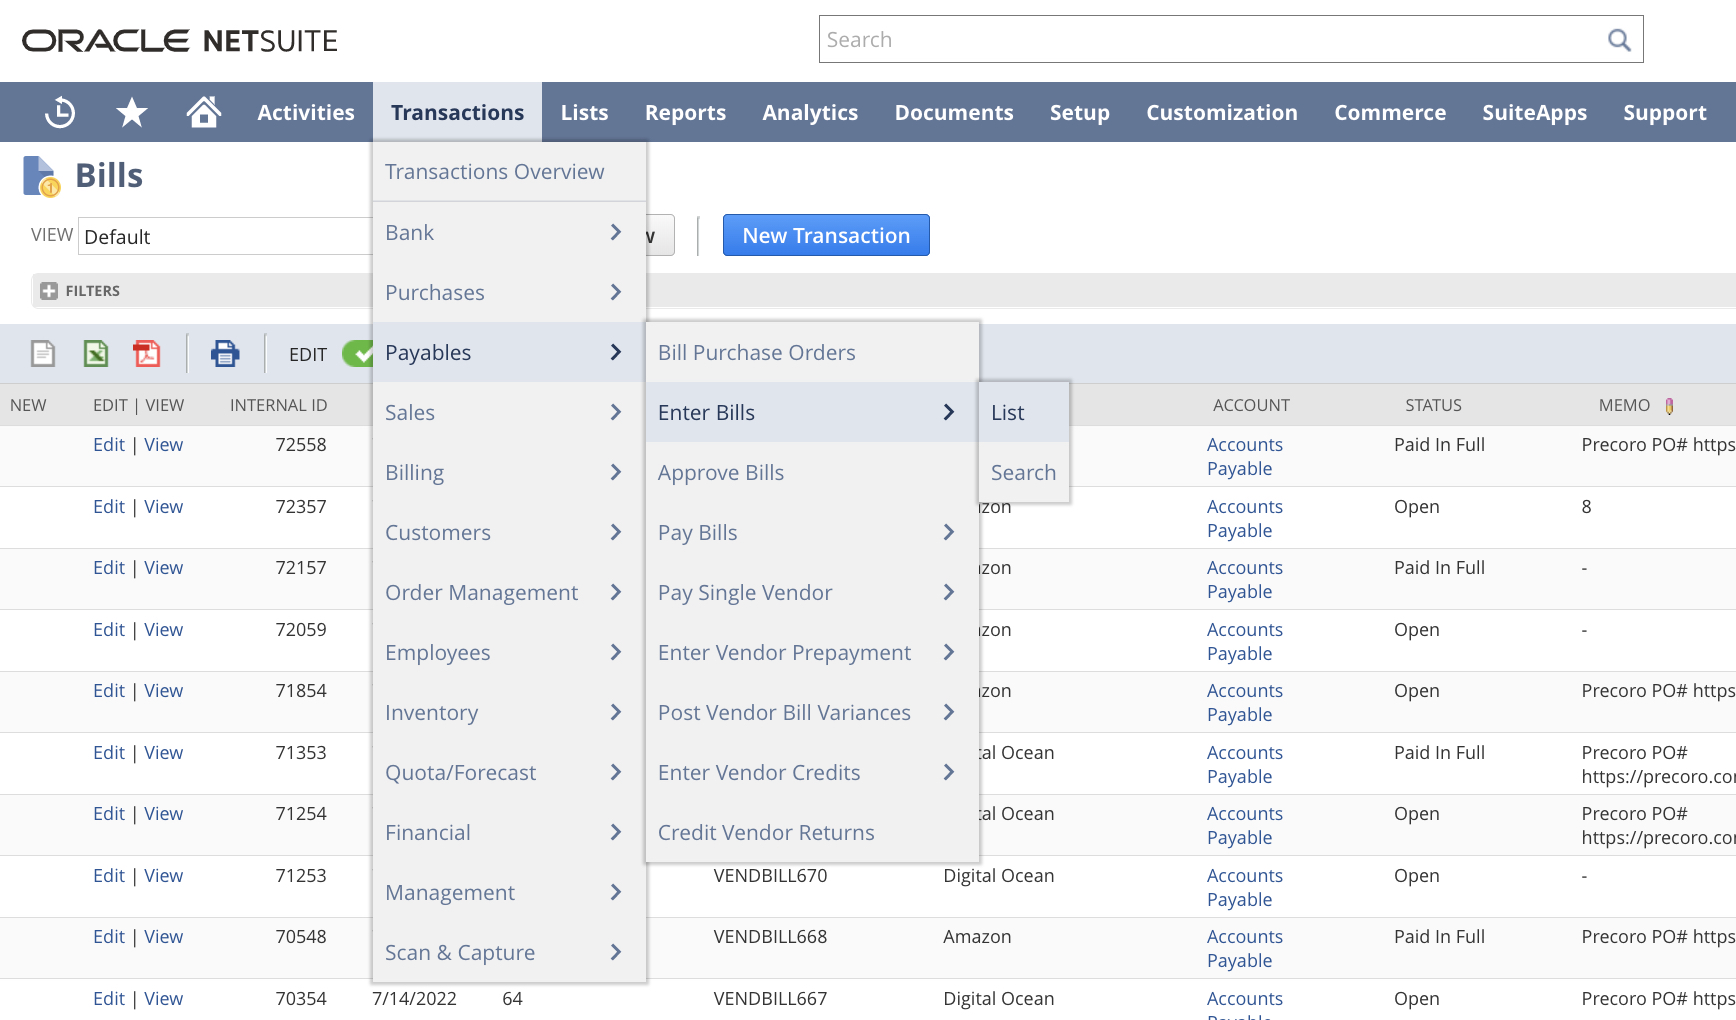
In NetSuite, the Invoice will be integrated into the Transactions → Payables → Enter Bills → List.
How to Send Invoices to NetSuite
In Precoro, create an Invoice, add items to it by filling out all necessary details, and the document will be automatically sent to NetSuite.
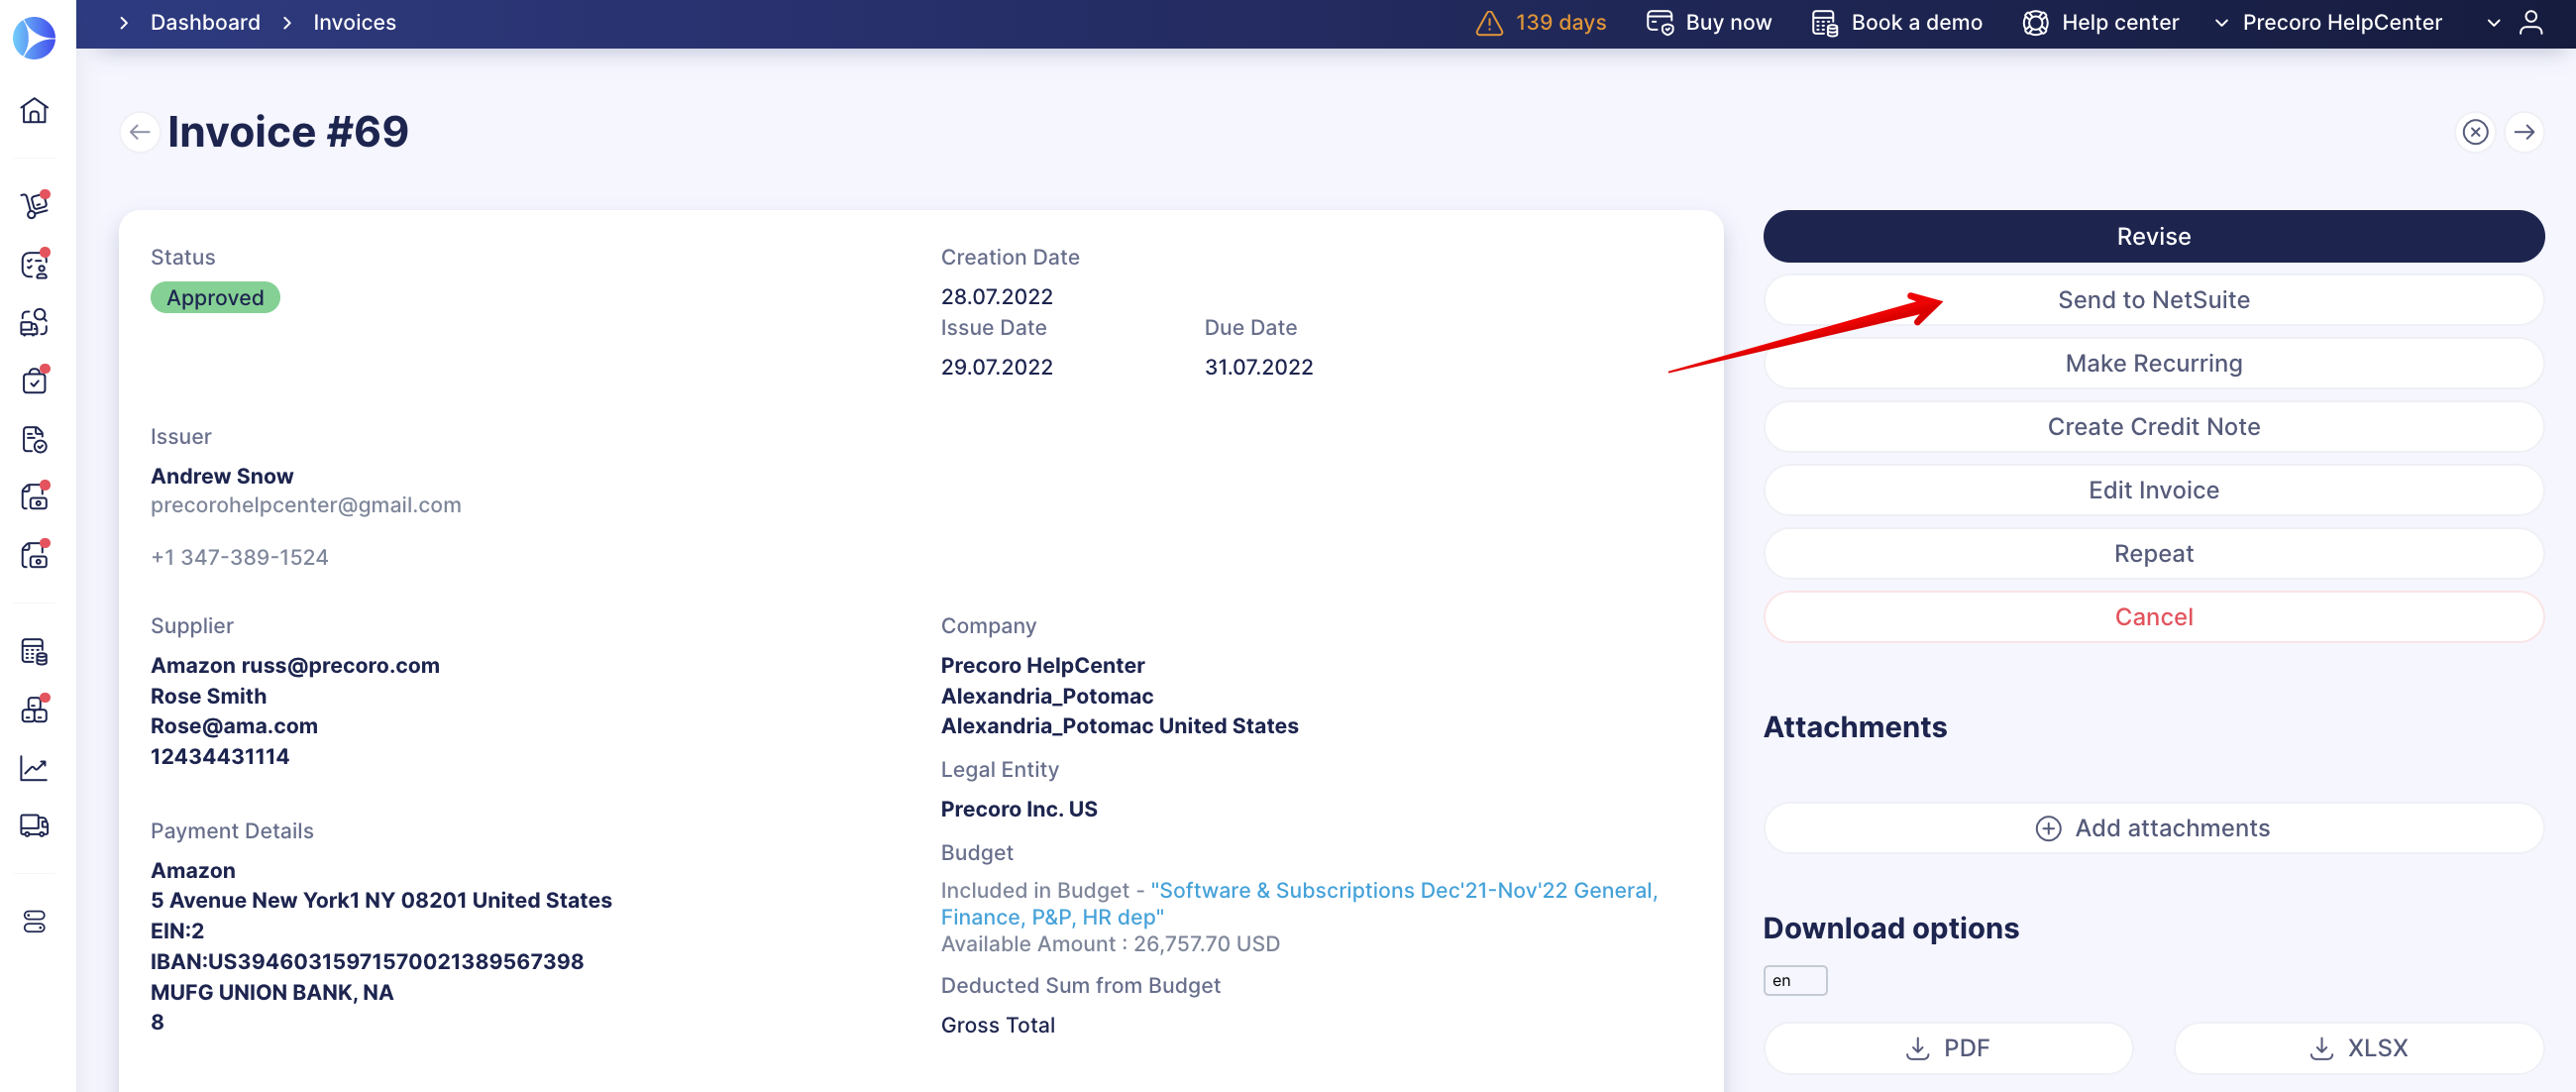
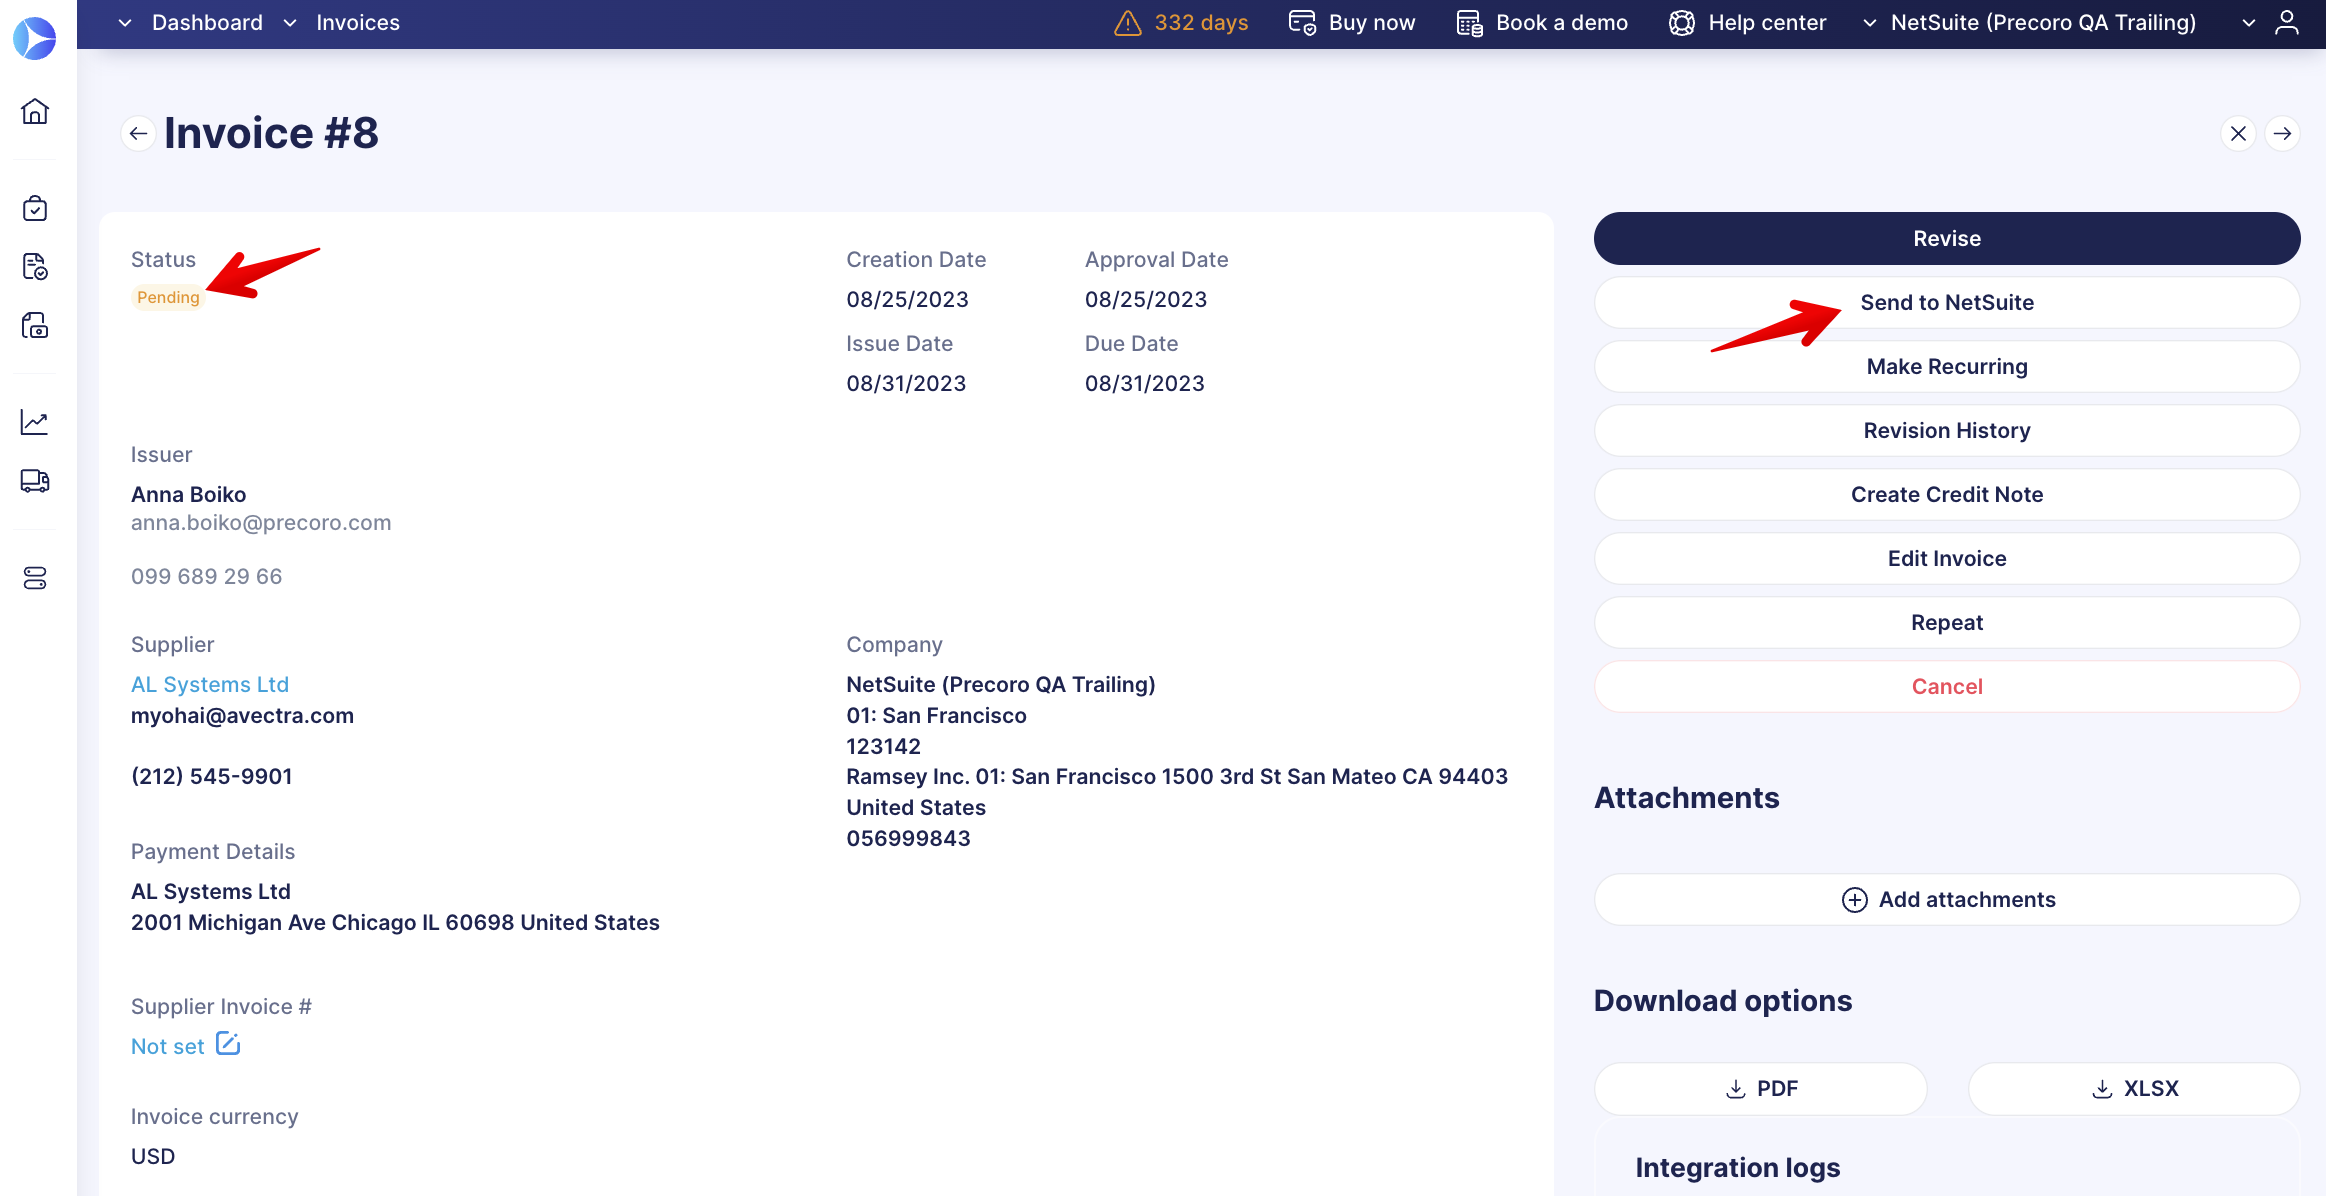
In case you have made changes you wish to import to NetSuite, use the Send to NetSuite button on the Invoice page to do it manually.
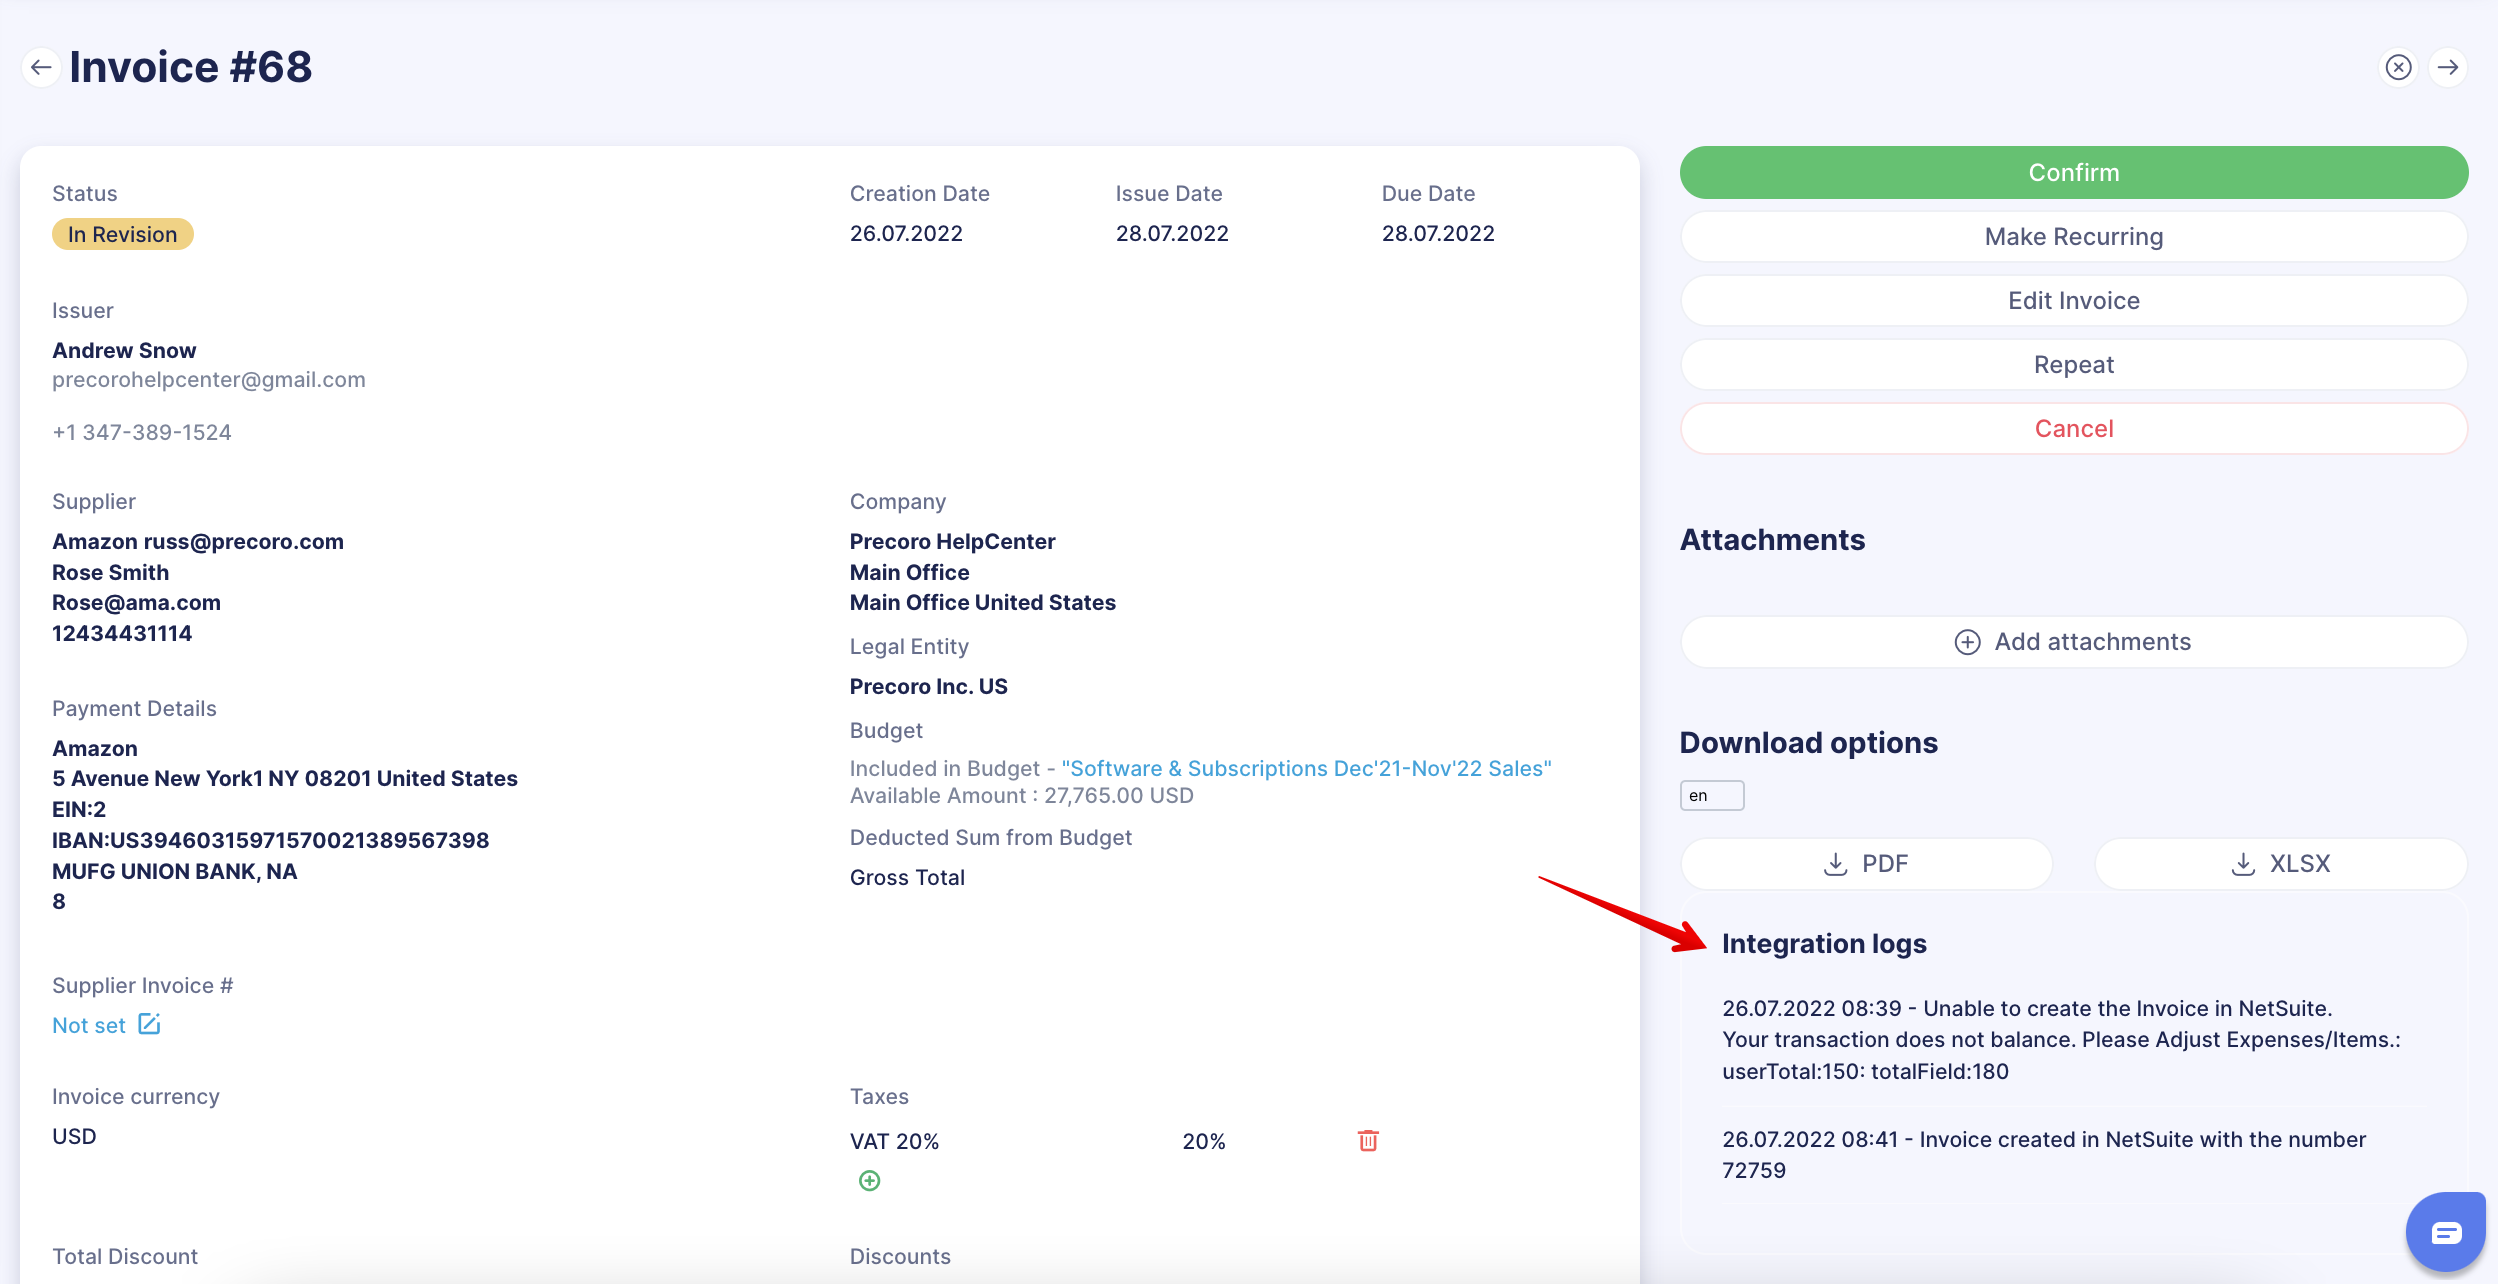
In the Integration logs, you can receive information in case there are any troubles with the Invoice import as well as see the message that the Invoice was successfully imported along with its number created in NetSuite.
Send Pending Invoices to NetSuite
You can send the documents with Pending Status to NetSuite.
To activate this feature, please contact our Support Team, who will happily assist you on the matter.
This feature will work for the chosen Invoice integration document type.
It will be available for users with the following Roles:
- Create and Approve Roles for Invoices.
When the document acquires Approved Status, the current system logic will work out, and the document will be automatically sent to NetSuite.
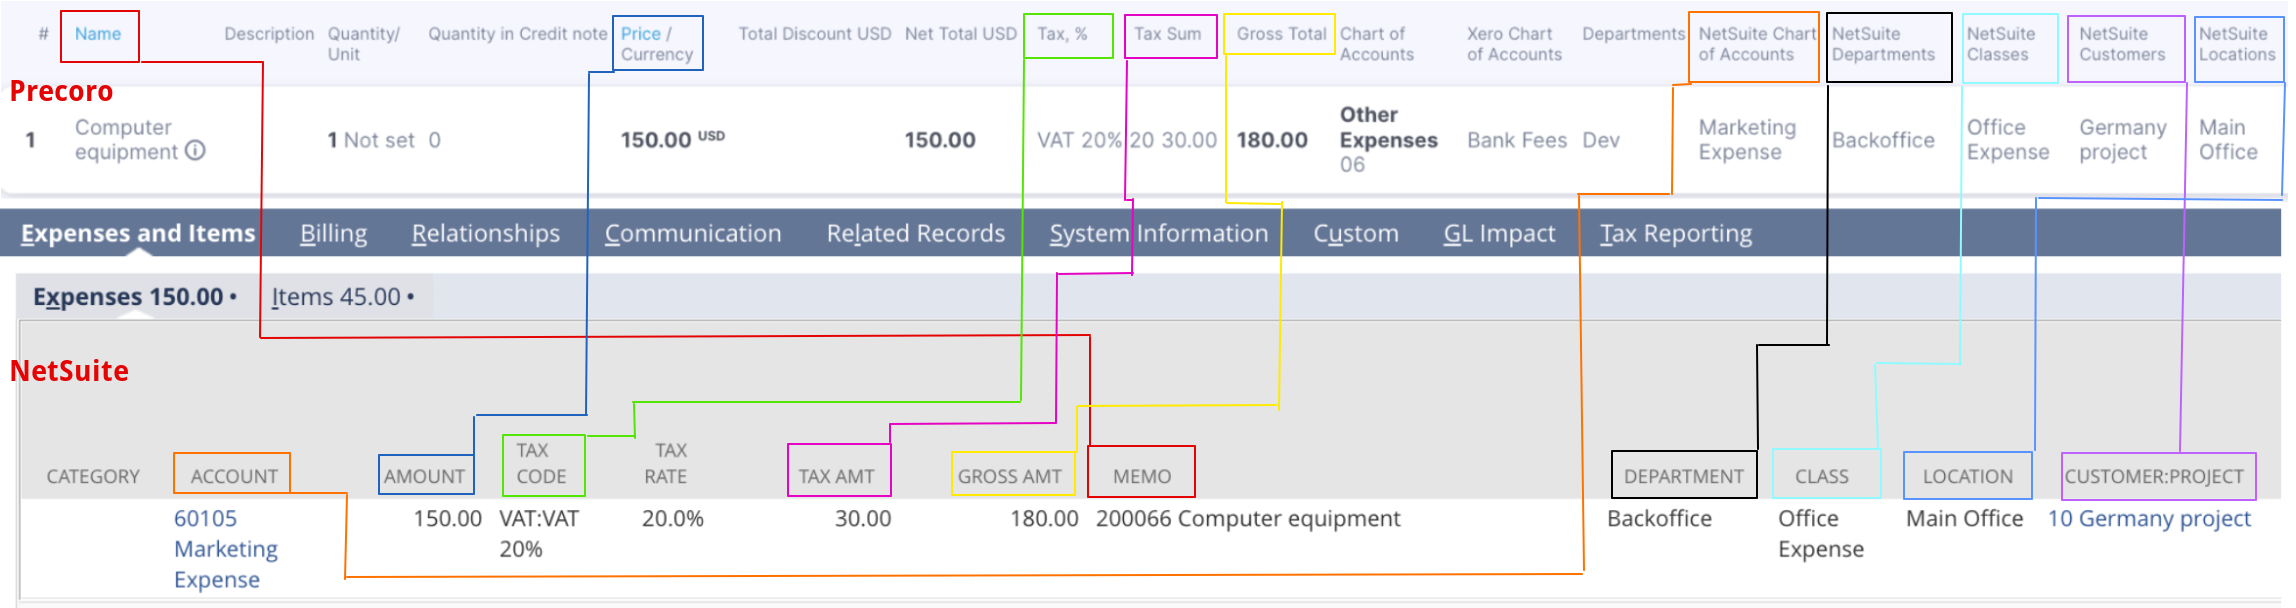
Integrated Fields and Data
In Invoices, the synchronization of all the fields works by one-way method. Therefore, the changes made in NetSuite will not be transferred into Precoro.
Primary Information Mapping
| Fields in Precoro | Fields in NetSuite |
| Invoice # | Reference No. |
| Supplier | Vendor |
| Invoice Currency | Currency |
| Issue Date | Date |
| Due Date | Due Date |
| Tax Sum | Tax |
| Gross Total | Amount |

Classification Mapping
| Fields in Precoro | Fields in NetSuite |
| Company Location | Location |
| Custom Fields for Documents — NetSuite Departments | Department |
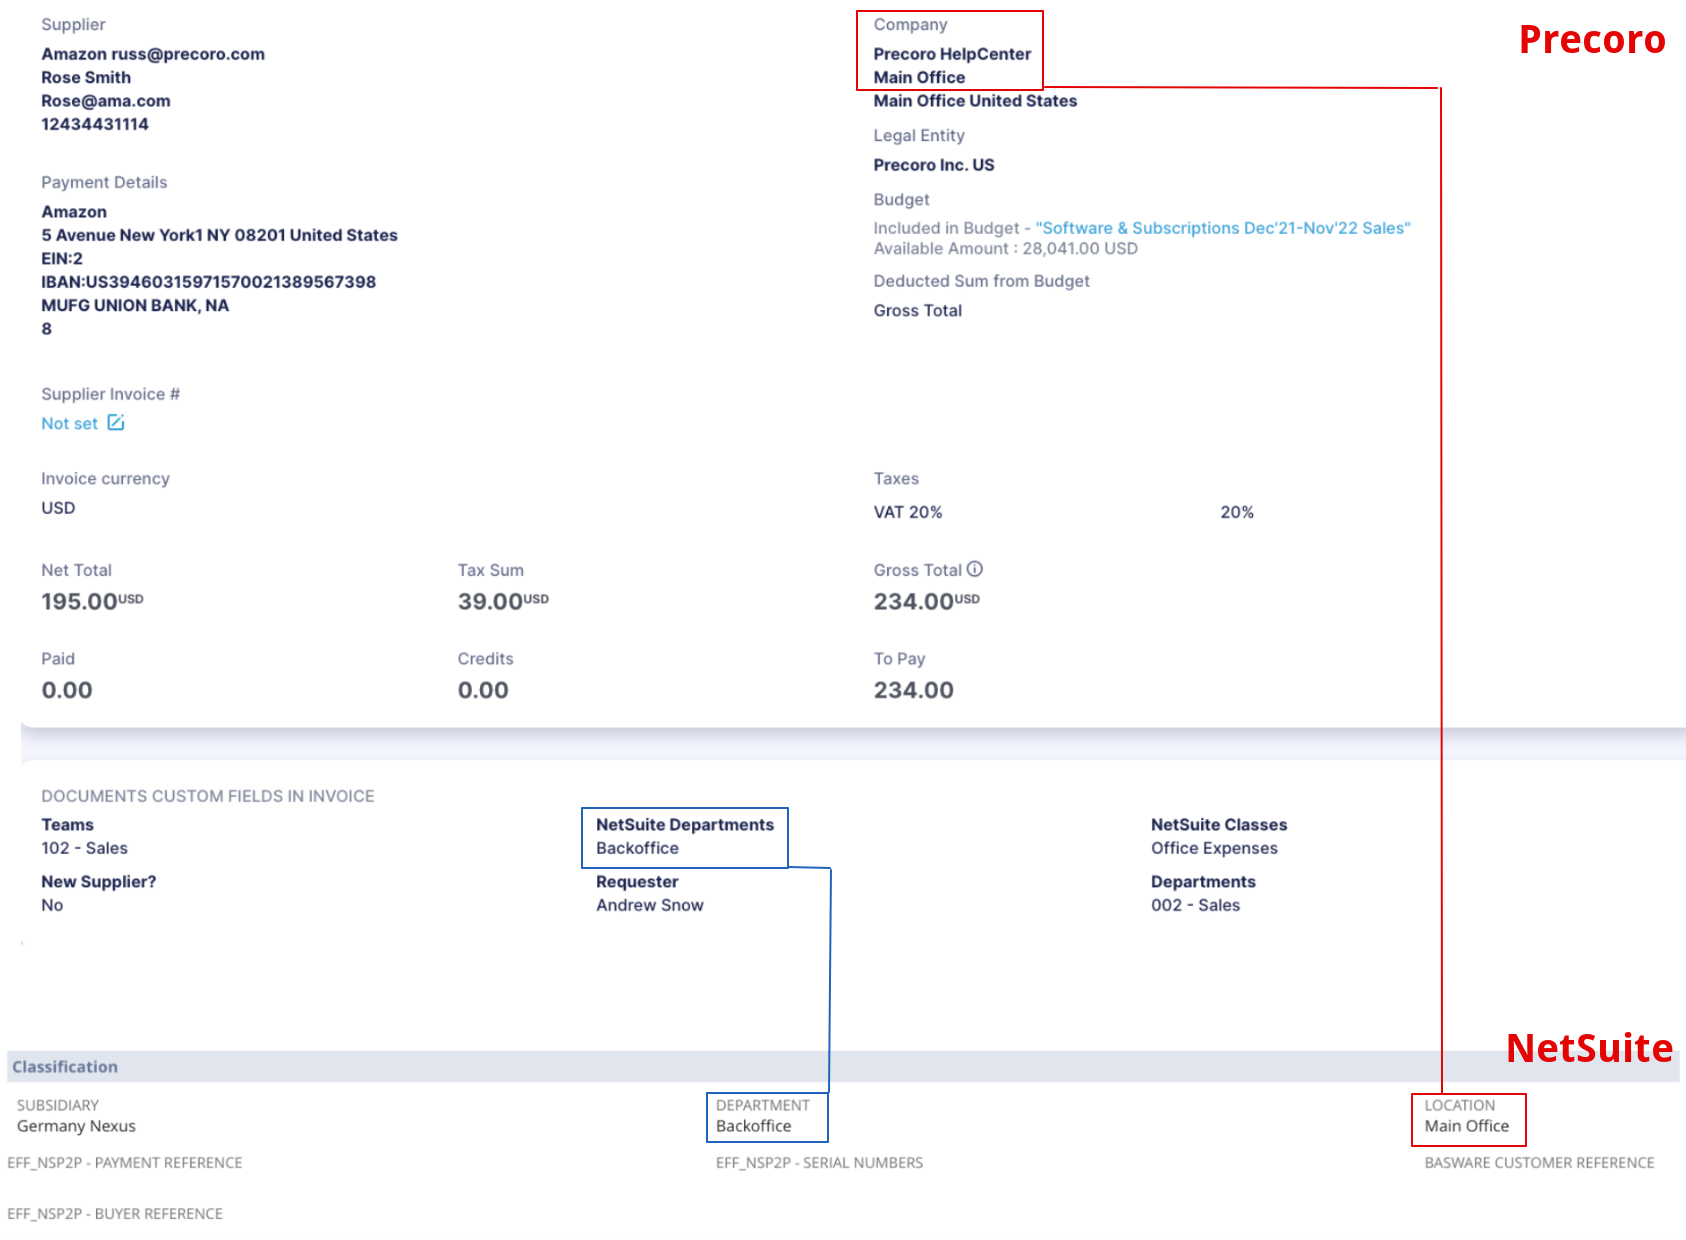
Find more information on the Locations integration in the following article: NetSuite Locations Integration.
Items and Expenses Mapping
General information on the item’s integration can be found here.
When integrating Invoice items, you should consider the way of adding them.
-
If the items were added from the Item Management using the Add button, and the items were previously integrated, they will be displayed in the Items tab in NetSuite.
Only previously integrated items will be transferred into the Items section in NetSuite.
In case you have added non-integrated items from the Item Management list, they will still be integrated into the Expenses block.
-
If the items were added manually using the Add button, they will be displayed in the Expenses tab in NetSuite.
Mapping of the integrated items added from the Item Management list
| Fields in Precoro | Fields in NetSuite |
| Name | Item |
| Quantity/Unit | Quantity |
| Price/Currency | Amount |
| Tax,% | Tax Code |
| Tax Sum | Tax Amt |
| Gross Total | Gross Amt |
| Custom Fields for Items — NetSuite Locations | Location |
| Custom Fields for Items — NetSuite Departments | Department |
| Custom Fields for Items (or Custom Fields for Documents) — NetSuite Classes | Class |
| Custom Fields for Items — NetSuite Customers | Customer Project |
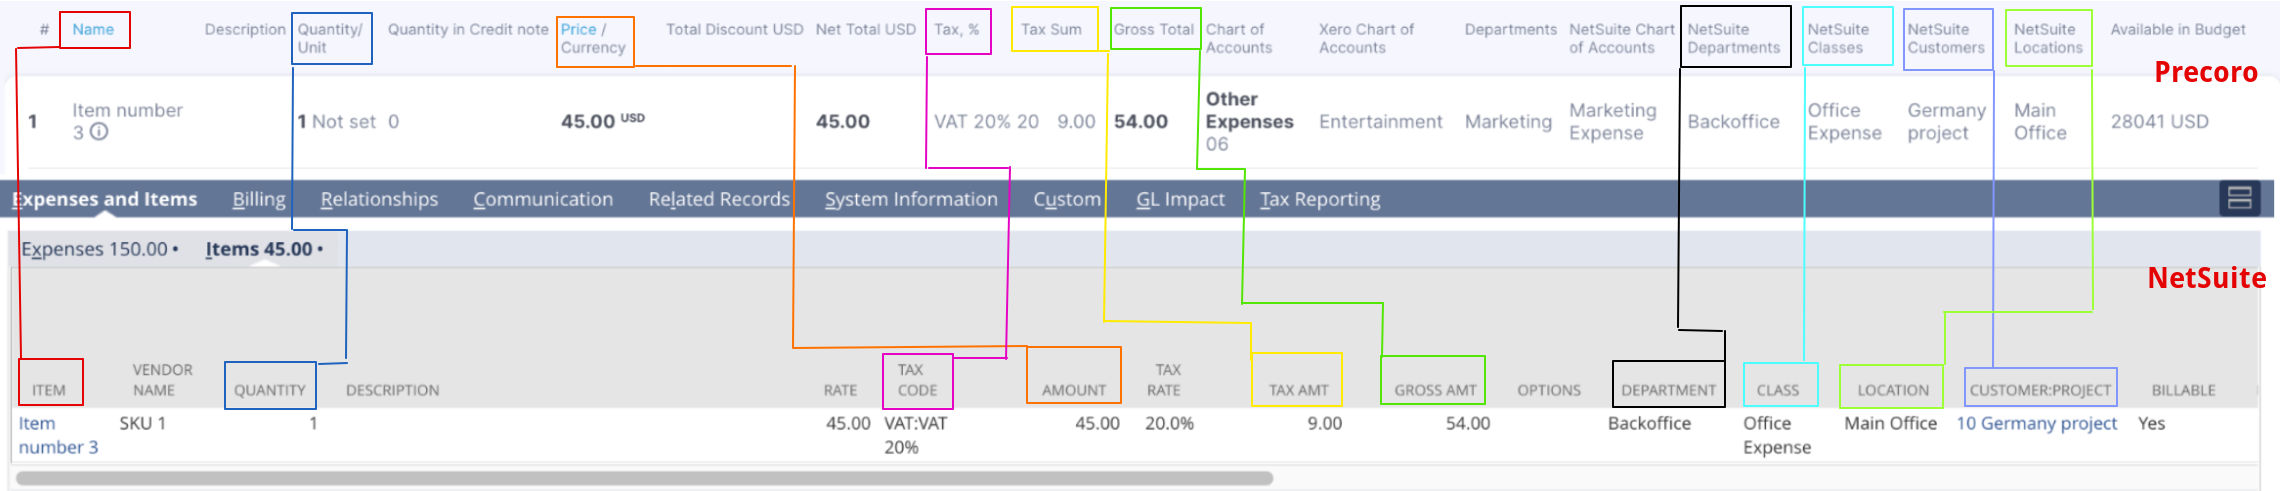
Classes can also be integrated as Custom Fields for Documents. Find more information on the Classes integration in this article.
Mapping of the manually added items
| Fields in Precoro | Fields in NetSuite |
| Name | Memo |
| Price/Currency | Amount |
| Tax,% | Tax Code |
| Tax Sum | Tax Amt |
| Gross Total | Gross Amt |
| Custom Fields for Items — NetSuite Locations | Location |
| Custom Fields for Items — NetSuite Departments | Department |
| Custom Fields for Items — NetSuite Classes | Class |
| Custom Fields for Items — NetSuite Customers | Customer Project |
| Custom Fields for Items — NetSuite Chart of Accounts | Account |
Attachments Integration
In NetSuite, Attachments are transferred to the Communications → Files tab:

How to Cancel an Invoice
If you cancel the document in Precoro, it will be automatically removed from NetSuite.
Related Payments Integration
You can create Payments in NetSuite and import them to Precoro:
Through the Integrations Page
To import to Precoro, choose the Invoice Due Date and press the Import Payment button.
Through the Payments Page
To import to Precoro, choose the Invoice Due Date and press the Import from NetSuite button.
In Payments Type in Precoro, you will see the Payment from NetSuite type to easily distinguish those that are imported.
In NetSuite, find Payments in the Related Records tab.

Related Credit Notes Integration
To send a Credit Note type of document, please follow the steps below:
1. Go to the Integrations page and select the Approved Invoices and Credit Notes option in the Documents to Send field.
2. Create a Credit Note document and Confirm it, and it will be automatically sent to NetSuite.
In NetSuite, you can find the integrated document in the Transactions → Payables → Enter Supplier Credits.
The Credit Note documents from Precoro are integrated as Vendor Credits in NetSuite.
In NetSuite, you also have to add permission for the Integration Role → Permissions → Transactions → Enter Vendor Credits with the set value Full.
%202023-12-13%2015-08-24-png.png?width=661&height=1122&name=Monosnap%20Bill%20Credit%20-%20NetSuite%20(Precoro%20QA%20Trailing)%202023-12-13%2015-08-24-png.png)
You can revise, edit, or cancel the document and then manually send the changes to NetSuite using the Send to NetSuite button.
Field mapping for the Credit Note is identical to the mapping of Invoices, except for the Created From field, which contains the Invoice ID in NetSuite.
-png.png?width=659&height=931&name=image%20(32)-png.png)
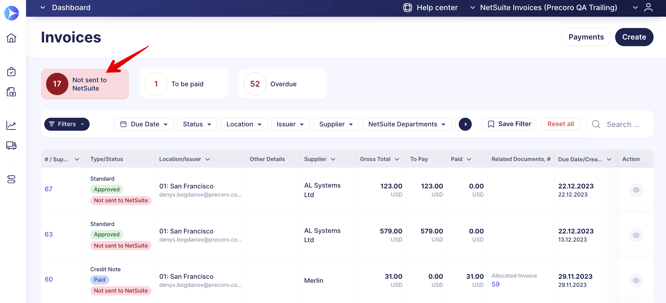
Tracking the Not Sent Documents
To view all invoices and credit notes that haven't been sent to NetSuite, find the “Sent to NetSuite” filter and set the value to No. You will see the complete list of documents regardless of their other statuses.
To view all documents you can still send, use the “Not Sent to NetSuite” infocard. It filters only invoices that were not exported due to a possible error and have the Approved status.