TABLE OF CONTENTS
- When to Use Custom Fields for Items
- How to Create Custom Item Fields
- How to Edit Custom Item Fields
- Need More Customization?
- Frequently Asked Questions
When to Use Custom Fields for Items
Custom Fields for Items are fields configured in your company and assigned to items in the catalog and documents to store necessary information. They can be used in Budgets, helping you allocate costs to appropriate budget lines.
Most often, custom fields for items are used to set up Charts of Accounts/Cost Centers using the Drop-down list type with predefined options. The fields can also display additional information relevant to your business in Text and Date formats.
How to Create Custom Item Fields
Step 1: Add a New Field
Navigate to Configuration (Configuration for app.precoro.us) → Custom Fields for Items. You will see a list of all active custom fields for items created by your company. Press Add field in the top right corner.

On the Create Item Custom Field page, begin by entering the new field’s Name and Description.

Step 2: Select a Type
Next, you can select one of the following types:
|
Drop-down list |
Allows selecting options from the list predefined for this field. You can add the options after configuring basic settings and availability for the field. Use this type when setting up the Chart of Accounts. |
|
Text |
Allows entering text information without predefined options. This type can be used for business-specific details requiring flexibility beyond standard options as well as codes and numbers. |
|
Date |
Suggests to select a date from the calendar. Use this type if you need expected payment or delivery dates stated for items. |
If you choose the Drop-down list type, you can also select the sorting criteria for options.
Step 3: Configure Basic Settings
In the Basic Settings section, set the parameters depending on the selected type.

These settings are available for Text and Date types:
-
Required to select in items—makes the field mandatory.
-
Print in Excel & PDF documents—adds this field to Excel & PDF versions of the documents.
If you select the Drop-down list type, you will see these parameters:
-
Required to select in items—makes the field mandatory.
-
Show Option Code — if you use option codes, they can be displayed in documents, budgets, and the catalog.
-
Print code in Excel & PDF documents—adds option codes to Excel & PDF versions of the documents.
-
Print name in Excel & PDF documents—adds option names to Excel & PDF versions of the documents.
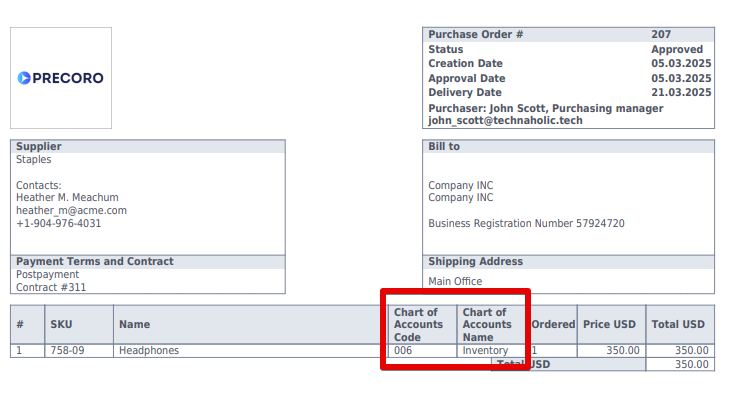
Here is an example of a purchase order PDF with a custom field option code and name printed:
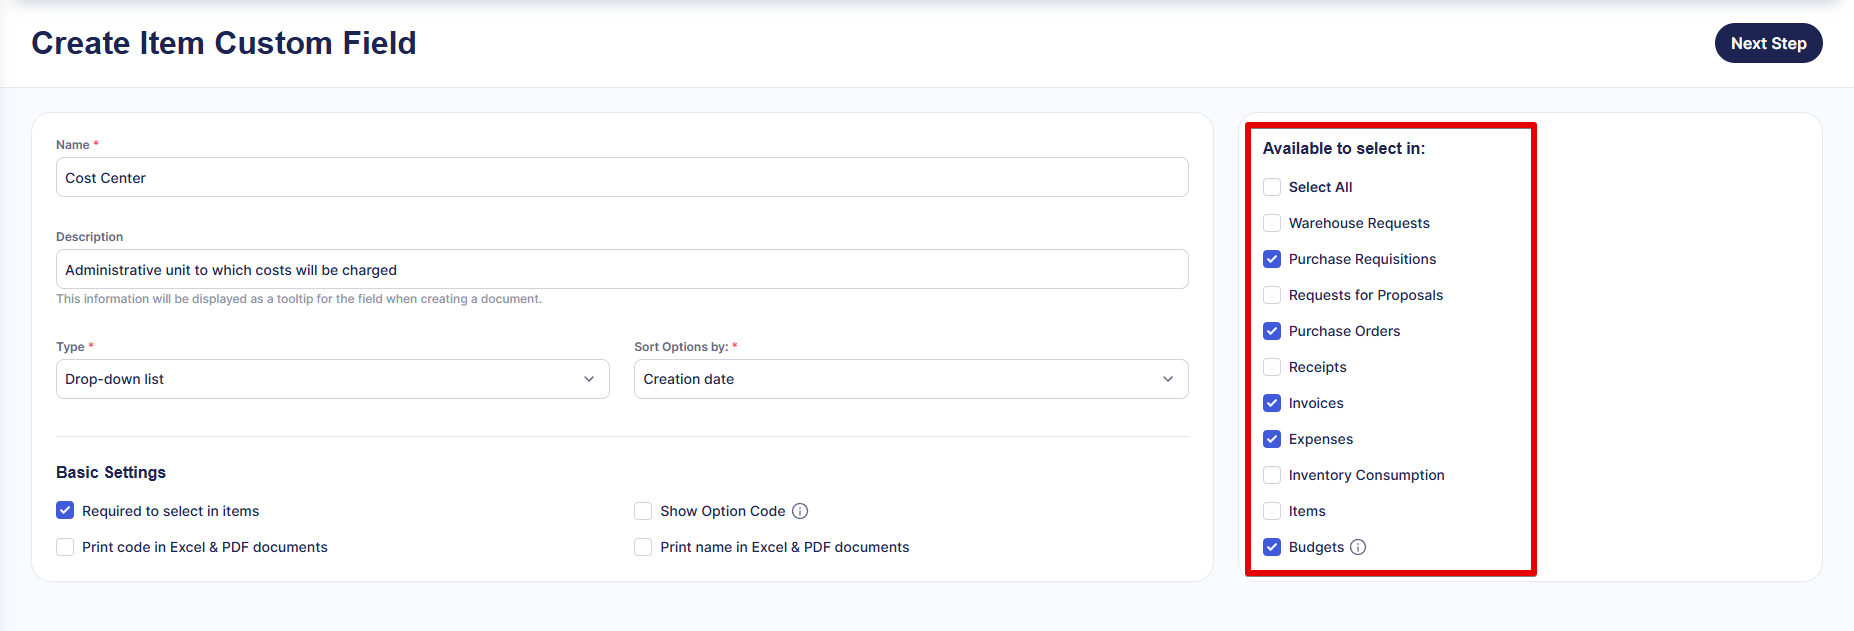
Step 4: Set Availability in Modules
Select which modules you need the field available in. Please note: to be included in budgets, the field must be available in Purchase Requisitions, Purchase Orders, Invoices, and Expenses.
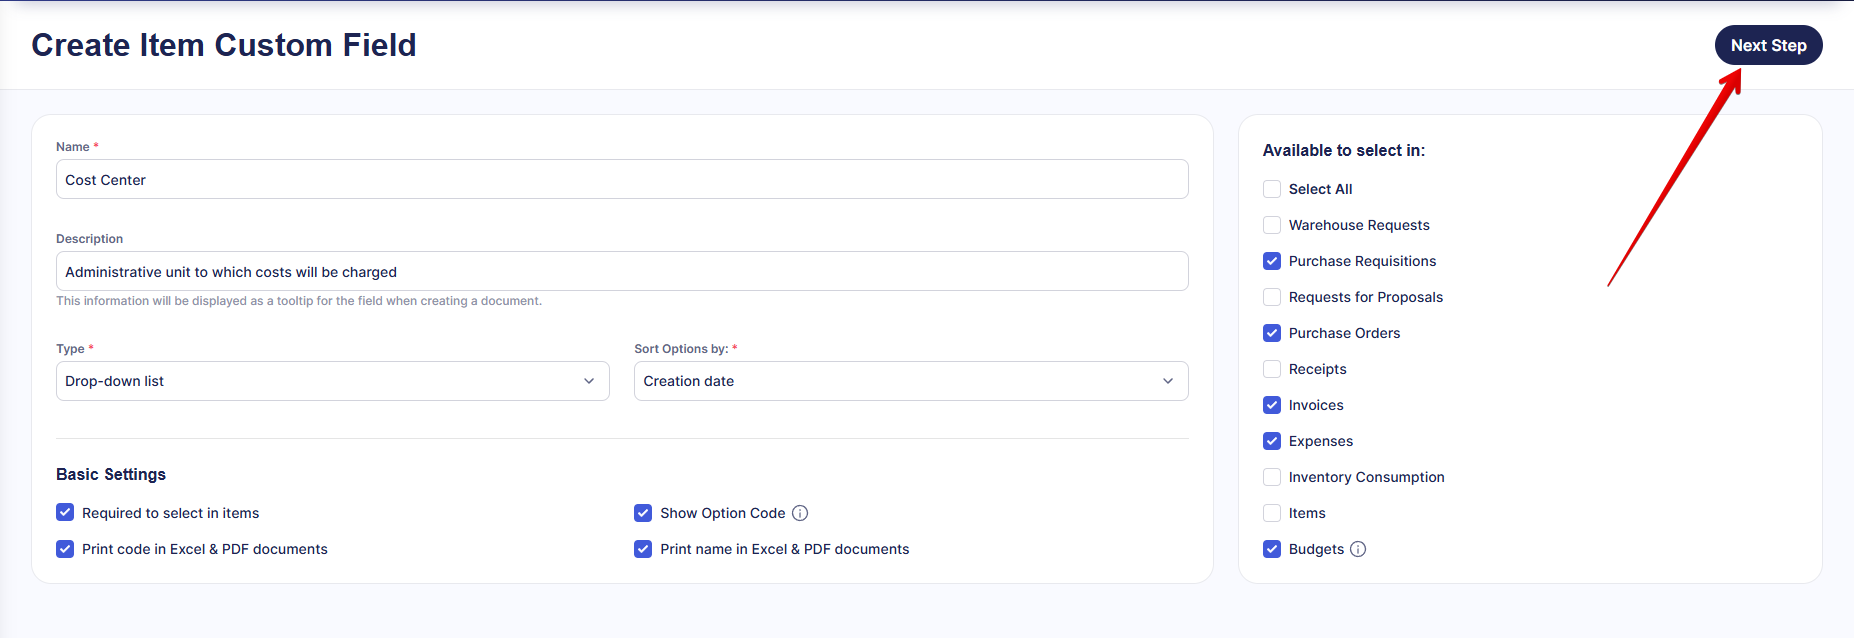
Step 5: Save the Custom Field’s Configuration
Review the configuration; you can save the custom field once everything looks good.
If you created a Text or Date type field, click Save in the top right corner to finalize the process. However, if you are making a Drop-down list field, click Next Step to save the configuration and proceed to add options.
Step 6: Add Options for Lists
To ensure every Drop-down list field has at least one option for users to select, these rules apply:
- When you create a custom field with the Drop-down list type, it’s disabled by default. The field is enabled automatically when you add the first option.
- When you edit a previously deactivated field, it’ll remain disabled even if you add new options.
- If you disable all options of a custom field, it’ll be automatically disabled too.
You can easily add options via a table in the lower part of the page. You can create an option hierarchy with up to 5 levels. Here’s what you can do in the options table:
-
Add new options by filling in the codes and names;
-
Add sub-options after clicking the Add sub-level button;
-
Edit options using the Edit (pencil) button, including activating and deactivating options.
-
Delete options using the Delete (bin) button.
-
Expand or collapse sub-levels by pressing the downwards arrow to the left of the option.
Once you set up the list, press Update in the top right to save the changes.
You can also import options via an XLSX template; review this article to learn how.
How to Edit Custom Item Fields
Editing Existing Fields
You can navigate to Configuration — Custom Fields for Items, open the created field, edit all its settings, and then press Update to save the changes.
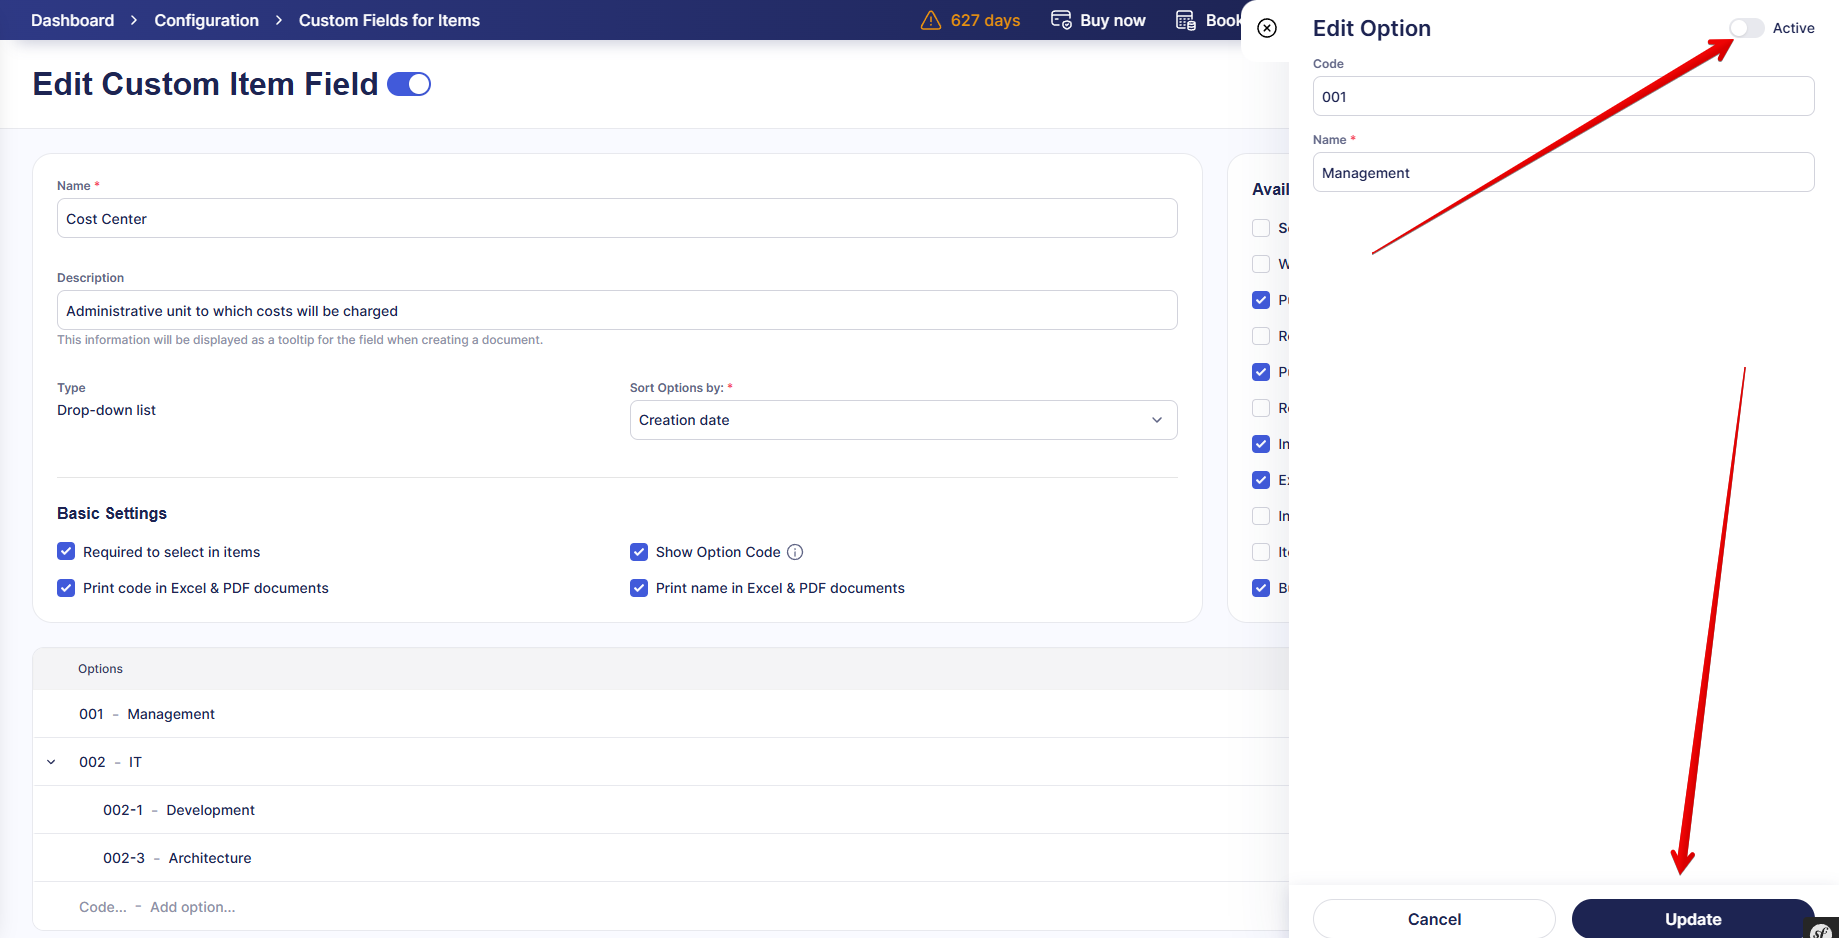
To edit options:
- Open the created field and find the option you want to change in the list.
- Click the Edit button (pencil icon).
- A sidebar will open on the right, allowing you to make necessary changes.
- Press Update to save the changes or Cancel to discard them.

Please double-check the information if you have active integrations, as name changes can affect the integration work.
Activating, Deactivating, and Deleting Fields and Options
To deactivate a Custom Item Field:
Open it, switch off the toggle by its name, and press Update. A field cannot be deactivated if used in budgets or integrated.

Once deactivated, the field will not be shown in the general Custom Fields for Items list.
To reactivate a Custom Item Field:
-
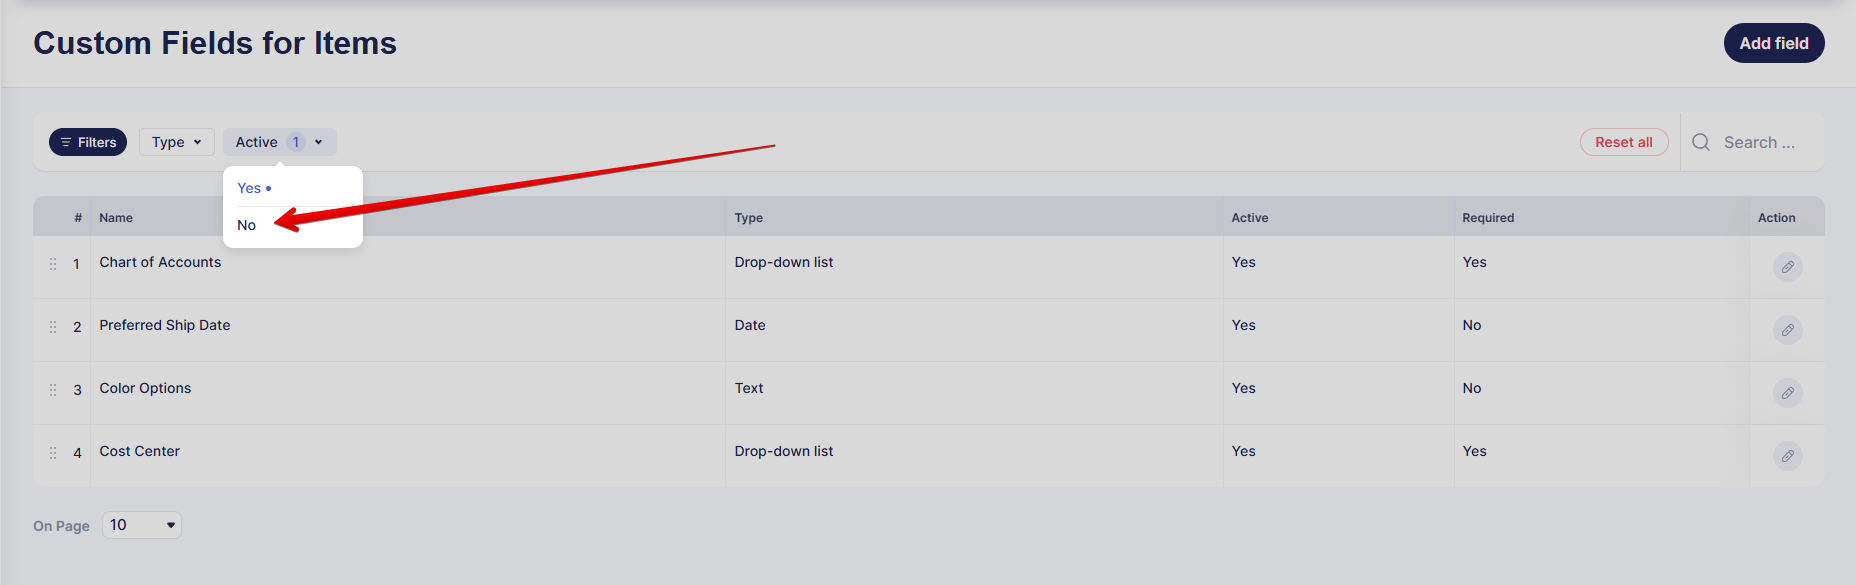
Open the Custom Fields for Items page.
-
Find the Active filter and select No.

-
You will see a list of inactive fields. Open the one you need to reactivate.
-
Switch on the toggle by its name, then press Update. A field without any active options can't be activated.
To deactivate a custom field option:
-
Open the Custom Item Field.
-
Find the needed option in the list and click the pencil icon.
-
Switch off the Active toggle at the top of the sidebar.
-
Click Update.
If the deactivated option has sub-options, they’ll be deactivated as well.
If you disable all options of a custom field, it’ll be automatically disabled too.
To reactivate the option, simply click Activate in the option list.

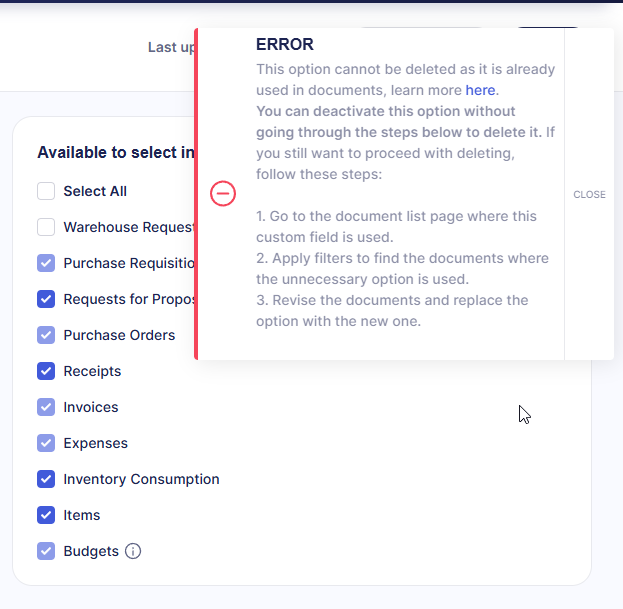
You can also Delete options not used in the documents by clicking the Delete (bin) button opposite the option. If you try to delete an option used in documents, you will see a message explaining why the action is restricted and how to proceed.
Need More Customization?
If the available custom fields or configurations don’t fully match your needs, the functionality you’re looking for may be in development or waiting to be requested. To see what's in store, please check out our Open Product Roadmap.
There, you can:
-
See what’s planned and in progress
-
Upvote ideas that matter to you
-
Leave comments to share your use case
-
Subscribe to announcements and follow relevant ideas
-
Submit new feature requests
To get started:
-
Review existing ideas and upvote the ones that you find helpful.
-
Log in or sign up using your business email to access full functionality.
-
Submit new ideas and share insights with your peers in the comments.
Every suggestion counts—your feedback shapes what we build next. Refer to this article for more details on working with the product plan.
Frequently Asked Questions