TABLE OF CONTENTS
What Are Custom Forms
Create as many Custom Forms as your company’s process needs for the Purchase Orders, Purchase Requisitions, Invoices, Expenses, and Service Orders types of documents and for Suppliers.
- Build your own tailored document layouts in Precoro.

- Appoint which fields will be required to fill in by your employees.
- Configure dependencies between the fields in a form to make the workflow even more automated. You can display or hide document fields based on other document fields or custom supplier fields.

How to Set Up and Use Custom Forms
Users with Configuration Roles can create new forms.
To start using Custom Forms, you should first:
- Decide on the type of document you wish to adjust.
- Go to Documents Custom Fields and create new fields for adding to the forms.
Find more information on working with Documents Custom Fields in Precoro here.
To create a new Form:
1. Go to the Configuration → Custom Form Settings.
2. Press the New Custom Form button and enter the required information:
- Custom Form Name — this name will be displayed on the document page, so it should be evident to a user what kind of form this is.
- Custom Form Type — you need to select for which type of document you want to configure a new form.
3. You will see the list of all the Documents Custom Fields available for the chosen type of document. What you can do with those fields is:
- Make them Required, which means that users need to fill out those fields to be able to submit the form.
Please refer to this section to learn how custom document field configurations influence this setting.
Also, please note that if a custom document field is involved in approval, it cannot be hidden into dependencies.
- Make them Dependent On the other fields. This setting will determine when the specific field will be triggered.
Please see more information on how to work with dependencies in this article:
You can also see the Fields you can include in the Request tab that contains the list of other Document Fields available for adding to the form.
Drag and drop the added fields, they will be displayed in the document depending on how you set their positions.
💡Please note: If you add the Supplier field to a custom PR form, it will affect how suppliers are assigned to items in that PR. Learn more in this section of the PR guide.
4. Press the Create button in the top right corner after setting up the form.
To create any type of document, Standard or Custom, you must click the Create button and select the necessary option from the drop-down list. You can create Custom Documents for the PR, PO, Invoice, Expense, Supplier, and Service Order.
To create a Standard document, please select the corresponding option from the list.

You can also create Custom Service Order and Custom Purchase Order documents from Requisitions.
You will be able to select the needed document type from the list in the PR document directly, by clicking the Create Purchase Order button or on the PO management page and clicking the From Requisitions button.
How Custom Document Field Configurations Affect Custom Forms and Approval
Case 1:
- A custom document field is required to select in documents and is unavailable in the approval workflow and budgets.
- The field is not required in a custom document form.
- The field is later marked as required in the custom document form.
The documents in Draft, Pending, and In Revision statuses previously created with this form can’t be confirmed or approved unless the field is filled in.
Case 2:
- A custom document field is required to select in documents and is unavailable in approval workflows and budgets.
- The field is either required or not in a custom document form.
- The field becomes available in the approval workflow or budgets.
Once the field is marked as available to select in the Approval Workflow or Budgets modules, it automatically becomes required in custom document forms, and this setting can’t be changed.
The documents in Draft, Pending, and In Revision statuses previously created with this form can’t be confirmed or approved unless the field is filled in.
Removing the Available in Approval Workflow/Budgets check in the custom field's settings does not automatically make it not required in custom document forms. However, the setting will be unlocked and available for editing.
Dependency Types and How to Set Them
When setting dependencies, the following options are available:
💡 Please note: Mandatory company-wide fields cannot be made dependent on triggers, as they are required in Configurations and may be part of the document approval workflow.
- Selected Option — Field A will be triggered when the needed set option is selected in field B. For example, you can display and ask for information in the field Service Purpose if the Request Type is Service.

Let’s see how it works in the document:
- Completed Field — field A will be triggered when Field B is filled out with any value (without focus on a specific option, unlike the Selected Option type).

Let’s see how it works in the document:
- New Supplier Added — the chosen field will be triggered if a new supplier is requested. For example, if the user requests a new supplier in a document, the field New contract or existing one? — will be triggered. In this case, you must make sure that the Supplier field is added to the form as well, so the users can make a request.

Let’s see how it works in the document:
How to Set Up Dependencies on Custom Supplier Fields
In addition to making custom document fields dependent on other custom document fields, you can also set up dependencies on custom supplier fields if the Supplier field is added to the form.
Just like with the dependencies on document fields, the dependent field may appear if:
- A certain custom supplier field is completed (filled out in the supplier card);
- A certain option is selected in the specified custom supplier field.
These options are available when you click Display the Field If opposite the dependent field.
Please note that this functionality is especially helpful when the dependent field is Editable by Supplier.
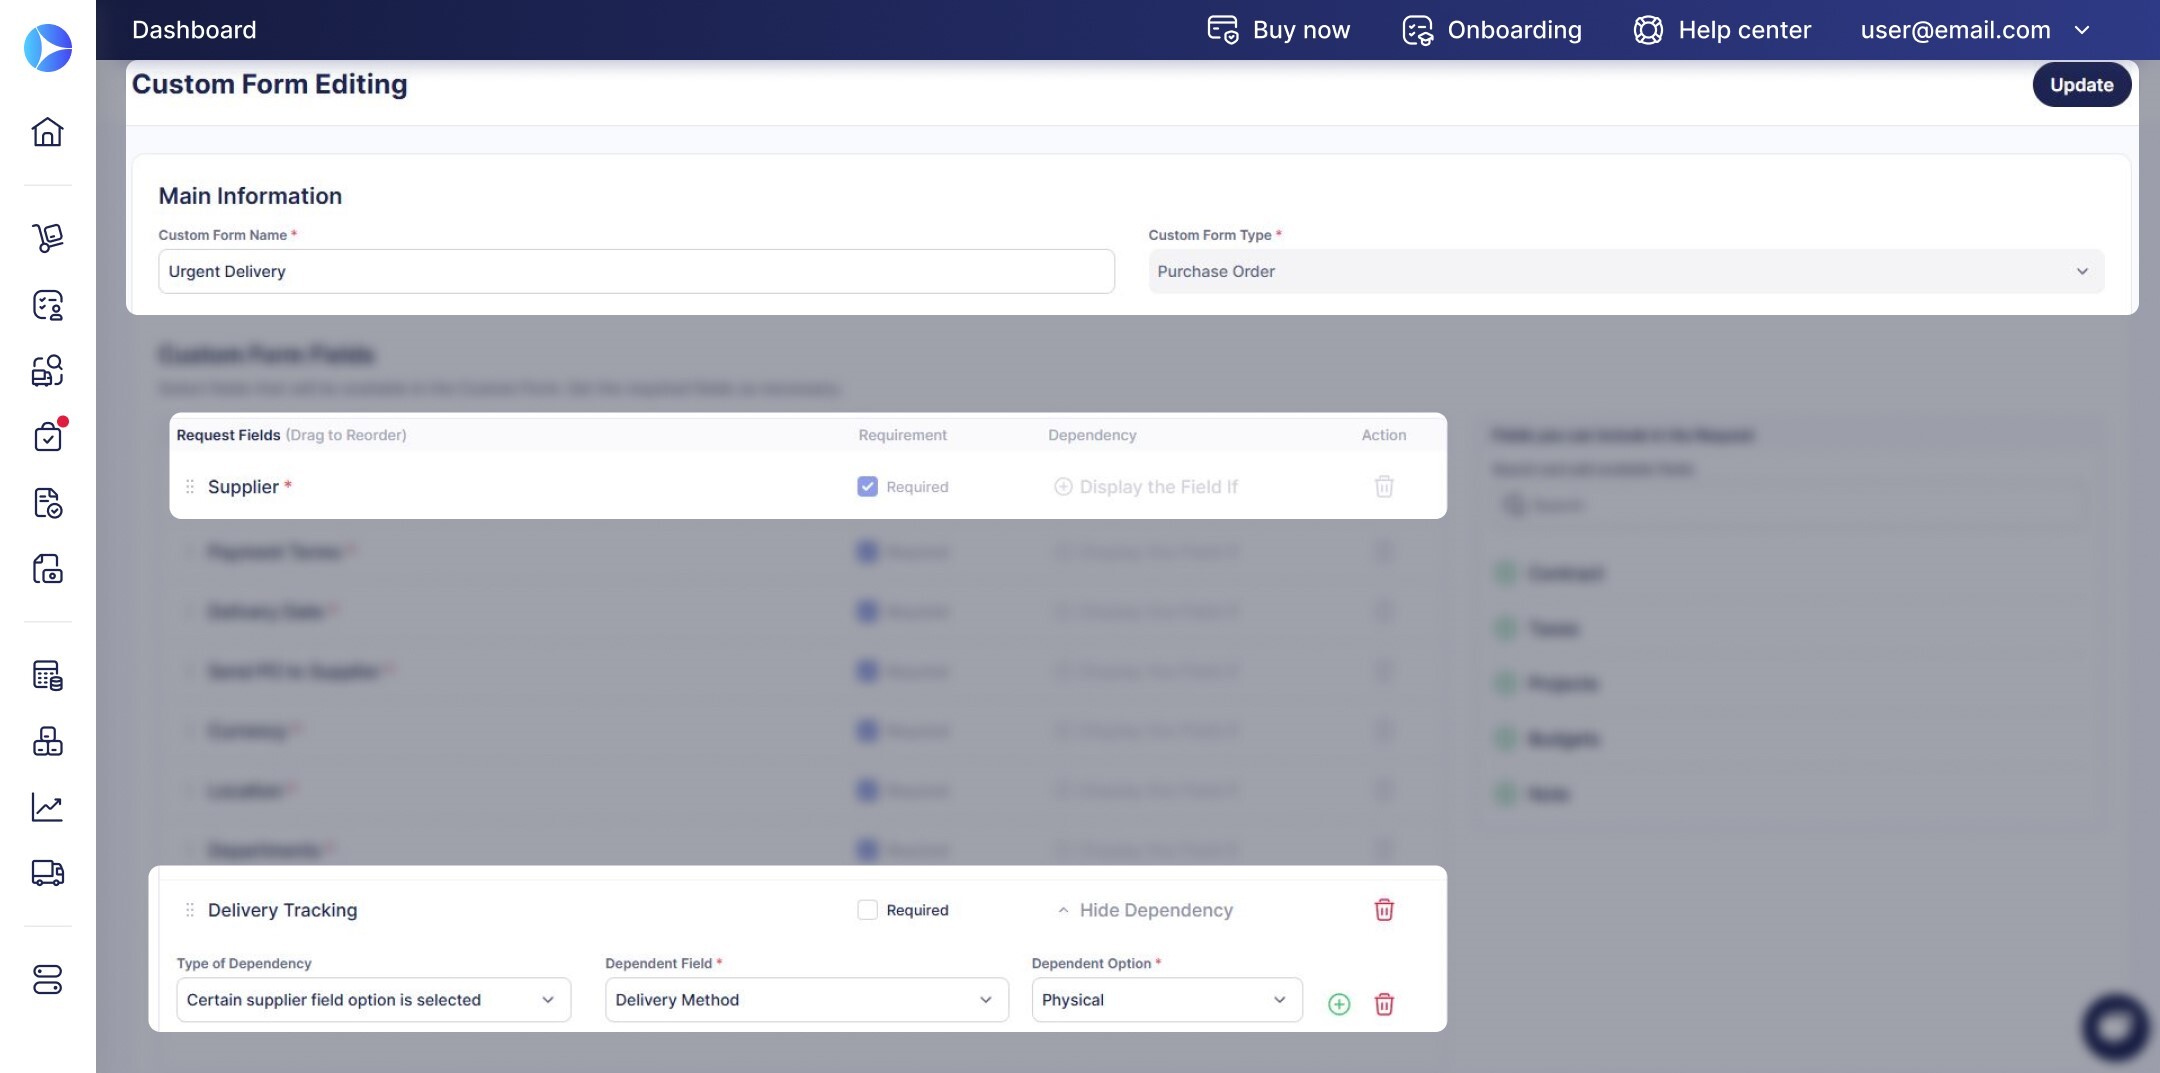
Let's review the following case: A company needs an Urgent Delivery form for purchase orders, where suppliers that sell physical items would be able to fill out the Delivery Tracking field. Here's how to set it up:
- In Supplier Management → Custom Supplier and Contract Fields, we set up the Delivery Method field. It's required to select in documents and has two options: Digital and Physical.
- In Configuration → Custom Fields for Document, we create a Delivery Tracking field available in Purchase Orders and Documents for Suppliers. It has the Text type, so vendors can add a link to the delivery service tracking page.
- We should then set up the Urgent Delivery form with all necessary fields. The Supplier field will be mandatory, and we can add Delivery Tracking from the Fields you can include in the Request section.
- To configure the dependency, we can:
- Click Display the Field If opposite the Delivery Tracking field.
- Select the Certain supplier field option is selected option.
- Configure the dependency on Delivery Method—Physical.
With this setup, when an order is created
-
Using the Urgent Delivery custom form
- For a supplier with the Physical option selected in the Delivery Method field
The Delivery Tracking field will appear on the order form and will be available for editing by the supplier. At the same time, suppliers that provide digital products and services won't need to fill out tracking information.
Handling Company-Level Dependencies between Custom Document Fields
When you’re designing Custom Document Forms, Precoro automatically includes dependencies between custom document fields configured on the company level. This ensures you can’t create a form that’s impossible to fill out.
Here's how field dependencies affect custom form creation:
- Automatic field addition: When you add a dependent field, all controlling fields are automatically added to the form.
- Required controlling fields: If you try to remove a controlling field from the form, the Delete button will be greyed out. Hover over it to see a tooltip that will inform you which fields are dependent on it. You won’t be able to remove it as long as there are dependent fields.
- Removing dependencies: Once you remove the dependent field from the form or disable the dependency in custom field settings, you can remove the controlling field from custom forms.
- Creating new fields: Newly created custom fields are automatically added to all relevant custom forms. If they depend on other fields, Precoro also adds the controlling fields to the forms.
How to Apply And/Or Choice Filters
You can add multiple dependent fields by using the And/Or choice filters:
- And — if you need the chosen conditions fulfilled IN ALL the selected fields.
- Or — if you need the chosen conditions fulfilled In AT LEAST ONE of the selected fields.
For example, you want both fields to be filled out for the user to see the third one. In that case, use the And choice filter. If you want either field to be filled out (at least one from the selected), use the Or choice filter.

How to Set Mandatory Attachments
You can ask for mandatory attachments when users create the custom Supplier request.
The process will work as follows:
- From the administrative side
1. Go to the Supplier Custom Form settings and open the Supplier form you want to edit.
2. In the form, scroll down to the Attachments Required from the Requester section, where you can set the required file attachments you wish the Requester to submit.
3. Click the Add Attachment Field and fill out the following details:
-
- Attachment Name — enter a short and clear name so that your users would understand which file should be attached.
- Description — input a brief informational note for users specifying what kind of attachment they should upload.
- Make Required — activate the Required check mark to make the attachment mandatory or leave it empty for it to be optional.
-
Select Formats — choose from the following file formats: PDF, XLSX, JPG, and PNG.
4. To save the changes, click the Approve check mark next to the Add Attachment Field and then click the Update button for the whole form.
- From the user’s side
1. When creating a New Supplier Request, you will see the name, description, and format of the needed file in the Attachments section.
2. Click the Add Attachments button and upload the file to the request form from your device.
3. When the form is completed, click the Request button below to submit it.
On the Supplier Management page, you will be able to view the attached file:

What Actions Can Be Done With Custom Forms
To make your work with Custom Forms more convenient and simple, you can do the following actions with them:
- Preview — to see the relevant information, you can open it in the preview without opening the form itself.
- Copy — to eliminate manual work, you can make a copy of the existing form and edit it as you need.
- Edit — adjust the settings and make changes to the created form.
- Delete — you can delete only those forms that have not been used for creating documents.
💡 Please note: If documents have already been created from your Custom Form, the form cannot be deleted. Instead, you can deactivate it.
- Active toggle — the blue-colored toggle means that the form is active. To deactivate it, press the toggle to turn it grey.
How to Create a Supplier Custom Form From the Document
You can create a Supplier Form Type and select the forms needed in the document when requesting a new Supplier.
Follow the steps described below:
1. Open the Custom Form Settings and press the New Custom Form button.
2. Enter the Name and select the Supplier option in the Form Type field.
3. Edit the Form according to your specifications and click the Create button in the top right corner.
In the “Fields you can include in the Request” for Suppliers, you can manage: all the available CFDs, Custom Supplier Fields, as well as OCR and Supplier Default Options. That way, your users will see a more customized form when adding or requesting new Suppliers.
4. Create the document of your choice, either Purchase Order, Purchase Requisition, or Invoice. Click on the Supplier field and press the Add New Supplier button.
5. You will see the selection field "What type of Supplier Request do you want to create?" where you are able to see the list of all available Supplier Custom Forms. By default, users can also see and select the Standard Supplier Request. Select the needed Form and click the Next button.
💡 Please note: The "What type of Supplier Request do you want to create?" field will only be displayed if you have previously created the Supplier Custom Form, so the users will be able to select one.
6. After selecting the Form, the user proceeds to fill out all the required fields and places a new request by pressing the Request button below.
How to Deactivate Standard Document Forms
You can disable standard document forms for purchase orders and invoices. You'll find the relevant checkboxes in Configurations → Basic Settings → Document Setup tab.
In the Purchase Orders section:
- Standard Purchase Order Form;
- Standard Order from Requisitions Form.
In the Invoices section:
- Standard Invoice Form;
- Standard Order-Based Invoice Form.
If you disable any of these checkboxes, the standard form for the corresponding document type will be disabled. Instead, users will fill out the custom forms established in your company, so the orders and invoices are guaranteed to have the fields necessary for your workflow.
Need More Customization?
If your document forms or configuration options don’t fully match your processes, the functionality you’re looking for may already be in development or waiting to be requested. To see what's in store, please check out our Open Product Roadmap.
There, you can:
-
See what’s planned and in progress
-
Upvote ideas that matter to you
-
Leave comments to share your use case
-
Subscribe to announcements and follow relevant ideas
-
Submit new feature requests
To get started:
-
Review existing ideas and upvote the ones that you find helpful.
-
Log in or sign up using your business email to access full functionality.
-
Submit new ideas and share insights with your peers in the comments.
Every suggestion counts—your feedback shapes what we build next. Refer to this article for more details on working with the product plan.