TABLE OF CONTENTS
- How to Set Up Amazon PunchOut Integration
- FAQs
A PunchOut Catalog is an online B2B E-commerce site that you can access from the Precoro procurement system.
Setting up the punchout integration between the Precoro system and the Supplier’s Catalog will make your purchasing process more effortless. Once this connection is achieved, your company will be able to access the approved Supplier’s E-commerce websites by logging into the Precoro procurement system.
Note that you must create a new PunchOut group in your account even if you already have an active Punch-In group set up. Please follow the steps below to create new configurations.
How to Set Up Amazon PunchOut Integration
Configuration Settings For Administrators
To start the setup process, please make sure you have an Amazon Business Account on Amazon.
1. Create a new PunchOut Group within your Amazon Business Account.
To create a new Group, please follow these steps:
1. Open your Amazon Business Account and proceed to your Account Details → Business Settings.

2. In the Members section, click on the Groups:

3. Give your group a recognizable name (e.g., PunchOut Purchasing), select the Shared Payment Methods and Shared Addresses in the settings, and click the Add Group button.

2. Turn On the Procurement System Integration in the Created Group.
Make sure you are setting the purchasing system inside the needed group.
You can view and switch between the groups on the Business Settings page:

To set up the purchasing system:
1. Find and open the group you have created.
2. Scroll to the bottom of the page and click Purchasing System under the System Integrations section.
3. On the Set up your purchasing system page, type in Precoro as your purchasing system, and click Save if you are using the app.precoro.com server.
Please note that our US server users (those who utilize the app.precoro.us) should type in and select the Precoro-US option.

4. You will be provided with automatically generated data: "From Identity" in cXML, "Shared Secret" in cXML, Punchout URL, and Purchase Order Request URL. Press the Save button below.
Note that once you create the group and add your credentials to Precoro, your integration is automatically set in the Test mode (see on the right).
This means that any purchases you make during the testing period will not be fulfilled or charged to your account. You can switch the integration status from Test to Active mode by the end of this setup.

3. Go to Precoro and Copy the Credentials There.
1. Go to Configurations > Marketplace Configuration, and click Setup on the Amazon card:
2. To begin, identify the starting point for your purchasing process: select Purchase Requisition or Purchase Order in the Start Purchase Processes From field. Depending on your choice, you'll see the Request from Amazon button in the Purchase Requisitions or Purchase Orders module. It'll also define which settings you'll need to select in this step.
3. If your company uses multiple legal entities, enable the Set by Legal Entity option to configure PunchOut catalogs separately for each one. Learn more here.
4. Copy and paste the generated data from Amazon into the corresponding fields.
If you are unable to open the Amazon Punchout Configuration page, please contact your admin for a Configuration Role.

Please note: You have to copy and paste the Purchase Order Request URL, which is unique to your group, as shown in the image above. The Punchout URL is generic and will not work.
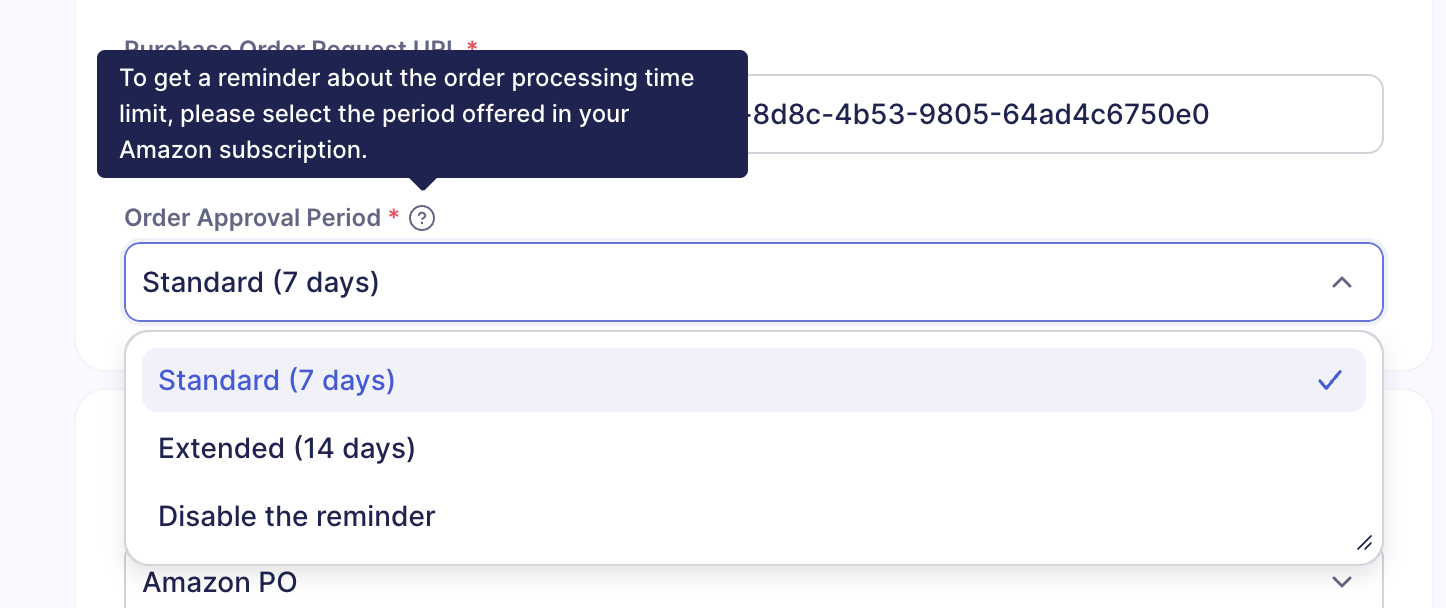
5. Select the correct option in the Order Approval Period field.
This setting is necessary to account for the processing period offered in your Amazon subscription.
- If your subscription offers a 14-day order processing period (like Business Prime Enterprise Subscription), you can take up to 14 days to review and approve the order in Precoro.
- For lower-tier subscription, the orders have to be sent to Amazon in 7 days.
Precoro will show reminders about the remaining approval time before the order expires.
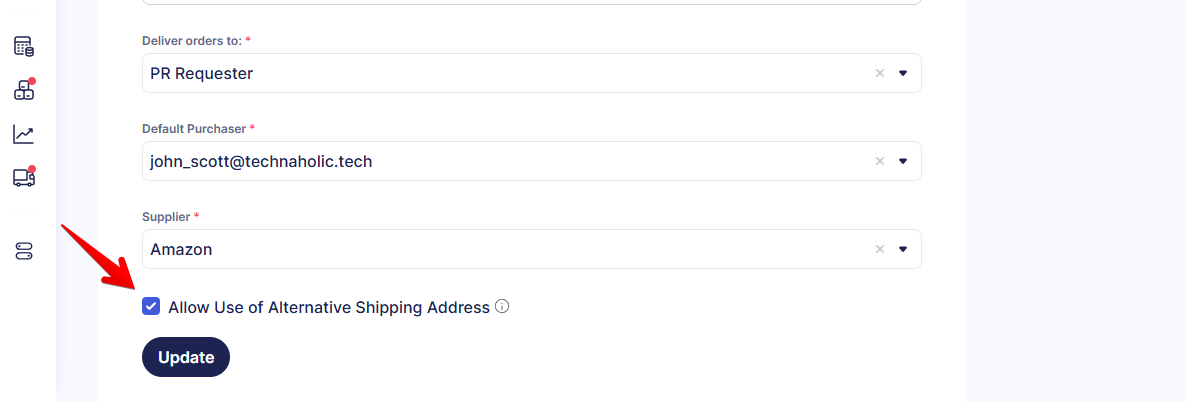
6. Fill out all the required fields in Precoro to finish the setup:

- Deliver orders to (only if Purchase Requisition is selected in Start Purchase Processes From)—here, you need to specify whose contacts should be provided for delivery: the PO Purchaser or the PR Requester.
- Default Purchaser (only if Purchase Requisition is selected in Start Purchase Processes From)—select a user who will be listed as the Purchase Order Purchaser created from the Staples Purchase Requisition. Please note that only those users with Create Purchase Order roles can be selected from the list.
- Supplier—select Amazon Business as the supplier. If you do not have Amazon on your Supplier list yet, you can create an Amazon Business Supplier using the Add New Supplier button. By default, when the Purchase Orders are created, the selected Supplier will be displayed in the documents.
- Allow Use of Alternative Shipping Address (optional)—activating this checkbox ensures that the shipping address entered during checkout is automatically filled in the Precoro document, even if it differs from your default location. Additionally:
-
The document's Location will follow your configuration settings.
-
The address in the Amazon Shipping Address field will be sent to Amazon.
-
Printed documents will display the Amazon Shipping Address.
-
You can select the Amazon Shipping Address in Reports.
-
4. Add the Created Locations in Precoro to Amazon.
Before applying the settings, please ensure you are implementing the changes in the right group (switch between the groups on the top panel by clicking on the group’s name).
1. In Amazon Business, make sure you are operating within your created group. Go to Business Settings → Billing & Shipping → Addresses and delivery preferences. You need to add the same address you have added in Precoro to Amazon Business in the Shared Address Book section.
2. Click the Actions on the right and select the Add an Address option.
3. Fill out all of the required fields exactly as you did in Precoro. Please note that Amazon Business will not allow you to save the location without entering a phone number.
Also, if you click on the options below, Can you accept weekend deliveries? Some of your orders might be delivered over the weekend.
4. Once you have filled out the necessary fields, click Add an address and repeat for all necessary locations.
Alternatively, you can choose to upload your addresses in bulk if you have a lot of different locations to add. For this, instead of selecting Add an address, select the Upload addresses for the current group option. Then, you will be prompted to download a templated Excel file where you can fill out the necessary fields in the file following the instructions and then upload it back to the platform.
5. Add or Update your Locations in Precoro.
To add new or update the existing Location in Precoro, follow these steps:
1. Open Location Management(Location Management for precoro.us), click Add Location to create a new one, or select an existing one and press the Edit Action button.
2. Press the Marketplace Shipping address button below and enter the needed information into the corresponding fields.
Please note that when you enter information in the Location address field, it is searched in Google Maps, and you receive prompts for selection. When you select a prompt, the data is automatically entered into the corresponding fields.
You can still correct and edit the automatically entered information in all the address fields.
6. Add the Payment Method to the Group.
In Amazon, first, ensure you add the payment methods in the needed group.
Go to the Business Settings → Billing & shipping → Payment methods. There you can select and add the most preferable methods for your company so the users would be able to place orders.
If you are using the Invoice line, it will have been automatically added to your group.
If you are using a credit card, click Add payment method and follow the instructions. Once you have filled out the card information, click Save.
7. Add Users Who Should Have Access to Your Group.
In Amazon, first, ensure you add people to the needed group.
Go to the Business Settings → Members → People → Add People button.
You can select the most preferable option from the available ones: Invite by email, Upload a spreadsheet, or Share an Invite link.
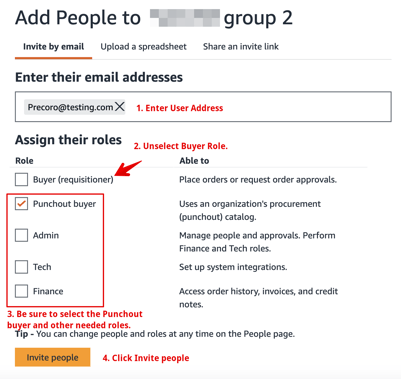
Let’s go ahead and select the Invite by email option:
1. Enter the relevant email addresses of the users you would like to have access to the integration. Please make sure to separate the email addresses by pressing Enter on the keyboard.
2. Unselect the Buyer (Requisitioner) role, and make sure to select the Punchout Buyer. Then, select other relevant accesses that you would like your users to have.
3. Click Invite people.
Alternatively, you can choose to upload your users in bulk. For this, select the Upload a spreadsheet option instead. This will prompt you to download a template Excel file. Fill it out following the instructions.
Make sure to select the Punchout Buyer role for all of the users, regardless of the secondary role (e.g., Admin, Finance, Tech) to be able to use your company’s procurement (punchout) catalog.
Please make sure you have not selected the Buyer (requisitioner) role–this role allows you to skip the punchout process.
If you do not see the Punchout buyer role, you need to check if you are inside the created PunchOut group.
Important to note:
- If your users already have an Amazon Business account, they will not receive an email inviting them to join the group. They will simply be added to this group.
- If your users do not yet have an Amazon Business account, they will receive an email inviting them to join your Amazon Business account. They will only appear as the member of the group once they accept the email invitation and register on the platform.
- The users have to have both an Amazon Business account and a Precoro account under the same email address. For example, it is not possible to utilize a general Amazon Business account (e.g., accounting@company.com) if the same email address is not registered as a corresponding Precoro user.
- If a Precoro user who isn't added to the group attempts to create a document via the PunchOut when the integration is established, they will be added to your Amazon Business account with the Punchout buyer role.
8. Make Sure to Remove the Requisitioner Role.
Before applying the settings, please ensure you are implementing the changes in the right group (switch between the groups on the top panel by clicking on the group’s name).
Go to the general group and remove the Requisitioner role from the users who will be using the integration. Having both the requisitioner role on the general level and the punchout buyer role on the group level does not work together.
1. Go to your company account business settings by clicking on your company name on the left. You will proceed to Business Settings → Members → People.
2. Check the assigned roles for each user. If you find users with a Requisitioner role, click on Actions on the left, and then click Edit role.
3. Unselect the Buyer (requisitioner) role and click Save.

Now, the settings are done. Your PunchOut settings are in test mode, and you are ready to place a test Purchase Order.
9. Place Your Test Purchase Order.
Congratulations! You are almost done. Now, you need to test whether the integration has been set up correctly. As a reminder, while your account integration is in the test mode, your orders will not be fulfilled and/or charged to your account.
To test the integration:
1. Depending on the option you selected in the Start Purchase Processes From field, go to the Purchase Requisitions or Purchase Orders module in Precoro. Click the Request from Amazon button on the top action panel:

If you have several PunchOut catalogs set up, you'll see the Request from Marketplace button. Click it and then select a catalog.
2. Create a new document, and you will be automatically redirected to the Amazon store.
3. Add necessary items to the cart and click Proceed to checkout when ready.
4. On the checkout page, you can see and edit the order information. If everything looks good, click the Submit Order for Approval button.
Once done, you will see the warning message stating that this order requires approval. This means that everything has been integrated correctly.
In case you do not see this option, please check the previous steps or contact our Amazon Business Integration Specialist at support@precoro.com.
5. You will be redirected to Precoro, and the purchase requisition or purchase order should have a Draft status. If needed, edit the document and add the required information like department, budget, location, or chart of accounts.
6. When done with editing, click Confirm, and if you have the approval workflow set up, your document will go through the approval process. If not, it will be automatically approved on Amazon and canceled in a few hours because of active testing mode. Your test orders will not be shown on the orders page on Amazon.
If you're using the PunchOut functionality to create a purchase requisition, a related order is created automatically once the requisition is approved (if there is an approval workflow) or confirmed.
If the document was sent to the marketplace, you need to cancel the order directly with the supplier. Canceling an approved document in Precoro does not cancel the order on the supplier's side.
Once the document has gone through to Precoro, you cannot edit item prices, add new items, or delete existing items. You can only perform the following actions: Approve the document or Reject it without changing the original information from the Amazon order.
10. After the Successful Testing, Switch to Active Mode.
Once you have checked that everything works correctly, you can switch to active mode:
1. Open the Business Settings → System Integrations → Purchasing system.
2. Press the Switch to Active Mode button, which will put the integration into live mode.
Only orders created after switching to Active Mode will be processed. The orders previously created for testing will be canceled.
Once the integration is in live mode, all of your subsequent orders will be processed and charged to your account.
Please make sure to share the instructions for the integration with your team.
Important note: According to Amazon policies, orders created via PunchOut must be approved and sent to the marketplace within 7 or 14 days (depending on subscription type). Otherwise, the document expires. Please ensure you've selected a crrect subscription type as explained here.
To help you track this requirement and ensure Amazon receives your approved orders, Precoro provides the following reminders:
- Time reminders on creation
When you create a PR or PO via PunchOut, a flash message appears in the top-right corner of the screen, showing how much time you have to approve the order and send it to Amazon.
- Warnings for expired orders
If the order isn’t approved in 7 days, opening it displays this message:
“This order has expired and won't be received by the marketplace.”

Now, all of your purchases on Amazon will be processed through Precoro approval. In case you would like to have an option of purchasing outside of Precoro approval processes (not recommended), please contact our Amazon Business Integration Specialist at support@precoro.com.